background image

2019_07_22-10:00

16

836 829  R. 07/19

 SAMOA Industrial, S.A. · Pol. Ind. Porceyo,  I-14 · Camino del Fontán, 831 · 33392 -  Gijón - Spain · Tel.: +34 985 381 488 · www.samoaindustrial.com

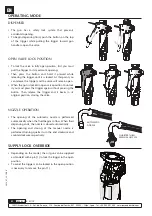
FR

REMPLACEMENT DU FILTRE

AVERTISSEMENT: 

Couper la pression du système 

et déconnecter l’alimentation en air de la pompe 
avant de remplacer le filtre.
Faire baisser la pression en vidant le pistolet dans 
un récipient et ouvrir tout type de purge d’air ou 
de drainage de fluide qui soit présent sur le 
système, si nécessaire.

!

PROBLÈMES ET SOLUTIONS

SPÉCIFICATIONS TECHNIQUES

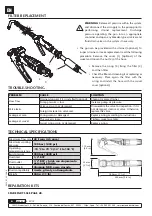
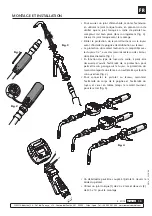
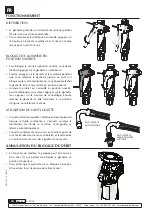
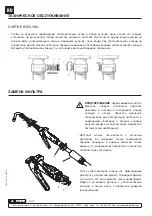
•  Le pistolet peut être équipé d’un filtre (en option). Pour 

inspecter ou remplacer le filtre, suivre la procédure 
suivante. Démonter la protection (1) (en option) du 
raccord et dévisser l’écrou (2) du tuyau.

1

2

•  Démonter le joint torique (3) qui retient le 

filtre (4) et ensuite retirer le filtre.

•  Contrôler le filtre et le nettoyer ou le 

remplacer si nécessaire. Remettre en place le 
filtre et le joint torique, revisser le tuyau, ainsi 
remettre la protection de raccord (en option).

4

3

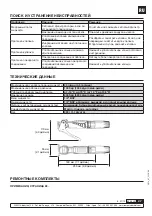
110 mm 

(4.3 in)

55 mm 
(2.1 in)

180 mm (7.1 in)

250 mm (9.8 in)

DESSIN DE PIECES DE RECHANGE, PAGE 28.

KITS DE RÉPARATION

Débit maximum

40 l/min (4.5 gpm)

Pression maximale de travail

100 bar (1450 psi)

Températures limites 
d’utilisation

-10 ºC to 70 ºC 
(14 ºF to 158 ºF)

Pression d’explosion

400 bar (5800 psi)

Entrée de fluide

1/2" BSP

Sortie de fluide

1/2" BSP et bride avec 
logement pour joint torique

Revêtement des pièces 
humides

Aluminium, NBR, acier 
revêtu de zinc

Fluide compatibles

Huile, glycol, antigel

Poids

500 g (1.1 lb)

PROBLEM

CAUSE

SOLUTION

Débit faible

Le filtre est bouché, s’il est installé (option).

Nettoyer ou remplacer le filtre.

La pression de la pompe est trop basse.

Augmenter la pression d’air de la pompe.

La vanne fuit

Le joint de la vanne est endommagé.

Démonter la vanne pour la contrôler. Si elle 

n’est pas endommagée, nettoyer le siège de 

la vanne. Ou alors, remplacer la vanne.

Corps étranger sur le joint de la vanne.

Leakage at cam

Le joint torique est endommagé.

Remplacer le joint en respectant les instructions.

Leakage at swivel

Le raccord est dévissé.

Resserrer le raccord tournant.

Le joint torique du raccord est endommagé.

Remplacer le joint.

Summary of Contents for 363100

Page 1: ...r Деталь 363 100 OIL CONTROL HANDLE 2 PISTOLA DE ACEITE 7 POIGNEE DE DISTRIBUTION 12 COMANDO DE ÓLEO PARA ÓLEO LUBRIFICANTE 17 РУКОЯТКА ДЛЯ РЕГУЛИРОВАНИЯ ПОТОКА МАСЛА 22 EN ES FR PT RU Parts and technical service guide Guía de servicio técnico y recambio Guide d instructions et pièces de rechange Bedienungsanleitung und Teileliste Руководство по техническому обслуживанию и деталям ...

Page 2: ...e fluid The control handle allows a progressive openning valve for better control of oil delivery The valve can be locked in open position by means of the trigger button The gun includes protection to prevent accidental opening Refer to the operation section for details of operation All guns include 1 2 BSP threaded swivel a swivel cover and nozzle extension outlet with automatic or quarter turn o...

Page 3: ...se before installing the oil gun in the system The swivel cover is compatible with 1 2 hoses either with male fixed terminal or swivel nut fig 1 Depending on the type of terminal hose may be necessary to open the end of the swivel cover to allow its passage through the hose The swivel cover has a slot at its end for easy opening fig 2 To connect the gun to the network keep fixed the gun body and t...

Page 4: ...ase the trigger and the valve will remain open When the gun is locked in open valve position to unlock it you must press the trigger again without pressing the button Then release the trigger and it backs to its original position closing the valve NOZZLE OPERATION The opening of the automatic nozzle is performed automatically when the fluid begins to flow When fluid dispensing ends the nozzle is c...

Page 5: ... DISSASEMBLY Proceed first to the disassembly of the valve as described in the previous section Then remove the screws of the cam 4 and remove the trigger 5 To avoid damaging the o rings push out the cam 6 on one side until only the o ring of that side 7 is visible Remove the o ring 7 and then fully remove the cam with the other o ring 8 on the opposite side To mount proceed the other way around t...

Page 6: ...er with the o ring and install the hose with the swivel cover optional 4 3 Maximum flow rate 40 l min 4 5 gpm Maximum working pressure 100 bar 1450 psi Operating temperature range 10 ºC to 70 ºC 14 ºF to 158 ºF Burst pressure 400 bar 5800 psi Fluid inlet 1 2 BSP Fluid outlet 1 2 BSP y brida con alojamiento para junta tórica Wetted parts Aluminio NBR acero cincado Fluid compatibility Aceite glicol ...

Page 7: ...ediante el botón situado en el gatillo es posible bloquear la válvula en posición abierta La pistola tiene una protección para impedir la apertura accidental Consulte el apartado de operación para detalles de funcionamiento Todas las pistolas incorporan rótula giratoria con rosca 1 2 BSP un protector de rótula y extensión con boquilla automática o manual de apertura cuarto de vuelta INTRODUCCIÓN 3...

Page 8: ...r de rótula a la manguera El protector de rótula es compatible con mangueras de 1 2 con terminal macho fijo o tuerca loca fig 1 En función del tipo de terminal de la manguera puede ser necesario abrir el extremo del protector para permitir su deslizamiento por la manguera El protector posee una ranura en su extremo que facilita su apertura fig 2 Para conectar la pistola a la red mantenga fijo el c...

Page 9: ... la válvula permanecerá abierta Cuando la pistola se encuentra bloqueada en posición de válvula abierta para realizar el desbloqueo debe volver a presionar el gatillo sin accionar el botón y soltarlo con lo que retrocede a su posición original cerrando la válvula MANEJO DE LA BOQUILLA La apertura de la boquilla automática se realiza automáticamente cuando se comienza a dispensar fluido Cuando se p...

Page 10: ... EJE DE GIRO Proceda en primer lugar al desmontaje de la válvula según lo descrito en el apartado anterior Quite a continuación los tornillos del eje de giro 4 y extraiga el gatillo 5 Para no dañar las juntas tóricas saque por un extremo el eje de giro 6 hasta que asome sólo la junta de ese lado 7 Extraiga la tórica 7 y a continuación saque totalmente el eje con la otra junta tórica 8 por el lado ...

Page 11: ...imo 40 l min 4 5 gpm Presión máxima de trabajo 100 bar 1450 psi Rango de temperatura de funcionamiento 10 ºC to 70 ºC 14 ºF to 158 ºF Presión de rotura 400 bar 5800 psi Conexión de entrada 1 2 BSP Conexión de salida 1 2 BSP y brida con alojamiento para junta tórica Materiales partes húmedas Aluminio NBR acero cincado Fluidos compatibles Aceite glicol y anticongelante Peso 500 g 1 1 lb 110 mm 4 3 i...

Page 12: ...meilleur contrôle du débit La vanne peut être bloquée en position ouverte au moyen de la gâchette Le pistolet comporte une protection afin d éviter toute ouverture accidentelle Se reporter à la section Fonctionnement pour plus de détails sur l utilisation de la poignée Tous les pistolets sont équipés d un raccord tournant 1 2 BSP à roulement à billes une protection du raccord tournant et un flexib...

Page 13: ...la poignée de distribution au réseau La protection du raccord tournant est compatible avec les tuyaux 1 2 avec des raccords mâles ou des écrous du même diamètre fig 1 En fonction du type de tuyau de sortie il peut être nécessaire d ouvrir l extrémité de la protection pour permettre son passage sur le tuyau La protection du raccord comporte une fente à son extrémité qui facilite son ouverture fig 2...

Page 14: ...osition ouverte Lorsque le pistolet est verrouillé en position ouverte pour le débloquer vous devez appuyer sur la gâchette sans appuyer sur le bouton de verrouillage Ensuite relâcher la gâchette et elle retournera à sa position d origine en refermant la vanne UTILISATION DE L ANTI GOUTTE L ouverture de l anti goutte s effectue automatiquement lorsque le fluide commence à s écouler Lorsque la dist...

Page 15: ...A CAME Avant de démonter la came procéder au démontage de la vanne comme décrit dans la section précédente Ensuite dévisser les vis de la came 4 et retirer la gâchette 5 Pour éviter d endommager les joints toriques pousser vers l extérieur la came 6 d un coté jusqu à ce que le joint 7 soit visible Retirer le joint torique 7 et ensuite démonter complètement la came avec l autre joint 8 du coté oppo...

Page 16: ...on de raccord en option 4 3 110 mm 4 3 in 55 mm 2 1 in 180 mm 7 1 in 250 mm 9 8 in DESSIN DE PIECES DE RECHANGE PAGE 28 KITS DE RÉPARATION Débit maximum 40 l min 4 5 gpm Pression maximale de travail 100 bar 1450 psi Températures limites d utilisation 10 ºC to 70 ºC 14 ºF to 158 ºF Pression d explosion 400 bar 5800 psi Entrée de fluide 1 2 BSP Sortie de fluide 1 2 BSP et bride avec logement pour jo...

Page 17: ...te acionar progressivamente otimizando o controle da vazão no abastecimento através do botão localizado no gatilho é possível bloquear a válvula mesmo aberta Esta válvula possui uma proteção para impedir acidentalmente a abertura Consultar a arte de detalhes de operações para melhores detalhes do funcionamento O comando de óleo possui um giratório na entrada com rosca 1 2 BSP uma proteção emborrac...

Page 18: ...mento de óleo A proteção emborrachada é compatível com mangueiras de com terminal macho fixo ou giratório figura 1 Em função do tipo de terminal da mangueira pode ser necessário abrir a extremidade da proteção emborrachada para permitir o deslizamento pela mangueira A proteção emborrachada possui uma rasura na sua extremidade que facilita a abertura figura 2 Para conectar o gatilho na rede manter ...

Page 19: ...até que ele esteja bloqueado Neste momento a alavanca do gatilho pode ser solta e a válvula permane cerá aberta para continuar o abastecimento MANUSEIO DA VÁLVULA ANTIGOTEJANTE A abertura da válvula antigotejante automática se faz automaticamente quando se inicia o abastecimento do fluido ou seja quando a alavanca do gatilho é acionada Quando o abastecimento é interrompido a valvula antigotejante ...

Page 20: ... DO EIXO DE GIRO Primeiramente desmontar a válvula segundo escrito no capitulo anterior Em seguida retirar os parafusos do eixo de giro 4 e remover a alavanca do gatilho 5 Para não danificar as vedações puxar o eixo de giro pela extremidade 6 até que o anel de vedação se solte sozinho 7 Retirar o anel de vedação 7 remover totalmente o eixo juntos com o outro anel de vedação 8 pelo lado contrario A...

Page 21: ...ão e monte a mangueira com a proteção emborrachada do giratório 4 3 110 mm 4 3 in 55 mm 2 1 in 180 mm 7 1 in 250 mm 9 8 in PROBLEM CAUSE SOLUTION Slow flow Strainer clogged if it is installed optional Clean or replace strainer Pump pressure is low Increase pump air pressure Valve leaks Valve seal worn or damaged Disassemble the valve for inspection If it is not damaged clean seat valve Otherwise r...

Page 22: ... масла Клапан может быть заблокирован в открытом положении с помощью пусковой кнопки Пистолет включает предохранитель чтобы не допустить случайного открытия Подробное описание механизма см в разделе посвященном эксплуатации устройства В состав каждого пистолета входит резьбовое поворотное соединение 1 2 BSP поворотная крышка и дополнительный выходной патрубок с автоматически открывающимся или откр...

Page 23: ...масляного пистолета в системе Поворотная крышка совместима с 1 2 шлангами со штыревым неподвижным контактом или накидной гайкой рис 1 В зависимости от типа контакта шланг может потребоваться для открытия конца поворотной крышки и ее прохождения через шланг Поворотная крышка имеет прорезь на конце чтобы упростить ее открытие рис 2 Чтобы подключить пистолет к сети следует закрепить корпус пистолета ...

Page 24: ... клапан останется открытым Послеблокировкипистолетавположениисоткрытым клапаном чтобы разблокировать его следует нажать спусковой механизм еще раз без нажатия кнопки Затем следует отпустить спусковой механизм Спусковой механизм возвращается в исходное положение и клапан закрывается ИСПОЛЬЗОВАНИЕ НАСАДКИ Автоматическое открытие насадки происходит автоматически когда жидкость начинает течь Когда под...

Page 25: ...о механизма 1 2 3 2 1 2 2 ТЕХНИЧЕСКОЕ ОБСЛУЖИВАНИЕ Ослабить и удалить поворотное соединение 1 Затем удалить пружину 2 клапан 3 и стержень 4 1 4 3 2 СНЯТИЕ КУЛАЧКА Сначала следует разобрать клапан в порядке который описывается в предыдущем разделе Затем следует вынуть винты кулачка 4 и удалить спусковой механизм 5 Чтобы не допустить повреждения уплотнительных колец следует вытолкнуть кулачок 6 в од...

Page 26: ...ышку 1 опционально поворотного контакта и ослабить гайку 2 шланга 1 2 Снять уплотнительное кольцо 3 фиксирующее фильтр 4 и затем сам фильтр Проверить фильтр и очистить его или заменить если необходимо Обратно установить фильтр с уплотнительным кольцом а также шланг с поворотной крышкой опциональное 4 3 ТЕХНИЧЕСКОЕ ОБСЛУЖИВАНИЕ СНЯТИЕ КУЛАЧКА Чтобы не допустить повреждения уплотнительных колец в бл...

Page 27: ...з Вес 500 г 1 1 фунта 110 мм 4 3 дюйма 55 мм 2 1 дюйма 180 мм 7 1 дюйма 250 мм 9 8 дюйма Проблема Причина Решение Медленный поток жидкости Сетчатый фильтр засорен если он установлен опционально Очистить или заменить сетчатый фильтр Давление на выходе насоса низкое Повысить давление воздуха в насосе Протечка клапана Уплотнение клапана изношено или повреждено Разобрать и осмотреть клапан Если он не ...

Page 28: ...l S A Pol Ind Porceyo I 14 Camino del Fontán 831 33392 Gijón Spain Tel 34 985 381 488 www samoaindustrial com SPARE PARTS PIEZAS DE RECAMBIOS PIÈCES DE RECHANGE PEÇAS DE REPOSIÇÃO ПРИМЕЧАНИЯ 21 17 22 18 19 4 2 11 20 24 23 8 16 7 2 1 11 10 13 6 5 4 9 12 ...

Page 29: ...ble conformable con boquilla antigoteo automática 1 8 369228 Flexible outlet with quarter turn opening non drip tip Extensión flexible a 90º con boquilla antigoteo manual de apertura cuarto de vuelta 1 9 369230 Flexible outlet with automatic non drip tip Extensión flexible a 90º con boquilla anti goteo automática 1 10 369232 Rigid outlet with quarter turn opening non drip tip Extensión rígida a 60...

Page 30: ...ble adaptable droit et bec anti goutte automatique Extensão flexível adaptável com ponteira antigotejante automática 1 8 369228 Flexible coudé à 90º et bec anti goutte manuel ouverture quart de tour Extensão flexível 90º com ponteira antigotejante manual de apertura quarto de volta 1 9 369230 Flexible coudé à 90º et bec anti goutte automatique Extensão flexível 90º com ponteira antigotejante autom...

Page 31: ...369226 Гибкий формуемый выходной патрубок с автоматически открывающимся герметичным наконечником 1 8 369228 Гибкий выходной патрубок с открывающимся на четверть оборота герметичным наконечником 1 9 369230 Гибкий выходной патрубок с автоматически открывающимся герметичным наконечником 1 10 369232 Жесткий выходной патрубок с открывающимся на четверть оборота герметичным наконечником 1 11 369234 Гибк...

Page 32: ...CE FR SAMOA INDUSTRIAL S A Pol Ind Porceyo I 14 Camino del Fontán 831 33392 Gijón Spanien bestätigt hiermit dass das die Produkt e 366 000 der den EG Richtlinie n 2004 108 EG entspricht entsprechen DE SAMOA INDUSTRIAL S A Pol Ind Porceyo I 14 Camino del Fontán 831 33392 Gijón Espanha declara que os produtos 2100S DO cumprem as diretrizes da União Europeia 366 000 2004 108 EG PT EC CONFORMITY DECLA...

Reviews: