background image

31

R. 03/22 853 823

 SAMOA Industrial, S.A. · Pol. Ind. Porceyo,  I-14 · Camino del Fontán, 831 · 33392 -  Gijón - Spain · Tel.: +34 985 381 488 · www.samoaindustrial.com

2022_03_16-11:30

PARTS  LIST  /  LISTA  DE  RECAMBIOS  /  PIÈCES  DE  RECHANGE  /  ERSATZTEILLISTE  /  

PEÇAS DE REPOSIÇÃO  / СПИСОК ЗАПАСНЫХ ЧАСТЕЙ

1
2
3
5
7

6
8

9

8

10

8

51
52
53

11

11

12

13

14

16

15

11

11

12

13

14

15

17

1

22

21

19

20

22

21

19

20

24

25

26

25

26

31

27

28

29

30

31
32

33

34

35

36

37

38

39

40

39

41

42

38

39

40

39
42

26

43

45

44

50

49

59

60
61

62

63

64
65

62

63

64
65

66

67

42

4

8

9

8

4

25

68

42

69

70
71
42

72

74

69

70

74

42

73
74
75

76

73
74
75

76

77
78
79

48

47

46

23

88

18

54

56
57

58

55

51
52
53

54

56
57

58

55

539502

539502

25

26

539505

38

39

40

39

41

42

534601

539601

539602

534604

534603

534000

Summary of Contents for 530610

Page 1: ...d Ersatzteile Manual de utilizagao e garantia Список деталей и руководство по техническому обслуживанию Part No Cód Réf Art Nr Cód Деталь 530610 530620 530630 530611 530621 530631 60 1 RATIO AIR OPERATED GREASE PM35 2 BOMBA NEUMÁTICA DE GRASA PM35 RATIO 60 1 6 POMPE À GRAISSE PNEUMATIQUE PM35 RAPPORT DE PRESSION 60 1 10 PNEUMATISCHE FETTPUMPE PM35 RATIO 60 1 14 PROPULSURA PNEUMÁTICA PARA GRAXA PM3...

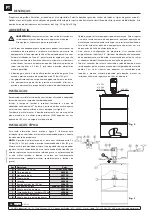
Page 2: ...poor maintenance or removal of identification labels may invalidate the guarantee All fittings in the system connected to the outlet of the pump should be suitable for the maximum possible pressure generated by the pump air motor If the systems cannot be designed to take the maximum pressure produced by the pump safety valves or diverter valves should be fitted Fig 2 418 006 418 004 418 002 410 00...

Page 3: ...n the foot valve Disassemble and clean Replace if damaged Grease leakage through the air outlet muffler or the leakage warning hole on the pump body 44 Grease has passed over to the air motor caused by scratched piston rod 34 or worn or damaged seals 2x 39 Verify the piston rod 34 and replace damaged worn parts Air leakage through the air outlet muffler 55 Damaged or worn piston O ring 31 Replace ...

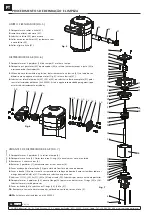
Page 4: ...e 2 curved keys 5 4 Unscrew the 5 bolts 7 and take tehm away along with their washers 6 5 Pull upwards the head of the motor 18 till it s free from the rest of the pump 6 Pull upwards the part 10 till it s out of the head of the motor Remove o rings 3x8 and 9 and replace them later by new ones 7 Remove o rings 19 20 4x 21 22 and the one 8 below the washer 23 Replace them later by new ones 8 Remove...

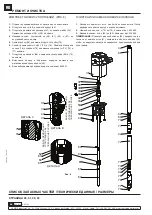
Page 5: ...place seals 38 39 by new ones 4 Take away the assembly consisting of parts 59 61 65 and 67 from the lowers 5 With the tube 68 secured on a vise unscrew the tube 79 6 Extract the parts 2x 42 75 and 76 Remove the circlip 74 from the valve 78 and replace the components 75 76 and 77 by new ones 7 Unscrew the part 71 and replace the seals 69 and 70 by new ones 8 Assemble again in reverse order replacin...

Page 6: ...tegridad del equipo Use componentes originales de Samoa Industrial S A Cualquier modificación no autorizada del equipo uso indebido mantenimiento incorrecto o la retirada de las etiquetas identificativas puede ser causa de anulación de la garantía Todos los accesorios que se encuentren en la línea de salida de fluido deben de ser aptos para la máxima presión generada por la bomba Si el sistema no ...

Page 7: ...a de grasa Existe fuga de grasa en algún punto del circuito Verifique y apriete o repare Válvula de impulsión no cierra por impurezas Desmonte y limpie Válvula inferior no cierra por impurezas o por deterioro Desmonte y limpie Sustituya en caso de deterioro Pérdida de grasa por el silenciador de escape de aire o por el orificio testigo de fugas en el cuerpo de salida 44 La grasa ha pasado al motor...

Page 8: ...ornillos 7 junto con sus arandelas 6 5 Tire hacia arriba del cabezal motor 18 hasta liberarlo del resto de la bomba 6 Tire hacia arriba del casquillo 10 hasta sacarlo del cabezal Saque también todas las tóricas del interior 3x 8 y 9 Deséchelas y sustitúyalas posteriormente por unas nuevas 7 Deseche las tóricas 19 20 4x 21 22 y la 8 que se encuentra bajo la arandela 23 Reemplácelas por unas nuevas ...

Page 9: ...nte 68 y reemplace las juntas 69 y 70 por unas nuevas 8 Vuelva a ensamblar todo en orden inverso sustituyendo todas las juntas metálicas 4x 42 9 Todas las juntas necesarias se incluyen en el kit 534601 1 Desmontando los bajos según lo descrito en el apartado anterior se puede acceder fácilmente a las válvulas de los bajos 2 Válvula inferior componentes del 73 al 76 Kit 534602 3 Válvula superior co...

Page 10: ... une mauvaise utilisation un mauvais entretien ou l enlèvement des étiquettes d identifications peuvent invalider la garantie Tous les accessoires raccordés en sortie de fluide doivent être adaptés à la pression maximale produite par la pompe Si le système n est pas conçu pour résister à la pression maximale exercée par la pompe l installation de soupapes de sécurité comme des clapets de décharge ...

Page 11: ...bles Solutions La pompe ne fonctionne pas ou ne distribue pas de graisse Pression insuffisante de la distribution d air Augmenter la pression de la distribution d air Un des éléments du circuit de sortie est bouché ou fermé Nettoyer et ouvrir le circuit de sortie Poches d air autour de la zone d entrée de la graisse Compacter la graisse La pompe commence à pomper beaucoup trop vite Le réservoir es...

Page 12: ...elles 6 5 Tirez la tête motrice 18 vers le haut jusqu à ce qu elle soit libérée du reste de la pompe 6 Tirez la douille 10 vers le haut jusqu à ce qu elle soit retirée de la tête de pompe Retirez également tous les joints toriques à l intérieur de 3x 8 et 9 Jetez les et remplacez les par des nouveaux 7 Jetez les joints toriques 19 20 4x 21 22 et 8 sous la rondelle 23 Remplacez les par de nouvelles...

Page 13: ...77 par des nouveaux 7 Dévisser le composant 68 et remplacer les joints 69 et 70 par des neufs 8 Remontage dans l odre inverse en remplaçant tous les joints métalliques 4x 42 9 Tous les joints à remplacer sont inclus dans le kit 534601 1 En démontant le bas comme nous l avons décrit précédemment on peut accéder facilement aux soupapes basses 2 Soupape inférieure composants du 73 au 76 Kit 534602 3 ...

Page 14: ...e nicht die Struktur der Einrichtung Benutzen Sie Originalkomponenten von Samoa Industrial S A Jegliche unbefugte Änderung unsachgemäßer Gebrauch ungenügende Wartung oder Entfernung der Identifikationsetiketten der Einrichtung kann Grund für die Aufhebung der Garantie sein Alle Zubehörteile die sich an der Fluidauslauflinie befinden müssen für den von der Pumpe generierten Höchstdruck geeignet sei...

Page 15: ...unreinigungen oder Verschleiß nicht Bauen Sie es auseinander und putzen Sie es Ersetzen Sie es im Verschleißfall Fettverlust durch die Abluftschall dämpfer oder durch die Leckmel derbohrung am Pumpkörper 44 Das Fett ist aufgrund eines zerkratzten Kolbens 34 oder Verschleiß oder Schaden an den Einsatzdichtungen 2x 39 in den Motor eingedrungen Überprüfen Sie den Kolben 34 und ersetzen Sie die versch...

Page 16: ... 5 Schrauben 7 mit den dazugehörigen Unterlegscheiben 6 5 Ziehen Sie den Antriebskopf 18 nach oben bis er sich vom Rest der Pumpe gelöst hat 6 Ziehen Sie die Buchse 10 nach oben bis sie aus dem Pumpenkopf entfernt ist Entfernen Sie auch alle O Ringe in 3x 8 und 9 Entsorgen Sie sie und ersetzen Sie sie durch neue 7 O Ringe 19 20 4x 21 22 und 8 unter der Unterlegscheibe 23 entsorgen Zu einem spätere...

Page 17: ...ie Dichtungen 69 und 70 durch neue 8 In umgekehrter Reihenfolge wieder zusammenbauen dabei alle Metalldichtungen 4x 42 austauschen 9 Alle erforderlichen Dichtungen sind im Satz 534601 enthalten 1 Nach Abbau der Unterseite wie zuvor beschrieben hat man einfachen Zugang zu den unteren Ventilen 2 Unteres Ventil Komponenten 73 bis 76 Kit 534602 3 Oberes Ventil Komponenten 62 bis 65 Kit 534603 ANMERKUN...

Page 18: ...iginais Samoa Industrial S A Qualquer modificação não autorizada deste equipamento uso indevido manutenção incorreta ou a retirar as etiquetas de identificação levará a anulação da garantia Todas as conexões do sistema conectado a saída da bomba devem ser adequadas para a máxima pressao possível gerada pelo motor da bomba 1 ar Se os sistemas nao puderem ser concebidos para suportar a pressao máxim...

Page 19: ... acontecendo Pressão de ar não está adequada Aumentar a pressão de ar Algum elemento na linha de saída está obstruído ou fechado Verificar os elementos da linha de abastecimento mangueira e válvulas de graxa Há bolhas de ar ao redor da área de sucção da propulsora Compactar a graxa A propulsora esta batendo muito rápido O tambor ou reservatório esta vazio ou o nível de graxa esta abaixo do tubo de...

Page 20: ...as 5 4 Retirar os 5 parafusos 7 juntamente com as suas arruelas 6 5 Puxar a cabeça de alimentação 18 para cima até ficar livre do resto da bomba 6 Puxar a bucha 10 para cima até ser removida da cabeça da bomba Remover também todos os o rings dentro de 3x 8 e 9 Descarte os e substitua os por novos 7 Anéis em O 19 20 4x 21 22 e 8 sob arruela 23 Substituir por novas numa data posterior 8 Desaparafusa...

Page 21: ...arafusar componente 68 e substituir selos 69 e 70 por novos 8 Remontar em ordem inversa substituindo todas as juntas metálicas 4x 42 9 Todas as juntas necessárias estão incluídas no kit 534601 1 Separar o motor de ar das partes inferiores 2 Fazer a limpeza da valvula inferior ou substituir a valvula inferior 73 76 em caso de estar danificada 3 Limpar a valvula superior ou fazer a troca da valvula ...

Page 22: ...аться накопленное давление поэтому перед техническим обслуживанием необходимо сбросить давление и отсоединить насос от систем подачи текучей среды Для обеспечения безопасной эксплуатации данного агрегата все работы по обслуживанию должны выполняться только квалифицированным персоналом Когда насос не используется следует отключить подачу воздуха чтобы избежать несчастных случаев Не изменять и не мо...

Page 23: ...вающую трубу так чтобы она дошла до уровня смазки Насос продолжает работать хотя выход смазки закрыт Утечка смазки в какой либо точке контура Проверить и затянуть или отремонтировать соединения Загрязнение верхнего клапана Разобрать и очистить клапан Заменить клапан в случае повреждения Загрязнение нижнего клапана Разобрать и очистить клапан Заменить клапан в случае повреждения Утечка смазки через...

Page 24: ...ут или трубу чтобы действовать как рычаг на выходе материала и используйте его для откручивания двигателя 4 После откручивания потяните двигатель пока не увидите штифт 35 на штоке 34 Используя молоток и молоточек извлеките штифт 35 Двигатель теперь свободен РЕМОНТ И ОЧИСТКА ВНИМАНИЕ Перед началом любого технического обслуживания или ремонта отключить подачу сжатого воздуха и открыть клапан для сбр...

Page 25: ...снимите крышку 2 2 Открутите пробку 3 Выбросьте уплотнительное кольцо 4 и установите новое позже 3 Снимите 2 изогнутых ключа 5 4 Выкрутите 5 винтов 7 вместе с шайбами 6 5 Потяните вверх силовую головку 18 пока она не освободится от остальной части насоса 6 Потяните вверх втулку 10 пока она не выйдет из головки насоса Также снимите все уплотнительные кольца внутри 3x 8 и 9 Выбросьте их и замените н...

Page 26: ...се металлические прокладки 4x 42 9 Все необходимые прокладки входят в комплект 534601 1 Разобрать нижнюю часть как было описано выше После разборки откроется доступ к клапанам смазки 2 Нижний клапан поз с 73 по 76 Комплект арт 534 602 3 Верхний клапан поз с 62 по 65 Комплект арт 534 603 ПРИМЕЧАНИЕ Отвинтить верхний клапан 65 закрепить его в тисках и отвинтить шток 61 зажав его в области штифта 60 ...

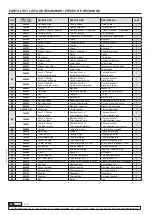
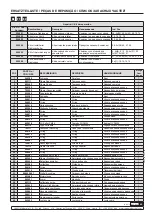
Page 27: ...t torique 2 27 853481 Inverster rod Vástago inversor Tige d inversion 1 28 853622 Upper shock absorber Amortiguador superior Amortisseur supérieur 1 29 893444 Fastening nut Tuerca fijación Écrou de fixation 1 30 853480 Air piston Émbolo aire Piston à air 1 31 946157 O ring Junta torica Joint torique 1 32 943010 Elastic pin Pasador elástico Goupille élastique 1 33 840450 001 Plunger stop Tope embol...

Page 28: ...on à haute pression 1 62 943806 Key Chaveta Cotter 1 63 944010 Steel ball Bola Acero Boule d acier 1 64 853422 Ball stop spacer Espaciador tope bola Entretoise de butée à bille 1 65 853491 Ball valve body Cuerpo válvula bola Corps de la vanne à bille 1 66 943042 Clamp sleeve Manguito sujección Manchon de serrage 1 67 840468_001 Starter rod Varilla cebador Tige de démarreur 1 68 753235 xxxx1x Pumps...

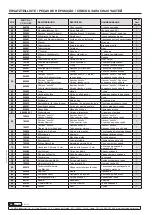
Page 29: ...11 853506 Gleitende Dichtung Vedação deslizante Скользящее уплотнение 2 12 946766 O ring O ring Уплотнительное кольцо 1 13 946072 O ring O ring Уплотнительное кольцо 1 14 853612 Schieben Deslizamento Раздвижной 1 15 946122 O ring O ring Уплотнительное кольцо 1 16 853616 PU Puffer PM35 Tampão PU PM35 Буфер ПУ PM35 1 17 853115 Tope corredera Paragem deslizante Ограничитель скольжения 1 18 753117 Gle...

Page 30: ...ão Поршень высокого давления 1 62 943806 Schlüssel Chave Ключ 1 63 944010 Stahlkugel Bola de Aço Стальной шар 1 64 853422 Abstandhalter für Kugelstopper Espaçador de paragem de bola Проставка шарового упора 1 65 853491 Kugelhahngehäuse Corpo da válvula de esfera Корпус шарового крана 1 66 943042 Spannhülse Manga de fixação Зажимная втулка 1 67 840468_001 Starterstange Vara de alimentação Стержень ...

Page 31: ...1 2 3 5 7 6 8 9 8 10 8 51 52 53 11 11 12 13 14 16 15 11 11 12 13 14 15 17 1 22 21 19 20 22 21 19 20 24 25 26 25 26 31 27 28 29 30 31 32 33 34 35 36 37 38 39 40 39 41 42 38 39 40 39 42 26 43 45 44 50 49 59 60 61 62 63 64 65 62 63 64 65 66 67 42 4 8 9 8 4 25 68 42 69 70 71 42 72 74 69 70 74 42 73 74 75 76 73 74 75 76 77 78 79 48 47 46 23 88 18 54 56 57 58 55 51 52 53 54 56 57 58 55 539502 539502 25 ...

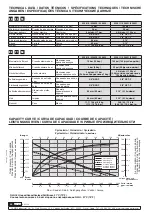
Page 32: ...áxima Maксимальная производительность 2 kg min 7 bar 2 кг мин при давлении 7 бар 4 4 lb min 100 psi 4 4 фунт мин при давлении 100 фунт кв дюйм Lufteinlassgewinde Conexão de entrada de ar Соединение на входе воздуха 3 8 BSP F 3 8 NPT F Fluidauslassgewinde Conexão de saída de fluido Соединение на выходе масла 3 8 BSP F 3 8 NPT F Luftkolbendurchmesser Diâmetro do pistão de ar Диаметр пневматического ...

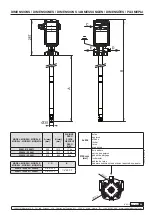
Page 33: ...0 530611 925 1212 11 kg 530620 530621 730 1017 10 kg 530630 530631 516 803 9 kg MODEL MODELO MODÈLE MODELL MODELO МОДЕЛЬ C D E 530610 530620 530630 3 8 BSP F 1 4 BSP F 530611 530621 530631 3 8 NPT F 4xM 8 Ø 90 DIMENSIONS DIMENSIONES DIMENSIONS ABMESSUNGEN DIMENSÕES РАЗМЕРЫ 4xM8 holes agujeros orifices löcher furos отверстия Ø90 mm мм hole pattern patrón de agujeros gabarit de perçage lochmuster pa...

Page 34: ...853 823 R 03 22 SAMOA Industrial S A Pol Ind Porceyo I 14 Camino del Fontán 831 33392 Gijón Spain Tel 34 985 381 488 www samoaindustrial com 2022_03_16 11 30 NOTES NOTAS NOTES ANMERKUNGEN NOTAS ПРИМЕЧАНИЕ ...

Page 35: ...R 03 22 853 823 SAMOA Industrial S A Pol Ind Porceyo I 14 Camino del Fontán 831 33392 Gijón Spain Tel 34 985 381 488 www samoaindustrial com 2022_03_16 11 30 NOTES NOTAS NOTES ANMERKUNGEN NOTAS ПРИМЕЧАНИЕ ...

Page 36: ...retrizes da União Europeia 2006 42 CE FR PT SAMOA INDUSTRIAL S A Pol Ind Porceyo I 14 Camino del Fontán 831 33392 Gijón Spanien bestätigt hiermit dass dieses Produkt 530610 530620 530630 530611 530621 530631 der EG Richtlinie n 2006 42 EG entspricht DE Сертификат соответствия ТС RU C ES АБ58 В 01839 срок действия с 28 07 2017 по 27 07 2020 выдан органом по сертификации продукции М ФОНД ООО Агентст...

Reviews: