5
R. 03/22 853 823
SAMOA Industrial, S.A. · Pol. Ind. Porceyo, I-14 · Camino del Fontán, 831 · 33392 - Gijón - Spain · Tel.: +34 985 381 488 · www.samoaindustrial.com
EN
2022_03_16-11:30
35
37
38
39
36
40
39
42
41
59
44
50
49
60
61
65
66
67
42
68
42
69
70
71
42
72
73
74
75
42
76
79
77
78
DETAIL B
38
39
40
39
DETAIL C
74
DETAIL D
62
63
64
75
65
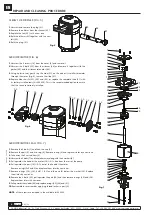
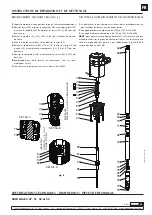
IMPORTANT: SEAL ORIENTATION AS SHOWN
IMPORTANT: SEAL ORIENTATION
AS SHOWN
PARTS LIST / TECHNICAL DATA / DIMENSIONS
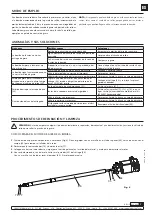
SPARE PARTS SEE PAGES: 27, 31, 32 and 33.
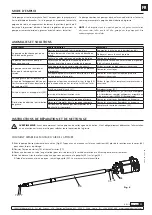
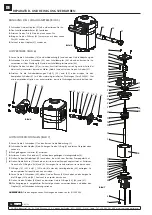
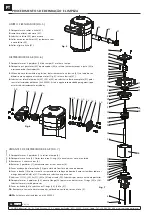
Fig. 8
REPAIR AND CLEANING PROCEDURE
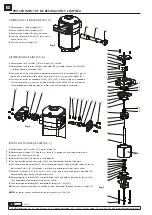
LOWER SEALS KIT (FIG. 8)
1.
Take away the air motor from the lowers, as described previously.
2.
Unscrew the bolts (50) and remove the body (44).
3.
Unscrew the scraper nut (41) and extract the washer (38). Replace
seals (38), (39) by new ones.
4.
Take away the assembly consisting of parts (59), (61), (65) and (67)
from the lowers.
5.
With the tube (68) secured on a vise, unscrew the tube (79).
6.
Extract the parts 2x(42), (75) and (76). Remove the circlip (74) from the
valve (78) and replace the components (75), (76) and (77) by new ones.
7.
Unscrew the part (71) and replace the seals (69) and (70) by new ones.
8.
Assemble again in reverse order, replacing all metallic seals 4x(42).
9.
All necessary seals are included in the available kit 534601.
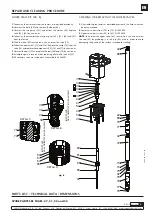
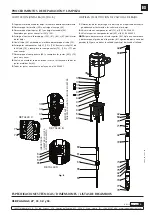
1.
Disassembling the lowers as described previously, the fluid valves can
be easily accessed.
2
. Lower valve: parts from (73) to (76). Kit 534602.
3
. Upper valve: parts from (62) to (65). Kit 534603.
NOTE:
to unscrew the upper valve (65), secure it in a vise and unscrew
the rod (61) by grabbing it in the pin (60) area in order to avoid
damaging the quality of the surface intended for sealing.
CLEANING OR REPLACING THE LOWERS VALVES


