13
R. 07/21 854 823
SAMOA Industrial, S.A. · Pol. Ind. Porceyo, I-14 · Camino del Fontán, 831 · 33392 - Gijón - Spain · Tel.: +34 985 381 488 · www.samoaindustrial.com
2021_07_01-08:30
KIT AIR MOTOR PACKING NUT/ JUNTAS EMPAQUETADURA MOTOR DE AIRE / JOINTS ETANCHEITE INTERNE
MOTEUR PNEUMATIQUE / DICHTUNG VERPACKUNG FÜR LUFTMOTOREN
1.
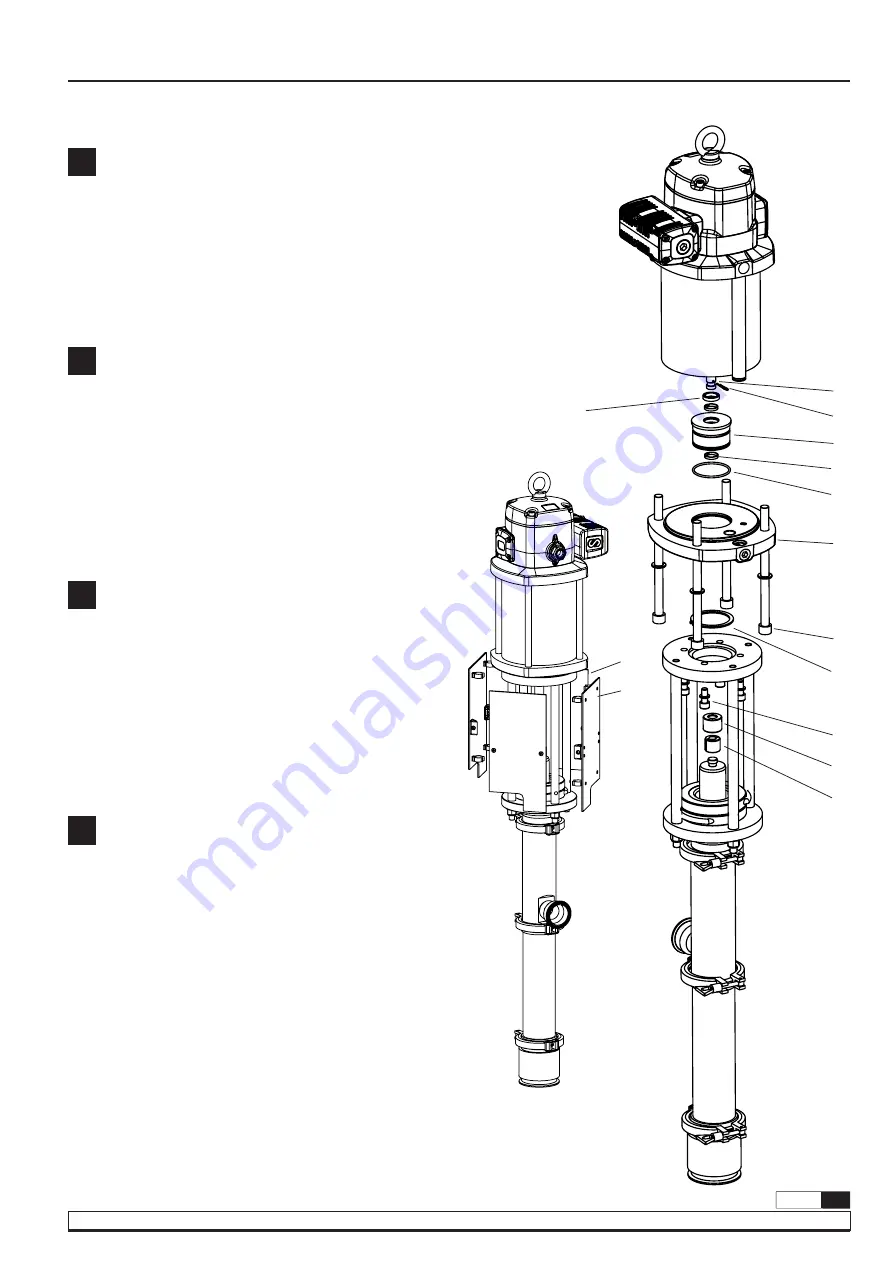
Separate the guards (fig. 8).
2.
Remove the spring clip (53) which through the air motor piston rod
(51). Lift the coupling cover (76) and remove the couplings (77).
3.
Unscrew the bolts (64) and remove air motor.
4.
Unscrew the bolts (60) and remove lower flange (58).
5.
Remove and replace the O-ring (57), slide rings (55) and U-seal (54).
Apply thread locker (Loctite 243) on (60, 64).
1.
Retire los guardas protectoras (fig. 8).
2.
Retire el pasador del muelle (53) del vástago motor (51). Levante la
cubierta (76) y retire los acoples (77) (fig. 9).
3.
Quite los tornillos (64) y retire el motor.
4.
Quite los tornillos (60) y retire la brida inferior (58).
5.
Retire y sustituya la junta tórica (57), los anillos guía (55) y el collarín
neumático (54). Vuelva a montar el conjunto en sentido inverso
aplicando sellador de resistencia media (Loctite 243) en las
roscas (60, 64).
1.
Retirez les protections (fig. 8).
2.
Retirez la goupille élastique (53) de la tige de commande (51).
Soulever le couvercle (76) et retirer les raccords (77) (fig. 9).
3.
Retirez les vis (64) et retirez le moteur.
4.
Retirer les vis (60) et retirer la bride inférieure (58).
5.
Retirez et remplacez le joint torique (57), les bagues de guidage (55)
et le collier pneumatique (54). Remontez l’assemblage dans l’ordre
inverse en appliquant un mastic de résistance moyenne (Loctite 243)
sur les filetages (60, 64).
1.
Entfernen Sie die Schutzvorrichtungen (Abb. 8).
2.
Entfernen Sie den Federstift (53) von der Antriebsstange (51). Heben
Sie die Abdeckung (76) an und entfernen Sie die Kupplungen (77)
(Abb. 9).
3.
Schrauben (64) entfernen und Motor abnehmen.
4.
Schrauben (60) entfernen und unteren Flansch (58) abnehmen.
5.
Entfernen und Ersetzen Sie die Dichtung O-Ring (57), Führungsringe
(55) und Pneumatikbund (54). Bauen Sie die Baugruppe in
umgekehrter Reihenfolge wieder zusammen, indem Sie mittelfestes
Dichtmittel (Loctite 243) auf die Gewinde auftragen (60, 64).
51
53
56
55
57
58
60
61
64
76
77
Fig. 9
Abb. 9
EN
ES
FR
DE
Fig. 8
Abb. 8
66
67
54
REPAIR AND CLEANING PROCEDURE / PROCEDIMIENTOS DE REPARACIÓN Y LIMPIEZA /
RÉPARATION ET NETTOYAGE / REINIGUNGS- UND REPARATURVERFAHREN


