64 | SAMLEX AMERICA INC.
SECTION 10 |
Programming of Operating Parameters
10.3.4 Programming Procedure
Refer to the Overall Menu Map at Fig 10.1.
From Table 10.1, first identify the parameter to be changed. Then, refer to the Menu Map at Fig 10.1 and determine
the navigating path to access the “Set UP Screen” for the desired parameter. Typical procedure will be as follows:
When the unit is ON, the LCD will display up to 2 lines of operating parameters through one of the 5 “Dash
Board” Screens (If Startup Display is being shown, press the Down key
to enter the Dash Board). Typical
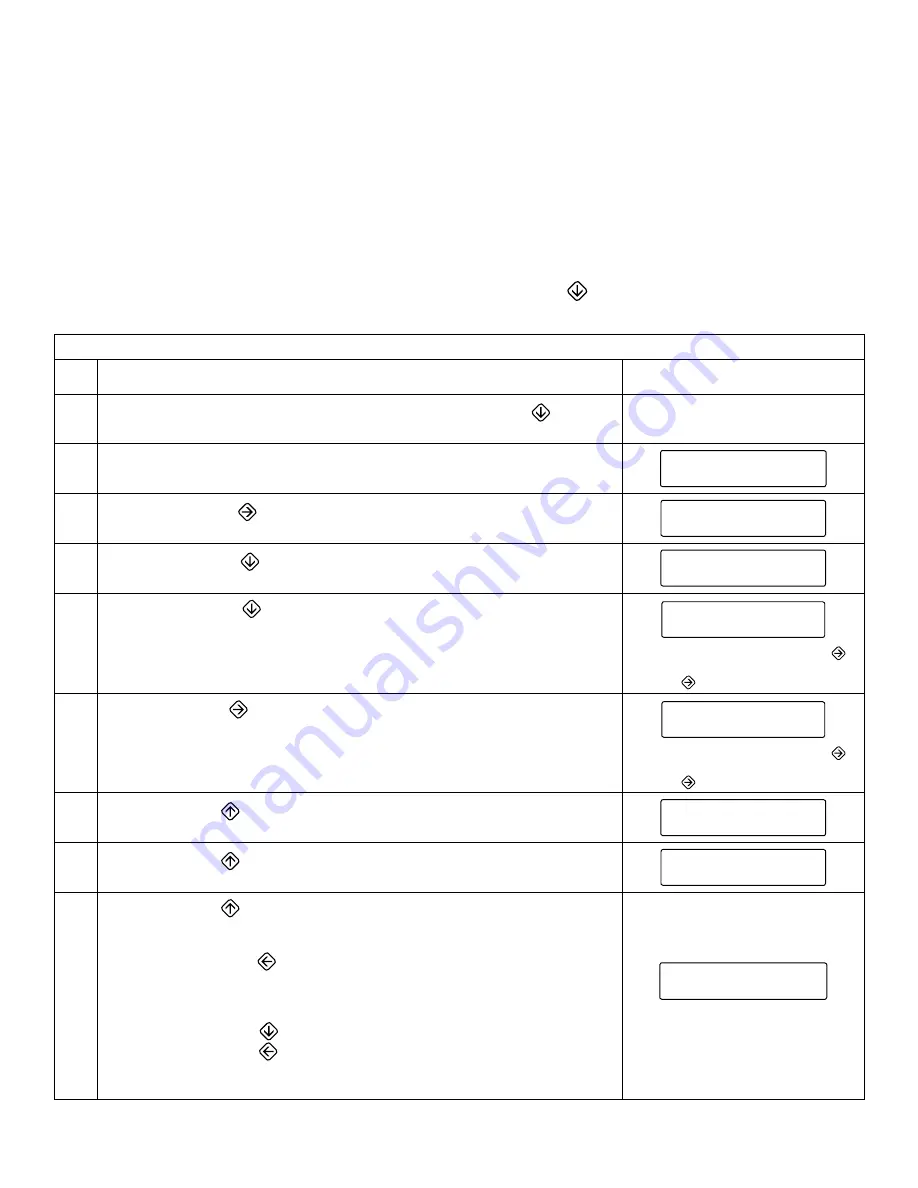
programming steps are explained in Table 10.3 below for changing value of parameter:
TABLE 10.3 EXAMPLE OF PROGRAMMING STEPS FOR CHANGING PARAMETER
Step
No.
Action
Display Screens
1
From the any screen in the DASH BOARD, press the Down Key
to enter
the MAIN MENU that consists of Parameter Setup Groups 1 to 6
2
MAIN MENU Screen for Parameter Group 1: “1. UI Setting” will be dis-
played as shown on the right:
1 . U I S e t t i n g s
|
V
– –
>
3
Press the Right Key
to move to Parameter Group 2: “2. Input Setup” as
shown on the right
2 . I n p u t S e t u p
<
– –
V
– –
>
4
Press the Down key
to move to SUB MENU Parameter: “ a. OVP
Setting” as shown on the right
a . OV P S e t t i n g
|
V
– –
>
5
Press the Down Key
to move to the Setup Screen for parameter “OVP
Setting” as shown on the right.
Default value of 34.0 V will be displayed
<
OV P S e t t i n g
>
–
3 4 . 0 V
+
In this screen, pressing the Right key
increases (+) the value & pressing the
Left Key
reduces the value.
6
Use the Right Key
to increase (+) the value to say 34.5V as shown on
the right
<
OV P S e t t i n g
>
–
3 4 . 5 V
+
In this screen, pressing the Right key
increases (+) the value & pressing the
Left Key
reduces the value.
7
Press the Up Key
. The screen will move back to the SUB MENU Item “a”
for parameter “ OVP Setting” as shown on the right
a . OV P S e t t i n g
|
V
– –
>
8
Press the Up Key
again. The screen will move back to the MAIN MENU
item “2” for “ Input Setup” as shown on the right
2 . I n p u t S e t u p
<
– –
V
– –
>
9
Press the Up Key
again. Save / Discard screen as shown on the right will
be displayed. Blinking Cursor “<<<” will appear against “Save”
TO SAVE:
• Press the Left Key
• After saving is completed, the screen will move back to the same DASH
BOARD screen from where it had exited for programming (Step 1)
TO DISCARD:
• Press the Down Key
to move the Blinking Cursor “<<<” next to “Discard”
• Press the Left Key
• After saving is completed, the screen will move back to the same DASH
BOARD screen from where it had exited for programming (Step 1)
<<<
S a v e
D i s c a
r
d
"<<<" will be blinking


