background image

- 31 -

SR 1046PRO

15

instruction manual

H

arv es t er

2/2012

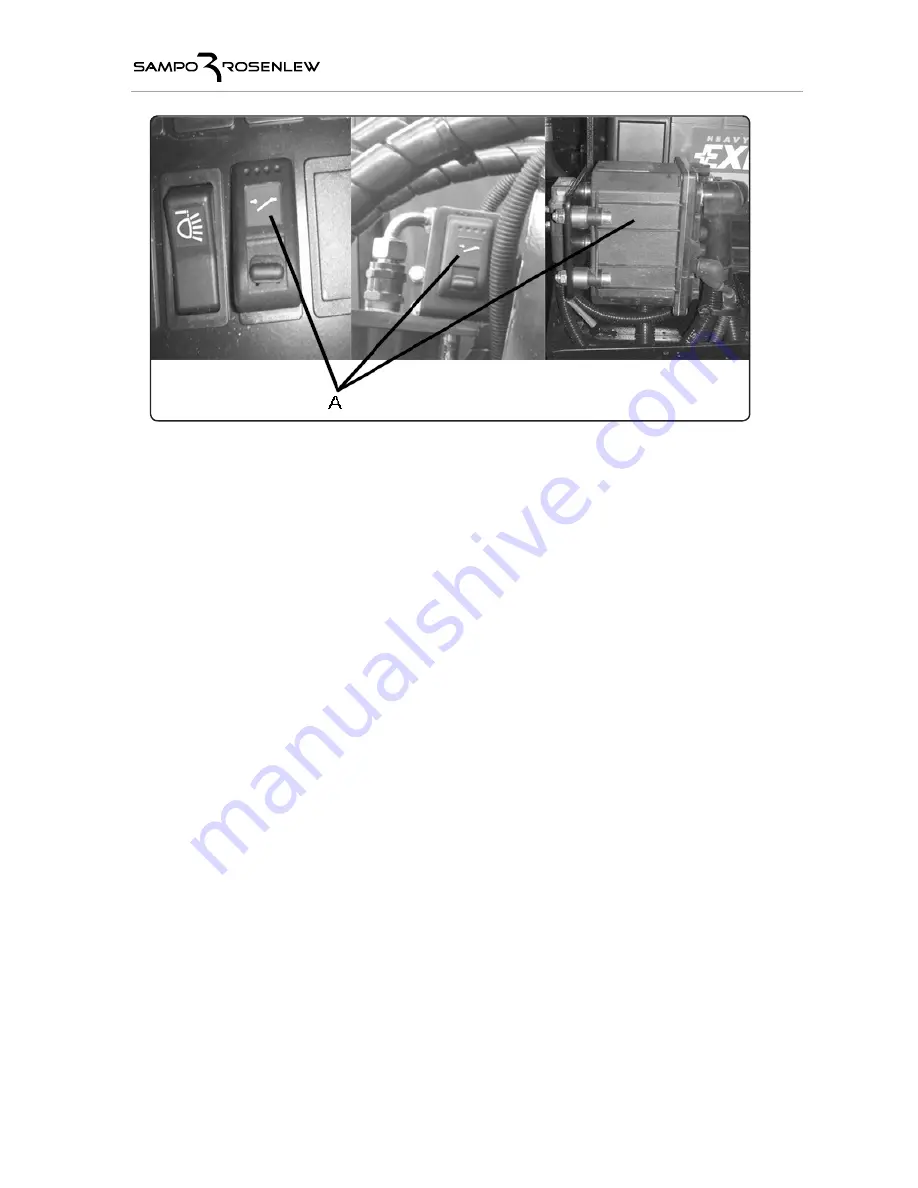
Main power switch (Fig. 15) Controls Electricity for the Whole Forest 

Harvester

There is an electric main power switch to control the electrical instruments of the harvester. 
It is located on the left-hand side, behind the rear wheel inside a closed box. There are two 
power switches. One is inside the cabin on the side instrument panel, and the other one inside 
the aforementioned closed box. 

When you leave the cab for an extended period of time, always switch the power off from 
the main switch as well. Just turning the ignition key to the 0 position leaves several electri-
cal equipment on, including the fan motor. This uses enough power to potentially cause the 
battery to empty while you are away.

Emergency stop

When the emergency stop switch (fig. 1, switch F) is depressed all the way, the diesel engine 
gets switched off, but there is still current in the electrical system, but the power to the joys-
ticks, the crane control module and harvester head module switches off. This engages the 
brakes. When the engine is switched off, the harvester cannot be steered.

Summary of Contents for SR1046PRO

Page 1: ...SR1046PRO Harvester instruction manual Sampo Rosenlew Ltd P O Box 50 FI 28101 PORI FINLAND 2 2012 0812371 Englanti...

Page 2: ......

Page 3: ...parts catalogue for the harvester head the instruc tions for the harvesting computer the instructions for the crane the instructions for the base machine control system as well as the engine manual a...

Page 4: ...ntee 15 Structure and functions of the forest harvester 16 Cut away picture of the forest harvester 17 Operator control instruments 18 Signs and symbols 24 Operation and Adjustments 25 Hydraulics 37 E...

Page 5: ...e crane fully and fix it to the transporter 2 Driving in traffic On public roads a transporter shall be used to move the harvester Remember that the harvester has articu lated steering Test brake func...

Page 6: ...s before getting in the cab open or ensure from the outside that the lock on the right side door is unlocked When the harvester is in use the exits must be closed For safety reasons their construc tio...

Page 7: ...ot stuck in the line If the harvester is just leaning against the lines try to drive it away from them Follow the advice from the people nearby Due to their own safety they shall stay a minimum of 20...

Page 8: ...ves tracks and rolls with the engine running Before welding disconnect the battery cables input cable of the diesel engine control unit the left hand side cable under the cover of the control unit att...

Page 9: ...lectric system in case of a short circuit and overheated brakes pose a real risk of fire The harvester comes with two 6 kilo hand extinguishers They are stored above the rear wheel inside the side gua...

Page 10: ...distance from jointed components Keep at a safe distance from the harvester the crane the head and the wood handled Keep at a safe distance from power lines See the safety distances above Symbol To av...

Page 11: ...off the main power when servicing the harvester head remove pressure from the pressure accumulator as instructed Always wear a properly adjusted safety belt while working and driv ing on the road Ope...

Page 12: ...ing engine parts also quote the engine number Write down the serial numbers of the forest harvester and engine on this page and in the spare parts list Fill in the serial numbers of the crane and the...

Page 13: ...m h 3rd gear 0 19 km h Electrically controlled flow divider valve At the front hydraulically controlled mechanical differential lock Tyres Front 500 60 26 5 540 65R28 600 55 26 5 Rear 500 60 26 5 540...

Page 14: ...14 SR1046PRO instruction manual Harvester 2 2012 Certificate on conformity to the EU directives...

Page 15: ...d guards made of polycarbonate damage due to measures taken by the purchaser affecting the quality and structure of the harvester Increasing of the hydraulic working pressure and pressure limits may c...

Page 16: ...h the front and rear tyres go along the same tracks which means that the harvester is easy to handle even in dense forest as you only need to keep your eye on the front The harvester is extremely nimb...

Page 17: ...2 2012 1 Final drive 2 Gearbox 3 Hydraulic motor 4 Traction hydraulics pump 5 Working hydraulics pump 6 Hub motor 7 Fuel tank 8 Radiator 9 Oil cooler 10 Intercooler 11 Hydraulic valve 12 Oil tank 13...

Page 18: ...J Measuring device touchpad K Charge indicator light Switches on the instrument panel fig 2 A Throttle B Frame lock C Brakes D PC E Sound signal F Windscreen wiper G Windscreen washer H Harvesting co...

Page 19: ...19 SR1046PRO D A C B E 3 F instruction manual Harvester 2 2012 Equipment on the ceiling fig 3 A Alarm light yellow B Fire extinguishing system light red C Indoor light D Speaker E Radio F PC...

Page 20: ...Crane lowering down O3 Frame steering left rotator turn O4 Frame steering right rotator turn Mini levers fig 5 Crane control lever left V1 Outer boom inwards V2 Outer boom outwards V3 Crane turn left...

Page 21: ...de tilt vertical straightening 33 Single wipe B Driving direction Right side push button board 1 Programmable preset 2 Programmable preset 3 Programmable preset 4 Programmable preset 5 Programmable do...

Page 22: ...forward 9 Fast feed backward 10 Head open closed 11 Saw 12 15 Programmable tree species 1 4 16 27 Programmable preset A Drive harvest switch Vertical lever switches when the harvester head has a rear...

Page 23: ...aightening or side tilt automation reset 19 Boom side tilt vertical straightening or side tilt automation reset the same function as above 20 Vacant 21 Programmable quality 1 22 Programmable quality 2...

Page 24: ...lock front 4WD Master switch electric Air filter Hour gauge Pressure filter Hydraulic oil level Fuel Windscreen washer Diesel engine stop Charge Gear diagram Gear 1 1 Gear 2 2 Turning signal Windscree...

Page 25: ...working brakes and the frame lock get disengaged This keeps the harvester stationary and stable during harvesting but allows nimble moving towards the next tree Doorswitch When the left side door is o...

Page 26: ...just the backrest angle using lever D Air suspended seat has more adjustments fig 11 1 To adjust the fore and aft position unlock lever A and move the seat in the required direction 2 Adjust the heigh...

Page 27: ...e pedal When harvesting or driving on hilly roads the brake switch should be in its auto matic position In the cab there is also brake pedal A which can be depressed to generate braking power on the b...

Page 28: ...er should be switched off in case of unintended crane movements A forest harvester equipped with hydrostatic transmission must never be parked using only the gear but the parking brake must always be...

Page 29: ...29 SR1046PRO 13a instruction manual Harvester 2 2012...

Page 30: ...position The engine is stop ped using the electric stopper by turning the ignition key to position 0 Beware of the movements of the harvester head when you switch off the diesel engine When the power...

Page 31: ...e the cab for an extended period of time always switch the power off from the main switch as well Just turning the ignition key to the 0 position leaves several electri cal equipment on including the...

Page 32: ...ill increase the temperature in the cab Air conditioner cools the Air in the Cab The cab can be equipped with air conditioning system Turn switch D fig 16 to the right to switch on and regulate the ai...

Page 33: ...ing forward there are holes as shown in fig 17 near the reduc tion gear With the harvester on tow the operator must be in the cab and the engine running to enable steering Four wheel drive must be off...

Page 34: ...prefilter A is inside the filter cartridge and it is continually drained by means of an exhaust fume ejector Fill the tank with fuel free from impurities fig 19 The volume of the fuel tank is 135 litr...

Page 35: ...sion tank Check the coolant level daily before starting The coolant temperature can be seen on the iqan monitor It shall be between 75 95oC A warning symbol on the iqan monitor indicates engine overhe...

Page 36: ...guishers shall be checked every six months by an authorised service outlet The harvester may also be equipped with a semi automatic fire extinguishing system which shall be operated in compliance with...

Page 37: ...n using front wheel drive the directional valves close off the connection to the distributor valve and the drive pump At the same time they engage the rear hub motors in neutral A Drive pump B Front h...

Page 38: ...y means of a pressure reducing valve A directional valves B cylinders The frame lock is equipped with a dual function cylinder The cylinder derives its load from the return flow When the frame lock is...

Page 39: ...10A Fire extinguishing F25 15A Rotating flasher F26 3A Handles F27 5A PC monitor heating F28 10A Sound signal F29 20A PC and voltage reducer F30 3A Cab indoor light and electri cal equipment light F3...

Page 40: ...arrow to the left The display brightness can be adjusted by pressing the Menu button and selecting the back light setting SAFETY SYMBOLS Various notifications and warnings can be displayed in the Iqan...

Page 41: ...of all notifications and warnings in the order of importance message information confirmation warning alarm error critical The notifications and warnings detected by the Iqan machine control system a...

Page 42: ...ch as the name of the software loaded in the monitor author of the last revision and the date of the revision By pressing F1 F2 or F3 you can view information on modules the modem or log The Back butt...

Page 43: ...TS You can access several outputs and parameters in order to adjust them by pressing the F1 button in the main menu First a page opens on screen with a number of adjustable groups such as diesel engin...

Page 44: ...he fuel gauge Above the fuel gauge is the oil temperature gauge and below the fuel gauge the coolant tempera ture gauge These temperatures are also displayed as numerical values When the power is on b...

Page 45: ...he crane adjustments driver selection and func tion parameters The function parameters open a new page on which you can select the vibration filters power limits or other parameters You can return to...

Page 46: ...rs and working hours The total hours indicate the time that the machine power has been on The operating hours indicate the time the diesel engine has been on The working hours indicate the time the di...

Page 47: ...switch data mini EME lever Banana sidetilt right Side tilt switch data vertical grip Banana sidetilt left Side tilt switch data vertical grip Harvester Head closed Head closed vertical grip EME lever...

Page 48: ...maller than this angle Standard setting 1 5 FP Autotilt Deceleration Angle The angle at which side tilt automation starts decelera ting movement speed towards mid position Standard setting 6 FP Autoti...

Page 49: ...ering power limit Deceleration of the frame steering speed to the value set with this parameter when the diesel engine revolu tions decrease under load The smaller the value the smaller the effect FP...

Page 50: ...sure there is no danger of injuries if you need to start the engine while performing main tenance and also after maintenance work Ensure that all periodic maintenance work and cleaning are performed o...

Page 51: ...into a hot engine The coolant level shall be approx half way up the expansion tank Coolant is added through the expansion tank Make sure there is anti freeze in the radiator in the cold season 3 Chec...

Page 52: ...t wheels 600 Nm Rear wheels 540 Nm 5 Cleaning of radiator grilles Depending on the operating environment the radiator grilles shall be cleaned often enough to prevent the engine from over heating Clea...

Page 53: ...paper Do not remove the inner cartridge unless it needs replacing The filter protects the suction channel against impu rities during service Blow dry compressed air not over 5 bar inside the filter G...

Page 54: ...ng bulbs comply with the Manufacturer s recommendations 8 Draining of water out of water separator The fuel pre filter with water separator is located on the left side of the engine Drain any accu mul...

Page 55: ...lace worn and damaged belts fig 36 12 Cleaning of polycarbonate windows Remove any particles that may damage the window surface Avoid using any sharp objects Use mild and environmentally friendly dete...

Page 56: ...ditioning Outside The Heating Season The heater shall be used approx once a month outside the heating season too This is done to prevent the fan motor and water pump from getting stuck Also air condit...

Page 57: ...h the oil table A Fillling opening B Control opening C Drain opening 5 Changing of the hydraulic oil filter Change the filters in the working and traction hydraulics fig 42 A Return filter B Breather...

Page 58: ...l be disposed of in an appropriate manner Use an oil type in accordance with the oil table see chapter Lubrication 7 Checking condition of hydraulic hoses Check The condition of hoses Replace worn out...

Page 59: ...king hydraulics have a joint oil tank Oil should be changed at least once a year Before changing the oil run the system until it is warm and adjust all the cylinders in their shortest position Oil is...

Page 60: ...n in the cab and the oil is in its operating tempe rature the filter cartridge is clogged and shall be replaced If hydraulic oil becomes over heated The temperature of the hydraulic oil should not exc...

Page 61: ...year to maintain its anti corrosion proper ties The cooling system is drained by opening the draining taps in the radiator water cell and on the left hand side of the engine at the rear and by unscre...

Page 62: ...ect lubrication is of major importance to the perfect functioning and long working life of the forest harvester due to which the lubrication recommendations shall be followed carefully while simultane...

Page 63: ...0 3 Brakes 50 4 Steering cylinders 50 5 Joint 50 6 Hydraulics 1000 7 Frame lock 10 8 Engine 500 9 AC Lubrication of crane and changing of oil in turning motor The crane is lubricated every 10 hours Th...

Page 64: ...ional heater and air conditioning outside the heating season 4 Replace the hydraulic oil filters after the first 500 operating hours 5 Check the screw tightness after the first 500 operating hours par...

Page 65: ...der Condition of the harvester head Bearing clearances and attachments Wear corrosion and dents It is important to have the recorded defects repaired before storage to ensure the efficient functioning...

Page 66: ...relays Gaskets and packing For the saw Chains Spare guide bar General Parts Hexagonal screws M6 M12 the most common lengths of 16 40 mm strength class min 8 8 Hexagonal nuts M6 M12 strength class 8 A...

Page 67: ...ng can also be done at home Before starting to recharge Disconnect the battery cables Unplug the cells Make sure the fluid level is high enough Use 5 10 of the Ah of the battery for charging current F...

Page 68: ...ries fig 49 2 Connect one end of another auxiliary starting cable to the frame of the harvester same point where batteries grounding is located fig 49 Connect the last end to the negative pole of the...

Page 69: ...69 SR1046PRO instruction manual Harvester 2 2012 Hydraulic diagram...

Page 70: ...70 SR1046PRO instruction manual Harvester 2 2012 Hydraulic diagram part catalogue SR1046 pro...

Page 71: ...71 SR1046PRO instruction manual Harvester 2 2012 Electric diagram...

Page 72: ...72 SR1046PRO instruction manual Harvester 2 2012...

Page 73: ...73 SR1046PRO instruction manual Harvester 2 2012...

Page 74: ...74 SR1046PRO instruction manual Harvester 2 2012...

Page 75: ...75 SR1046PRO instruction manual Harvester 2 2012...

Page 76: ...76 SR1046PRO instruction manual Harvester 2 2012...

Page 77: ...77 SR1046PRO instruction manual Harvester 2 2012...

Page 78: ...78 SR1046PRO instruction manual Harvester 2 2012...

Page 79: ...79 SR1046PRO instruction manual Harvester 2 2012...

Page 80: ...80 SR1046PRO instruction manual Harvester 2 2012...

Page 81: ...81 SR1046PRO instruction manual Harvester 2 2012...

Page 82: ...82 SR1046PRO instruction manual Harvester 2 2012...

Page 83: ...83 SR1046PRO instruction manual Harvester 2 2012...

Page 84: ...84 SR1046PRO instruction manual Harvester 2 2012...

Page 85: ...85 SR1046PRO instruction manual Harvester 2 2012...

Page 86: ...86 SR1046PRO instruction manual Harvester 2 2012...

Page 87: ...87 SR1046PRO instruction manual Harvester 2 2012...

Page 88: ...E30 blinker right front E31 blinker right back E32 blinker left back E33 blinker left front E34 park light left front E35 park light right front E36 park light left back E37 park light right back E38...

Page 89: ...seat kompressor air bolster M6 seat blower M7 seat air suspension M8 heater device blower M9 extra heater M10 extra heater water pump M11 windscreen sweep M12 windscreen wash M13 hydraulics fullpump...

Page 90: ...esel R12 rpm diesel R13 fire protection R14 motor grid heater R15 forward speed potentiometer R16 blower resistor R17 body link slow sensor R18 8k fan rpm Eber R19 5 5K fan rpm R20 470 fan rpm R21 12K...

Page 91: ...brake X2 1 boom sensor 5V X2 2 boom sensor 5V X2 3 boom sensor signal X2 4 boom tilt sensor 5V X2 5 boom tilt sensor 5V X2 6 boom tilt sensor signal X3 1 boom bottom worklight 24V X3 2 boom bottom wo...

Page 92: ...dal supply Vref X16 3 P1 foot pedal ground Vref X16 4 P1 foot pedal signal X16 5 P2 foot pedal ground Vref X16 6 P2 foot pedal signal MD3 C1 GREY X17 1 ground X17 2 CanL A XA2 X17 3 CanL B measuring d...

Page 93: ...X25 5 windscreen gear 2 X25 6 windscreen gear 1 Black round connector X25 1 windscreen gear 1 X25 2 windscreen 24V X25 3 windscreen backcurrent X25 4 windscreen gear 2 X25 5 windscreen ground X26 1 C...

Page 94: ...module pump 1 on off X34 3 MCI module pump 2 propo X34 4 MCI module pump 3 X34 5 x35 1 worklight boom bottom 24V x35 2 worklight boom bottom ground X36 1 PC 12V X36 2 phone system 12V X36 3 printer 12...

Page 95: ...C pole X47 2 worklight switch supply hydr tank pump control X47 3 generator D X47 4 alarm light X47 5 windscreen relay X47 6 generator D X47 7 blinker relay 49a pole X47 8 alarm relay X47 9 blinker re...

Page 96: ...m pump 24V X63 2 vacuum pump ground X64 1 hydraulics level sensor bottom signal X64 2 hydraulics level sensor bottom ground X65 1 hydraulics pressure filter signal X65 2 hydraulics pressure filter gro...

Page 97: ...x79 55 fuel lift pump Do1 control x79 56 x79 57 x79 58 x79 59 x79 60 x79 61 x79 62 x79 63 x79 64 x79 65 water sensor x79 66 x79 67 x79 68 x79 69 x79 70 x79 71 x79 72 x79 73 x79 74 x79 75 x79 76 x79 7...

Page 98: ...eed potentiometer siognal X91 1 12V phone system X91 2 12V A4 printer X91 3 voltage reduce U1 ground X91 4 radio mute X91 5 voltage reduce U2 ground X91 6 empty X91 7 empty X91 8 empty X91 9 empty X92...

Page 99: ...103 5 fan speed 4 X10⁴ 1 air conditioning on off X104 2 air conditioning on off AC panel light 24V X105 1 AC panel light ground X105 2 X10⁶ 1 fan controller signal 24V X106 2 fan controller signal sig...

Page 100: ...100 SR1046PRO instruction manual Harvester 2 2012...

Page 101: ...101 SR1046PRO instruction manual Harvester 2 2012...

Reviews: