background image

5

samsara.com/support

© 2023 Samsara Inc.

IMPORTANT SAFETY AND USE INFORMATION

This installation guide contains typical information specific to products manufactured at the time of its publication. The contents 

of this guide do not constitute a warranty and are for reference only. Consult applicable local laws and ordinances to determine 

any installation restrictions. It is the installer’s responsibility to comply with all applicable laws and ordinances when installing this 

hardware.

Do not attempt to repair this product, use any third party replacement parts with this product, or otherwise modify this product 

except in accordance with product manuals or as otherwise instructed by Samsara. Failure to do so may cause property damage, 

lead to physical injury, or void your product warranty.

Any installation not in accordance with the instructions in the installation guide or otherwise in the Documentation or other than as 

described by the relevant IP rating or recommended operating conditions may result in physical injury or property damage. Failure 

to follow these directions could result in serious injury or death.

This hardware and any associated software may not be compatible with third party products and/or services and may interfere 

with the operations of or void warranties for such third party products and/or services.

Do not install or adjust hardware while driving or operating the vehicle. Do not install this hardware in a location that could interfere 

with the driver’s visibility or operation of vehicle controls. Do not install this hardware on or near airbag panels or within the working 

range of an airbag.

Do not install hardware while the vehicle is unsecured. Do not install hardware while the vehicle is turned on unless instructed to 

turn on the vehicle by the installation guide. Failure to follow installation instructions may cause serious physical injury, damage to 

the vehicle or the hardware, and void vehicle or other third party product warranties.

Batteries in the hardware may have a shorter life span if not used in accordance with instructions. Do not short circuit, crush, 

disassemble, heat above 60°C/140°F, incinerate, or expose the battery or its contents to water. Do not remove the battery from 

the hardware to recharge or for any other reason, including disposal. Do not solder directly to the battery cell. Do not use if battery 

appears damaged.

This product includes capacitors and batteries which may present a potential fire, explosion, electric shock, or burn hazard. Do not 

touch or come into close proximity to any capacitors within this hardware.

Keep this hardware between -40°C/-40°F to 60°C/140°F externally powered, -20°C/-4°F to 60°C/140°F discharging on battery, 

0°C/32°F to 45°C/113°F charging. Failure to keep this hardware in the specified temperature range may result in safety risks.

Failure to follow mounting instructions may create risk of physical injury or property damage from falling objects. If mounting the 

hardware to a building wall, check for wiring or plumbing before drilling any holes.

After installation, this product will be able to charge batteries at any moment. 


CAUTION SYMBOL, PLEASE REFER TO WARNINGS


DC SYMBOL, TO INDICATE DIRECT CURRENT

Summary of Contents for CBL-AG-BEQP

Page 1: ...ENT MOTORIS 6 8 INFORMATIONS IMPORTANTES CONCERNANT LA S CURIT ET L UTILISATION 9 GUIDE D INSTALLATION QUIPEMENT MOTORIS 10 12 INSTALLATIONSLEITFADENE ELEKTRISCHE KOMPONENTEN 14 16 BELANGRIJKE INFORMA...

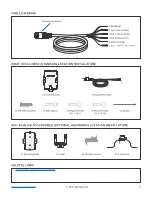
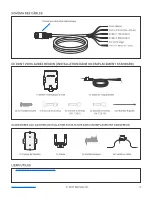
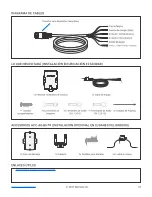
Page 2: ...HZB ACCESSORIES OPTIONAL HAZARDOUS LOCATION INSTALLATION 1x Mounting plate 1x Cover 2x Machine screws 2x In line fuse 1234 567 890 2x Self drilling screws 7x Butt splices 3x Ring terminals RV 1 25 6 2...

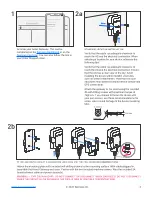
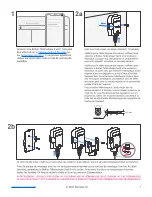
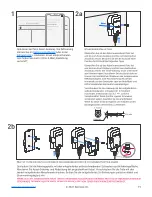
Page 3: ...tallic structures such as within metal trailers Placement in such structures may adversely impact device cellular and GPS connectivity Attach the gateway to the asset using the provided 6 self drillin...

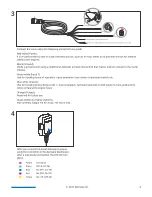
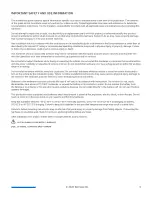
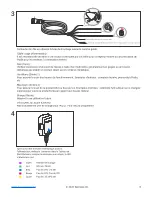
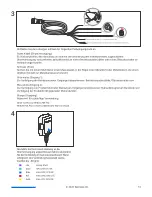
Page 4: ...meter oil pressure switch etc Blue white Input 2 Use for tracking productivity or alerts Input examples hydraulic solenoid on belt loader to track productivity when compared to engine hours Orange Ou...

Page 5: ...ty or operation of vehicle controls Do not install this hardware on or near airbag panels or within the working range of an airbag Do not install hardware while the vehicle is unsecured Do not install...

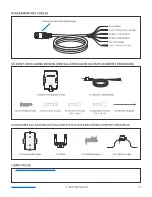
Page 6: ...AG BHZB INSTALLATION FACULTATIVE DANS UN EMPLACEMENT DANGEREUX 1x Plaque de Fixation 1x Cache 2x Vis M caniques 2x Fusible en S rie 1234 567 890 2x Vis Autoperceuses 7x Raccords Bout Bout 3x Cosses A...

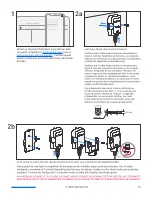
Page 7: ...vit mobile et GPS de l appareil Fixez le bo tier t l matique l actif l aide des vis autoperceuses n 6 fournies avec un couple maximum de 7 kgf cm Si vous choisissez de fixer l appareil avec vos propre...

Page 8: ...d huile etc Bleu blanc Entr e 2 Pour assurer le suivi de la productivit ou des alertes Exemples d entr es sol no de hydraulique sur le chargeur bande pour suivre la productivit par rapport aux heures...

Page 9: ...at riel sur ou proximit des panneaux d airbag ou dans le rayon d action d un airbag N installez pas le mat riel tant que le v hicule n est pas s curis N installez pas le mat riel lorsque le v hicule e...

Page 10: ...ACC AG BHZB INSTALLATION FACULTATIVE DANS UN EMPLACEMENT DANGEREUX 1x Plaque de Montage 1x Cache 2x Vis M caniques 2x Fusible en Ligne 1234 567 890 2x Vis Autoperceuses 7x Raccords Bout Bout 3x Cosses...

Page 11: ...it cellulaire et GPS de l appareil Fixez le bo tier t l matique l actif l aide des vis autoperceuses n 6 fournies avec un couple maximum de 7 kgf cm Si vous choisissez de fixer l appareil avec vos pro...

Page 12: ...d huile etc Bleu blanc Entr e 2 Pour assurer le suivi de la productivit ou des alertes Exemples d entr es sol no de hydraulique sur le chargeur bande pour suivre la productivit par rapport aux heures...

Page 13: ...u proximit de tels panneaux ou encore dans le rayon d action d un coussin gonflable N installez pas le mat riel tant que le v hicule n est pas s curis N installez pas le mat riel lorsque le v hicule e...

Page 14: ...STALLATION IN GEFAHRENBEREICHEN 1x Montageplatte 1x Abdeckung 2x Maschinenschrauben 2x Leitungssicherung 1234 567 890 2x Selbstschneidende Schrauben 7x Sto verbinder 3x Ringkabelschuhe RV 1 25 6 2x Ri...

Page 15: ...e den Gateway mit den mitgelieferten selbstschneidenden Schrauben Nr 6 mit einem maximalen Drehmoment von 0 7 Nm an Ihrem Verkehrsmittel Wenn Sie Ihre eigenen Schrauben verwenden wollen beachten Sie d...

Page 16: ...nge beispielsweise Betriebsstundenz hler ldruckschalter usw Blau weiss Eingang 2 Zur Verfolgung von Produktivit t oder Warnungen Eing nge beispielsweise Hydraulikmagnet am Bandlader zur Verfolgung der...

Page 17: ...nnte Installieren Sie diese Hardware nicht an oder in der N he von Airbaggeh usen oder im Wirkungsbereich eines Airbags Installieren Sie keine Hardware solange das Fahrzeug nicht gesichert ist Install...

Page 18: ...L EN LUGARES PELIGROSOS 1x Placa de Montaje 1x Cubierta 2x Tornillos para Metales 2x Fusible en L nea 1234 567 890 2x Tornillos autoperforantes 7x Conexiones de Empalme 3x Terminales de Anillo RV 1 25...

Page 19: ...del dispositivo Fije el dispositivo telem tico al activo utilizando los tornillos autoperforantes N m 6 proporcionados con un par de torsi n m ximo de 7 kgf cm Si elige fijar el dispositivo con sus pr...

Page 20: ...co Entrada 2 Utilizar para realizar seguimiento de la productividad o de alertas Ejemplos de entrada solenoide hidr ulico en cinta transportadora para realizar el seguimiento de la productividad en co...

Page 21: ...uipo sobre o cerca de paneles de una bolsa de aire o dentro del radio de acci n de una bolsa de aire No instale el equipo si el veh culo no est asegurado No instale el equipo con el veh culo encendido...

Page 22: ...S OPTIONELE INSTALLATIE VOOR GEVAARLIJKE LOCATIES 1x Montageplaat 1x Deksel 2x Machineschroeven 2x In line Zekering 1234 567 890 2x Zelfborende Schroeven 7x Uiteindelas 3x Oogaansluitingen RV 1 25 6 2...

Page 23: ...activa met de bijgeleverde zelfborende schroeven nummer 6 met een maximumkoppel van 7kgf cm Als u ervoor kiest om het apparaat met uw eigen schroeven vast te zetten gebruik dan deze aanbevelingen voor...

Page 24: ...r enz Blauw wit Invoer 2 Te gebruiken voor het bijhouden van productiviteit of waarschuwingen Invoervoorbeelden hydraulische soleno de op bandlader om productiviteit bij te houden in vergelijking met...

Page 25: ...et voertuig kan belemmeren Installeer het product niet op of in de buurt van airbagpanelen of binnen het bereik van een airbag Installeer het product niet terwijl het voertuig in beweging is Installee...

Reviews: