Type 3277 Actuator with 240 to 700 cm²
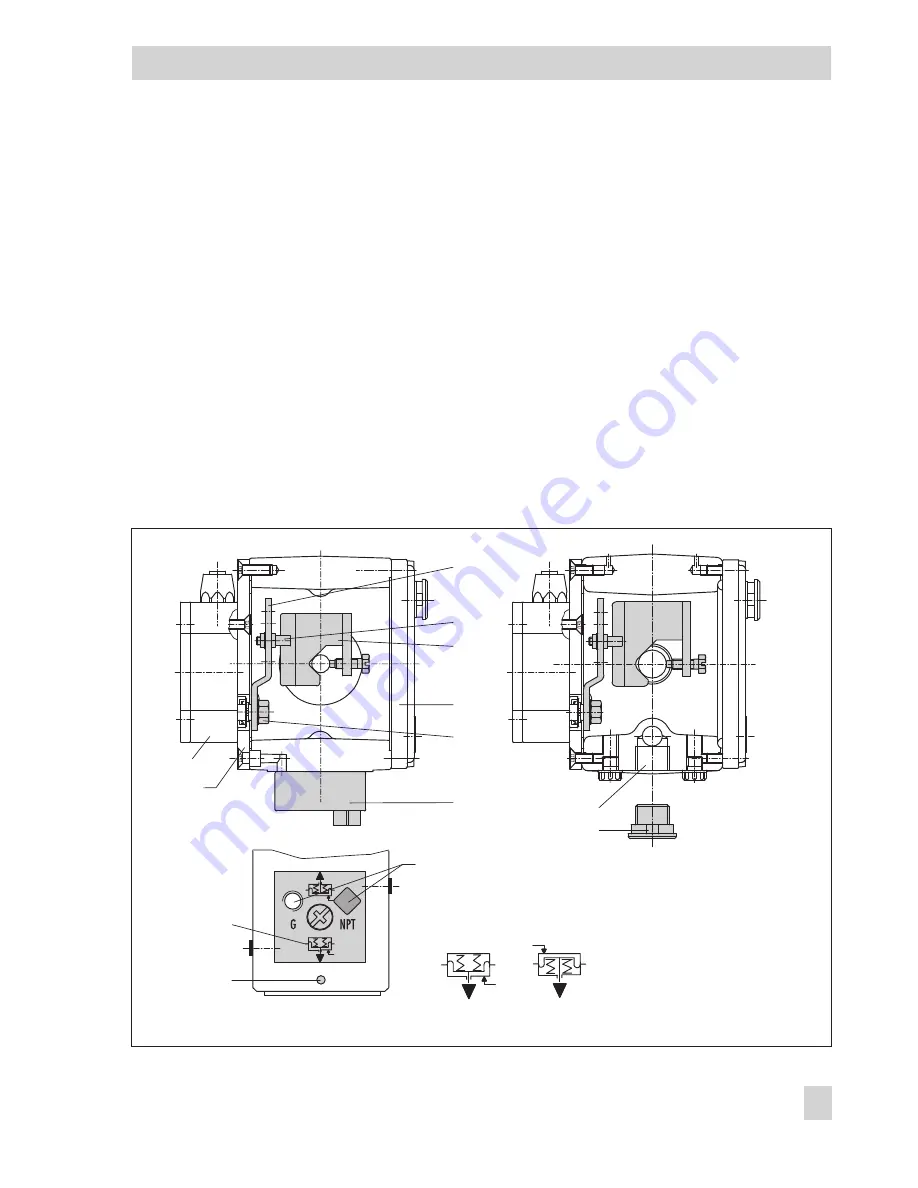
The signal pressure is routed to the connec-
tion at the side of the actuator yoke for the
version "Actuator stem extends".
For the fail-safe position "Actuator stem re-
tracts" the connection on the top diaphragm
case is used. The connection at the side of
the yoke must be fitted with a venting plug
(accessories).
Mounting the position sensor
1. Place the lever (1) on the sensor in
mid-position and hold it in place.
Unthread the nut (1.1) and remove the
lever together with the disk spring (1.2)
from the sensor shaft.
2. Screw the position sensor (20) onto the
mounting plate (21).
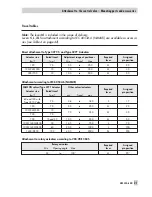
3. Depending on the actuator size and
rated valve travel, determine the re-
quired lever and position of the fol-
lower pin (2) from the travel table on
page 21.
The positioner is delivered with lever
M
in pin position
35
on the sensor. If nec-
essary, remove the follower pin (2)
from its pin position and move it to the
borehole for the recommended pin po-
sition and screw tight.
4. Place the lever (1) and disk spring (1.2)
on the sensor shaft.
EB 8384-6 EN
35
Attachment to the control valve – Mounting parts and accessories
20
21
9
11
1.1
1.2
3
2
1
Fig. 13 · Mounting for Type 3277-5 Actuator (left) and Type 3277 Actuator (right)
Signal pressure
Vent plug
Actuator stem
extends
retracts
Symbol
Marking
Signal pressure
1
Lever
1.1 Nut
1.2 Disk spring
2
Follower pin
3
Follower clamp
9
Connecting plate
11 Cover
20 Position sensor
21 Mounting plate
Summary of Contents for 3730-6
Page 19: ...EB 8384 6 EN 19...
Page 51: ...EB 8384 6 EN 51...
Page 113: ...EB 8384 6 EN 113...
Page 114: ...114 EB 8384 6 EN...
Page 115: ...EB 8384 6 EN 115...
Page 116: ...116 EB 8384 6 EN...
Page 117: ...EB 8384 6 EN 117...
Page 118: ...118 EB 8384 6 EN...
Page 119: ...EB 8384 6 EN 119...
Page 120: ...120 EB 8384 6 EN...
Page 123: ...EB 8384 6 EN 123 diagnostic functions 11 Z Zero calibration 68 Index...


