background image

Rear Panel Layout

1

2

3

4

5
6

7

8

9

10

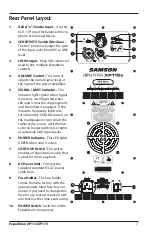
1. 

XLR & ¼” Combo Input  - Use this 

XLR / 1⁄4” input for balanced micro-

phone or line level device.

2. 

SENSITIVITY Switch (Mic/Line) - 

The MIC position changes the gain 

of the input jacks from MIC to LINE 

level. 

3. 

LINK Output - Male XLR connector 

used to link multiple Expedition 

cabinets.

4. 

VOLUME Control - This control 

adjusts the overall signal level at 

the input of the power amplifiers. 

5. 

SIGNAL / LIMIT Indicator - This 

indicator lights green when signal 

is present. It will light red when 

the amp is near the clipping point 

and the limiter is engaged.  If the 

indicator frequently lights red, 

turn down the VOLUME control on 

the loudspeaker or turn down the 

signal at the source, until the indi-

cator no longer lights red, or lights 

occasionally with signal peaks.

6. 

POWER Indicator - This LED lights 

GREEN when amp is active.

7. 

CONTOUR Switch - This switch 

enables an equalization curve that 

is ideal for music playback. 

8. 

AC Power Inlet - Connect the 

supplied standard IEC AC power 

cable here.

9. 

Fuse Holder - The fuse holder 

comes from the factory with the 

appropriately rated fuse for your 

model. If you need to change this 

fuse for any reason, replace it with 

one that has the same exact rating. 

10.  POWER Switch - Switches on the 

Expedition’s main power.

7

Expedition XP112/XP115

Summary of Contents for Expedition XP112a

Page 1: ...XP112a XP115a Owner s Manual...

Page 2: ...t requires proper treatment recovery and recycling Private household in the 28 member states of the EU in Switzerland and Norway may return their used electronic products free of charge to designated...

Page 3: ...upply cord or plug breakage damage due to liquid or objects falling onto the apparatus exposure to rain or moisture or if the apparatus does not operate normally or has been dropped 15 POWER ON OFF SW...

Page 4: ...se pages you ll find a detailed itemization of the features of the Expedition PA system as well as a description of its front and rear panels step by step instructions for its setup and use and full s...

Page 5: ...h high end reproduction Balanced Mic Line input with Volume control and Signal Limit LED Contour equalization switch XLR Line Output connectors to daisy chain multiple Expedition cabinets Internal tim...

Page 6: ...dspeaker Plug the power cable into an AC outlet Note Always make sure that the AC outlet is configured with the correct voltage as indicated on the rear panel of the Expedition loudspeaker 6 Switch th...

Page 7: ...t and the limiter is engaged If the indicator frequently lights red turn down the VOLUME control on the loudspeaker or turn down the signal at the source until the indi cator no longer lights red or l...

Page 8: ...dynamic microphone into the Expedition s XLR INPUT Set the SENSITIVITY switch to the MIC position Switch the Power switch to the ON position While speaking or singing into the microphone slowly raise...

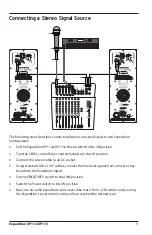
Page 9: ...r cable to an AC socket Using standard XLR or 1 4 cables connect the line level signals from a mixer or key board into the Expedition Inputs Set the SENSITIVITY switch to the LINE position Switch the...

Page 10: ...improve the projection of the speakers and may eliminate the need for speaker stands Note When using a speaker pole mount be sure the pole is capable of supporting the weight of the Expedition loudspe...

Page 11: ...Mic Line Connectors Output Balanced XLR Line Output Contour Equalization 100Hz 12K Hz Boost Electronic Protection Thermal Overload Analog limiter Compressor Power Consumption 260 W AC Connector 3 pin...

Page 12: ...Samson Technologies Corp 45 Gilpin Avenue Hauppauge New York 11788 8816 Phone 1 800 3 SAMSON 1 800 372 6766 Fax 631 784 2201 www samsontech com...

Reviews: