background image

Guided Tour -
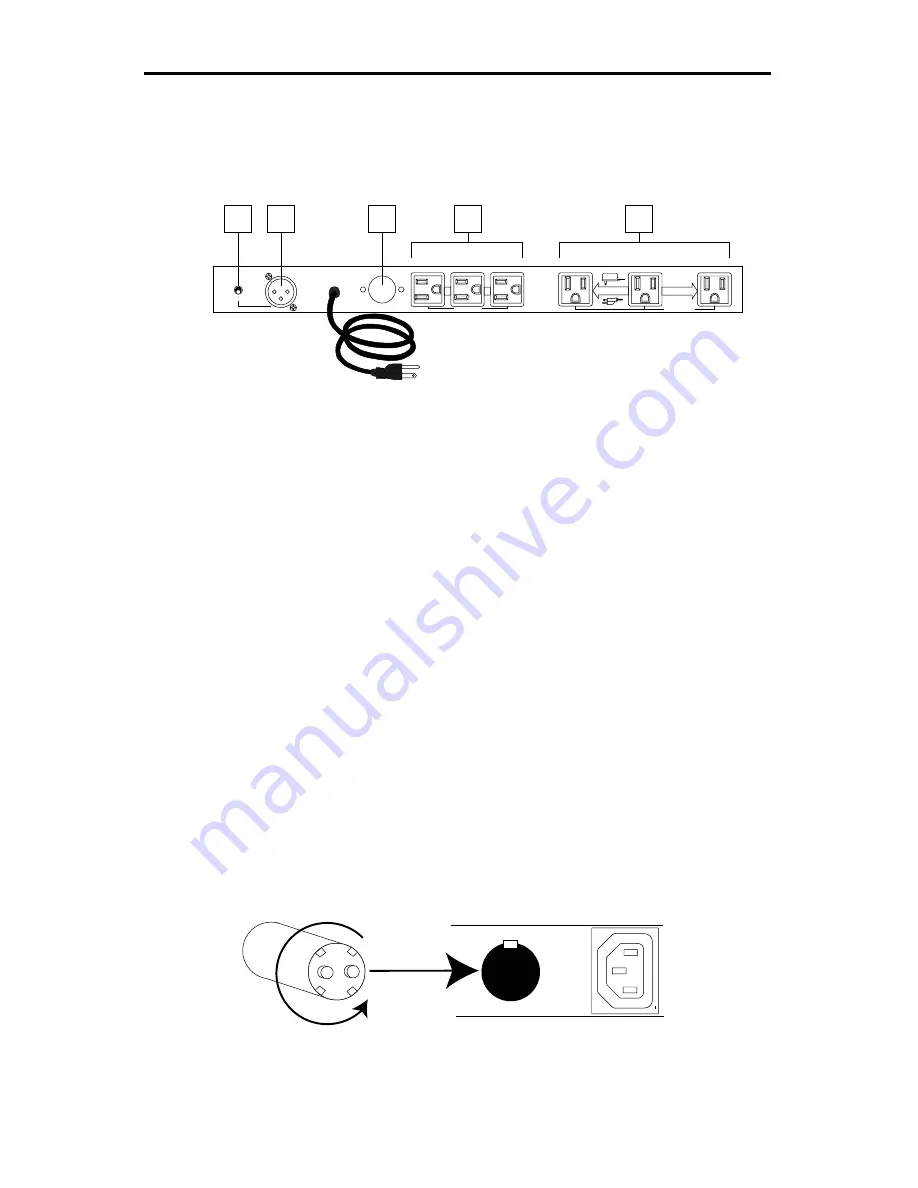
PowerBrite Pro7 Rear Panel

1: Lamp switch - Used to turn on or off a connected Littlite®-
compatible lamp (see #2 below).

2: Lamp connector - If required, you can connect a Littlite®-
compatible lamp to this 12 VDC female XLR jack.

3:  Switched AC outlets (horizontal mount) - Connect external
equipment to these standard 3-pin AC outlets, which are turned on and
off from the front panel Outlets switch (see #2 on the previous page).

4:  Switched AC outlets (vertical mount) - Similar to the AC outlets
described in #3 above, these are mounted vertically so as to
accommodate external transformer AC power adapters.

5:  Fluorescent starter - This is a standard 4 watt, 110 volt condenser
type fluorescent starter, used for starting the fluorescent light in the
slide-out drawer (see #3 on the previous page).  To remove the starter,
twist it counterclockwise a half-turn and pull it straight out.  To insert a
new starter, line up its pins with the slot and twist it a half-turn in the
other direction.  Be certain the replacement starter is rated at 4 watts or
greater.

10

AC INPUT 115 VAC

F

L

U

O

R

E S

C E N T ST

A

R

T

E

R

C

O

N

D

EN

SE

R

4W

A

T

T

S

SAMSON

ON

OFF

PBPRO7

or

SWITCHED

SWITCHED

M

A

X

L

O

A

D
4

0

0

m

A

1

2

V

D

C

L

A

M

P

3

4

1

2

5

10A

 MAX.  LOAD

F

L

U

O

R

E

S C

E N T S T

A

R

T

E

R

C

O

N

D

EN

SE

R

4

W

A

T

T

S

Summary of Contents for POWERBRITE PB9

Page 1: ...AMSON PowerBrite Pro7 AMMETER VOLTMETER PUSH PUSH SAMSON OUTLETS UNSWITCHED 15 AMP SAMSON 15 A M P POWER DISTRIBUTION SYSTEM WITH AC LINE NOISE AND SURGE SUPPRESSION PowerStrip PS9 PBPRO7 PS9 PowerB Br ri it te e Pro PowerB Br ri it te e PowerS St tr ri ip p LIGHT OUTLETS UNSWITCHED 15 AMP SAMSON 15 PowerBrite PB9 A M P PUSH PUSH PB9 ...

Page 2: ...364 3888 Table of Contents Introduction 3 System Features 4 Guided Tour PS9 Front Panel 5 Guided Tour PS9 Rear Panel 6 Guided Tour PB9 Front Panel 7 Guided Tour PB9 Rear Panel 8 Guided Tour Pro7 Front Panel 9 Guided Tour Pro7 Rear Panel 10 Setting Up and Using Your PowerStrip or PowerBrite 11 Changing the PowerBrite Bulb 12 Specifications 13 Appendix A Fluorescent Or Incandescent 14 Ordering a Cus...

Page 3: ...se and complete specifications You ll also find a warranty card enclosed don t forget to fill it out and mail it in This will enable you to receive online technical support and will allow us to send you updated information about other Samson products in the future SPECIAL NOTE Should your PowerStrip PS9 PowerBrite PB9 or PowerBrite Pro7 ever require servicing a Return Authorization number RA is ne...

Page 4: ...ear An independent dedicated switch with status light for powering the rear panel switched outlets In the PowerBrite PB9 and PowerBrite Pro7 a lockable slide out drawer contains a standard 4 watt fluorescent bulb similar to that used in many desktop lamps and readily available at most hardware stores and electrical suppliers that fully illuminates all gear underneath with cool clear light In addit...

Page 5: ...ng of the Outlets switch see 1 above 3 Circuit breaker This circuit breaker will trip whenever the total load on the PS9 all rear panel switched outlets plus the front panel unswitched convenience outlet exceeds 15 amps To reset it unplug one or more devices so as to reduce the load and gently press the circuit breaker in until you hear it click 5 OUTLETS UNSWITCHED 15 AMP SAMSON 15 A M P POWER DI...

Page 6: ...d on and off from the front panel Outlets switch see 2 on the previous page 2 Switched AC outlets vertical mount Similar to the AC outlets described in 1 above these are mounted vertically so as to accommodate external transformer AC power adapters 6 115V 60Hz 15A MAXIMUM 15 AMPERE LOAD FOR ALL 9 OUTLETS SAMSON or PS9 SWITCHED SWITCHED PowerStrip PS9 1 2 ...

Page 7: ... page 10 in this manual for information on how to change the bulb To lock the drawer back into place gently slide the drawer back in again using both fingers on the Push squares until it clicks See the inside back cover of this manual for information about our Neo Rack service which allows the inlay to be replaced with a custom facility logo or name 4 Unswitched convenience outlet This 3 pin AC ou...

Page 8: ...arter This is a standard 4 watt 110 volt condenser type fluorescent starter used for starting the fluorescent light in the slide out drawer see 3 on the previous page To remove the starter twist it counterclockwise a half turn and pull it straight out To insert a new starter line up its pins with the slot and twist it a half turn in the other direction Be certain the replacement starter is rated a...

Page 9: ... change the bulb To lock the drawer back into place gently slide the drawer back in again using both fingers on the Push squares until it clicks See the inside back cover of this manual for information about our Neo Rack service which allows the inlay to be replaced with a custom facility logo or name 5 Ammeter This ten stage LED meter shows the amount of current being drawn by equipment connected...

Page 10: ...as to accommodate external transformer AC power adapters 5 Fluorescent starter This is a standard 4 watt 110 volt condenser type fluorescent starter used for starting the fluorescent light in the slide out drawer see 3 on the previous page To remove the starter twist it counterclockwise a half turn and pull it straight out To insert a new starter line up its pins with the slot and twist it a half ...

Page 11: ...ets 5 Turn on all connected equipment one at a time If the total load exceeds 15 amps the front panel circuit breaker will trip To reset it unplug one or more devices then press in the front panel circuit breaker 6 You can also use the unswitched front panel convenience outlet for additional temporary power needs such as connecting a guitar amplifier soldering iron etc This outlet is fully operati...

Page 12: ...el outlets Then remove the PowerBrite from your rack and use both fingers to press gently on the two Push squares on the slide out drawer so that it extends out towards you With the drawer extended turn the PowerBrite upside down The illustration below shows how to remove the clear plastic diamond lens at the bottom of the drawer Gently pull back on one of the retaining tabs with your finger and i...

Page 13: ...d Pendant Bulb Starter PB9 and Pro7 only Fluorescent Bulb Type F4T5CW Bulb Life Typical 3 000 Hours Lumens 95 Fluorescent Starter Condenser Type FS2 110 Vac 4 20 Watts Starter Fuse Internal 500 milliAmp T type General Dimensions 19 in w x 7 5 d x 3 5 h 482 mm w x 190 d x 88 h Weight 7 lbs 3 2 kg Conforms UL and CUL FLUORESCENT LIGHTING UNIT LIGHTING SWITCH CIRCUIT BREAKER LINE FILTER FRONT AC OUTL...

Page 14: ...ir longer tube length which imparts an increased diffusion pattern The quality of fluorescent light is similar to daylight while incandescent lights impart an artificial glow There are also a wide variety of fluorescent bulb types readily available from most hardware stores including soft glow and colored bulbs which can impart distinctive lighting effects Fluorescent lighting systems require no d...

Page 15: ...41 8 x 3 4 or larger 2 Logos created on computer can be sent on a 3 1 2 floppy or Zip disk in the following formats BMP EPS PICT TIFF Illustrator and Photoshop 3 Scanned images on disk must have a minimum resolution of 300 D P I 4 Any Name that fits easily in the space above if you don t have a logo we can use your name 5 Custom Logo If you need a logo designed call or write us for information All...

Page 16: ... head screwdriver to remove the two retaining screws holding down the metal nameplate bracket Inside the window you will find a slot that holds a four layer sandwich consisting of a clear cover 1 in the illustration above found closest to the window logo film 2 color film 3 and white diffusor 4 Replace the logo film with your new custom Neo Rack film the color film can also optionally be replaced ...

Reviews: