background image

Positioning the RL112A/RL115A

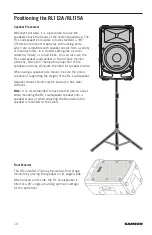
Speaker Placement

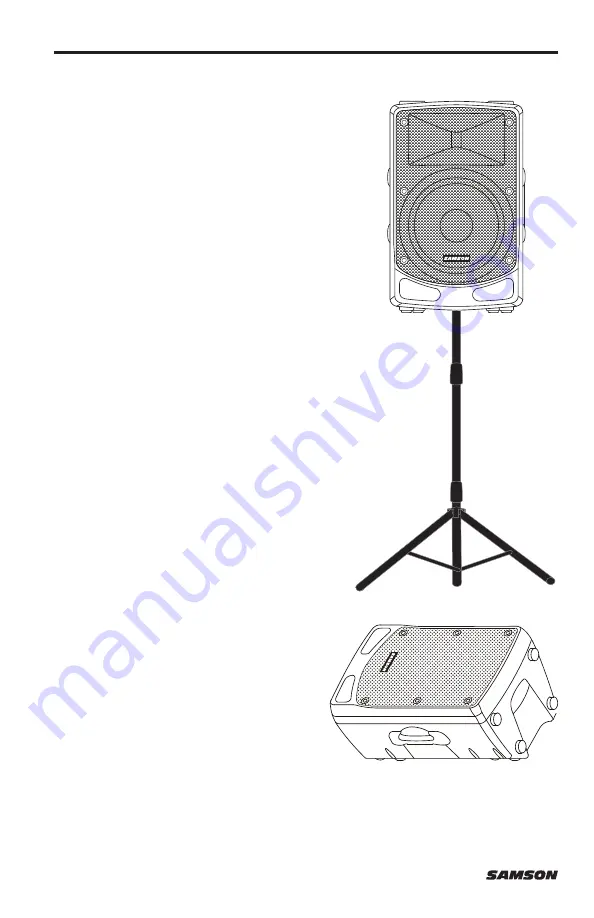
Whenever possible, it is a good idea to raise the 
speakers above the heads of the listening audience. The 
RL Loudspeaker enclosures include standard 1-3/8” 
(35mm) pole mount receptacles with locking bolts, 
which are compatible with speaker stands from a variety 
of manufacturers. In a smaller setting like a school 
cafeteria, library, or a mall kiosk, you can also use the 
RL Loudspeaker loudspeaker in the tilt back monitor 
positions, which will improve the projection of the 
speakers and may eliminate the need for speaker stands.

When using a speaker pole mount, be sure the pole is 
capable of supporting the weight of the RL Loudspeaker.

Speaker stands should only be placed on flat, level 
surfaces.

Note:  It is recommended to have another person assist 
when mounting the RL Loudspeaker speaker onto a 
speaker stand, or when adjusting the stand while the 
speaker is mounted on the stand.

Floor Monitor

The RL112A/RL115A may be used as floor stage 
monitors by placing the speaker on its angled side.

When placed on its side, the RL Loudspeaker is 
tilted at a 45° angle, providing optimal coverage 
for the performer. 

10

Summary of Contents for RL112A

Page 1: ...Owner s Manual 800W 2 Way Active Loudspeakers...

Page 2: ...ct method of disposal By doing so you will ensure that your disposed product undergoes the necessary treatment re covery and recycling and thus prevent potential negative effects on the environment an...

Page 3: ...rt stand tripod bracket or table specified by the manufacture or sold with the apparatus When a cart is used utilize caution when moving the cart apparatus combination to avoid injury from tip over 14...

Page 4: ...against harmful interference in a residential installation This equipment generates uses and can radiate radio frequency energy and if not installed and used in accordance with the instructions may ca...

Page 5: ...ges you ll find a detailed description of the features of your RL Loudspeaker as well as step by step instructions for its setup and use If your loudspeaker was purchased in the United States you ll a...

Page 6: ...r cable into an AC outlet Note Always make sure that the AC outlet is configured with the correct voltage as indicated on the rear panel of the RL Loudspeaker loudspeaker 7 Switch the RL Loudspeaker s...

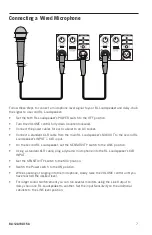
Page 7: ...the second RL Loudspeaker set the SENSITIVITY switch to the LINE position Using a standard XLR cable plug a dynamic microphone into the RL Loudspeaker s XLR INPUT Set the SENSITIVITY switch to the MI...

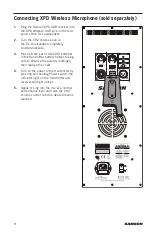
Page 8: ...the transmitter battery holder taking care to observe the polarity markings then replace the cover 4 Turn on the power to the transmitter by pressing and holding Power switch the indicator light on t...

Page 9: ...e XPD USB wireless input 6 MIX OUT Male XLR connector used to link multiple RL Loudspeaker cabinets 7 SIGNAL LIMIT Indicator This indicator lights green when signal is present It will light red when t...

Page 10: ...which will improve the projection of the speakers and may eliminate the need for speaker stands When using a speaker pole mount be sure the pole is capable of supporting the weight of the RL Loudspeak...

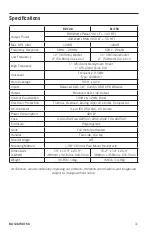
Page 11: ...Equalization 100Hz 12kHz Boost Electronic Protection Thermal Overload Analog Optical Limiter Compressor AC Connector 3 pin IEC 250 VAC 20 A male Power Consumption 420 W Fuse 110V 120V T4A AC250V 220V...

Page 12: ...ork 11801 Phone 1 800 3 SAMSON 1 800 372 6766 www samsontech com Follow us Having Trouble with your RL Loudspeaker We can help CONTACT OUR SUPPORT TEAM support samsontech com Our experts can help you...

Reviews: