background image

14

The RSX series loudspeakers are a perfect solution for many fixed installations such as live 
sound venues, discos, schools, houses of worship, convention centers and airport terminals. The 
two-way speaker enclosures are extremely versatile for installation as they can be suspended in 
several different positions by using the twelve fly points.

IMPORTANT NOTE: Suspending an RSX loudspeaker should only be done by a qualified, 
licensed and insured professional sound contractor. Installation in an unsafe manner or location 
can result in property damage and serious injury. When installing the speaker, make sure all 
local ordinances are understood and adhered to. Always check and ensure that whatever struc-
ture the speaker is mounted to is devoid of cracks, deformations, or any signs of fatigue. 

The RSX speakers are designed to be mounted directly to a 
structure. Never suspend an RSX cabinet from another speak-
er, and do no suspend another speaker from an RSX cabinet. 

When suspended, always affix a safety cable from the RSX 
cabinet to the mounting structure. 

A minimum of two (2) attachment points must be used when 
suspending the speaker enclosure. The rear and side attach-
ment points are only used as pull-back points to adjust the 
angle of the speaker. Only the top and bottom fly points are 
load-bearing suspension points. 

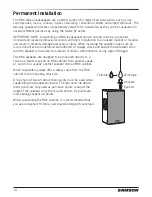
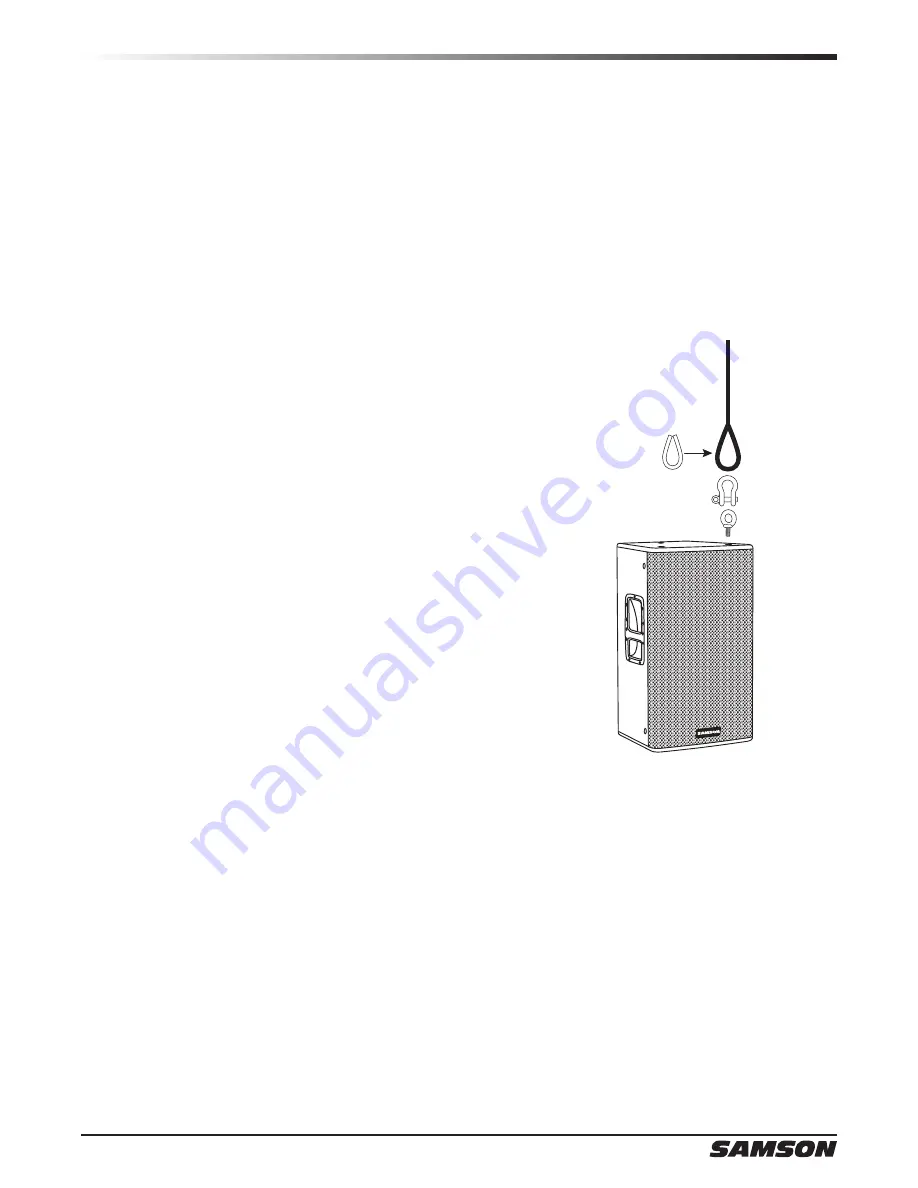
When suspending the RSX cabinet, it is recommended that 
you use an eyebolt, thimble, and shackle along with wire rope. 

Permanent Installation

Eyebolt

Shackle

Wire rope

Thimble

Summary of Contents for RSX110

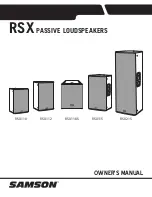
Page 1: ...OWNER S MANUAL RSX PASSIVE LOUDSPEAKERS RSX112 RSX118S RSX115 RSX215 RSX110...

Page 2: ...son Technologies Corp v2 2 Samson Technologies Corp 45 Gilpin Avenue Hauppauge New York 11788 8816 Phone 1 800 3 SAMSON 1 800 372 6766 Fax 631 784 2201 www samsontech com Speakon is a registered trade...

Page 3: ...e 6 Clean only with a damp cloth 7 Do not block any of the ventilation openings Install in accordance with the manufacturers instructions 8 Do not install near any heat sources such as radiators heat...

Page 4: ...tures 6 Input Connections 8 Basic Set Up 9 Using Speaker Stands 10 Floor Monitor Positioning 11 Configuring the RSX118S Subwoofer 12 Using an External Crossover 13 Permanent Installation 14 Cable Wiri...

Page 5: ...peaker instructions for its setup and use and full specifications If your loudspeaker was purchased in the United States you ll also find a warranty card enclosed don t forget to fill it out and mail...

Page 6: ...g 12 304 mm Celestion low frequency driver with 2 5 64 mm voice coil 1 75 44 mm Celestion PEPT high performance compression driver 60 x 90 horn with 1 exit for a controlled consistent sound 2 x Speako...

Page 7: ...und 2 x Speakon and phone parallel speaker jacks Twelve M10 10 mm fly points Trapezoidal plywood construction with durable black textured paint finish RSX118S 18 Passive Subwoofer 500 watts AES 2000 w...

Page 8: ...stallation applications to use Speakon style connectors because they lock into jacks providing a secure connection are able to handle high current and the contacts do not cause a momentary short when...

Page 9: ...to a power amplifier or powered mixer you must pay attention to the mini mum load impedance of the amplifier Most amplifiers can safely provide power to loudspeakers with a minimum load impedance of 8...

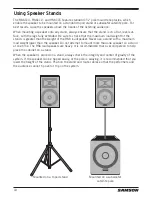
Page 10: ...the weight of the RSX loudspeaker Never use a stand with a maximum load weight lower than the speaker Do not attempt to mount more than one speaker on a stand at one time The RSX loudspeakers are heav...

Page 11: ...d to their ears In a large stage monitor system several RSX speakers can be daisy chained together using the parallel speaker connectors Note Be sure to check the manufacturer s minimum rec ommended i...

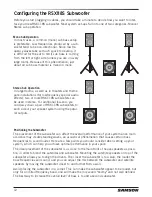
Page 12: ...ng the paral lel outputs Stereo Sub Operation Positioning the Subwoofer The placement of the subwoofer can affect the overall performance of your system since room acoustics may create standing waves...

Page 13: ...n speaker to reproduce the same frequencies as this will create duplication of low frequencies and create an imbalanced mix A good place to start is to use the frequency response of your speaker cabin...

Page 14: ...d adhered to Always check and ensure that whatever struc ture the speaker is mounted to is devoid of cracks deformations or any signs of fatigue The RSX speakers are designed to be mounted directly to...

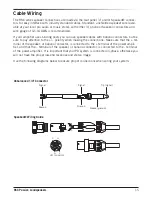
Page 15: ...wire gauge of 12 14 AWG is recommended If your amplifier uses binding posts you can use speaker cables with banana connectors but be sure to pay attention to the polarity when making the connections...

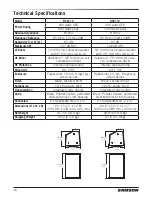
Page 16: ...r Celestion 1 25 mm voice coil compression driver Celestion 1 75 44 mm voice coil compression driver HF Protection Internal overload Lamp Internal overload lamp Directivity 60 x 90 60 x 90 Enclosure T...

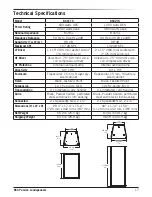
Page 17: ...with 3 76 mm voice coil HF Driver Celestion 1 75 44 mm voice coil compression driver Celestion 1 75 44 mm voice coil compression driver HF Protection Internal overload Lamp Internal overload lamp Dire...

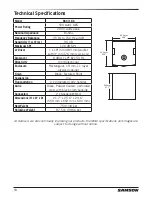
Page 18: ...m 11 layer plywood cabinet Finish Black Textured Paint Suspension n a Transportation 2 x Integrated carry handles Grille Black Powder Coated perforated steel with black cloth backing Connectors 2 x Sp...

Page 19: ...19 RSX Passive Loudspeakers Notes...

Page 20: ...Samson Technologies Corp 45 Gilpin Avenue Hauppauge New York 11788 8816 Phone 1 800 3 SAMSON 1 800 372 6766 Fax 631 784 2201 www samsontech com...

Reviews: