background image

7-32  

EB 6616-1/-2 EN

Operation


Î

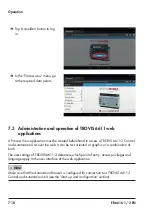
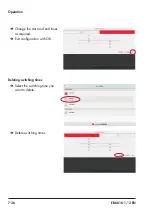
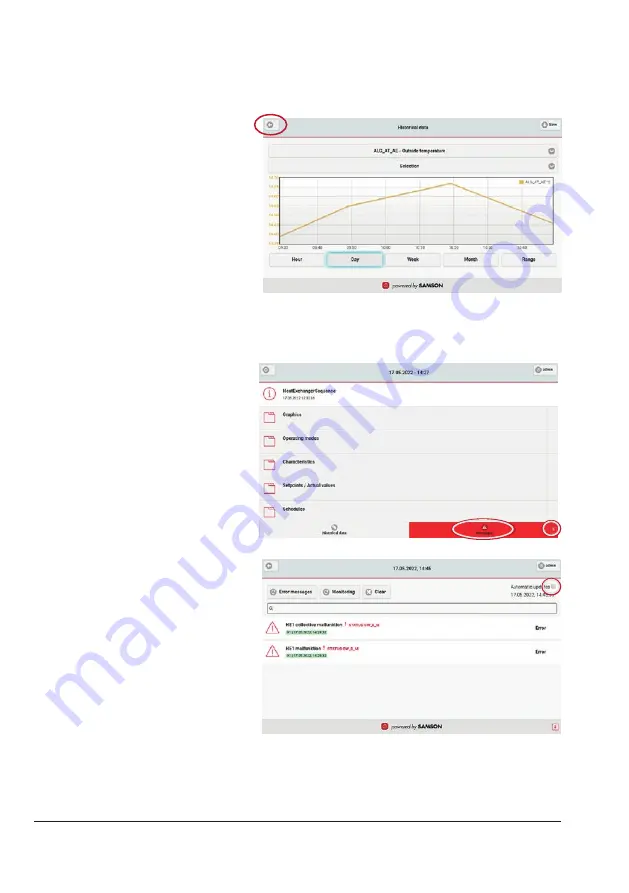
Tap Back button to return to the 

main screen.

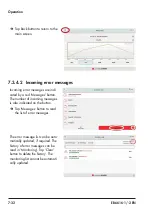
7.3.4.2  Incoming error messages

Incoming error messages are indi-
cated by a red 'Messages' button. 
The number of incoming messages 
is also indicated on the button.


Î

Tap 'Messages' button to read 
the list of error messages.

The error message list can be auto-
matically updated, if required. The 
history of error messages can be 

read in 'Monitoring'. Tap 'Clear' 

button to delete the history. The 
monitoring list cannot be automati-
cally updated.

Summary of Contents for TROVIS 6616-1

Page 1: ...Translation of original instructions EB 6616 1 2 EN Firmware version 1 50 Web Terminals TROVIS 6616 1 TROVIS 6616 2 Edition May 2022...

Page 2: ...sist you in mounting and operating the device safely The instructions are binding for handling SAMSON devices The images shown in these instructions are for illustration purposes only The actual produ...

Page 3: ...nal 4 1 5 Installation 5 1 5 1 Installation conditions 5 1 5 2 Preparation for installation 5 1 5 3 Mounting the web terminal 5 1 5 3 1 TROVIS 6616 1 5 1 5 3 2 TROVIS 6616 2 5 1 5 4 Electrical connect...

Page 4: ...f TROVIS 6611 web applications 7 18 7 3 1 Login 7 19 7 3 2 Configuration 7 20 7 3 2 1 User settings 7 20 7 3 3 System settings 7 23 7 3 3 1 Project settings 7 26 7 3 4 Operation 7 30 7 3 4 1 Historica...

Page 5: ...use the device for its intended purpose or for damage caused by external forces or any other external factors Refer to the technical data for limits and fields of application as well as possible uses...

Page 6: ...he controlled system com ponents e g control valves and pumps To avoid personal injury or property damage plant operators and operating personnel must prevent hazards that could be caused in the plant...

Page 7: ...and Automation Unit 1 1 Notes on possible severe personal injury DANGER Risk of fatal injury due to electric shock The TROVIS 6616 1 and TROVIS 6616 2 Web Terminals are designed for use in low voltag...

Page 8: ...luctuations Image persistence may damage the touch screen Do not allow static images to remain on the screen for long periods of time Manipulation of settings due to unauthorized access The web termin...

Page 9: ...ate at the time of publication of this document The name plate on the device may differ from the one shown 9 1 4 3 7 5 6 8 10 2 1 Device version 2 Supply voltage 3 Power consumption 4 Data Matrix code...

Page 10: ...2 2 EB 6616 1 2 EN...

Page 11: ...plant schemes with dynamically refreshed values Data such as set points time programs etc can be conveniently changed on the touch screen The alarm list shows recorded events in chronological order w...

Page 12: ...013 Class A Noise immunity According to EN 55024 2010 Device safety Class of protection Class III Overvoltage category OVC II Pollution degree PD 2 Degree of protection IP 54 at the front IP 20 at the...

Page 13: ...2 Interfaces USB 1x USB 2 0 A Ethernet 10 100 1x RJ 45 Others Network extension Ethernet 100BaseT typ LAN without repeaters hubs etc Associated software Operating system Android 5 1 1 7 Android 6 10...

Page 14: ...3 4 EB 6616 1 2 EN Design and principle of operation 3 3 Dimensions 141 210 33 Fig 3 1 Dimensions in mm TROVIS 6616 1...

Page 15: ...EB 6616 1 2 EN 3 5 Design and principle of operation 185 282 75 34 5 Fig 3 2 Dimensions in mm TROVIS 6616 2...

Page 16: ...3 6 EB 6616 1 2 EN...

Page 17: ...kaging from the device 2 Check scope of delivery see Fig 4 1 3 Dispose of the packaging in accordance with the valid regulations NOTICE 1x TROVIS 6616 1 Web Terminal 4x Fastening screw 1x Document IP...

Page 18: ...ons during long storage periods Storage instructions Protect the device against external influ ences e g impact Protect the device against moisture and dirt Make sure that the ambient air is free of a...

Page 19: ...o have them ready during mounting 5 3 Mounting the web terminal Risk of damaging the touch screen Do not be place the web terminal front side down on hard surfaces NOTICE The installation requires a p...

Page 20: ...5 2 EB 6616 1 2 EN Installation Fig 5 1 Installation dimensions for TROVIS 6616 1 Panel cut out and boreholes 260 163 Fig 5 2 Installation dimensions for TROVIS 6616 2 Panel cut out...

Page 21: ...erruption devices that can be protected against unintentional recon nection of the power supply Notes on electric wiring Use a stranded wire with a 1 5 mm wire cross section for the supply line Use at...

Page 22: ...1 cable must be used to establish connection over active components switch hub We recommend using a stranded wire with a 1 5 mm wire cross section to connect the sup ply line USB LAN 24 V DC Fig 5 3...

Page 23: ...using the same subnet mask 6 2 Device launcher Connect supply voltage The SAMSON start screen appears after approx 10 seconds The Launcher starts automati cally The Setup Wizard appears after approx 3...

Page 24: ...hange it The netmask DNS and gateway configurations can be changed if necessary If no DNS or gateway is required the IP address of the local host needs to be entered Change IP address Confirm change w...

Page 25: ...61x is configured as a time server by default As a result TROVIS 6610 can be used as a time server In projects using TROVIS 6611 2 another available NTP server e g ptbtime1 ptb de can be entered here...

Page 26: ...EB 6616 1 2 EN Start up and configuration 6 4 Restarting the Setup Wizard Swipe the screen to the second page of the Launcher Select Settings Enter 1732 as the password Confirm with OK Start the wiza...

Page 27: ...iguration Reboot the web terminal 6 5 Configuring Auto Start Select the Auto Start applica tion Make sure that the application you require e g Automation Browser Switch Auto Start to ON Alternatively...

Page 28: ...art application Start the selected application manually 6 6 Configuring Automation Browser Automation Browser is ready configured for use with TROVIS 6611 2 and TROVIS 6610 The default configuration c...

Page 29: ...EB 6616 1 2 EN 6 7 Start up and configuration Open menu Select Export Confirm export with YES The settings are saved to the MB_STATION xml file in the Download AutomationBrowser directory...

Page 30: ...6616 1 2 EN Start up and configuration The default configuration can be restored by selecting Import 6 6 1 Configuring Automation Browser for TROVIS 6611 2 Tap Select TROVIS 6610 Confirm deletion with...

Page 31: ...EB 6616 1 2 EN 6 9 Start up and configuration Tap Select Edit Tap Auto Start button Tap Auto Start button repeatedly to configure a delayed start...

Page 32: ...on on TROVIS 6611 2 A message concerning an invalid certificate appears after connection is established to TROVIS 6611 2 Control and Automation unit for the first time since TROVIS 6611 2 uses a self...

Page 33: ...EB 6616 1 2 EN 6 11 Start up and configuration 6 6 2 Configuring Automation Browser for TROVIS 6610 Select TROVIS 6611 Confirm deletion with DELETE Tap Select Edit...

Page 34: ...6 12 EB 6616 1 2 EN Start up and configuration Tap Auto Start button Confirm confirmation with Done Tap Connect button to open the application on TROVIS 6610...

Page 35: ...key indicates the user privilege level The user level is also indicated in the status bar The status bar remains visible in most cases A check icon in the button on the toolbar indicates that the use...

Page 36: ...ading is optional depending on the plant configuration Configuration of the time and date of the TROVIS 6610 CPU Module the reading in the status bar is not the same as the time saved in the actual we...

Page 37: ...the CPU module to be deleted End of logged data Start of logged data Measured data for the time selected Define the start and end times for each selected measured value Tap button to confirm the sele...

Page 38: ...data Tap button to display an online graph of the measured values defined in the SAMSON TROVIS 6693 Web Terminal Editor It is not possible to select other data Use the and but tons to shift the displa...

Page 39: ...TROVIS 6693 Web Terminal Editor The maximum data logging time is 25 hours 7 1 5 Configuring the target directory for online and offline trends The default directory for saving offline and online trend...

Page 40: ...ds from the bottom of the screen Tap button to open the configuration window of the Automation Browser Open the configuration window with button Select External storage and reconnect to the TROVIS 661...

Page 41: ...go to the Active alarms page The total number of active alarms as well as each individual alarm with the time and date of its activation are listed Alarms that are no longer valid are removed from th...

Page 42: ...O View web application enables users to access the input and outputs of the TROVIS 6610 CPU Module and the connected TROVIS 6620 TROVIS 6625 and TROVIS 6625 and TROVIS 6640 Modules without the Graphic...

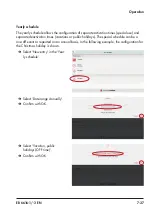
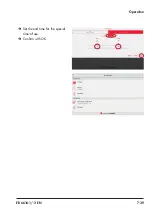
Page 43: ...configure Tap the highlighted button to configure the first switching time Use the up and down arrows to set the start and end times in 15 minute steps Tap button to exit the win dow without saving t...

Page 44: ...56 switching times per week can be configured Tap button to return to the weekly schedule Tap button to start the exit schedule procedure Exit the schedule with but ton For Automation Browser running...

Page 45: ...p the highlighted button to change the switching time Use the up and down arrows to change the start and end times Delete switching times with the white button Tap button to exit the window without sa...

Page 46: ...EB 6616 1 2 EN Operation Tap button to return to the weekly schedule 7 1 8 3 Deleting switching times Select the day of the week that you want to configure Tap button to delete the switching time per...

Page 47: ...pecial schedules The special schedules allow the configuration of separate activation times Special use ON time and separate deactivation times vacations or public holidays OFF time Tap button to open...

Page 48: ...without saving the changed setting Use the up and down arrows to set the start of the special use ON time Tap button to exit the window without saving the changed setting Tap button to configure an an...

Page 49: ...save the configura tion and exit the special use window Tap button to return to the overview of configured special times of use exception sched ule Tap the highlighted button to configure a further sp...

Page 50: ...ust be created beforehand in the graphical project management tool On trans ferring the application the TROVIS MOBILE web application is automatically transferred as well The start screens of the TROV...

Page 51: ...EB 6616 1 2 EN 7 17 Operation Open the browser on the start screen Start TROVIS MOBILE from the start screen Enter your password and confirm with...

Page 52: ...access a TROVIS 6611 2 Control and Automation Unit over the web It can be text oriented or graphic or a combination of both The user settings of TROVIS 6611 2 determine which point of entry access pri...

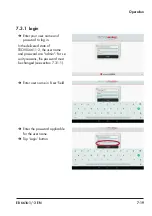
Page 53: ...nd password to log in In the delivered state of TROVIS 6611 2 the user name and password are admin For se curity reasons the password must be changed see section 7 3 1 1 Enter user name in User field...

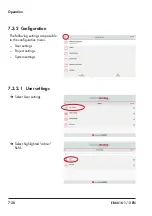
Page 54: ...EN Operation 7 3 2 Configuration The following settings are possible in the configuration menu User settings Project settings System settings 7 3 2 1 User settings Select User settings Select highlig...

Page 55: ...EB 6616 1 2 EN 7 21 Operation Open password configuration setting Change the password and hide the input field with the button Save configuration scroll to the end of the screen...

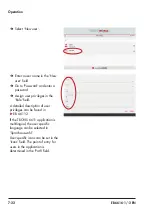
Page 56: ...rivileges in the Role field A detailed description of user privileges can be found in u EB 6611 2 If the TROVIS 6611 application is multilingual the user specific language can be selected in Sprachaus...

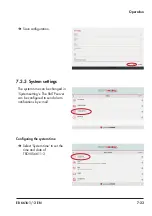
Page 57: ...uration 7 3 3 System settings The system time can be changed in System setting s The SMTP server can be configured to send alarm notifications by e mail Configuring the system time Select System time...

Page 58: ...h the time picker Save system time LAN settings LAN and WLAN must be configured at the user interface of the TROVIS 6611 2 Control and Automation Unit u EB 6611 2 before start up of the TROVIS 6616 x...

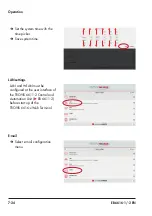
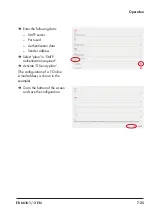
Page 59: ...SMTP server Port used Authentication data Sender address Select plain in SMTP authentication required Activate TLS encryption The configuration of a T Online e mail address is shown in the example Go...

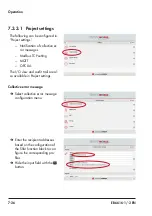
Page 60: ...sages Modbus TCP setting MQTT OPC UA The I O view and audit trail are al so available in Project settings Collective error message Select collective error message configuration menu Enter the recipien...

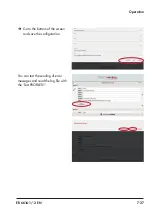
Page 61: ...EB 6616 1 2 EN 7 27 Operation Go to the bottom of the screen and save the configuration You can test the sending of error messages and read the log file with the Test PROFILE01...

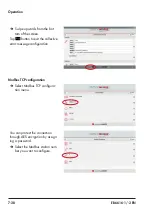
Page 62: ...screen Tap button to exit the collective error message configuration Modbus TCP configuration Select Modbus TCP configura tion menu You can protect the connection through AES encryption by assign ing...

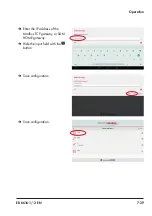
Page 63: ...EB 6616 1 2 EN 7 29 Operation Enter the IP address of the Modbus TCP gateway or SAM HOME gateway Hide the input field with the button Save configuration Save configuration...

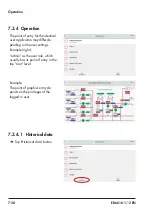
Page 64: ...application may differ de pending on the user settings Example right admin as the user role which usually has its point of entry in the top root level Example The point of graphics entry de pends on...

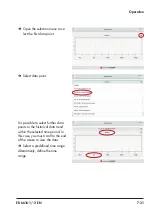
Page 65: ...data point Select data point It is possible to select further data points or the historical data trend within the selected time period In this case you must scroll to the end of the screen to view th...

Page 66: ...red Messages button The number of incoming messages is also indicated on the button Tap Messages button to read the list of error messages The error message list can be auto matically updated if requi...

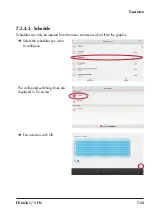
Page 67: ...ration 7 3 4 3 Schedule Schedules can only be opened from the menu structure and not from the graphic Select the scheduler you want to configure The configured switching times are displayed in Overvie...

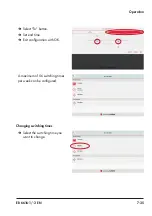
Page 68: ...7 34 EB 6616 1 2 EN Operation Adding switching times Select New entry in the Weekly schedule Select the day of the week Use the time picker to select the required time...

Page 69: ...1 2 EN 7 35 Operation Select To button Set end time Exit configuration with OK A maximum of 56 switching times per week can be configured Changing switching times Select the switching time you want to...

Page 70: ...7 36 EB 6616 1 2 EN Operation Change the start and end times as required Exit configuration with OK Deleting switching times Select the switching time you want to delete Delete switching times...

Page 71: ...e deactivation times vacations or public holidays The special schedule can be a one off event or repeated on an annual basis In the following example the configuration for the Christmas holiday is sho...

Page 72: ...7 38 EB 6616 1 2 EN Operation Set the start date for the special time of use Set the start time for the special time of use Select End button Set the end date for the special time of use...

Page 73: ...EB 6616 1 2 EN 7 39 Operation Set the end time for the special time of use Confirm with OK...

Page 74: ...7 40 EB 6616 1 2 EN...

Page 75: ...heck the network connection Network configuration error or error occurred while assigning the network to TROVIS 6611 2 or TROVIS 6610 Check the network configuration error or assignment of the network...

Page 76: ...8 2 EB 6616 1 2 EN...

Page 77: ...on to be taken in the event of a negative result Check the markings labels and nameplates on the web terminal for their readability and completeness Immediately renew damaged missing or incorrect name...

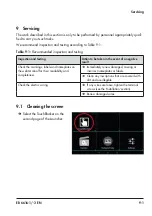
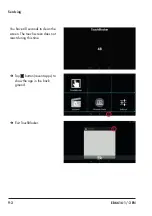
Page 78: ...9 2 EB 6616 1 2 EN Servicing You have 60 seconds to clean the screen The touch screen does not react during this time Tap button recent apps to show the app in the back ground Exit TouchBlocker...

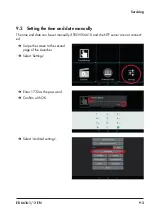
Page 79: ...me and date manually The time and date can be set manually if TROVIS 6610 and the NTP server are not connect ed Swipe the screen to the second page of the Launcher Select Settings Enter 1732 as the pa...

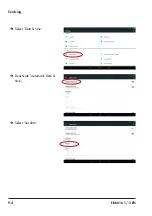
Page 80: ...9 4 EB 6616 1 2 EN Servicing Select Date time Deactivate Automatic date time Select Set date...

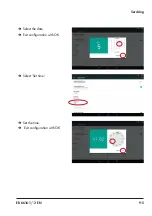
Page 81: ...EB 6616 1 2 EN 9 5 Servicing Select the date Exit configuration with OK Select Set time Set the time Exit configuration with OK...

Page 82: ...9 6 EB 6616 1 2 EN Servicing If you only wanted to set the time and date manually once activate Automatic date time again Tap to go to the Android set tings Tap button recent apps Exit Settings...

Page 83: ...EB 6616 1 2 EN 9 7 Servicing Reboot the web terminal...

Page 84: ...9 8 EB 6616 1 2 EN...

Page 85: ...qualified to carry out such tasks Risk of fatal injury due to electric shock Only allow trained and experienced personnel to perform the work Before disconnecting live wires switch off the supply volt...

Page 86: ...10 2 EB 6616 1 2 EN...

Page 87: ...tric shock Only allow trained and experienced per sonnel to perform the work Before disconnecting live wires switch off the supply voltage and protect it against unintentional reconnection Disconnect...

Page 88: ...11 2 EB 6616 1 2 EN...

Page 89: ...for service and repair work 12 1 Returning devices to SAMSON Defective web terminals can be returned to SAMSON for repair Proceed as follows to return devices to SAMSON 1 Put the web terminal out of...

Page 90: ...12 2 EB 6616 1 2 EN...

Page 91: ...internation al refuse regulations Do not dispose of components and haz ard substances together with your other household waste We can provide you with a recycling passport according to PAS 1049 on req...

Page 92: ...13 2 EB 6616 1 2 EN...

Page 93: ...alfunctions or defects arise E mail contact You can reach our after sales service at u aftersalesservice samsongroup com Addresses of SAMSON AG and its subsid iaries The addresses of SAMSON its subsid...

Page 94: ...14 2 EB 6616 1 2 EN Annex Default password User Administrator Password 1732...

Page 95: ......

Page 96: ...2023 04 12 English SAMSON AKTIENGESELLSCHAFT Weism llerstra e 3 60314 Frankfurt am Main Germany Phone 49 69 4009 0 Fax 49 69 4009 1507 samson samsongroup com www samsongroup com EB 6616 1 2 EN...

Reviews: