78
EB 8384-6S EN
Mounting and start-up
5.11 Mounting the leakage
sensor
Î
Normally, the control valve is delivered with
positioner and leakage sensor already
mounted.
If the leakage sensor is mounted after the
valve has been installed or it is mounted on-
to another control valve, proceed as de-
scribed in the following.
Risk of malfunction due to incorrect fasten-
ing!
Fasten the leakage sensor using a torque of
20 ±5 Nm.
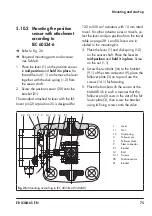
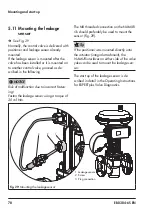
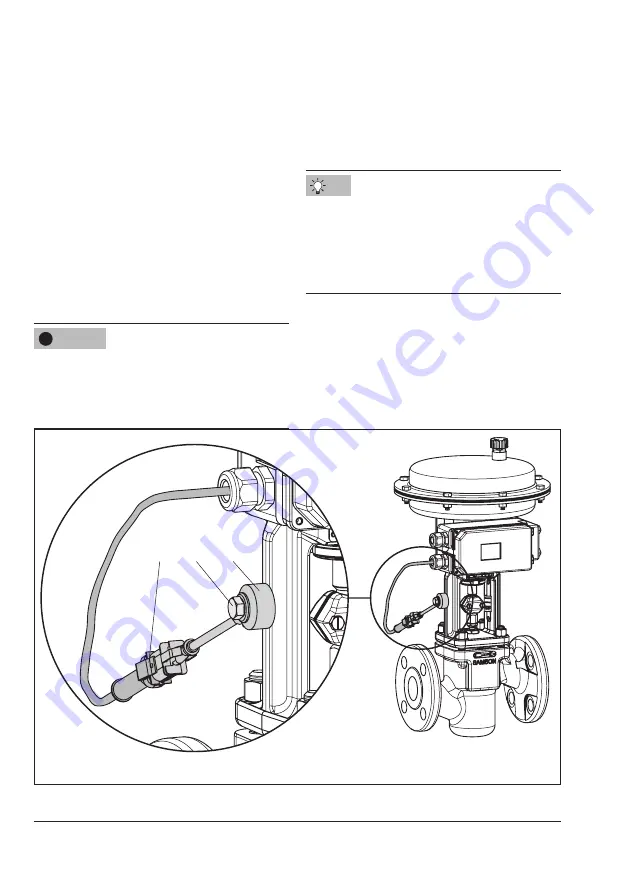
The M8 threaded connection on the NAMUR
rib should preferably be used to mount the
sensor (Fig. 29).
If the positioner was mounted directly onto
the actuator (integral attachment), the
NAMUR interfaces on either side of the valve
yoke can be used to mount the leakage sen
-
sor.
The start-up of the leakage sensor is de-
scribed in detail in the Operating Instructions
for EXPERTplus Valve Diagnostics.
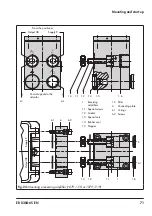
1
2
3
1 Leakage sensor
2 Screw
3 Plug connection
Fig. 29:
Mounting the leakage sensor
NOTICE
!
Tip
Summary of Contents for TROVIS SAFE 3730-6
Page 12: ...12 EB 8384 6S EN...
Page 16: ...16 EB 8384 6S EN...
Page 22: ...22 EB 8384 6S EN...
Page 40: ...40 EB 8384 6S EN...
Page 42: ...42 EB 8384 6S EN...
Page 82: ...82 EB 8384 6S EN...
Page 90: ...90 EB 8384 6S EN...
Page 96: ...96 EB 8384 6S EN...
Page 132: ...132 EB 8384 6S EN...
Page 152: ...152 EB 8384 6S EN...
Page 155: ...EB 8384 6S EN 155...
Page 156: ...156 EB 8384 6S EN...
Page 157: ...EB 8384 6S EN 157...
Page 158: ...158 EB 8384 6S EN...
Page 159: ...EB 8384 6S EN 159...
Page 160: ...160 EB 8384 6S EN...
Page 161: ...EB 8384 6S EN 161...
Page 162: ...162 EB 8384 6S EN...
Page 163: ...EB 8384 6S EN 163...
Page 164: ...164 EB 8384 6S EN...
Page 165: ...EB 8384 6S EN 165...
Page 166: ...166 EB 8384 6S EN...
Page 167: ...EB 8384 6S EN 167...
Page 182: ...182 EB 8384 6S EN...
Page 183: ...EB 8384 6S EN 183...

