background image

Controls and Functions

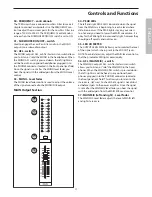
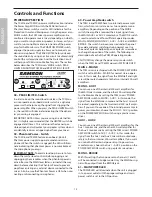
24BIT DIGITAL EFFECT SECTION

The TXM16 and TXM20 feature built-in, 24 Bit Digital 

Multi-effects Processor(s) with 100 dazzling, studio qual-

ity effects like Delay, Chorus, Flanging and lush Reverbs 

including Halls, Plates and Rooms.  In addition, there are 

multi-effects presets that have two effects combined 

together.  For example, Delay and Reverb or Reverb and 

Chorus, to name a few. The following section describes 

the features control knobs and layout of the powerful on-

board digital Multi-effects section.

28 - Program  Effects Display

The TXM series mixers Multi-effects Processors feature 

a dual digit, seven-segment numerical Effects Display 

for showing the effects PROGRAM number from 00 - 99.  

You will see the PROGRAM numbers change as you scroll 

through the effects pre-set using the DSP SELECT control. 

When the Effects Display shows two straight lines through 

the center of each segment, the effects are turned off and 

the EFX ON switch is in the out position. See section num-

ber 31 below. 

29 - Effect PROGRAM List

This section identifies the ten banks of built-in DSP effects 

presets.  The first bank of 10 presets have been pro-

grammed with common effects for live performance, and 

the following banks are set up in groups by the types of 

effects.

30- SELECT control knob 

The SELECT control knob is a continuously variable 

encoder, or tweaker, that allows you to call up one of 

the 100 built-in digital effects presets.  Simply rotate the 

SELECT knob to scroll through the preset programs using 

the Effects Display to choose the effect number you want.

31 – EFX ON switch

The EFX ON switch is used to turn the internal Digital 

Effect on and off. The effects are by-passed when the 

switch is in the out position and the Effects Display shows 

two dashes.

32 - AUX 1 RTN - Effects Return to Aux 1 control knob 

The AUX 1 RTN control is used to adjust the level of the 

effects from the built-in digital Multi-effect that’s being 

sent to the Aux 1 monitor bus.  This allows you to add the 

DSP effects to the signal in your monitor speakers. Turn 

this knob up if you want to hear the effect in the AUX 1 

monitor mix. 

33 - AUX 2 RTN - Effects Return Control 

The AUX 2 RTN control is used to adjust the level of the 

effects from the built-in digital Multi-effect being that’s 

being sent to the Aux 2 monitor bus.  This allows you to 

add the DSP effects to the signal in your monitor speak-

ers. Turn this knob up if you want to hear the effect in the 

AUX 2 monitor mix. 

34 - EFX SEND - Master Effect Send 

The master EFX SEND control is used to send the effect 

mix bus to an external effect device connected to the EFX 

OUT SEND jack.

35 - EFX RTN 1 PFL (Pre Fader Listen) - switch

The EXF RTN 1’s  PFL, or Pre Fader Listen switch allows you 

to listen, or “solo” the EFX 1 Return or group of channels 

in the headphones. When a stereo input channel’s PFL 

switch is pressed down, the EFX RTN 1 signal is assigned 

to the solo bus and can be heard in any optional head-

phones plugged in to the PHONES connector located in 

the front panel jack field. Since the signal is sent pre fader, 

you can hear the signal regardless of the position of the 

EXF RTN 1 volume Fader. This allows you to listen a EFX 

RTN 1 by itself: (let's say) to see if a reverb is long enough, 

or to cue up an echo without having to play it through 

the main PA.

36 – EFX RTN 1 FADER - Effects Level Control

The EFX RTN 1 fader control is used to adjust the level 

of the effects from the built-in digital Multi-effect  that’s 

being sent to the MAIN mix bus.  This allows you to hear 

the DSP effects in your MAIN speakers.

37 – TXM20’s Effect 2 control strip 

Same as functions 28 – 36 for DSP Multi-effects number 2.


ENGLISH

8

Summary of Contents for TXM20

Page 1: ...Powered Mixers 1000 WATT POWERED MIXERS WITH 24BIT DIGITAL EFFECTS...

Page 2: ...product Important Safety Instructions 1 Please read all instructions before operating the unit 2 Keep these instructions for future reference 3 Please heed all safety warnings 4 Follow manufacturers i...

Page 3: ...rre il rischio di incendio o di scariche elettriche non esponete questo apparecchio a pioggia o umidit Per ridurre il pericolo di scariche elettriche evitate di rimuoverne il coperchio o il pannello p...

Page 4: ...0 AUFNEHMEN 69 Subwoofer System mit MONO AUSGANG betreiben 69 TXM16 und TXM20 System Einrichtungen 70 TXM16 und TXM20 Verdrahtungsanleitung 72 Technische Daten 123 Blockdiagramm 126 ESPA OL Introducci...

Page 5: ...omes to monitor mixes The TXM16 and TXM20 will give you clean clear sound reproduction thanks to the high quality low noise microphone preamps super clean low impedance mix bus two on board 9 band gra...

Page 6: ...icrophone With the mixer s XLR connectors connecting standard low impedance dynamic mics is simple and con denser microphones are connected easily using the available 48 Volt Phantom Power Each of the...

Page 7: ...quency response is flat when the knob is in the 12 00 position Rotating the knob towards the right will boost the channel s high frequency response at 12 kHz by 15dB and rotating it towards the left w...

Page 8: ...al power amplifier For more information on the POWER AMP MODE switch see the section POWER AMP MODE Switch on page 12 in this manual 6 7 6 AUX2 PreFaderSendTXM16 PRE POSTTXM20 Each of the TXM16 and TX...

Page 9: ...lit MUTE switch allowing you to easily turn that chan nel on or off When MUTE switch is illuminated the channel is off conversely when the backlight is off the channel is on 12 PFL Pre Fader Listen sw...

Page 10: ...4 of this manual 18 AUX 1 Pre Fader Send Each of the TXM16 and TXM20 s stereo input channels include an AUX 1 send which controls the amount of that channel s signal that is sent to the AUX 1 Output...

Page 11: ...nals to the left and others to the right 24 MUTE switch The Stereo Input channels feature a large backlit MUTE switch allowing you to easily turn that channel on or off When the MUTE switch is illumin...

Page 12: ...tion and the Effects Display shows two dashes 32 AUX1RTN EffectsReturntoAux1controlknob The AUX 1 RTN control is used to adjust the level of the effects from the built in digital Multi effect that s b...

Page 13: ...ls in the headphones When the stereo input channel s PFL switch is pressed down that channel s sig nal is assigned to the solo bus and can be heard in any optional headphones plugged in to the PHONES...

Page 14: ...al up and down to prevent pops when the switch is turned on and off 48 PFL switch The CD TAPE input channel s PFL or Pre Fader Listen switch allows you to listen or solo the CD TAPE input in the headp...

Page 15: ...AK LED s illuminate when the signal from the MAIN mix is beginning to reach a level where distortion occurs If the PEAK lights stay on your mix is too hot and you need to lower the MAIN mix volume It...

Page 16: ...e switch The TXM16 and TXM20 have two internal power ampli fiers which can run in stereo or as two separate mono amplifiers Depending on the position of the MODE switch the amplifiers received their i...

Page 17: ...ider in the negative direction will cut that frequency by up to 12dB The response curve set using the Graphic Equalizer is also applied to the signal at the AUX 1 output 64 MONITOR EQ ON OFF switch Th...

Page 18: ...r Stereo Input Channels 1 4 inch and RCA Each of the TXM mixers has two sets of full featured stereo input channels Channels 9 10 and 11 12 on the TXM16 and Channels 13 14 and 15 16 on the TXM20 Use t...

Page 19: ...on TRS TIP RING SLEEVE jack for interfacing external effects processors on Left and Right MIX bus The signal is sent on the tip the Send and returns the Return on the sleeve of the connector M PHONES...

Page 20: ...ng a speaker to the BRIDGE jack use an 8 through 16 Ohm speaker CAUTION When using a bridge connection do not con nect anything to the AMP 2 jacks R AMP 1 Powered Speaker Outputs The AMP 1 output has...

Page 21: ...rallel to both the 1 4 inch jack and a Speakon connec tor of AMP1 and AMP 2 or a single speaker can be con nected to the BRIDGE jack bridge connection For each of these the required speaker impedance...

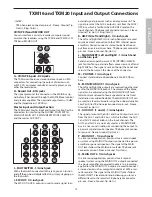
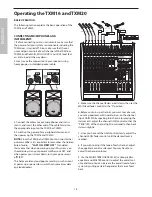
Page 22: ...operation of the TXM16 and TXM20 CONNECTING MICROPHONES AND INSTRUMENTS 1 Before connecting mics or instruments make sure that the power of all your system s components including the TXM mixer is tur...

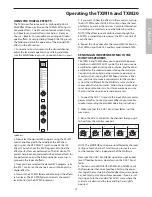
Page 23: ...raise the AUX 1 Send fader up until you get a good level If feedback occurs back down on the AUX 1 Send fader 4 You can use the MONITOR GRAPHIC EQUALIZER to cut the frequencies that cause feedback Set...

Page 24: ...tandard 1 4 inch insert Y cable connect the MAIN Insert to the Left input and output of a stereo com pressor like a Samson C com 16 or S com plus 2 Using another standard 1 4 inch insert Y cable conne...

Page 25: ...tem by engaging the SUBWOOFER ON OFF switch located in the MONO output strip When the SUBWOOFER ON OFF switch is pressed in the vari able Low Pass high cut filter is active Now you can use the FREQUEN...

Page 26: ...an exter nal power amp which is driving 2 monitor speakers For inputs four microphones are connected to channel 1 and 2 s low imped ance inputs and the output of the Bass Direct Box is also connected...

Page 27: ...ni tor speakers connected to POWER AMP 1 For inputs four microphones are connected to channel 1 and 2 s low imped ance inputs and the output of the Bass Direct Box is also connected to the Low Impedan...

Page 28: ...TING THE TXM16 and TXM20 There are several ways to interface the TXM16 and TXM20 to support a variety of applications The TXM16 and TXM20 feature balanced inputs and outputs so connecting balanced and...

Page 29: ...effets diff rents des groupes de voies ind pen dants Ces bus auxiliaires offrent galement une polyvalence in gal e pour les mixages de retour Les TXM16 et TXM20 permettent une reproduction sonore fid...

Page 30: ...t la connexion des micros dynamiques faible imp dance et l alimen tation fant me 48 V permet d utiliser des micros condensateur Chacune des voies micro ligne des TXM16 et TXM20 est quip e d un Jack d...

Page 31: ...hacun des filtres HF HAUTES FR Q Filtre Baxendall 15 dB 12 kHz La r ponse dans les hautes fr quences de la voie est plate lorsque ce bouton est r gl sur la position 12 00 Tournez ce bouton vers la dro...

Page 32: ...plus amples informations sur ce s lecteur consultez la section S lecteur POWER AMP MODE en page 36 6 7 6 AUX2 D partpr Fader TXM16 D partpr oupost Fader TXM20 Chacune des voies d entr e mono des TXM16...

Page 33: ...t r o sont quip es d une touche MUTE r tro clair e permettant de couper rapidement le signal de la voie La voie est coup e lorsque la touche MUTE est allum e De fa on inverse le signal de la voie est...

Page 34: ...1 D part pr Fader Chacune des voies d entr e st r o des TXM16 et TXM20 comporte un r glage AUX 1 servant d terminer le niveau du signal achemin la sortie AUX 1 Le signal ali mentant le d part AUX 1 e...

Page 35: ...d autres au c t droit 24 Touche MUTE Les voies d entr e st r o sont quip es d une touche MUTE r tro clair e permettant de couper rapidement le signal de la voie La voie est coup e lorsque la touche M...

Page 36: ...che est en position haute deux traits apparais sent alors sur l afficheur 32 BoutonAUX1RTN Retourdeseffets Le bouton AUX 1 RTN d termine le niveau des signaux trait s achemin s du processeur d effets...

Page 37: ...e Lorsque la touche PFL est en position basse la voie est assign e au bus Solo et isol e dans le casque optionnel connect l embase PHONES en face avant Comme le signal est pr Fader le niveau n est pas...

Page 38: ...offrant deux entr es micro La touche MUTE comporte un circuit lectronique permettant d viter que des bruits de pop ne se produi sent lorsque vous l enfoncez ou la rel chez 48 Touche PFL Cette touche...

Page 39: ...de la distorsion Lorsque les Leds PEAK demeurent allum es vous devez r duire le volume du bus de mixage principal car le niveau est trop lev Il n y a pas de probl me si les Leds PEAK s allument occasi...

Page 40: ...que l alimentation fan t me soit d sactiv e avant de connecter d connecter les micros 60 S lecteur Power Amp Mode Les TXM16 et TXM20 disposent de deux amplificateurs de puissance int gr s pouvant tre...

Page 41: ...se d termin e avec l galiseur graphique est galement appliqu e au signal d livr par la sortie AUX 1 64 Touche MONITOR EQ ON OFF La touche EQ ON OFF sert activer d sactiver l galiseur du mixage des ret...

Page 42: ...le d part et il est ren voy par la bague le retour du connecteur Entr es st r o Jacks 6 35 mm connecteurs RCA Les TXM sont quip es de deux voies d entr e st r o dis posant de toutes les fonctions soi...

Page 43: ...e corps le retour du connecteur M Embase PHONES Jack 6 35 mm Connectez votre casque st r o avec une imp dance comprise entre 60 et 600 Ohms cette embase N Sortie MONO SUB OUT Jack 6 35 mm Les signaux...

Page 44: ...te peut tre reli e au connec teur Speakon AMP 1 La charge d imp dance totale en mode Bridg doit tre sup rieure 8 Ohms L enceinte reli e au Jack BRIDGE doit offrir une imp dance comprise entre 8 et 16...

Page 45: ...AMP 1 et AMP 2 ou une seule enceinte peut tre reli e au Jack BRIDGE en mode bridg L imp dance des encein tes diff re pour chacune de ces configurations Rapportez vous aux sch mas suivants et assurez...

Page 46: ...TRUMENTS 1 Avant de connecter des micros ou des instruments veillez ce que tous les quipements de votre syst me incluant la console TXM soient hors tension Assurez vous galement que les r glages de vo...

Page 47: ...donc ind pendant du mixage principal Montez le Fader du d part AUX 1 pour obtenir un niveau convenable Baissez le lorsque du Larsen se produit 4 Utilisez l galiseur graphique MONITOR pour couper les...

Page 48: ...mpresseur st r o comme un Samson C com 16 ou S com plus en vous servant d un c ble d in sertion en Y standard muni de Jacks 6 35 mm 2 Reliez le connecteur MAIN Insert l entr e et la sortie droites du...

Page 49: ...ce faire appuyez sur la touche SUBWOOFER ON OFF situ e dans la voie de la sortie MONO Lorsque la touche SUBWOOFER ON OFF est en position basse le filtre passe bas ou coupe haut r glable est activ Vou...

Page 50: ...e la sortie POWER AMP 1 une autre la sortie POWER AMP 2 La sortie AUX OUT est reli e un ampli ficateur de puissance externe auquel sont reli s deux retours de sc ne Deux micros sont connect s aux ent...

Page 51: ...de puissance de la TXM16 est configur en mode MONO AUX1 Deux enceintes sont reli es la sortie POWER AMP 2 et deux retours de sc ne sont reli s la sortie POWER AMP 1 Deux micros sont connec t s aux ent...

Page 52: ...orps commun Signal Signal Masse Masse Pointe signal Corps masse Signal pointe Signal bague Masse Signal pointe Signal bague Masse Pointe signal Bague signal Corps masse TXM16 et TXM20 Guide de c blage...

Page 53: ...chwertigen rauscharmen Mikrofon Preamps dem super sau beren niederohmigen Mix Bus zwei internen grafi schen 9 Band EQs und einer Endstufe mit hoher Ausgangsleistung und geringer Verzerrung liefern der...

Page 54: ...l sse des Mischers lassen sich problemlos alle blichen niederohmigen Dynamikmikrofone und dank bereitstehender 48 Volt Phantomspannung Kondensatormikrofone anschlie en Jeder Mic Line Kanal des TXM16 u...

Page 55: ...en Frequenzgang des Kanals bei 12kHz um maximal 15dB verst rkt durch eine Linksdrehung werden die H hen um maximal 15dB bed mpft MF MID FREQUENCY VERST RKUNG BED MPFUNG Beim EQ des Mono Kanals dient d...

Page 56: ...des TXM16 und TXM20 ver f gt ber einen AUX 2 Send der den Signalanteil dieses Kanals steuert der zum AUX 2 Ausgang geleitet wird Da beim TXM16 das in Aux 2 eingespeiste Signal vor oder 6 7 PRE dem Kan...

Page 57: ...rundbeleuchteten MUTE Schalter mit dem sich dieser Kanal einfach ein und ausschalten l sst Bei leuch tendem MUTE Schalter ist der Kanal deaktiviert und bei ausgeschalteter Beleuchtung ist der Kanal ak...

Page 58: ...kanal des TXM16 und TXM20 verf gt ber einen AUX 1 Send der den Signalanteil dieses Kanals steuert der zum AUX 1 Ausgang geleitet wird Da das in Aux 1 eingespeiste Signal vor PRE dem Kanal Fader abgezw...

Page 59: ...verschieben 24 MUTE Schalter Die Stereo Eingangskan le verf gen ber einen gro en hintergrundbeleuchteten MUTE Schalter mit dem sich die ser Kanal einfach ein und ausschalten l sst Bei leuch tendem MU...

Page 60: ...gangen und auf dem Effekt Display zwei Striche angezeigt 32 AUX1RTN EffectsReturnaufAux1 Drehregler Mit dem AUX 1 RTN Regler stellen Sie den Effektpegel des internen digitalen Multieffekts ein der zum...

Page 61: ...PFL Taste eines Stereo Eingangskanals wird dieses Kanal signal dem Solo Bus zugeordnet Es kann dann ber alle optionalen Kopfh rer abgeh rt werden die an den PHONES Eingang des vorderseitigen Buchsen...

Page 62: ...ter f hrt um Pop Ger usche beim Ein Ausschalten zu ver meiden 48 PFL Schalter Mit dem PFL oder Pre Fader Listen Schalter des CD TAPE Eingangskanals k nnen Sie den CD TAPE Eingang in den Kopfh rern sol...

Page 63: ...en wenn das Signal der MAIN Mischung einen Pegel erreicht bei dem Verzerrungen auftreten Wenn die PEAK LEDs konstant leuchten ist Ihre Mischung zu stark ausgesteuert und Sie m ssen den MAIN Mix Pegel...

Page 64: ...sitzen zwei interne Endstufen die in Stereo oder als zwei separate Mono Amps betrieben werden k nnen Abh ngig vom MODE Schalter empfangen die Verst rker Ihre Eingangssignale vom MAIN AUX 1 oder AUX 2...

Page 65: ...ie negative Richtung bed mpft diese Frequenz um maximal 12dB Die mit dem grafischen EQ eingestellte Frequenzkurve wird auch auf das Signal am AUX 1 Ausgang angewandt 64 MONITOR EQ ON OFF Schalter Mit...

Page 66: ...Spitze gesendet Send und ber den Ring Return des Anschlusses zur ckgef hrt Stereo Eingangskan le 1 4 und Cinch Jeder TXM Mischer besitzt zwei Sets komplett ausges tatteter Stereo Eingangskan le Dies s...

Page 67: ...TIP RING SLEEVE Buchse zum Einschleifen von externen Effektprozessoren in den Left Right MIX Bus Das Signal wird ber die Spitze Send gesendet und ber den Schirm des Anschlusses Return zur ckgef hrt M...

Page 68: ...s d rfen Sie die AMP 2 Buchsen nicht belegen R AMP 1 Ausg nge mit Boxenspannung Der AMP 1 Ausgang ist mit einer 1 4 und Speakon Buchse ausger stet An diese Ausg nge mit Boxenspan TXM16 und TXM20 Eing...

Page 69: ...se von AMP 1 und AMP 2 anschlie en oder Sie k nnen nur eine Box an die BRIDGE Buchse gebr ckte Verbindung anschlie en F r jede Option ist eine andere Boxenimpedanz erforderlich Stellen Sie anhand des...

Page 70: ...M20 MIKROFONE UND INSTRUMENTE ANSCHLIESSEN 1 Bevor Sie Mikrofone oder Instrumente anschlie en m ssen alle Systemkomponenten inklusive TXM Mischer ausgeschaltet sein Stellen Sie ebenfalls sicher dass d...

Page 71: ...1 Send Fader hoch bis ein guter Pegel erreicht ist Falls Feedback entsteht schieben Sie den AUX 1 Send Fader etwas zur ck 4 Mit dem MONITOR GRAPHIC EQUALIZER k nnen Sie die Frequenzen bed mpfen die Fe...

Page 72: ...l mit dem linken Eingang und Ausgang eines Stereo Kompressors z B Samson C com 16 oder S com plus 2 Verbinden Sie den MAIN Insert ber ein weiteres stan dard 1 4 Insert Y Kabel mit dem rechten Eingang...

Page 73: ...nen Sie ber den MONO OUT des TXM16 und TXM20 ein Subwoofer Sys tem betreiben Bei gedr ckter SUBWOOFER ON OFF Taste ist das variable Low Pass oder High Cut Filter aktiviert Jetzt k nnen Sie mit dem FRE...

Page 74: ...ENDSTUFE 1 und eine Box mit ENDSTUFE 2 verbunden ist AUX OUT ist mit einer externen Endstufe verbunden die 2 Monitorboxen betreibt Bei den Eing ngen sind zwei Mikrofone an die niederohmigen Eing nge v...

Page 75: ...AUX1 Modus betrieben wobei zwei Boxen an ENDSTUFE 1 und zwei Monitorboxen an ENDSTUFE 2 ang eschlossen sind Bei den Eing ngen sind zwei Mikrofone an die niederohmigen Eing nge von Kanal 1 und 2 anges...

Page 76: ...nal Ring Masse Masse Masse Masse Schirm Masse Schirm Masse Signal Spitze Signal Spitze Signal Ring Signal TXM16 und TXM20 Verdrahtungsanleitung Asymmetrischer 1 4 Anschluss Verdrahtung XLR symmetrisch...

Page 77: ...s de monitorizaci n La TXM16 y TXM20 le ofrecen una reproducci n del sonido clara y limpia gracias a sus previos de micro de alta calidad y bajo nivel de ruidos buses de mezcla de baja impedancia los...

Page 78: ...conectores XLR de la mesa la conexi n de micros din micos de baja impedancia es sencilla y los micros condensadores se conectan tambi n de forma f cil usando la alimentaci n fantasma interna de 48 vol...

Page 79: ...kHz 15dB tipo estanter a La respuesta de AGUDOS del canal es plana cuando el mando est en la posici n de las 12 00 El giro a la derecha del mando realzar hasta en 15 dB la respuesta de frecuencia de a...

Page 80: ...a la etapa de potencia interna Para m s informaci n sobre el interruptor POWER AMP MODE vea la secci n Interruptor POWER AMP MODE en la p gina 84 de este manual 6 7 6 AUX2 PreFaderSendTXM16 PRE POSTT...

Page 81: ...canales de entrada mono disponen de un gran interruptor MUTE retroiluminado que le permite activar o desactivar esta funci n en ese canal Cuando est encendido el interruptor MUTE el canal est desactiv...

Page 82: ...trada stereo del TXM16 y TXM20 incluyen un env o AUX 1 que controla la cantidad de se al de ese canal que es enviada a la salida AUX 1 La se al que pasa a Aux 1 es enviada antes de o pre fader de cana...

Page 83: ...s de entrada a la izquierda y otras a la derecha 24 Interruptor MUTE Los canales de entrada stereo disponen de un gran interruptor MUTE retroiluminado que le permite activar o desactivar esta funci n...

Page 84: ...Cuando el interruptor est en la posici n de no pulsado los efectos estar n anulados y en la pantalla de efectos aparecer n dos guiones 32 AUX1RTN ControlderetornodeefectosaAux1 Se utiliza para ajusta...

Page 85: ...est en la posici n de pulsado la se al de ese canal es asignada al bus solo y puede ser escuchada a trav s de unos auriculares conectados a la toma PHONES del panel frontal Dado que la se al es enviad...

Page 86: ...l para evitar los petardeos que podr an producirse al activar o desactivar esta funci n 48 Interruptor PFL El interruptor PFL del canal de entrada CD TAPE le permite escuchar la entrada CD TAPE a trav...

Page 87: ...la PRINCIPAL llegue a un nivel en el que empiece a distorsionar Si el indicador PEAK se queda encendido fijo su mezcla ser demasiado activa y tendr que reducir el volumen de la mezcla PRINCIPAL No hay...

Page 88: ...onecte micr fonos 60 Interruptor Power Amp Mode El TXM16 y el TXM20 tienen dos etapas de potencia internas que pueden funcionar en stereo o como dos amplificadores mono independientes Dependiendo de l...

Page 89: ...desplaza hacia los valores negativos la cortar La curva de respuesta ajustada utilizando el ecualizador gr fico se aplica tambi n a la salida AUX 1 64 Interruptor MONITOR EQ ON OFF Este interruptor l...

Page 90: ...uelve a trav s del anillo retorno Canales de entrada stereo 6 3 mm y RCA Los mezcladores TXM tienen dos grupos de canales de entrada stereo totalmente equipados los canales 9 10 y 11 12 en el TXM16 y...

Page 91: ...nector env o y vuelve por el lateral retorno M PHONES toma de 6 3 mm Le permite conectar unos auriculares stereo standard con una impedancia entre 60 y 600 Ohmios N MONO SUB OUT toma de 6 3 mm Las sal...

Page 92: ...PRECAUCION Cuando utilice una conexi n en puente no conecte nada a las tomas AMP 2 R AMP 1 Salidas altavoz amplificado La salida AMP 1 tiene una toma de 6 3 mm y un conector Conexiones de entrada y sa...

Page 93: ...as tomas de 6 3 mm y Speakon de AMP1 o AMP 2 o puede conectar un nico altavoz a la toma BRIDGE conexi n en puente Para cada una de ellas la impedancia requerida para los altavoces ser diferente Consul...

Page 94: ...s del sistema incluyendo el propio mezclador TXM Compruebe tambi n que est n ajustados al m nimo el volumen y los controles de ganancia de cada canal del TXM16 o TXM20 as como los faders de nivel MAIN...

Page 95: ...uce realimentaci n reduzca el ajuste del fader AUX 1 Send 4 Puede utilizar el ECUALIZADOR GRAFICO DE MONITOR para cortar las frecuencias que produzcan realimentaci n Ajustar el ecualizador para conseg...

Page 96: ...CIPAL izquierda a la entrada y salida izquierda de un compresor stereo como el Samson C com 16 S com plus 2 Utilizando otro cable standard de inserci n de 6 3 mm en Y conecte la inserci n PRINCIPAL de...

Page 97: ...ma subwoofer activando el interruptor SUBWOOFER ON OFF colocado en la banda de salida MONO Cuando este interruptor est en la posici n de pulsado el filtro pasabajos variable de corte de agudos estar a...

Page 98: ...Caja directa Bajo Este sistema le muestra la etapa de potencia del TXM16 funcionando en el modo MAIN MAIN con un altavoz conectado a POWER AMP 1 y otro a POWER AMP 2 La salida AUX est conectada a una...

Page 99: ...clados Guitarra solista Caja directa Bajo Este sistema le muestra la etapa de potencia del TXM16 funcionando en el modo MONO AUX1 con dos altavoces conectados a POWER AMP 2 y dos monitores conectados...

Page 100: ...derecho Se al Se al Punta se al Punta se al Masa Masa Masa Masa Lateral masa Lateral masa Se al punta Se al punta Se al anillo Se al anillo Anillo se al Gu a de cableado de la TXM16 y TXM20 Conector n...

Page 101: ...no estremamente fles sibili anche per quanto riguarda il mix per i monitor Il TXM16 ed il TXM20 saranno in grado di fornirvi una riproduzione sonora chiara e pulita grazie ai preamplificatori microfon...

Page 102: ...di microfoni stan dard a bassa impedenza semplice e data la presenza dell Alimentazione Fantasma a 48 Volt anche il collegamento di microfoni a condensato re altrettanto facile Ognuno dei canali mic...

Page 103: ...ndolo verso destra si esal ta la risposta del canale sugli acuti a 12 kHz fino a 15dB ruotandolo verso sinistra la si attenua fino a 15dB MF MID FREQ MEDI ESALTAZIONE ATTENUAZIONE Quando si usano gli...

Page 104: ...del MODO DI AMPLIFICAZIONE POWER AMP MODE fate riferimento alle informazioni nell apposito paragrafo a pagina 108 di questo manuale 6 7 6 AUX 2 Mandata Pre Fader TXM16 PRE POST TXM20 Ognuno degli Ing...

Page 105: ...li di Ingresso Mono dispongono di un ampio inter ruttore di MUTE retroilluminato che permette di accender li e spegnerli facilmente Quando l interruttore di MUTE acceso il canale spento al contrario q...

Page 106: ...one di quattro bus ausiliari Per far funzionare il mixer correttamente importante comprendere il concetto di mandata Pre e POST fader Per ulteriori informazioni sulle mandate ausi liarie Pre e Post fa...

Page 107: ...ollo di BILANCIAMENTO Il controllo di BILANCIAMENTO del TXM16 e del TXM20 lo si usa per posi zionare il segnale stereo nel bus di MIX di Destra e Sinistra possibile creare immagini stereo posizionando...

Page 108: ...AUX 1 RTN Controllo di Ritorno Effetti all Aux 1 Il controllo AUX 1 RTN permette di regolare il livello degli effetti inviati dal Multieffetto digitale interno al bus di monitor Aux 1 Questo permette...

Page 109: ...ppo di cana li Quando questo interruttore PFL premuto il segnale del canale viene assegnato al bus di solo e lo si pu ascol tare in una qualsiasi cuffia opzionale collegata alla presa PHONES tra le pr...

Page 110: ...venire schiocchi quando lo si accende o spegne 48 Interruttore PFL Il tasto di PFL Pre Fader Listen Preascolto dell Ingresso CD TAPE NASTRO permette di ascoltare in cuffia ovvero di mettere in solo l...

Page 111: ...a raggiun gere il livello al quale interviene distorsione Se le luci di PICCO rimangono accese il livello del mix troppo alto e bisogna abbassare il volume di mix PRINCIPALE Va bene che le luci di PIC...

Page 112: ...mixer assicuratevi che il fader del Livello PRINCIPALE sia completamente chiuso Inotre quando collegate o staccate un microfono accertatevi che l Alimentazione Fantasma sia SPENTA 60 Selettore di MODO...

Page 113: ...ente fino ad un massimo di 12dB spostandoli nella direzione negativa la si attenua fino ad un massimo di 12dB La risposta in frequenza scel ta usando l Equalizzatore grafico viene applicata anche al s...

Page 114: ...o di proces sori effetti esterni Il segnale viene inviato dalla punta la Mandata e ritorna sull anello il Ritorno del connettore INGRESSI DEI CANALI STEREO 1 4 e RCA Ognuno dei mixer TXM dispone di un...

Page 115: ...a e Ritorno su prese TRS TIP RING SLEEVE PUNTA ANELLO CORPO per l inter facciamento di processori effetti esterni sul bus di MIX Sinistro e Destro Il segnale viene mandato sulla punta la Mandata e rit...

Page 116: ...cite Amplificate Le uscite AMP 1 dispongono di connettori jack da 1 4 e Speakon e quando si usa il TXM16 o il TXM20 nel modo in stereo sono le uscite amplificate da usare per il colle gamento delle ca...

Page 117: ...ttore jack da 1 4 che Speakon di AMP 1 e di AMP 2 oppure collegando una singola cassa acustica alla presa BRIDGE collegamento a ponte Per ognuno di questi tre modi differente l impedenza richiesta per...

Page 118: ...MICROFONI E STRUMENTI 1 Prima di collegare microfoni o strumenti assicuratevi che tutti i componenti del vostro sistema incluso il mixer TXM siano spenti Accertatevi anche che i controlli di volume e...

Page 119: ...Livello della Mandata Generale AUX 1 fino ad ottenere un buon livello Se c feedback abbassate il Fader della Mandata AUX 1 4 Potete usare l EQUALIZZATORE GRAFICO per i MONI TOR per eliminare le frequ...

Page 120: ...di Destra all ingresso e all uscita di Destra di un compressore stereo come il C com 16 o l S com plus Samson 3 Seguite poi le istruzioni del manuale d uso del com pressore per regolare correttamente...

Page 121: ...ndo l in terruttore SUBWOOFER ON OFF che si trova nella striscia della uscita MONO Quando l interruttore SUBWOOFER ON OFF premuto diventa attivo il filtro regolabile Passa basso ovvero di esclusione d...

Page 122: ...1 ed un altra cassa acustica collegata all USCITA AMPLIFICATA AMP 2 L Uscita AUX 1 collegata ad un finale di potenza esterno che alimenta 2 casse moni tor Per gli ingressi ci sono quattro microfoni c...

Page 123: ...tiche collegate all USCITA AMPLIFICATA AMP 1 e due casse monitor collegate all USCITA AMPLIFICATA AMP 2 Per gli ingres si ci sono quattro microfoni colle gati agli ingressi a bassa impeden za dei cana...

Page 124: ...e Massa Massa Corpo massa Punta segnale Corpo massa Massa Massa Segnale punta Segnale anello Anello segnale Segnale punta Segnale anello TXM16 e TXM20 Guida al Cablaggio Connettore Sbilanciato da 1 4...

Page 125: ...24dB TAPE IN to MAIN OUT Crosstalk 1KHz 70dB adjacent input 70dB input to output Input Channel Equalization Mono Channel HIGH 12KHz shelving 15dB Maximum MID variable 100 Hz to 8kHz peaking 15dB Maxi...

Page 126: ...entre entr e IN LINE et sorties MAIN OUT MONITOR OUT 16 dB entre entr e AUX IN et sortie MAIN OUT 24 dB entre entr e TAPE IN et sortie MAIN OUT Diaphonie 1 kHz 70 dB entre entr es adjacentes 70 dB ent...

Page 127: ...TAPE IN auf MAIN OUT bersprechen 1kHz 70dB Nachbareingang 70dB Eingang auf Ausgang Eingangskanal EQ Mono Kanal HIGH 12kHz Shelving 15dB Maximum MID variabel 100 Hz bis 8 kHz Peaking 15dB Maximum LOW 8...

Page 128: ...rosstalk 1 kHz 70 dB entrada adyacente 70 dB entrada a salida Ecualizaci n canal de entrada Canal mono HIGH 12 kHz tipo estanter a 15 dB m ximo MID variable de 100 Hz a 8 kHz tipo pico 15 dB m ximo LO...

Page 129: ...PE IN a MAIN OUT Intermodulazione a 1KHz 70dB tra ingressi adiacenti 70dB da ingresso a uscita Equalizzazione di Canale in ingresso Canale Mono ACUTI 12KHz a gradino Massimo 15dB MEDI variabile tra 10...

Page 130: ...126 Block Diagram...

Page 131: ......

Page 132: ...Samson Technologies Corp 45 Gilpin Avenue Hauppauge New York 11788 8816 Phone 1 800 3 SAMSON 1 800 372 6766 Fax 631 784 2201 www samsontech com...

Reviews: