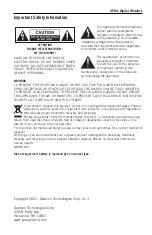
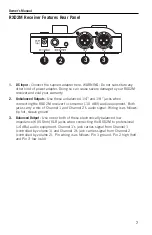
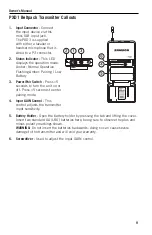
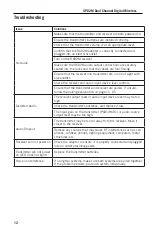
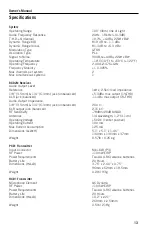
background image

Owner’s Manual

7

1.  DC Input -

 Connect the suplied adapter here. WARNING: Do not substitute any 

other kind of power adapter. Doing so can cause severe damage to your RXD2M 
receiver and void your warranty.

2.  Unbalanced Outputs -

 Use these unbalanced 1/4” and 1/8” jacks when 

connecting the RXD2M receiver to consumer (-10 dBV) audio equipment. Both 
jacks carry a mix of Channel 1 and Channel 2’s audio signal. Wiring is as follows: 
tip hot, sleeve ground

3.  Balanced Output -

 Use one or both of these electronically balanced low 

impedance (600 Ohm) XLR jacks when connecting the RXD2M to professional 
(+4 dBu) audio equipment. Channel 1’s jack carries signal from Channel 1 
(controlled by volume 1) and Channel 2’s jack carries signal from Channel 2 
(controlled by volume 2). Pin wiring is as follows: Pin 1 ground, Pin 2 high (hot), 
and Pin 3 low (cold)

RXD2M Receiver Features Rear Panel 

1

2

3

3

Summary of Contents for XPD2m

Page 1: ...XPD2m Digital Wireless System Owner s Manual...

Page 2: ...FIRE OR SHOCK HAZARD DO NOT EXPOSE THIS APPLIANCE TO RAIN OR MOISTURE TO PREVENT ELECTRICAL SHOCK MATCH WIDE BLADE PLUG TO WIDE SLOT AND FULLY INSERT Copyright 2021 Samson Technologies Corp v1 1 Samso...

Page 3: ...achments accessories specified by the manufacturer 12 Use only with the cart stand tripod bracket or table specified by the manufacturer or sold with the apparatus When a cart is used use caution when...

Page 4: ...om munications However there is no guarantee that interference will not occur in a particular installation If this equipment does cause harmful interference to radio or television reception which can...

Page 5: ...the instructions so that you can receive technical support and so that we can send you updated information about this and other Samson products in the future Also be sure to check out our website www...

Page 6: ...nd the VOLUME Power Control will illuminate white when powered on 2 PAIR button Press and hold for more than three seconds to enter pairing mode the READY LED will begin flashing NOTE the system is pa...

Page 7: ...oth jacks carry a mix of Channel 1 and Channel 2 s audio signal Wiring is as follows tip hot sleeve ground 3 Balanced Output Use one or both of these electronically balanced low impedance 600 Ohm XLR...

Page 8: ...batteries here being sure to observe the plus and minus polarity markings shown WARNING Do not insert the batteries backwards doing so can cause severe damage to the transmitter and will void your wa...

Page 9: ...wer Pair Switch Press 5 seconds to turn the unit on or off Press 5 seconds to enter pairing mode 4 Input GAIN Control This control adjusts the transmitter input sensitivity 5 Battery Holder Open the b...

Page 10: ...erformance meaning the performer using or wearing the transmitter can see the receiver 2 Connect the included power adapter to the RXD2M receiver before turning the power on Turn the RXD2M on momentar...

Page 11: ...both units light steadily indicating that the receiver and transmitter are paired and ready for operation figure 4 6 Turn on the connected amplifier or mixer but leave the PA system s volume at the mi...

Page 12: ...are paired If unsure follow the pairing explanation on page 11 5 Distorted Audio The receiver output level or audio input device level may be too high Check the transmitter s batteries and replace if...

Page 13: ...ut 1 THD XLR jack balanced 1 1dBu max output 1 THD Audio Output Impedance 1 8 3 5mm 1 4 6 3mm jack unbalanced 200 XLR output jack balanced 2 15 k RF Sensitivity 78dBm 20dB SINAD Antennas 1 4 wavelengt...

Page 14: ...Samson Technologies Corp 278 B Duffy Ave Hicksville New York 11801 Phone 1 800 3 SAMSON 1 800 372 6766 www samsontech com...

Reviews: