


3
ENGLISH
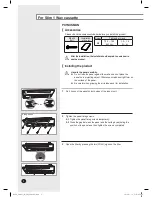
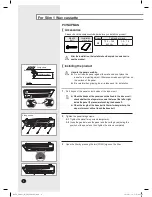
For Slim 1 Way cassette
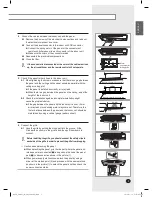
Connect the cables between the indoor unit and the panel.
4-1
Remove the 3 screws of the electrical component box and take out
the electrical component box cover.
4-2
Connect the panel connector to the indoor unit PCB connector.
Connect the swing motor of the panel or the connectors of
remote controller sensor to each connector of the indoor unit.
Make sure the colors of the connector match.
4-3
Reassemble the electrical component box.
4-4
Close the filter.
4
If the connector is disconnected or the color of the cables is mixed
up, the air conditioner and the remote control will not operate.
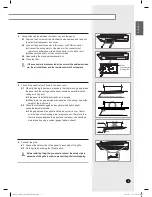
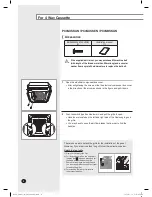
5
Make sure that there is no gap here.
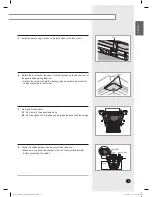
Connect the grille.
6-1
Connect the safety clips of the panel to each side of the grille.
6-2
Fix the grille by pushing the [Push] button.
6
Before installing the grille, you should connect the safety clips to
each side of the grille in order to prevent the grille from dropping.
Motor
connector for
driving grille
Check if the panel is firmly fixed to the indoor unit.
5-1
When tightening the screws, make sure that there is no gap between
the panel and the ceiling and the panel should be parallel with the
ceiling or ceiling joint.
If the panel is installed incorrectly, air may leak.
When there is a gap between the panel and the ceiling, adjust the
height of the indoor unit.
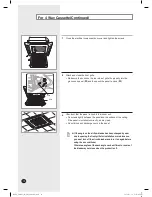
5-2
Check the installation again as incomplete installation might
cause the below problems.
If the gap between the panel and the indoor unit is over 15mm,
air may leak or condensing water may come out. Therefore, the
15mm distance between the panel and the indoor unit should be
maintained by using a vertical gauge (pattern sheet).
Air leak
Dirts
Dew
Make sure that there is no gap here.
NOTE
NOTE
NOTE
NOTE
3
NASA_PANEL_IM_EN_03683A(1).indd 3
2013-01-14 오후 8:35:33


