background image

7

ENGLISH

7

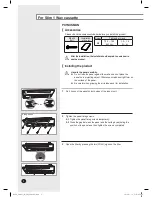
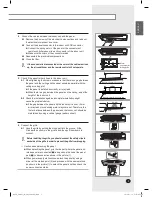
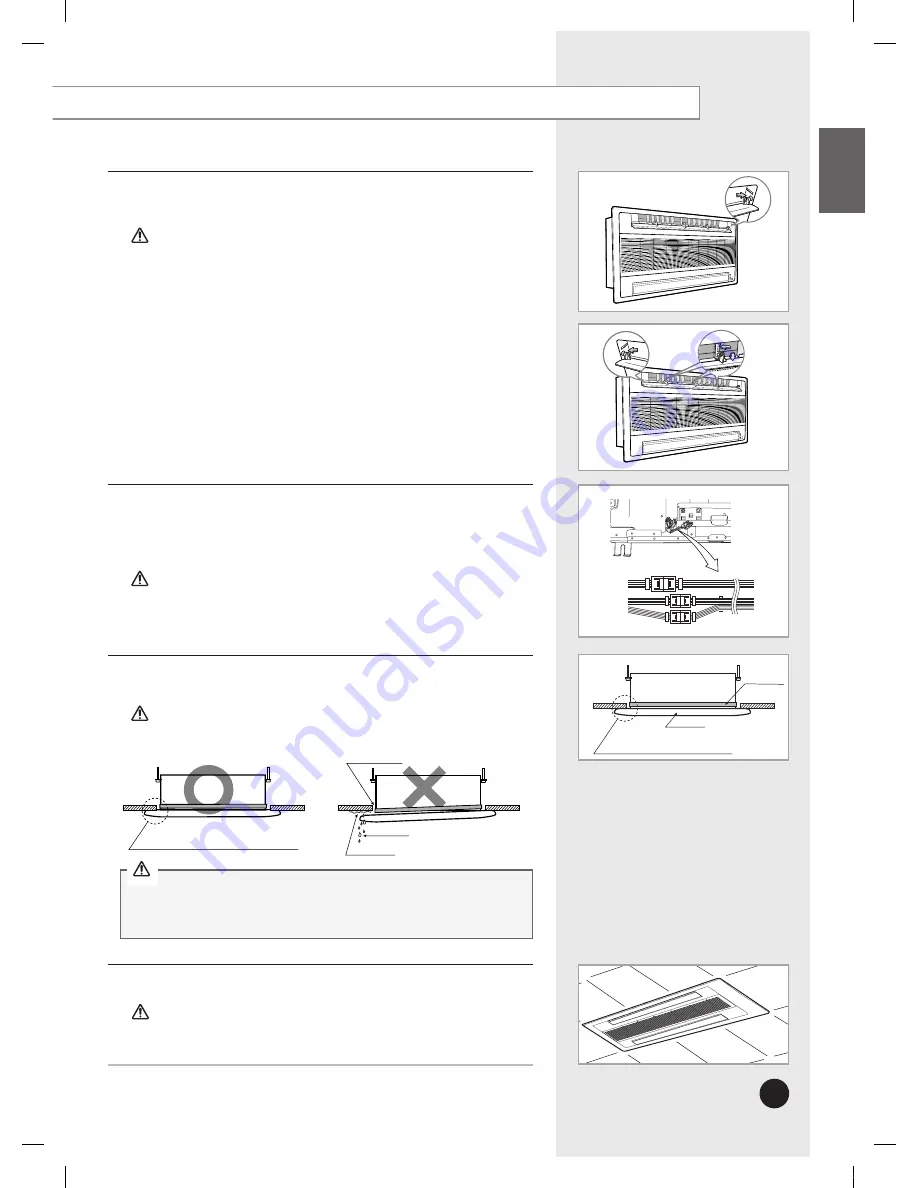
Install the air flow blade.

5-1

  Fix the right part of the blade to the indoor unit.

5-2

  Fix the other side of the blade.

5-3

  Fix the middle part of the blade by pushing slightly the middle tab 


 in the indoor unit.

5

If the direction is incorrect, the blade will not be inserted smoothly. 
Check that prominence of the right side has a small rectangular 
groove.

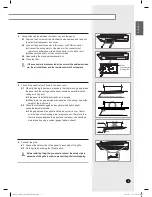
Connect cables between the electrical component box and panel.

6-1

  Detach 2 screws from the electrical component box.

6-2

  Connect the connector of the panel to the electrical component box.

6-3

  Reassemble the electrical component box.

6

Be careful about the color of cables not so that they will be mixed up.
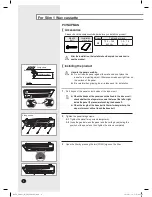
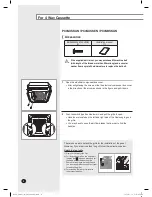
Indoor unit

Panel

Insulation

Must fit tightly against the 

ceiling without any gap.


If there is a gap between the panel and the ceiling, adjust the height of 

the indoor unit. Unless adjust the height, dew may form and drip from 

the gap.

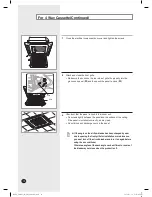
Check out that the panel is fixed to the indoor unit.

7-1

  Fix bolts tightly between the panel and the surface of the ceiling.

7-2

  Check it out not to cause air leaks.

7

If the panel is installed incorrectly, air may leak.

Do not close any discharge area of panel.

Air leaks

Dirts

Dew

Must fit tightly against the 

ceiling without any gap.

Reinstall the front grille in the reverse way.

8

CAUTION

CAUTION

CAUTION

CAUTION

CAUTION

For 2 Way Cassette

NASA_PANEL_IM_EN_03683A(1).indd   7

2013-01-14   오후 8:35:39

Summary of Contents for 1 way cassette type

Page 1: ...NASA_PANEL_IM_EN_03683A 1 indd 12 2013 01 14 오후 8 35 41 ...

Page 2: ...nk you for purchasing this Samsung product To receive more complete service please register your product at www samsung com register Panel 1 way 2 way 4 way cassette type IT FR ES EN PT DE EL DB68 03683A 1 AR RU NASA_PANEL_IM_EN_03683A 1 indd 13 2013 01 14 오후 8 35 41 ...

Page 3: ...nel carefully Do not lean the panel against the wall and do not place the panel on a projecting object Otherwise scratches might form on the surface of the panel Be careful when gripping the air intake panel for installation Hook Installing the product Please check the components below before you install the product Screw Tightening torque M4 12 0 15 0 kgf cm 1 2 1 5 N m M4x25 bolt Installation ma...

Page 4: ...installing the grille you should connect the safety clips to each side of the grille in order to prevent the grille from dropping Motor connector for driving grille Check if the panel is firmly fixed to the indoor unit 5 1 When tightening the screws make sure that there is no gap between the panel and the ceiling and the panel should be parallel with the ceiling or ceiling joint If the panel is in...

Page 5: ... gripping the air intake panel for installation Installing the product Please check the components below before you install the product M4x25 bolt Installation manual 4 After the installation the installer should explain to users how to use the product When the hooks of the panel cannot be fixed to the indoor unit check whether the step motor covers that are at the left or right inside the panel 2...

Page 6: ...k the installation again as incomplete installation might cause the problems below If the gap between the panel and the indoor unit is over 15mm air may leak or condensing water may come out Therefore the 15mm distance between the panel and the indoor unit should be maintained by using a vertical gauge pattern sheet Air leak Dirts Dew 5 Make sure that there is no gap here Make sure that there is n...

Page 7: ...between the ceiling and the panel 4 Remove the front grille 2 1 Remove the safety clips 2 2 Open the front grille about 45 and pull it forward 2 Open the front grille by pushing on both sides and center 1 For 2 Way Cassette M4x12 bolt M4x16 bolt Installation manual User s manual 6 Accessories PC2NUSMEN NASA_PANEL_IM_EN_03683A 1 indd 6 2013 01 14 오후 8 35 38 ...

Page 8: ...onent box 6 Be careful about the color of cables not so that they will be mixed up Indoor unit Panel Insulation Must fit tightly against the ceiling without any gap If there is a gap between the panel and the ceiling adjust the height of the indoor unit Unless adjust the height dew may form and drip from the gap Check out that the panel is fixed to the indoor unit 7 1 Fix bolts tightly between the...

Page 9: ...ch the front grille 1 Remove the safety clips first 2 Pull the green switch on the hinge part towards the sign and press and pull the hinge part to remove the grille There are two hinges on the grille and you must apply this step on both of them to remove the grille 3 For attaching the front grille reverse the procedure above There is no need to detach the grille for the installation of the panel ...

Page 10: ...e are electrical cables connected to that corner 4 Connect 3 cables between the indoor unit and the panel Make sure you check the number of pins on the two white terminal before connecting the cables 6 Fix the bolt to the panel 5 1 Fix 4 bolts to the panel temporarily 5 2 Fix them tightly not to make a gap between the panel and the ceiling 5 9 Groove Hook Panel White 11 PIN White 13 PIN Blue NASA_...

Page 11: ... of the ceiling If the panel is installed incorrectly air may leak Do not block any discharge vents in the panel 9 For 4 Way Cassette Continued Grille Hook NOTE If the angle on the air flow blades has been changed by user due to opening the front grille for installation or maintenance you must turn off the circuit breaker and turn it on again before using the air conditioner Otherwise angles of th...

Page 12: ...11 ENGLISH MEMO NASA_PANEL_IM_EN_03683A 1 indd 11 2013 01 14 오후 8 35 41 ...

Reviews: