background image

9

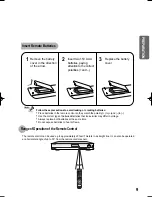
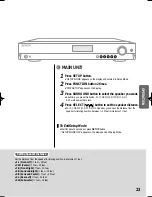
Insert Remote Batteries

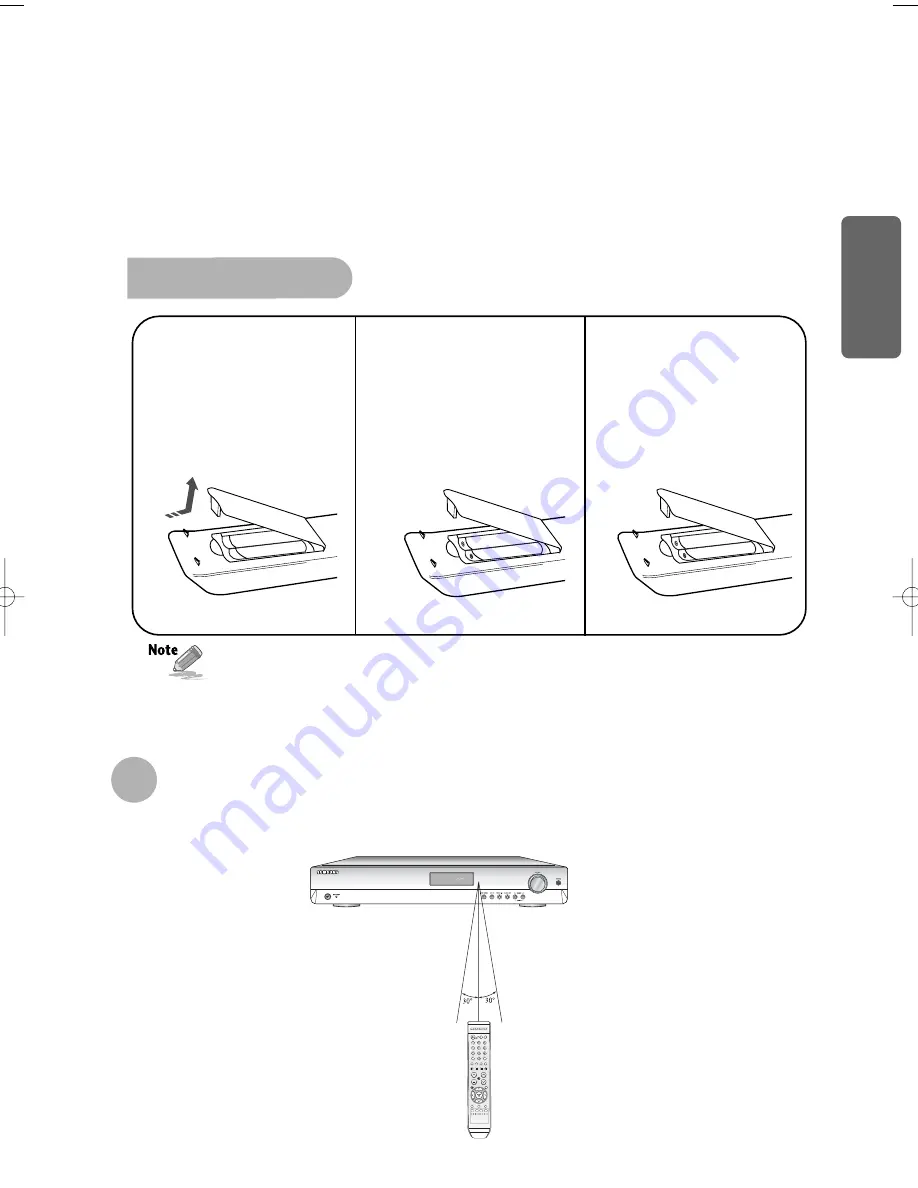
The remote control can be used up to approximately 23 feet/7 meters in a straight line. It can also be operated
at a horizontal angle of up to 30° from the remote control sensor.

Range of Operation of the Remote Control 

Remove the battery
cover in the direction
of the arrow.

1

Insert two 1.5V AAA
batteries, paying
attention to the correct
polarities (+ and –).

2

Replace the battery
cover.

3

Follow these precautions to avoid leaking or cracking batteries:

Place batteries in the remote control so they match the polarity:(+) to (+)and (–)to (–).

Use the correct type of batteries.Batteries that look similar may differ in voltage.

Always replace both batteries at the same time.

Do not expose batteries to heat or flame.

PREP

ARA

TION

AV-R610 XAC ENG-1  5/5/06 14:4212:0  Page 9

Summary of Contents for 2.0060510083255e16

Page 1: ...ELECTRONICS CANADA INC HEADQUARTERS 55 Standish Court Mississauga Ontario L5R 4B2 Canada TEL 1 905 542 3535 www samsung ca SERVICE DIVISION 55 Standish Court Mississauga Ontario L5R 4B2 Canada 1 800 SAMSUNG 1 800 726 7864 ...

Page 2: ...Instruction Manual Digital Surround AV Receiver System HT AS610 AV R610 ...

Page 3: ...LADE OF PLUG TO WIDE SLOT FULLY INSERT RISK OF ELECTRIC SHOCK DO NOT OPEN CAUTION TO REDUCE THE RISK OF ELECTRIC SHOCK DO NOT REMOVE REAR COVER NO USER SERVICEABLE PARTS INSIDE REFER SERVICING TO QUALIFIED SERVICE PERSONNEL CAUTION Note to CATV system installer This reminder is provided to call the CATV system installer s attention to Section 820 40 of the NEC which provides guidelines for proper ...

Page 4: ... a long period of time Protect the player from moisture i e vases and excess heat e g fireplace or equipment creating strong magnetic or electric fields i e speakers Disconnect the power cable from the AC supply if the player malfunctions Your player is not intended for industrial use Use of this product is for personal use only Condensation may occur if your player or disc have been stored in col...

Page 5: ...r Systems DTS play backs 5 1 channel sound with less compression than Dolby Digital for richer sound Features Digital AV Receiver This product is a pure digital AV receiver that performs digital signal processing to minimize signal distortion and loss SFE Sound Field Effect Using 24bit Audio DSP Provides more realistic surround sound with normal stereo audio sources ...

Page 6: ... 20 Setting the Speaker Listening Distance 22 Setting Digital Input 24 Setting DRC Dynamic Range Compression 25 Test Tone 26 Setting Speaker Level 28 Dolby Pro Logic ll Mode 30 Dolby Pro Logic ll Effect 32 SFE Mode 34 Stereo Mode 36 RADIO OPERATION Listening to Radio 38 Presetting Radio Stations 39 MISCELLANEOUS Convenient Functions 40 Operating TV with Remote Control 42 Operating your VCR DVD wit...

Page 7: ...n FUNCTION button SURROUND button VOLUME CONTROL INPUT MODE button SPEAKER INDICATOR DOLBY PRO LOGIC II INDICATOR RADIO BROADCASTING RECEIVING INDICATOR RADIO STEREO INDICATOR DIGITAL INDICATOR RADIO FREQUENCY INDICATOR DTS INDICATOR LIVE SURROUND INDICATOR L PCM INDICATOR DOLBY DIGITAL INDICATOR FRONT DISPLAY DOLBY INDICATOR ...

Page 8: ...PUT JACK VCR VIDEO OUTPUT JACK FRONT SPEAKER TERMINALS SUBWOOFER SPEAKER TERMINALS Rear Panel CD AUDIO INPUT JACKS DVD AUDIO INPUT JACKS VCR SAT AUDIO INPUT JACKS VCR AUDIO OUTPUT JACKS SUBWOOFER OUTPUT JACKS 1 2 PREPARATION DVD VIDEO INPUT JACK CENTER SPEAKER TERMINALS SURROUND SPEAKER TERMINALS Accessories œœ Remote Control FM Antenna User s Manual AM Antenna ...

Page 9: ...VEL button SPK DISTANCE button EXTERNAL DEVICE PLAYBACK button CUSOR ENTER button TV button AMP button DVD button VCR button DIMMER button TV VIDEO FUNCTION button CD button VCR SAT button DVD button DRC button INPUT MODE DIGITAL button INPUT MODE ANALOG button TUNER MEMORY button MODE button TUNING MODE button TUNER CHANNEL button SPK SELECT button TEST TONE button Remote Control EFFECT button ...

Page 10: ...ver in the direction of the arrow 1 Insert two 1 5V AAA batteries paying attention to the correct polarities and 2 Replace the battery cover 3 Follow these precautions to avoid leaking or cracking batteries Place batteries in the remote control so they match the polarity to and to Use the correct type of batteries Batteries that look similar may differ in voltage Always replace both batteries at t...

Page 11: ...hese speakers in front of your listening position facing inwards about 45 toward you Place the speakers so that their tweeters will be at the same height as your ear Align the front face of the front speakers with the front face of the center speaker or place them slightly in front of the center speakers Front Speakers It is best to install it at the same height as the front speakers You can also ...

Page 12: ...d the gray wire into the red terminal If more bass is desired you can connect an additional active subwoofer not supplied to the Subwoofer 1or 2 port Since the signal on the Subwoofer 1and 2 ports is not stereo you will hear the same mono bass sound regardless of the port you connect to Never touch speaker terminals while the power is on Doing so could result in electric shock Make sure the polari...

Page 13: ...t be sure to turn off the power and disconnect the power cord Connecting Video Component Video Projector Disconnect the power plug from the outlet if you will not use this unit for a long period of time In a DVD CD player you can select one digital audio input from OPTICAL and COAXIAL ...

Page 14: ... there is a Digital Out for the satellite cable STB it can be connected to the SAT Optical connector on the rear panel to provide multi channel surround If there is no Digital Out connector on the STB connect the Analog Audio Out connector to the VCR SAT Audio In on the unit If the external component has only one Audio Output jack connect it to either the right or left Audio Input jack of the main...

Page 15: ...14 Connecting External Components CD Player Before moving or installing the product be sure to turn off the power and disconnect the power cord Connecting Audio Component ...

Page 16: ...g fan is activated automatically to supply cool air to the unit Please observe the following cautions for your safety Make sure the unit is well ventilated If the unit has poor ventilation the temperature inside may rise and cause damage to it Do not obstruct the cooling fan or ventilation holes If the cooling fan or ventilation holes are covered with a newspaper or cloth heat may build up inside ...

Page 17: ...nit This unit will be turned on or set to Standby mode 2 MAIN UNIT REMOTE CONTROL You can operate your AMP TV DVD VCR with one remote control See pages 42 45 for more details Press the POWER button of the remote control This unit will be turned on or set to Standby mode Before Using the AV Receiver Turning On Off ...

Page 18: ...press the this button FM AM DVD VCR SAT CD will be selected in turn Method 1 Method 2 Press the FUNCTION button Each time you press the this button FM AM DVD VCR SAT CD will be selected in turn Press CD VCR SAT DVD or TUNER button You can directly select CD VCR SAT DVD or TUNER OPERATION ...

Page 19: ...MOTE CONTROL For DVD Function Press the INPUT MODE DIGITAL button DVD OPTICAL or COAXIAL will be selected Press the INPUT MODE ANALOG button DVD ANALOG will be selected For CD Function Press the INPUT MODE DIGITAL button CD OPTICAL or COAXIAL will be selected Press the INPUT MODE ANALOG button CD ANALOG will be selected or or ...

Page 20: ... INPUT MODE button CD OPTICAL or COAXIAL and CD ANALOG will be selected repetitively You can enjoy Dolby Digital only if you connect the Digital Audio Output jack of an external audio component to the optical coaxial Digital Audio Input jack on the main unit The digital input mode is set to either OPTICAL or COAXIAL depending on the setting of SETUP DIGITAL IN ...

Page 21: ...u press this button F SPK C SPK S SPK SW SPK CROVR SPK MODE OFF will be selected in turn Press button to set the speaker mode To Exit Setup Mode Wait for about 5 seconds or press the SPK SELECT button of the remote control to select SPK MODE OFF To turn the SUBWOOFER On or Off Press SUBWOOFER button Each time you press this button SW SPK YES SW SPK NO will be selected in turn If you play in 2 Chan...

Page 22: ...display and exits Setup Mode LARGE Select when you use large speaker You can listen to full range sound SMALL Select this when you use small speaker Bass below 100Hz will not be output NONE Select this when you use no speaker YES Subwoofer Select this when you use Subwoofer Speaker NO Subwoofer Select when you do not use Subwoofer Speaker CROVR Select the crossover frequency for the best bass resp...

Page 23: ...er distance For F L CEN F R S W S R S L Speaker you can set the distance from the speaker to listening position between 1 30 feet in intervals of 1 feet To Exit Setup Mode Wait for about 5 seconds or press the SPK DISTANCE button of remote control to select DIST OFF If the listening position is beyond the range of speaker distance setup when you place the speaker set the speaker distance to the ma...

Page 24: ...p Mode Press FUNCTION button 2 times DIST SETUP appears on the display Press SURROUND button to select the speaker you want Each time you press this button F L CEN F R S R S L S W will be selected in turn Press SELECT button to set the speaker distance For F L CEN F R S W S R S L Speaker you can set the distance from the speaker to listening position between 1 30 feet in intervals of 1 feet Settin...

Page 25: ...s DIGITAL IN appears on the display Press SURROUND button to select the DVD or CD function Each time this button DVD CD will be selected in turn Press SELECT button to set the digital input Each time you press this button OPTICAL COAXIAL will be selected in turn MAIN UNIT 1 2 3 4 To Exit Setup Mode Wait for about 5 seconds or press SETUP button SETUP MODE OFF appears on the display and the unit ex...

Page 26: ...D appears on the display Press SELECT button to set DRC Each time you press this button DRC STD DRC MAX DRC MIN will be selected in turn To Exit Setup Mode Wait for about 5 seconds or press SETUP button SETUP MODE OFF appears on the display and the unit exits Setup Mode STD Sets DRC effect to standard MAX Sets DRC effect to maximum MIN Sets DRC effect to minimum Setting DRC MAIN UNIT 1 2 3 Press D...

Page 27: ...n To Automatically Output Test Tone REMOTE CONTROL Press SETUP button SETUP MODE appears on the display and enters into Setup Mode Press FUNCTION button 5 times TEST T AUTO appears in the display Press SURROUND button Test signal will be automatically output as follows F L CEN F R S R S L S W During test signal output press SELECT button to adjust the speaker output level from 10 to 10 dB by 1 ste...

Page 28: ...N button 6 times TEST T MANU appears in the display Press SURROUND button Each time you press this button F L CEN F R S R S L S W will be selected in turn Press SELECT button to set the test tone as you want You can adjust the speaker output level from 10 to 10dB by 1 step The sound gets quieter at 10dB and louder at 10dB To Manually Output Test Tone MAIN UNIT 1 2 4 3 To Stop Test Tone Press SETUP...

Page 29: ... CEN F R S R S L S W SPK LVL OFF will be selected in turn Press button to set the speaker level you want You can adjust it from 10 to 10dB by 1 step The sound gets quieter at 10dB and louder at 10dB Default setting value is 00dB To Exit Setup Mode Wait for about 5 seconds or press SPK LEVEL button on the remote control to select SPK LVL OFF Remote Control 1 2 ...

Page 30: ...s SETUP button SETUP MODE appears on the display and enters into Setup Mode Press FUNCTION button 8 times LEVEL SETUP appears on the display Press SURROUND button Each time you press this button F L CEN F R S R S L S W will be selected in turn Press SELECT button to set to the speaker level you want You can adjust it from 10 to 10dB by 1 step The sound gets smaller at 10dB and louder at 10dB Defau...

Page 31: ... This mode provides 5 1 channel sound from 2 channel sources Press MODE button Each time you press this button CINEMA MATRIX GAME PROLOGIC MUSIC will be selected in turn To Exit Setup Mode Wait for about 5 seconds REMOTE CONTROL ...

Page 32: ...ss this button DPL ll SFE STEREO will be selected in turn Press SELECT button Each time you press SELECT button CINEMA MATRIX GAME PROLOGIC MUSIC will be selected in turn Each time you press SELECT button MUSIC PROLOGIC GAME MATRIX CINEMA will be selected in turn Dolby Pro Logic ll Mode To Exit Setup Mode Wait for about 5 seconds MAIN UNIT 1 2 OPERATION You cannot use Dolby Pro Logic ll Mode for m...

Page 33: ...this button C WIDTH DIMENSION PANORAMA DPL ll EFT OFF will be selected in turn Press button to select Dolby Pro Logic II effect you want C WIDTH You can set from 0 to 7 DIMENSION You can set from 7 to 7 PANORAMA You can Set it ON or OFF To Exit Setup Mode Wait for about 5 seconds or press Effect button of remote control to select DLP ll EFT OFF REMOTE CONTROL 1 2 3 ...

Page 34: ...h side wall imaging To Exit Setup Mode Wait for about 5 seconds or press SETUP button SETUP MODE OFF appears on the display and exits Setup Mode Press SETUP button SETUP MODE appears on the display and enters into Setup Mode Press FUNCTION button 10 times DPL ll MODE appears on the display Press SURROUND button Each time you press this button C WIDTH DIMENSION PANORAMA will be selected in turn Pre...

Page 35: ...ic place and you can feel live sound as if you are listening at actual site Press SFE MODE button Each time you press this button HALL THEATER ARENA CLUB DOME STADIUM CHURCH will be selected in turn To Exit Setup Mode Wait for about 5 seconds REMOTE CONTROL ...

Page 36: ...ected in turn Press SELECT button Each time you press Select button HALL THEATER ARENA CLUB DOME STADIUM CHURCH will be selected in turn Each time you press Select button CHURCH STADIUM DOME CLUB ARENA THEATER HALL will be selected in turn To Exit Setup Mode Wait for about 5 seconds MAIN UNIT 1 2 OPERATION ...

Page 37: ...t the left and right channels are played back in Stereo Mode Press STEREO button STEREO appears in the display and Stereo Mode is selected Press SURROUND button to select STEREO Each time you press this button DPL ll SFE STEREO will be selected in turn To Exit Setup Mode Wait for about 5 seconds To Exit Setup Mode Wait for about 5 seconds REMOTE CONTROL MAIN UNIT ...

Page 38: ...e Pro Logic II O O O O ANALOG L C R SL SR SW DTS ES DTS 5 1 O O O O DTS L C R SL SR SW DTS 96 24 DTS 5 1 O O O O DTS L C R SL SR SW DTS 5 1 DTS 5 1 O O O O DTS L C R SL SR SW L PCM Audio Neo 6 O O O L PCM L R Dolby D 2ch DD SFE O O O O DIGITAL L C R SL SR SW Dolby D 2ch Surr DD SFE O O O O DIGITAL L C R SL SR SW L PCM Audio SFE O O O O L PCM L C R SL SR SW Analogique SFE O O O O ANALOG L C R SL SR...

Page 39: ...y to increase or decrease frequency by step by step Press FUNCTION button to select FM or AM Select the frequency Automatic Tuning Press and hold TUNING button to automatically tune in frequency Manual Tuning Press TUNING button briefly to increase or decrease the frequency step by step To Listen to Mono Stereo Press MO ST button on the remote Each time you press this button STEREO MONO will be se...

Page 40: ... TUNER MEMORY button Tuner number will blink on the display Press TUNING CH button to select preset 2 You can select from presets 1 to 30 Press TUNER MEMORY button Tuner number will disappear and station 89 1 will be saved in preset 2 To preset other stations repeat steps 2 to 5 To Listen to Preset Station Press TUNING MODE button of the remote control to select the PRESET and press TUNING CH butt...

Page 41: ...n again changes the sleep time from what you have set earlier To Cancel Sleep Timer Press SLEEP button until SLEEP OFF appears on the display To Output Sound Again Press MUTE button again MUTE will disappear and sound will Output Press the MUTE button MUTE appears on the display This function is useful when answering a doorbell or telephone call Sleep Timer Function Mute Function REMOTE CONTROL RE...

Page 42: ...nit will turn automatically back on in 5 seconds Do not turn the volume up too high when you use headphones as It may damage your hearing Reset Function Using Headphone REMOTE CONTROL Press the DIMMER button Eachtimeyoupressthis thebrightnessofthedisplaywillbeadjusted You can adjust the brightness of the display Adjust the Display REMOTE CONTROL MISCELLANENOUS Using the RESET function will erase a...

Page 43: ... 2 Press POWER button to turn on the TV 3 Point the remote control toward the TV 4 While holding down POWER button enter the code corresponding to your brand of TV IfthecodematchestheTV scode theTVwillbeturnedoff IfthereismorethanonecodelistedforyourTVinthetable enter oneatatimetodeterminewhichcodeworks YoucanusetheTVPOWER VOLUME CHANNEL MENUand Numericbuttons 0 9 5 If TV is turned on or off when ...

Page 44: ... NIKEI 003 ONKING 003 ONWA 003 PANASONIC 006 007 008 009 054 066 067 073 074 PENNEY 018 PHILCO 003 015 017 018 048 054 059 062 069 090 PHILIPS 015 017 018 040 048 054 062 072 112 114 117 118 PIONEER 063 066 080 091 PORTLAND 015 018 059 PROTON 040 QUASAR 006 066 067 RADIOSHACK 017 048 056 060 061 075 RCA PROSCAN 018 059 067 076 077 078 092 093 094 REALISTIC 003 019 SAMPO 040 SAMSUNG 000 015 016 017...

Page 45: ... 3 Point the remote control toward the DVD VCR 4 While holding down POWER button enter the code corresponding to your brand of DVD VCR IfthecodematchestheDVD VCR scode theDVD VCR willbeturnedoff IfthereismorethanonecodelistedforyourDVD VCR in thetable enteroneatatimetodeterminewhichcodeworks IfyouoperateVCR pressVCRbuttontosettheremotetoVCRmode YoucanuseDVD VCR POWER VOLUME PLAY PAUSE STOP SKIP ME...

Page 46: ...Y 019 020 072 PENTAX 001 020 021 033 062 PHILCO 001 033 046 049 091 094 PHILIPS 001 030 033 049 050 066 091 PILOT 025 PIONEER 049 PORTLAND 011 QUASAR 001 033 049 067 091 107 108 RICO 036 RCA PROSCAN 001 020 021 031 032 033 049 051 062 066 070 091 104 REALISTIC 001 009 025 033 044 048 054 091 101 105 SAMSUNG 000 006 031 032 057 058 071 072 073 074 075 076 077 078 079 080 081 SANYO 008 009 046 048 0...

Page 47: ...electedtoStereo Refer to pages 10 11 to connect it properly Refer to pages 20 21 to select LARGE or SMALL Refer to pages 30 37 to select other Surround Modes Remote controller does not work There is no sound from surround speaker The sound from each device is changed during stereo playback Can t receive broadcasting Is AM or FM antenna connected properly Are the batteries exhausted Is the distance...

Page 48: ...t the digital input If PROTECTION appears on the display check whether speaker terminal is shorted and then turn on the device MISCELLANENOUS Product Protection Function Heat Protection Protection function works if the main unit is overheated or power transformer is overheated appears in the display when this function works If speaker terminal is shorted If speaker cord is shorted If there is no p...

Page 49: ...evel Frequency Response S N Ratio Usable Sensitivity Distortion Rated Output Front Speaker Left Right Center Speaker Surround Speaker Left Right Subwoofer Input Sensitivity Impedance S N Ratio Analog Input Separation 1KHz Analog Input Digital Input 96KHz PCM TV Format Input Level Impedance Output Level Impedance Video Frequency Response Component Video Frequency Response S N Ratio GENERAL FM TUNER...

Page 50: ...portation to and from the service centre is the customer s responsibility The original dated sales receipt must be retained by the customer and is the only acceptable proof of purchase It must be presented to the authorized service centre at the time service is requested Exclusions This warranty does not cover damage due to accident fire flood and or other acts of God misuse incorrect line voltage...

Reviews: