background image

YP-K3J

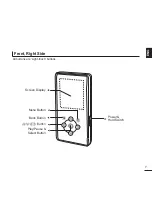
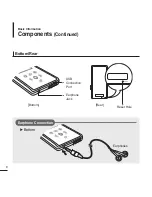
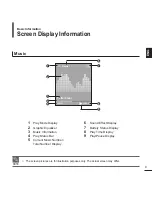
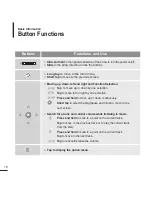
Summary of Contents for 2.0080218091405e16

Page 1: ...YP K3J ...

Page 2: ... your ears while using the earphone remove the earphone immediately and lower the volume To avoid a risk of traffic accident Do not use the earphones while you are driving a bicycle automobile or motorcycle It can cause a serious accident and furthermore is prohibited by law in some areas Using the earphones while walking in particular on a crosswalk can lead to a serious accident Take care not to...

Page 3: ...damage to the player Do not cause excessive impact on the player by dropping it Do not place heavy objects on top of the player Prevent any foreign particles or dust from entering into the player Always use the accessories provided by or approved by Samsung Do not spray water on the player Never clean the player with chemical substances such as benzene or thinner as it may cause fire electric shoc...

Page 4: ...PC 18 Adding Files Folders in Samsung Media Studio 20 Transferring Files to the Player with Samsung Media Studio 22 Chapter 3 Multimedia function Listening to Music 24 Listening to Music 24 Creating a Playlist Using Samsung Media Studio 28 To Play a Playlist 30 Using the Music Option Menu 31 Photo Viewing 34 Photo Viewing 34 Using the Photo Option Menu 36 Listening to FM Radio 37 Listening to FM R...

Page 5: ...tting Settings 44 Setting Display 44 Setting Time 46 Setting Language 48 Setting the System 49 Chapter 5 Troubleshooting To Upgrade Firmware 51 Troubleshooting 53 Chapter 6 Appendix Menu Tree 55 Product Specifications 56 ...

Page 6: ...s Basic Information 6 Checking the Accessories Design of accessories is subject to change for the purpose of improvement without notice Player Earphones Charger USB Cable Installation CD Neckstrape Carrying case ...

Page 7: ...7 ENG Front Right Side Power Hold Switch Screen Display Back Button Play Pause Select Button Menu Button Button All buttons are Light touch buttons ...

Page 8: ...8 Bottom Rear USB Connection Port Earphone Jack Reset Hole Components Continued Basic Information Rear Bottom Earphone Connection Bottom Earphones ...

Page 9: ...only The actual screen may differ Music Normal 1 Life is cool 002 020 00 02 20 1 2 3 4 5 6 7 8 9 1 Play Mode Display 2 Graphic Equalizer 3 Music Information 4 Play Status Bar 5 Current Music Number Total Number Display 6 Sound Effect Display 7 Battery Status Display 8 Play Time Display 9 Play Pause Display ...

Page 10: ...wn continuously Short tap to select the play pause and function move to the next screen Search for a track and control volume while listening to music Press and hold to scan to a point on the current track Tap to move to the previous track or to play the current track from the start Press and hold to scan to a point on the current track Tap to move to the next track Tap to reduce increase the volu...

Page 11: ... to operate the touch screen Otherwise touch screen may be damaged Do not tap on the touch screen if your fingers are not clean Do not tap on the touch screen with your gloves on Otherwise the button does not operate in any way Tap on touch screen with your fingertip ...

Page 12: ...the con verter s plug Make sure that the charger s plug is inserted all the way into the outlet Battery Charger Safety Basic Information CAUTION RISK OF ELECTRIC SHOCK DO NOT OPEN The uninsulated parts inside the charger could cause electric shock For your safety do not open the case of the charger Read this User Manual to prevent any problems that may occur while using the charger ...

Page 13: ...arge longer than 12 hours Do not plug several devices into the same outlet Do not use a charger that is defective When using the rechargeable battery for the first time or after several months of non use fully charge it first Overcharging will reduce the battery life The rechargeable battery is a consumable item and its capacity will decrease gradually To prolong the life of your battery use the f...

Page 14: ...ally turned off when none of the buttons have been tapped for a preset period of time Default 1 minute in the pause mode Page 46 NOTE NOTE Tap to move to the previous screen Press and hold to move to the main menu screen Playing Music 1 Press and hold to move to the main menu 2 Tap to select Music and then tap The Music Menu will appear 3 Use and to select a music file of your choice 4 Tap The mus...

Page 15: ...t In Hold mode all buttons are disabled This function is useful when you are walking or jogging 1 Slide the HOLD switch in the direction of the arrow 2 Slide the HOLD switch in the opposite direction of the arrow to release the Lock function Normal 1 Life is cool 002 020 00 02 20 Normal 1 Life is cool 002 020 00 02 20 ...

Page 16: ...ion occurs you can re initialize the system by pressing the Reset hole Press the Reset hole at the rear of the player with a pointed object such as a safety clip The system will be initialized Your settings and files will not be affected Reset Function Reset hole ...

Page 17: ...er installation is complete and Media Studio starts 1 Click Install now Installing Samsung Media Studio Use Media Studio to transfer music files from your PC to the player Loading Your Desired File Install the program on PCs running Windows XP after logging on with the Administrator account Please refer to the PC user manual on how to log on with the Administrator account CAUTION ...

Page 18: ...ired File Before you start Use the USB Cable provided when connecting the player to your PC 1 1 Connect the USB cable to the USB port on your PC 2 2 Connect the other end of the USB cable to the USB Connection Port on the bottom of the player ...

Page 19: ...X or higher Windows Media Player 10 0 or higher Resolution 1024 X 768 or higher PC Requirements CAUTION If you connect the player through a USB hub the connection may be unstable Please connect the player to your PC directly If you connect the player to your PC in the low battery condition the player automatically checks the battery status and charges itself for several minutes before connecting t...

Page 20: ...red File Please refer to Help for more information on how to use Media Studio Click MENU Help Help from the menu at the top of the Media Studio program Media Studio enables you to select and organize files and folders in preparation for transfer to your player 3 3 2 ...

Page 21: ...des file types ex TXT XOV etc other than music and photo files 3 Click Add Folder on the bottom of Media Studio The Open Folder window will appear Before you start Connect the player to your PC Media Studio must be installed on your PC To add folders 3 Click Add File on the bottom of Media Studio The Open window will appear 4 Select the files to add and click Open The selected files are added to t...

Page 22: ...ote CDDB Music Recognition ServiceSM CDDB is a registered trademark of Gracenote The Gracenote logo and logotype the Gracenote CDDB logo and logotype and the Powered by Gracenote CDDB logo are trademarks of Gracenote Music Recognition Service and MRS are service marks of Gracenote Perform the following steps to transfer files from your PC to the player 4 3 2 Portable window ...

Page 23: ...music and photo files 3 Select the file to transfer in the left file list Do not disconnect the USB cable during file transfer This may cause damage to the player or your PC CAUTION When transferring a photo file to the player using Media Studio it is automatically converted into JPG format before transfer The file size is automatically adjusted too A photo file that is transferred to the player w...

Page 24: ...ar Music Menu Now Playing You can see the current song Artists To play by artist Albums To play by album Tracks To play in numeric or alphabetical order Genres To play by genre Playlists To play by Playlist NOTE The music files compatible with the player are MP3 and WMA MP1 or MP2 files which only have a changed extension to MP3 may not play on the player 3 Tap to select Artists and then tap 1 2 3...

Page 25: ...ms for the artist will appear 5 Tap to select an album then tap The music files for the selected album will appear 6 Tap to select a music file to play then tap The music will start playing 4 5 6 Music Now Playing Artists Albums Tracks Genres Playlists ...

Page 26: ... NOTE Power is automatically turned off when none of the buttons have been tapped for a preset period of time Default 1 minute in the pause mode Page 46 To search within a track 1 Press and hold while the selected track is playing It searches to the beginning or the end of the track 2 Release the button at the point you want to start It starts playing from the point you release the button ...

Page 27: ...current track starts playing from the beginning To play the previous next track Tap within 3 seconds of play The previous track will start playing Tap The next track will start playing CAUTION When playing VBR files the previous track may not play even if you tap within 3 seconds of play ...

Page 28: ...the top of Media Studio The My Album window appears A playlist is a list of your favorite songs 2 Click New Album on the bottom The Creation window appears 3 Type in the album title and click OK A new album playlist will be created and stored in the My Album section of Media Studio 1 2 3 3 ...

Page 29: ...red album in the right window 4 Select files that you want to transfer in the My PC window 1 Click My Album on the top of Media Studio The My Album window appears 2 Click Portable in the right corner of the window The Portable window appears 3 Select a desired album in the My Album list 4 Click icon The selected album will be transferred to the player and stored in Music Playlists 5 Click icon The...

Page 30: ...old to move to the main menu 2 Tap to select Music and then tap The Music Menu will appear 3 Tap to select Playlists and then tap The Playlist s will appear If there is no playlist found you will see a message of No File on the screen 4 Tap to select the playlist of your choice then tap The music files saved in the selected playlist will appear 5 Tap to select a music file to play then tap The mus...

Page 31: ... B Dance Concert Hall or User Using the Music Option Menu Listening to Music Sound Effect Graphic EQ Play Mode Normal You can set 3D sound effect and bass enhancement 3D Bass Setting Classical Jazz Ballad Club R B Dance 1 Tap to select User and then tap The User menu appears 2 Tap to select 3D BASS and then tap The 3D BASS setting menu appears 3 Tap to move either to 3D or BASS Tap to select the d...

Page 32: ...B Dance 1 Tap to select User and then tap The User menu appears 2 Tap to select EQ and then tap The EQ setting menu appears 3 Tap to select the frequency you want to adjust Tap to adjust the selected frequency s level and then tap You can select one from 10 to 10 for EQ The confirmation window appears 4 Tap to select Yes or No and then tap The settings are completed 3D BASS EQ ...

Page 33: ...not be displayed on the screen Sound Effect Graphic EQ Play Mode Normal To select the play mode 1 Tap while listening to music The music option menu appears 2 Tap to select Play Mode and then tap The play mode menu appears 3 Tap to select the desired mode and then tap You can select either Normal Repeat One Repeat or Shuffle Normal To play all the tracks in order one time Repeat One To repeat one ...

Page 34: ...ode The slideshow will start You can view your picture files in order as a Slideshow 2 Tap to stop the slideshow Slideshow Viewing Tap You can see the previous or next photo on the display To view the previous next photo NOTE You will see thumbnail photos if the appropriate information is included in the file For a file with no information you will see instead Photo Viewing Photo Viewing Before yo...

Page 35: ...ears You can listen to the song that you last played while viewing your photo 2 Tap to select Background Music On or Background Music Off Background Music On You can listen to the song that you last played while viewing your photo Background Music Off No background music is played while viewing a photo NOTE Select Photo from Settings Display Screen Saver and the selected photo is displayed on the ...

Page 36: ...ption menu appears 2 Tap to select Zoom and then tap The Zoom Setting menu appears 3 Tap to select the desired scale factor and then tap You can select either 100 200 or 400 4 Tap to move to the portion of the photo to magnify 5 To cancel the magnification select 100 from the Zoom options and then tap This returns to the original size ...

Page 37: ... to move to the main menu 2 Tap to select FM Radio and then tap FM radio reception will start Tap while listening to the FM radio Sound is muted Tap once again to hear sound To use Mute function Always connect your earphones to the player when searching or setting frequencies The earphones are used as antennas to receive FM radio reception CAUTION FM Radio ...

Page 38: ... your saved FM presets one preset at a time 2 Tap to select Go to Manual Mode and then tap You will see Manual Mode on the screen NOTE If no preset frequencies are set you will see Preset list does not exist and the player will not switch to Preset Mode If you set Default Set the saved preset lists are deleted If you select Preset List on the FM option menu you will see the preset frequencies For ...

Page 39: ...tically search for frequencies Press and hold in Manual Mode The broadcast station frequency nearest from the point the button is released will be searched Tap in Manual Mode Moves to next frequency whenever the button is tapped Manual Mode Manual Mode ...

Page 40: ...Up to 30 presets are automatically saved Setting FM Presets Listening to FM Radio You can set up to 30 presets in FM Radio mode To cancel during setting Tap to cancel during auto scanning The auto preset setting is canceled and frequencies set up to then are stored Using Auto Preset deletes all previous presets NOTE Go to Preset Add Preset Auto Preset FM Sensitivity Manual Mode ...

Page 41: ...er Tap in Preset Mode The preset number is selected and you can listen to the stored radio frequency 4 To set a preset for other frequencies follow 1 3 steps above If a frequency that you try to add already exists in the list you will see This preset already exists and the selected frequency is not added to the preset list NOTE If you want to check the preset list in Preset Mode tap to select Pres...

Page 42: ...lect the preset frequency you want to delete and then tap The confirmation window will appear 4 Tap to select Yes and then tap The selected preset will be deleted 5 To select and delete other preset numbers follow 1 4 steps above To Delete Presets Listening to FM Radio 89 1MHz 89 2MHz 89 3MHz 89 4MHz Delete Preset ...

Page 43: ... Tap to select FM Sensitivity and then tap The FM Sensitivity menu appears 3 Tap to select the sensitivity and then tap You can select from High Middle and Low The higher FM sensitivity is the more frequencies that can be received Go to Preset Add Preset Auto Preset FM Sensitivity Manual Mode ...

Page 44: ...2 Tap to select Settings and then tap The Settings menu appears 3 Tap to select Display and then tap The Display menu appears 4 Use the and to set the desired functions Button Operation Tap to move up or down in the list Tap to select and confirm your settings Tap to return to the previous screen NOTE Display Time Language System Settings Settings ...

Page 45: ... saver image Display Off If no button is tapped within the time set shown below the screen display will automatically turn off Select either 15sec 30sec 1min 3min 5min and Always On With the display turned off tap any button to turn back on the screen display Screen Saver Setting Photo 15 sec 1 Tap to select Screen Saver and then tap The screen saver menu appears 2 Tap to select the desired screen...

Page 46: ...d then tap The Time menu appears 4 Use the and to set the desired functions Sleep Timer Turns off power automatically after the preset time Select either Off 15min 30min 60min 90min or 120min Auto Power Off Automatically turns power off when there is no button operation after the preset time in the pause mode Select either 15sec 30sec 1min 3min or 5min Time Set You can set the current time Page 47...

Page 47: ... select Time set and then tap 2 Tap to move to AM PM Hour Minute and use the to set the time 3 Tap The confirmation window will appear 4 Tap to select Yes and then tap The time setting will be saved Hour Min PM 06 35 Time Set ...

Page 48: ...Settings and then tap The Settings menu appears 3 Tap to select Language and then tap 4 Use the and to select the language for the menu Select from English Français Deutsch Italiano Español Magyar Nederlands Polski Português and Svenska The supported languages can be changed or added NOTE Display Time Language System Settings ...

Page 49: ...eleted or changed according to the target region of the player If you change the FM region the previously stored radio frequencies are deleted NOTE Resume You can set the start point where the player resumes playback after you stop playing the music Selecting On will resume playback from the last stopped point while Off will resume playback from the beginning of the last played file Beep Enables b...

Page 50: ...irmware version Memory Indicates the remaining memory capacity Used indicates the usage Remain indicates the remaining capacity and Total indicates the total memory capacity Files Music indicates the number of music files Photo for the number of photos and Total for the number of entire files If you set Default Set all functions you set are initialized to the default settings Regarding the Built I...

Page 51: ...hen the player page appears select Firmware below the model name to download the latest firmware 3 Uncompress the downloaded file onto your Desktop The uncompressed files will be displayed 4 Connect the player to your PC with the USB cable 5 Right click on the Start button on the bottom left of your PC s screen then choose Explore to Open Windows Explorer on your PC Samsung YP K3 is displayed in W...

Page 52: ...cting USB Cable the player will be turned off automatically 9 Slide and hold the HOLD switch in the opposite direction of the arrow The firmware will be upgraded When upgrading is complete the player will be turned off automatically NOTE Check the battery charge status of the player If the battery is not sufficiently charged the firmware will not be upgraded You need to have at least 20 MB of free...

Page 53: ...ry life differs from the Manual The battery time can vary depending on the sound mode and display setting The battery life may be shortened when left for extended periods in low or high temperatures Program Malfunction Connection to your PC is disabled Please check if your PC requirements are met Press Start on the toolbar of your PC to run Windows Update Select Key Updates and Service Packs then ...

Page 54: ... if the music file is damaged Check if there is enough battery power Check if the USB cable is securely connected Reconnect if necessary Check if the memory is full Press the Reset hole Check if the USB cable has been disconnected during file or data transmission If this is the case it may cause serious damage not only to files data but also to the player You have to be extra cautious as Samsung c...

Page 55: ... È º Display Music FM Radio Photo Settings Screen Saver Display Off Time Sleep Timer Auto Power Off Time Set Language System Resume Beep Volume Limit FM Region Default Set About Menu Tree You can quickly view the menu structure ...

Page 56: ... Rechargeable 500mAh Music MPEG1 2 2 5 Layer3 8kbps 320kbps 22kHz 48kHz WMA 48kbps 192kbps 22kHz 48kHz Image JPEG ISO IEC 10918 1 Annex F Sequential DCT based mode of operation 20mW 16 Ω 20Hz 20KHz 88 dB based on 1KHz 0 dB Music 25 hrs based on MP3 128kbps volume level 15 and normal mode 5 35 C 23 95 F Stainless Plastic 1 76 oz 50g 1 73 X 3 78 X 0 27 inches 44 X 96 X 6 95 mm 87 5 108 0MHz 50dB 1 3...

Page 57: ...ver any product unit other than this product unit and the license does not extend to any unlicensed product unit or process conforming to ISO IEC 11172 3 or ISO IEC 13818 3 used or sold in combination with this product unit The license only covers the use of this product unit to encode and or decode audio files conforming to the ISO IEC 11172 3 or ISO IEC 13818 3 No rights are granted under this l...

Page 58: ...n to and from the service centre is the customer s responsibility The original dated sales receipt must be retained by the customer and is the only acceptable proof of purchase It must be presented to the authorized service centre at the time service is requested Exclusions This warranty does not cover damage due to accident fire flood and or other acts of God misuse incorrect line voltage imprope...

Page 59: ... 0 If you have any questions or comments relating to Samsung products please contact the SAMSUNG customer care centre Samsung Electronics Canada Inc Customer Service 1 800 SAMSUNG 7267864 www samsung com ca ...

Reviews: