background image

1

EnG

  c

O

nn
E

c

T

iO

n

S

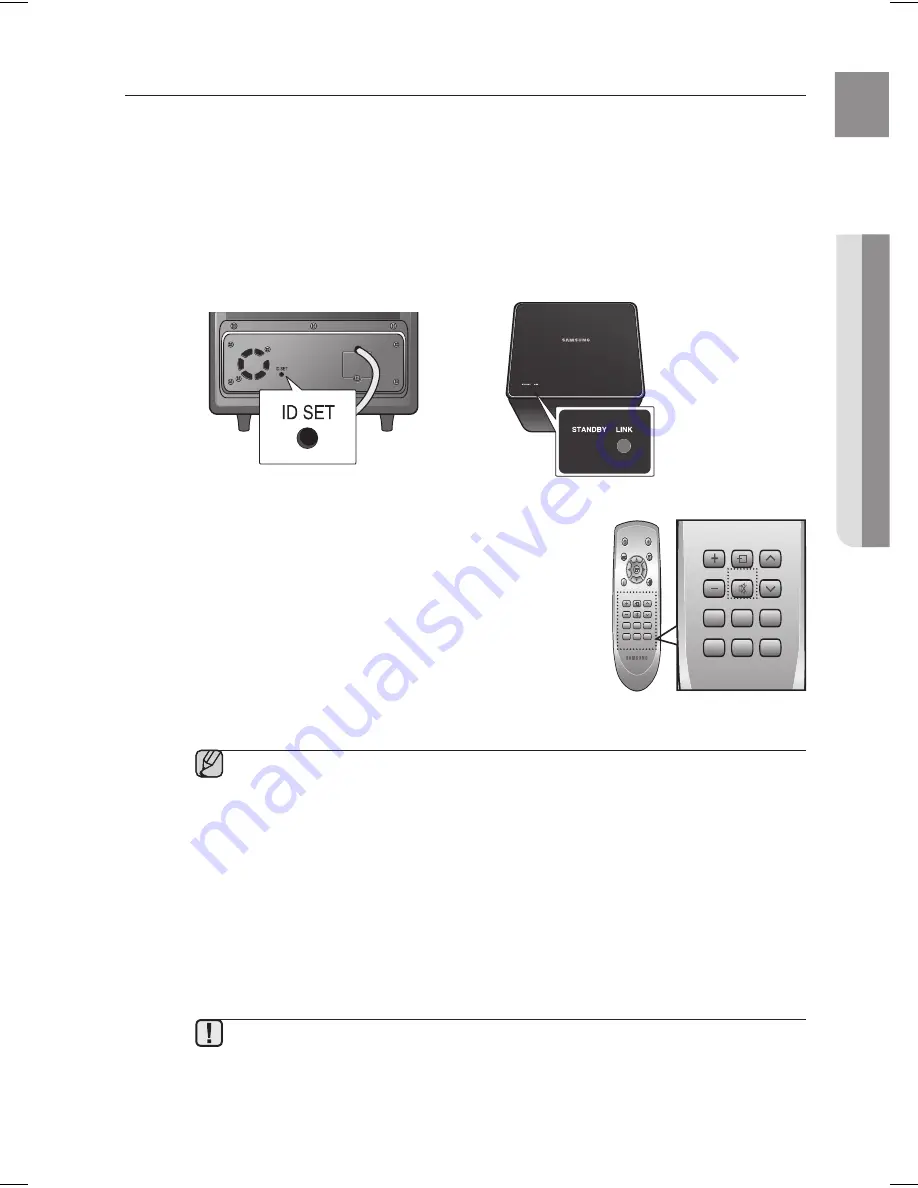
cOnnEcTinG THE WiRElESS SUBWOOFER (HT-WS1 Only)

The  Subwoofer's  linking  ID  is  preset  at  the  factory  and  the  main  unit  and  sub  should  link  (connect  wirelessly) 
automatically when turned on. If the link indicator does not light when main unit and subwoofer are turned on, please 
set the ID by following the process below.


Before moving or installing the product, be sure to turn off the power and disconnect the power 
cord.
If the main unit is powered off, the wireless subwoofer will be in the standby mode and the 
STANDBY LED on the upper side will blink.
If you use a device such as a microwave oven, wireless LAN Card, Bluetooth equipment, or 
any other device that uses the same frequency (2.4GHz) near the system, some sound 
interruption may be heard due to interference.
The transmission distance of a radio wave is about 10m, but may vary depending on your 
operating environment. If a steel-concrete wall or metallic wall is between the main unit and the 
wireless receiver module, the system may not operate at all, because the radio wave cannot 
penetrate metal.
If the main unit doesn't make wireless connection, follow steps 1-4 above to retry the  
connection between the main unit and wireless subwoofer.


The wireless receiving antenna is built into the wireless subwoofer. Keep the unit away from 
water and moisture.
For optimal listening performance, make sure that the area around the wireless subwoofer 
location is clear of any obstructions.

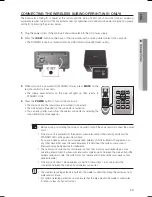
1. 

Plug the power cords of the main unit and subwoofer into the AC power supply.

Press the

 id SeT

 button on the back of the subwoofer with a small, pointed object for 3 seconds.

The STANDBY indicator is turned off and the LINK indicator (blue LED) blinks quickly.

While main unit is powered off (STANDBY mode), press 

MUTe

 on the 

remote control for 5 seconds.

The  volume  Level  Indicator  on  the  main  unit  lights  up,  then  returns  to 
STANDBY mode.

Press the 

POWeR

 button 

to

 turn on the main unit.

The main unit and the subwoofer are now linked (connected).
The Link indicator (blue LED) on the subwoofer is turned on.
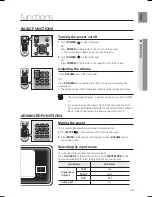
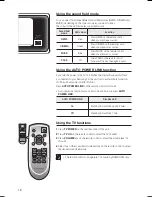
You can enjoy better sound from the wireless subwoofer by selecting the 
sound field mode. ( See page 16 )


POWER

TV POWER

TV SOURCE

VOL

TV CH

PASS

NEWS

MUSIC

MUTE

CINEMA

O/A 

INPUT

POWER

LINK

AUTO

MENU

EXIT

TOOLS

INFO

POWER

TV POWER

TV SOURCE

VOL

TV CH

PASS

NEWS

MUSIC

MUTE

CINEMA

O/A 

INPUT

POWER

LINK

AUTO

MENU

EXIT

TOOLS

INFO

Summary of Contents for AH68-02184F

Page 1: ...Air Track Active Speaker System user manual imagine the possibilities Thank you for purchasing this Samsung product To receive more complete service please register your product at www samsung com register HT SB1 HT WS1 ...

Page 2: ...source you want to enjoy Compatibility with various audio Technologies This unit employs decoders compatible with Dolby Digital DTS Digital Theater Systems and SFE Sound Field Effect Dolby Digital This is the standard audio signal format used on DVDs and other purely digital media This surround technology delivers high quality digital audio of up to 5 1 discrete channels to produce a directional a...

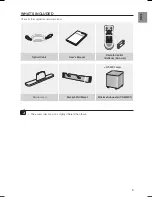
Page 3: ... SOURCE VOL TV CH PASS NEWS MUSIC MUTE CINEMA O A INPUT POWER LINK AUTO MENU EXIT TOOLS INFO Optical Cable User s Manual Remote Control Batteries AAA size Cradle stand Bracket Wall Mount Wireless Subwoofer PS WWS1 The accessories may look slightly different than these HT WS1 only ...
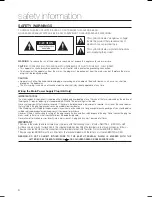
Page 4: ... pin face of the plug and if it requires replacing a fuse approved to BS1362 of the same rating must be used Never use the plug with the fuse cover removed If the cover is detachable and a replacement is required it must be of the same colour as the fuse fitted in the plug Replacement covers are available from your dealer If the fitted plug is not suitable for the power points in your house or the...

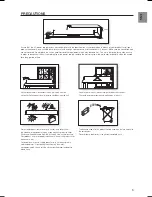
Page 5: ...at e g fireplace or equipment creating strong magnetic or electric fields Disconnect the power cable from the AC supply if the unit malfunctions Your product is not intended for industrial use Use of this product is for personal use only Condensation may occur if your product or disc has been stored in cold temperatures If transporting the unit during the winter wait approximately 2 hours until th...

Page 6: ...iptions 8 8 Front panel 9 Rear panel remote control 10 10 Tour of the remote control connections 12 12 Installing the cradle stand 12 Installing the wall mount 13 Connecting the wireless subwoofer 14 Connecting the Crystal Surround Air Track troubleshooting 17 17 Troubleshooting appendix 18 18 Specifications functions 15 15 Basic functions 15 Advanced functions ...

Page 7: ...e This involves tips or instructions on the page that help each function operate About the use of this user s manual Be sure to be familiar with Safety Instructions before using this product See page 4 If a problem occurs check the Troubleshooting See page 17 Copyright 2009 Samsung Electronics Co Ltd All rights reserved No part or whole of this user s manual may be reproduced or copied without the...

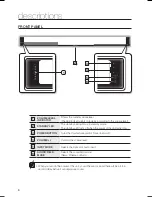
Page 8: ...n POWER BUTTOn Turns the Crystal Surround Air Track on and off VOlUME Controls the volume level inPUT MODE Selects the Optical or Audio input SOUnD FiElD MODE Selects the sound field mode News Cinema or Music When you turn on the power of this unit you will hear a click and there will be a 4 to 5 second delay before it can reproduce sound PCM DOLBY DTS INPUT MODE NEWS CINEMA MUSIC MAX MIN CINEMA M...

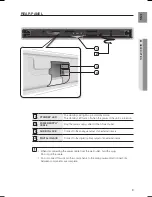
Page 9: ...o the AC wall outlet AUDiO in JAcK Connect to the analogue output of an external device DiGiTAl in JAcK Connect to the digital optical output of an external device When disconnecting the power cable from the wall outlet hold the plug Do not pull the cable Do not connect this unit or other components to the main power until all connections between components are complete DIGITALIN OPTICAL AUDIOIN 1...

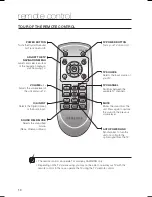
Page 10: ...udio input SOUND FIELD MODE Selects the sound field mode News Cinema or Music TV POWER BUTTON Turns your TV on and off TV SOURCE Selects the input source of your TV TV CHANNEL Switches between the available TV channels MUTE Mutes the sound from the unit Press again to restore the sound to the previous volume level AUTO POWER LINK Synchronizes to turn the unit on or off with the optical signal from...

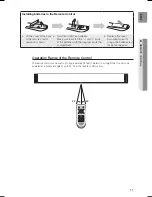
Page 11: ...up to approximately 23 feet 7 meters in a straight line It can also be operated at a horizontal angle of up to 30 from the remote control sensor Installing batteries in the Remote Control 1 Lift the cover at the back of the remote control upward as shown 2 Install two AAA size batteries Make sure to match the and ends of the batteries with the diagram inside the compartment 3 Replace the cover Ass...

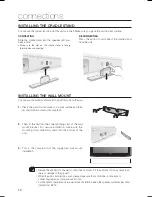
Page 12: ...ding slots of the wall mount bracket For secure installation make sure the mounting studs slide firmly down into the bottom of the slots 1 Place the wall mount bracket on a wall surface and then secure it with two screws not supplied PCM DOLBY DTS INPUT MODE NEWS CINEMA MUSIC MAX MIN 3 This is the completion of the suggested wall mount installation connections INSTAllING THE CRADLE STAND You can u...

Page 13: ...doesn t make wireless connection follow steps 1 4 above to retry the connection between the main unit and wireless subwoofer The wireless receiving antenna is built into the wireless subwoofer Keep the unit away from water and moisture For optimal listening performance make sure that the area around the wireless subwoofer location is clear of any obstructions 1 Plug the power cords of the main uni...

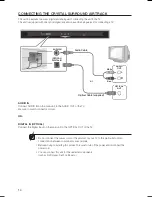
Page 14: ...DIGITAL IN OPTICAL Connect the Digital Input on the main unit to the OPTICAL OUT of the TV Do not connect the power cord of this product or your TV to the wall outlet until all connections between components are complete Before moving or installing this product be sure to turn off the power and disconnect the power cord You can connect this unit to other external components such as DVD player Set ...

Page 15: ...remote control again or press VOLUME to restore the sound Selecting the input mode You can select either Optical input or Audio input Press O A INPUT on the remote control or touch INPUT MODE on the front panel repeatedly to select the Digital Optical or Audio input Input mode LED colour Digital input Optical PCM Red DOLBY Green DTS Blue Audio input Off PCM DOLBY DTS INPUT MODE NEWS CINEMA MUSIC P...

Page 16: ...d on off The unit will power off after 20 min Press AUTO POWER LINK on the remote control of this unit Auto power link function turns on and off each time you press AUTO POWER LINK AUTO POWER LINK Standby LED On Standby LED will blink quickly 3 times Off Standby LED will blink 1 time Using the TV functions 1 Press TV POWER on the remote control of this unit 2 Press TV CH on the remote control to s...

Page 17: ...the Mute function on Is the volume set to minimum Connect it correctly Press Mute button to cancel the function Adjust the volume Picture does not appear on a TV when the function is selected Is the TV connected properly Connect it correctly Remote control does not work Are the batteries drained Is the distance between remote control and main unit too far Replace with new batteries Operate at a cl...

Page 18: ... unit 80W CH 4Ω THD 10 1kHz Subwoofer 100W 3Ω THD 10 120Hz Input sensitivity Impedance 1800mV 47KΩ S N ratio analogue input 70dB Separation 1kHz 60dB FREQUENCY RESPONSE Analogue input 20Hz 20kHz 3dB Digital input 48kHz PCM 20Hz 20kHz 3dB based on TV S N ratio distortion separation and usable sensitivity are based on measurement using AES Audio Engineering Society guidelines Nominal specification S...

Page 19: ...ANDS 0900 SAMSUNG 0900 7267864 0 10 Min www samsung com nl NORWAY 3 SAMSUNG 7267864 www samsung com no POLAND 0 801 1SAMSUNG 172678 022 607 93 33 www samsung com pl PORTUGAL 80820 SAMSUNG 726 7864 www samsung com pt SLOVAKIA 0800 SAMSUNG 726 7864 www samsung com sk SPAIN 902 1 SAMSUNG 902 172 678 www samsung com es SWEDEN 075 SAMSUNG 726 78 64 www samsung com se U K 0845 SAMSUNG 7267864 www samsun...

Page 20: ...lectronic Equipment Applicable in the European Union and other European countries with separate collection systems This marking on the product accessories or literature indicates that the product and its electronic accessories e g charger headset USB cable should not be disposed of with other household waste at the end of their working life To prevent possible harm to the environment or human heal...

Reviews: