9
English
Installation Pr
oc
edur
e
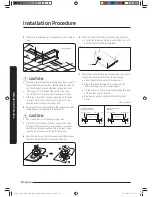
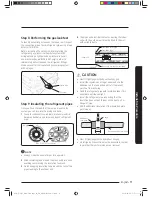
Step 5 Purging inert gas from the
indoor unit
The indoor unit comes with nitrogen gas (inert gas)
charged at the factory. Therefore, all inert gas must be
purged before connecting the assembly piping.
Unscrew the pinch pipe at the end of each refrigerant
pipe.
Liquid side
Gas side
Insulator
NOTE
• To prevent dirt or foreign objects from getting into the
pipes during installation, do not remove the pinch pipe
completely until you are ready to connect the piping.
Step 6 Cutting and flaring the pipes
1
Make sure that you have the required tools available:
pipe cutter, reamer, flaring tool, and pipe holder.
2
If you wish to shorten the pipes, cut them with a pipe
cutter, ensuring that the cut edge remains at a 90°
angle to the side of the pipe. Refer to the illustrations
below for examples of edges cut correctly and
incorrectly.
Pipe cutter
Pipe
Oblique
Rough
Burr
3
To prevent any gas from leaking out, remove all burrs
at the cut edge of the pipe, using a reamer.
4
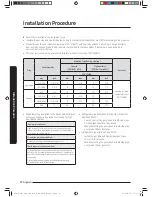
Slide a flare nut on to the pipe and modify the flare.
Pipe
Flare
D
A
Flare
R 0.4 to 0.8 mm
D
L
90
° ±2°
45°
±
2°
(0.016 to 0.032 inch)
Outer Diameter (D)
Depth (A)
Flare dimension (L)
mm
inch
mm
inch
mm
inch
Ø6.35
1/4
1.3
0.051
8.7 to 9.1
0.34 to 0.36
Ø9.52
3/8
1.8
0.071
12.8 to 13.2
0.50 to 0.52
Ø12.70
1/2
2.0
0.079
16.2 to 16.6
0.64 to 0.65
Ø15.88
5/8
2.2
0.087
19.3 to 19.7
0.76 to 0.78
Ø19.05
3/4
2.2
0.087
23.6 to 24.0
0.93 to 0.94
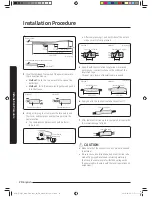
5
Check that the flaring is correct, referring to the
illustrations below for examples of incorrect flaring.
Correct
Inclined
Damaged
Surface
Cracked
Uneven
Thickness
k}t㨰䛙~TmGX ptluki]_TW^\\WhTWXUGGG`
YWX_TWYTY_GGG㝘㤸GXXaXXa[Z

