background image

E-

13

ENGLISH

Bio-Pure Filter Installation (Optional)

Open the front grille by pushing on both sides and center.

2

Remove the front grille.

3-1 Remove the safety clips.

3-2 Open the front grille about 45

°

and pull it forward.

3

Pull out the air filter.

4

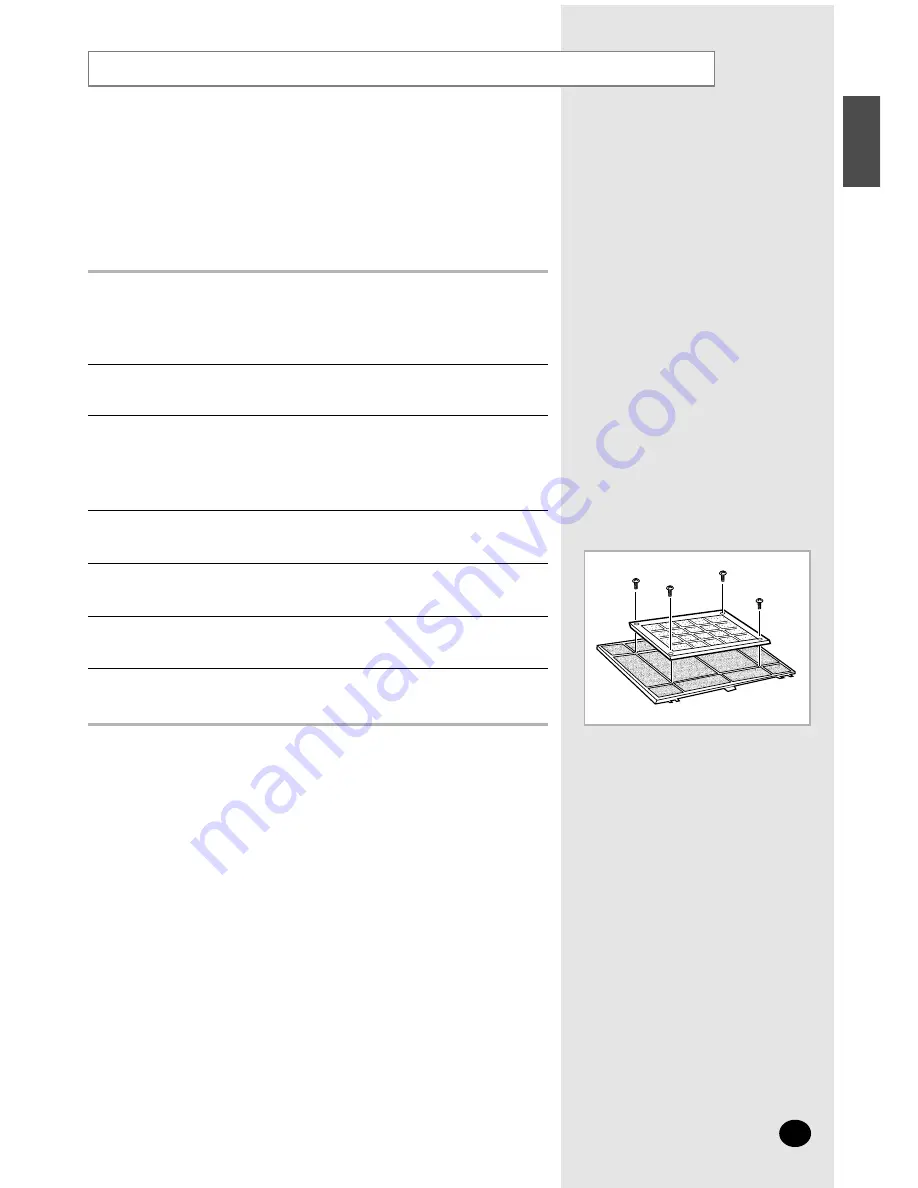
Locate the bio-pure filter on the center of air filter.

5

Secure the bio-pure filter with four screws.

6

Reinstall the air filter, the front grille and the safety clips.

7

Do not remove the packing from a bio-pure filter until you wish
to use the filter, as it will lose its properties.

N

N

N

N

o

o

o

o

tt

tt

e

e

e

e

The air conditioner can be fitted with a Bio-Pure filter to remove minute dust
particles. The service life of the filter is approximately three months depending
on the time during which the air conditioner is used.

Remove the vinyl packing from the filter.

1

Summary of Contents for AVMGH052EA4

Page 1: ...ondicionado sistem tico Enfriamiento y Calefacci n Climatiseur num rique multifonctionnel Refrigeraci n y Calefacci n Sistema Aria Condizionata Fresca e Calore Sistema Ar Condicionado Arrefecimento e...

Page 2: ...than 7 meters from the air conditioner If applicable WARNING DURING OPERATION Never store or ship the air conditioner upside down or sideways to avoid damage to the compressor The appliance is not int...

Page 3: ...eparate collection systems This marking shown on the product or its literature indicates that it should not be disposed with other household wastes at the end of its working life To prevent possible h...

Page 4: ...his instruction may differ from yours depending on the model E 4 Air flow blades outlet Air inlet Air filter inside the grille Indoor Unit Timer indicator Fan indicator Remote control sensor On Off in...

Page 5: ...ir outlet Connection valve TYPE D Outdoor Unit Air outlet Connection valve TYPE E Outdoor Unit If the heat exchanger in the outdoor unit gets dusty cooling efficiency may fall So clean the heat exchan...

Page 6: ...button Swing button On Timer button Off Timer button On Off Timer Set Cancel button Fan speed adjustment button Temperature adjustment buttons Temperature setting Fan speed Air flow direction On Time...

Page 7: ...indicator when the time to clean the air filter refer to page 12 N N N No o o ot t t te e e e Communication error indicator On Timer setting Off Timer setting Test indicator On Timer button Off Timer...

Page 8: ...button On Off indicators On Off buttons Index The operating lamp comes on even when only one air conditioner connected to the centralized controller is operating N N N No o o ot t t te e e e Operatin...

Page 9: ...reset button Then the wired remote controller will display the FILTER SIGN indicator when the time to clean the air filter N N N No o o ot t t te e e e Mode selection button Room number display Test i...

Page 10: ...gh frost may form on the outdoor unit at HEAT mode If this happens The heating operation stops The defrost mode will be triggered automatically for about 10 minutes No intervention is required after a...

Page 11: ...r may condense on and drip from the surface of the indoor unit if it is used for a long periods High humidity levels The standardized temperature for heating is 7 C If the outdoor temperature drops to...

Page 12: ...hed insert the air filters into the front grille 6 Clean the unit with a vacuum cleaner or a brush once a month 7 Reinstall the front grille and the safety clips 8 IMPORTANT You must give attention wh...

Page 13: ...ure the bio pure filter with four screws 6 Reinstall the air filter the front grille and the safety clips 7 Do not remove the packing from a bio pure filter until you wish to use the filter as it will...

Page 14: ...mode has been selected The room temperature may be too low or too high Dust may be blocking the air filter guard refer to page 12 for cleaning instructions Check that there is no obstacle in front of...

Page 15: ...E 15 ENGLISH Technical Specifications Power Supply Model 1 208 230V 60Hz AVMGH052CA3 4 AVMGH072CA3 4 AVMGC052CA3 4 AVMGC072CA3 4 1 220 240V 50Hz AVMGH052EA3 4 AVMGH070EA3 4 AVMGC052EA3 4 AVMGC070EA3 4...

Page 16: ...08 65 65 0 15 min 01805 121213 0 12 min 06 40 985 985 199 153 153 02 261 03 710 0900 20 200 88 0 10 min 231 627 22 0 801 801 881 80 8 200 128 0850 123 989 902 10 11 30 08 585 367 87 0870 242 0303 8 80...

Reviews: