Disassembly and Reassembly
Samsung Electronics
3-17
No
Parts
Procedure
Remark
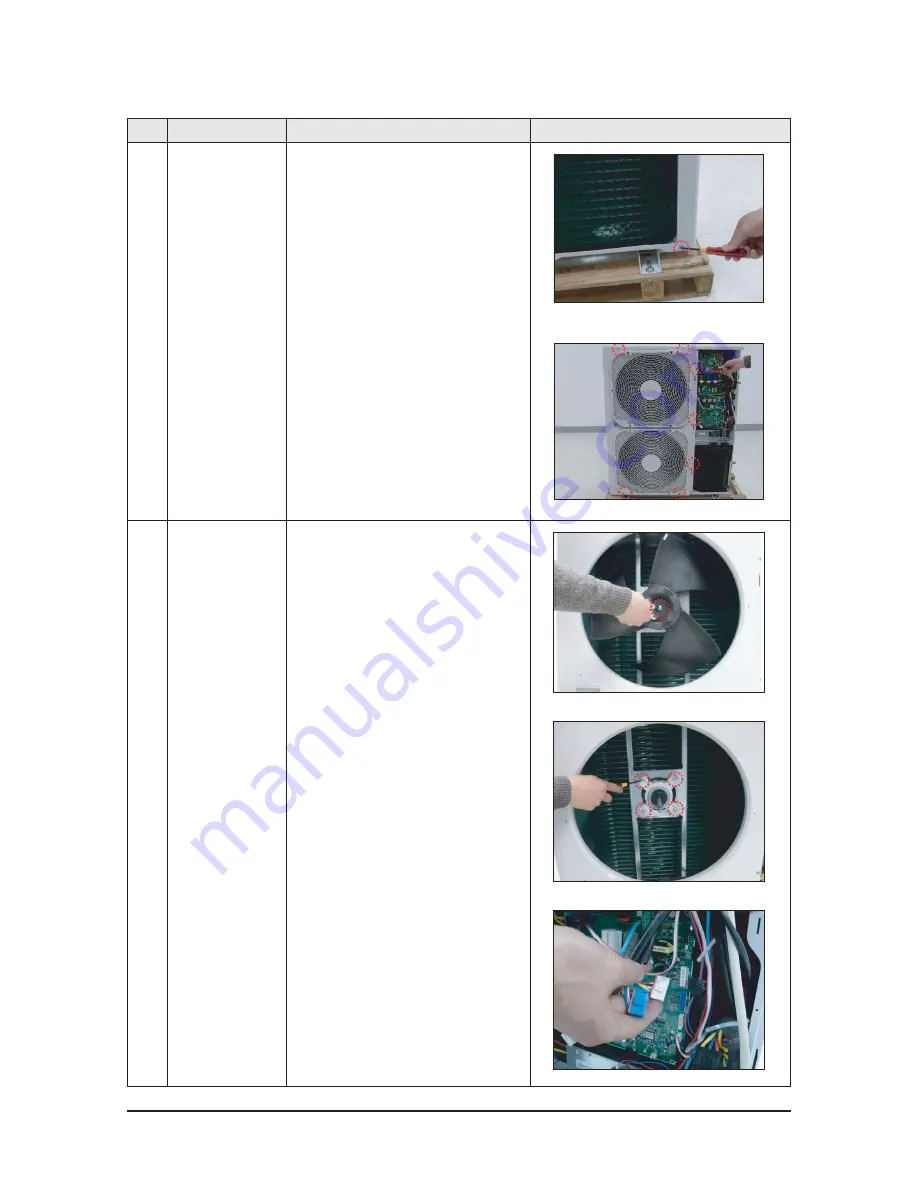
6) Unfasten the two bolts and disassemble the
column. (Use +Screw Driver)
7) Unfasten the eleven bolts and disassemble
the front board. (Use +Screw Driver)
2
Fan and electricity
1) Unfasten the flange nut to remove the fan.
(Refer to the right figure.)
(Use Monkey Spanner.)
2) Unfasten the four fixing bolts and remove
the electrical machinery.
(Use Monkey Spanner.)
3) Disassemble the electrical cable. The white
plug is for the upper part. The blue plug is
for the lower part.
Summary of Contents for AVXCSH023/032/040CE
Page 114: ...0 02 Samsung Electronics 4 30...
Page 232: ...0 02 Samsung Electronics 5 20...
Page 250: ...0 02 Samsung Electronics 5 38...
Page 262: ...0 02 Samsung Electronics 5 50...
Page 263: ...5 51 Samsung Electronics 5 2 Outdoor Unit 5 2 1 RVXVHT075 100FE RD075 100VHXFA...
Page 264: ...Exploded Views and Parts List Samsung Electronics 5 52 RVXVHT075 100FE RD075 100VHXFA cont...
Page 267: ...Exploded Views and Parts List 5 55 Samsung Electronics 5 2 2 RVXVHT125FE RD125VHXFA...
Page 268: ...Exploded Views and Parts List Samsung Electronics 5 56 RVXVHT125FE RD125VHXFA cont...
Page 279: ...Exploded Views and Parts List 5 67 Samsung Electronics 5 2 5 RD040 050MHXCA...
Page 285: ...PCB Diagram 6 5 Samsung Electronics 6 1 4 Duct type Slim MAIN PCB...
Page 288: ...0 02 Samsung Electronics 6 8...
Page 289: ...PCB Diagram 6 9 Samsung Electronics 6 1 5 Duct type MSP MAIN PCB...
Page 291: ...PCB Diagram 6 11 Samsung Electronics 6 1 6 Duct type BIG MAIN PCB...
Page 295: ...PCB Diagram 6 15 Samsung Electronics 6 1 7 Wall mounted type Neo Forte without EEV MAIN PCB...
Page 298: ...0 02 Samsung Electronics 6 18...
Page 299: ...PCB Diagram 6 19 Samsung Electronics 6 1 8 Wall mounted type Neo Forte with EEV MAIN...
Page 302: ...0 02 Samsung Electronics 6 22...
Page 303: ...PCB Diagram 6 23 Samsung Electronics 6 1 9 Wall mounted type Vivace MAIN PCB...
Page 332: ...0 02 Samsung Electronics 7 16...


