background image

Country

Customer Care Centre   

Web Site

AUSTRIA

0800-SAMSUNG (726-7864)

www.samsung.com/at

BELGIUM

0032 (0)2 201 24 18

www.samsung.com/be

CZECH REPUBLIC

844 000 844

www.samsung.com/cz

Distributor pro Českou republiku: 


Samsung Zrt., česka organizační složka Vyskočilova 4, 14000 Praha 4

DENMARK

70 70 19 70

www.samsung.com/dk

EIRE

0818 717 100 

www.samsung.com/ie

FINLAND

030-6227 515

www.samsung.com/fi

FRANCE

3260 SAMSUNG (€ 0,15/Min)

08 25 08 65 65 (€ 0,15/Min)

www.samsung.com

GERMANY

01805 - SAMSUNG (726-7864) (€ 0,14/Min) 

www.samsung.com

HUNGARY

06-80-SAMSUNG (726-7864)

www.samsung.com

ITALIA

800-SAMSUNG (726-7864)

www.samsung.com

LUXEMBURG

0035 (0)2 261 03 710

www.samsung.com/be

NETHERLANDS

0900-SAMSUNG (726-7864) (€ 0,10/Min)

www.samsung.com/nl

NORWAY

815-56 480

www.samsung.com/no

POLAND

0 801 801 881

022-607-93-33

www.samsung.com/pl

PORTUGAL

80820-SAMSUNG (726-7864)

www.samsung.com/pt

SLOVAKIA

0800-SAMSUNG (726-7864)

www.samsung.com/sk 

SPAIN

902 10 11 30

www.samsung.com

SWEDEN

0771-400 200

www.samsung.com/se

SWITZERLAND

0800-SAMSUNG (726-7864)

www.samsung.com/ch

U.K

0845 SAMSUNG (7267864)

www.samsung.com

TURKEY

444 77 11

www.samsung.com

ESTONIA

800-7267

www.samsung.ee

LATVIA

800-7267

www.samsung.com/lv

LITHUANIA

8-800-77777

www.samsung.lt

KAZAHSTAN

8-10-800-500-55-500

www.samsung.kz

KYRGYZSTAN

00-800-500-55-500

-

RUSSIA

8-800-555-55-55

www.samsung.ru

TADJIKISTAN

8-10-800-500-55-500

-

UKRAINE

8-800-502-0000

www.samsung.com

UZBEKISTAN

8-10-800-500-55-500

www.samsung.uz

LCD TV

user manual

imagine the possibilities

Thank you for purchasing this Samsung product. 

To receive more complete service, please register 

your product at

www.samsung.com/global/register

Model                         Serial No.                       

BN68-01702A-00

Contact SAMSUNG WORLDWIDE

If you have any questions or comments relating to Samsung products, 


please contact the SAMSUNG customer care centre. 

BN68-01702A-00L09-Cover.indd   1

2008-09-02   �� 2:50:56

Summary of Contents for BN68-01702A-00

Page 1: ...AMSUNG 726 7864 www samsung com pt SLOVAKIA 0800 SAMSUNG 726 7864 www samsung com sk SPAIN 902 10 11 30 www samsung com SWEDEN 0771 400 200 www samsung com se SWITZERLAND 0800 SAMSUNG 726 7864 www samsung com ch U K 0845 SAMSUNG 7267864 www samsung com TURKEY 444 77 11 www samsung com ESTONIA 800 7267 www samsung ee LATVIA 800 7267 www samsung com lv LITHUANIA 8 800 77777 www samsung lt KAZAHSTAN ...

Page 2: ...screen burn To avoid such image retention reduce the degree of brightness and contrast of the screen when displaying a still image Watching the LCD TV in 4 3 format for a long period of time may leave traces of borders displayed on the left right and center of the screen caused by the difference of light emission on the screen Playing a DVD or a game console may cause a similar effect to the scree...

Page 3: ...ing and Displaying the Current Time 25 Setting the Sleep Timer 25 Switching the Television On and Off Automatically 26 Function Description Choosing Your Language 26 Melody Entertainment Energy Saving 27 Selecting the Source 28 Editing the Input Source Names 29 USING The DTV FeATuRe Previewing the DTV Menu System 30 Updating the Channel List Automatically 31 Updating the Channel List Manually 31 E...

Page 4: ... 55 Connecting Anynet Devices 55 Setting Up Anynet 56 Scanning and Switching between Anynet Devices 57 Recording 59 Listening through a Receiver 59 Check Points before Requesting Service 60 Recommendations For Use Teletext Feature 61 Auto Wall Mount Sold separately 63 Using the Anti Theft Kensington Lock depending on the model 64 Securing the TV to the Wall 65 Troubleshooting Before Contacting Ser...

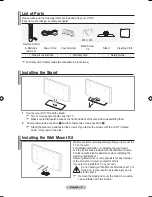
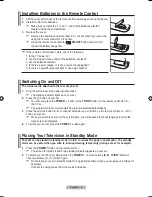
Page 5: ...istance when installing the wall mounted bracket Samsung Electronics is not responsible for any damage to the product or injury to yourself or others if you elect to install the TV on your own Do not install your Wall Mount Kit while your TV is turned on It may result in personal injury due to electric shock Remove the stand and cover the bottom hole with a cap and fasten with two screws Installin...

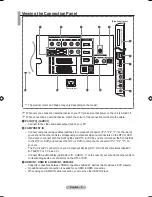
Page 6: ...u use the and buttons on the remote control Without the Remote Control you can turn on the TV by using the Channel buttons 5 Power Indicator Blinks and turns off when the power is on and lights up in stand by mode 6 Power Press to turn the TV on and off 7 Remote Control Sensor Aim the remote control towards this spot on the TV 8 SPEAKERS 2 MENU Press to see an on screen menu of your TV s features ...

Page 7: ...d connect the Set Top Box to the DTV or DVD and connect the DTV or DVD to component connector PR PB Y on your set The PR PB and Y connectors on your component devices DTV or DVD are sometimes labeled Y B Y and R Y or Y Cb and Cr Connect RCA audio cables optional to R AUDIO L on the rear of your set and the other ends to corresponding audio out connectors on the DTV or DVD 3 HDMI IN 1 HDMI IN 2 HDM...

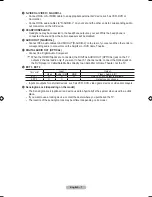
Page 8: ... and Component 480i 480p 576i 576p 720p 1080i 1080p HDMI DVI 50Hz X X X O O O O HDMI DVI 60Hz X O X X O O O Component O O O O O O O 4 ANT IN To view television channels correctly a signal must be received by the set from one of the following sources An outdoor aerial A cable television network A satellite network 5 SERVICE Connector for SERVICE only Connect this to the jack on the optional wall mo...

Page 9: ...nect to a Digital Audio Component When the HDMI IN jacks are connected the DIGITAL AUDIO OUT OPTICAL jack on the TV outputs 2 channel audio only If you want to hear 5 1 channel audio connect the Optical jack on the DVD player or Cable Satellite Box directly to an Amplifier or Home Theater not the TV EXT 1 EXT 2 Connector Input Output Video Audio L R RGB Video Audio L R EXT 1 O O O Only TV or DTV o...

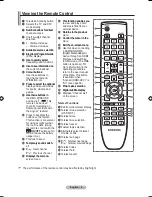
Page 10: ... time Previous channel Temporary sound switch off P Next channel P Previous channel Displays the main on screen menu This function enables you to view and play photo and music files from an external device Returns to the previous menu a Control the cursor in the menu b Exit the on screen menu c Use this when connecting a SAMSUNG DMA Digital Media Adapter device through an HDMI interface and switch...

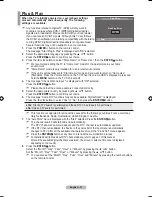
Page 11: ... your set 2 Press the P button on your set You also can press the POWER button or the TV DTV button on the remote control to turn the TV on The programme that you were watching last is reselected automatically 3 Press the numeric button 0 9 or channel up down button on the remote control or button on your set When you switch the set on for the very first time you will be asked to choose language i...

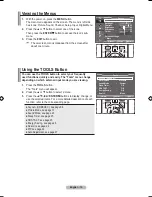
Page 12: ... mode you are viewing 1 Press the TOOLS button The Tools menu will appear 2 Press the or button to select a menu 3 Press the ENTER buttons to display change or use the selected items For a more detailed description of each function refer to the corresponding page Anynet HDMI CEC see page 56 Picture Mode see page 17 Sound Mode see page 23 Sleep Timer see page 25 SRS TS XT see page 23 Energy Saving ...

Page 13: ...ck that the antenna cable is connected correctly 5 Select the appropriate country by pressing the or button Press the ENTER button to confirm your choice 6 The message Some DTV functions may not be available Digital Scan is displayed Press the or button to select Yes or No then press the ENTER button Yes First an ATV search is performed and then a DTV ch auto search is performed No Only an ATV sea...

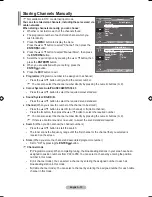
Page 14: ...pressing the or button Press the ENTER button to confirm your choice Even though you have changed the country setting in this menu the country setting for DTV is not changed Refer to page 31 4 Press the or button to select Auto Store then press the ENTER button 5 Press the ENTER button The TV will begin memorizing all of the available channels Press the ENTER button at any time to interrupt the me...

Page 15: ...tored Press the or button to select C Air channel or S Cable channel Press the button then press the or button to select the required number You can also select the channel number directly by pressing the numeric buttons 0 9 If there is abnormal sound or no sound re select the sound standard required Search When you do not know the channel numbers Press the or button to start the search The tuner ...

Page 16: ...es by muting out video and audio 5 Press the or button to select Child Lock then press the ENTER button 6 Select On by pressing the or button then press the ENTER button 7 Press the or button to select Channel List then press the ENTER button 8 Move to the field by pressing the or button select a channel to be locked and press the ENTER button If you press the ENTER button again the symbol next to...

Page 17: ...changed allowing you to assign new names Not available in DTV or external input mode 1 Press the MENU button to display the menu Press the or button to select Channel then press the ENTER button 2 Press the or button to select Name then press the ENTER button 3 If necessary select the channel to be assigned to a new name by pressing the or button Press the ENTER button The selection bar is display...

Page 18: ...pressing the or button and then press the ENTER button LNA Low Noise Amplifier If the TV is operating in a weak signal area the LNA function can improve the reception a low noise preamplifier boosts the incoming signal Not available in DTV or external input mode 1 Press the MENU button to display the menu Press the or button to select Channel then press the ENTER button 2 Press the or button to se...

Page 19: ...rtable display in a dark room The Picture mode must be adjusted separately for each input source Easy Setting 1 Press the TOOLS button on the remote control 2 Press the or button to select Picture Mode 3 Press the or button to select the desired picture mode 4 Press the EXIT or TOOLS button to exit Picture Mode Standard Backlight 7 Contrast 95 Brightness 45 Sharpness 50 Colour 50 Tint G50 R50 Deta...

Page 20: ...ed if the level of brightness of the picture is reduced and then this will reduce the overall running cost Configuring Detailed Settings on the Picture You can set detailed picture settings 1 Press the MENU button to display the menu Press the ENTER button to select Picture 2 Press the ENTER button to select Mode Press the or button to select Standard or Movie then press the ENTER button 3 Press t...

Page 21: ...urs R Offset G Offset B Offset R Gain G Gain B Gain Changing the adjustment value will refresh the adjusted screen Select the required option by pressing the or button then press the ENTER button Press the or button until you reach the optimal setting Reset The previously adjusted white balance will be reset to the factory defaults Flesh Tone 15 15 You can emphasize the pink flesh tone in the pict...

Page 22: ...thout any cutoff when HDMI 720p 1080i 1080p or Component 1080i 1080p signals are input Auto Wide function is available only in TV DTV Ext 1 Ext 2 AV and S Video mode In PC Mode only 16 9 and 4 3 mode can be adjusted Settings can be adjusted and stored for each external device you have connected to an input of the TV Temporary image retention may occur when viewing a static image on the set for mor...

Page 23: ...NIe Digital Natural Image engine This feature brings you more detailed image with 3D noise reduction detail enhancement contrast enhancement and white enhancement New image compensation Algorithm gives brighter clearer more detailed image to you DNIe technology will fit every signal into your eyes This function is not available in Movie and Standard mode HDMI Black Level Normal Low You can directl...

Page 24: ...s the or button to select the On 4 Press the or button to select a particular item 5 Press the or button to select the required option 6 Press the EXIT or TOOLS button to exit PIP On Off You can activate or deactivate the PIP function Main picture Sub picture Component TV Ext 1 Ext 2 AV DTV HDMI 1 2 3 4 TV Ext 1 Ext 2 AV DTV PC TV Ext 1 Ext 2 AV DTV Source You can select a source of the sub pictur...

Page 25: ...wo speaker playback system including internal television speakers It is fully compatible with all multichannel formats Easy Setting 1 Press the TOOLS button on the remote control 2 Press the or button to select SRS TS XT 3 Press the or button to select the Off or On 4 Press the EXIT or TOOLS button to exit TruSurround XT SRS and Symbol are trademarks of SRS Labs Inc TruSurround XT technology is in...

Page 26: ...in Used to listen to the sound of the main picture Sub Used to listen to the sound of the sub picture Manufactured under license from Dolby Laboratories Dolby and the double D symbol are trademarks of Dolby Laboratories Selecting the Sound Mode You can set the sound mode in the Tools menu When you set to Dual I II the current sound mode is displayed on the screen 1 Press the TOOLS button on the re...

Page 27: ...2 Press the or button to select Time then press the ENTER button 3 Press the or button to select Sleep Timer then press the ENTER button 4 Press the or button repeatedly until the desired time appears Off 30 60 90 120 150 180 Press the ENTER button 5 Press the EXIT button to exit The TV automatically switches to standby mode when the timer reaches 0 Easy Setting 1 Press the TOOLS button on the rem...

Page 28: ...e remote control Auto Power Off When you set the timer On the TV will eventually turn off if no controls are operated for 3 hours after the TV was turned on by timer This function is only available in timer On mode and prevents overheating which may occur if a TV is on for too long time Choosing Your Language When you start using your set for the first time you must select the language which will ...

Page 29: ...imal picture and sound quality for sports You can enjoy more thrilling colour and sound Cinema Provides the optimal picture and sound quality for cinema You can experience a richer picture and enhanced sound Game Provides the optimal picture and sound quality for games This mode accelerates the playing speed when using an external game console connected to the TV If you set any of the three Entert...

Page 30: ...nnected to your TV s input jacks 1 Press the MENU button to display the menu Press the or button to select Input then press the ENTER button 2 Press the ENTER button again to select Source List When no external device is connected to your set only TV Ext 1 Ext 2 DTV are activated in the Source List AV S Video Component PC HDMI1 HDMI2 HDMI3 HDMI4 are activated only when they are connected to your s...

Page 31: ...t the required device Press the ENTER button 5 Press the EXIT button to exit When a PC with a resolution of 1920 x 1080 60Hz is connected to the HDMI IN 2 port you should set the HDMI2 mode to PC in the Edit Name of the Input mode Mode Custom Equalizer SRS TS XT Off Auto Volume Off Internal Mute Off Reset Move Enter Return TV Input Source List TV Edit Name Anynet HDMI CEC WISELINK Move Enter Retur...

Page 32: ...Setup Menu Transparency Change PIN Parental Lock Subtitle Subtitle Mode Audio Format Audio Description Digital Text Time Zone Common Interface System Product Information Signal Information Software Upgrade Reset High Medium Low Opaque Off On Normal Hard of hearing Primary Audio Language Secondary Audio Language Primary Subtitle Language Secondary Subtitle Language Primary Teletext Language Seconda...

Page 33: ...on message is displayed Updating the Channel List Manually You can specify the channel for a fast channel search 1 Press the MENU button to display the menu Press the or button to select Digital Menu then press the ENTER button 2 Press the or button to select Digital Channel then press the ENTER button 3 Press the or button to select Manual Store then press the ENTER button 4 Press the or button t...

Page 34: ...utton to display the menu Press the or button to select Digital Menu then press the ENTER button 2 Press the or button to select Digital Channel then press the ENTER button 3 Press the or button to select Edit Favourite Channels then press the ENTER button 4 Press the red button in the Edit Favourite Channels menu To add more channels refer to the step 5 on the previous description 5 If you want t...

Page 35: ...ssigned to the other channel That is the two numbers are exchanged The Favourite Channels are automatically sorted in ascending order of channel numbers 7 Press the EXIT button to exit Preview 1 In the Edit Favourite Channels menu select the channel to be previewed by pressing the or button 2 Press the yellow button The selected channel is displayed on the screen Delete 1 In the Edit Favourite Cha...

Page 36: ...and all channels Your favourite channels are only displayed if they were previously set in the Editing Your Favourite Channels menu refer to page 32 6 Press the red or green button to display the previous or next channel List page 7 Press the or button to select a channel to be tuned Press the ENTER button The channel number name and an icon are displayed in the top left corner while changing the ...

Page 37: ...is cancelled with the clock icon gone For details about scheduling programmes refer to the next page View programme information Select a programme of your choice by pressing the button Press the INFO button when the programme of your choice is highlighted Toggle between the Now Next Guide or Full Guide Press the red button repeatedly Display the Favourites and the All Channels list Press the green...

Page 38: ...red button The channel will be switched to the scheduled programme 5 Press the ENTER button to select an item and adjust with the or button You can also set hour and minute by pressing the number buttons on the remote control Channel Set the channel Time Set the time Date Set Year Month and Day Frequency Set the frequency Once Daily or Weekly 6 After setting the schedule Press the red button 7 Pre...

Page 39: ...he list of channels that have been scanned by the channel list update All channels are displayed in the all channel mode Favourites favourite channels is the list of channels that has been set in the Edit Favourite Channels menu refer to page 32 Adjusting the Menu Transparency You can set the Transparency of the menu 1 Press the MENU button to display the menu Press the or button to select Digital...

Page 40: ...nu then press the ENTER button 2 Press the or button to select Setup then press the ENTER button 3 Press the or button to select Change PIN then press the ENTER button The Enter PIN is displayed 4 Enter your current 4 digit PIN code by using the numeric buttons 0 9 The Enter New PIN is displayed 5 Enter your new PIN code by using the numeric buttons 0 9 The Confirm New PIN is displayed 6 Re enter ...

Page 41: ...gh Hard of hearing mode is selected Selecting the Audio Format You can only hear Dolby Digital sound through the audio receiver connected through an optical cable You can only hear PCM sound through the main speaker When sound is emitted from both the main speaker and the audio receiver a sound echo may occur due to the decoding speed difference between the main speaker and the audio receiver In t...

Page 42: ...cription This is an auxiliary audio function that provides an additional audio track for visually challenged persons This function handles the Audio Stream for the AD Audio Description when it is sent along with the Main audio from the broadcaster Users can turn the Audio Description On or Off and control the volume 1 Press the MENU button to display the menu Press the or button to select Digital ...

Page 43: ...t information For service or repair please contact a Samsung approved dealer 1 Press the MENU button to display the menu Press the or button to select Digital Menu then press the ENTER button 2 Press the or button to select Setup then press the ENTER button 3 Press the or button to select System then press the ENTER button 4 Press the ENTER button again to select Product Information The Product In...

Page 44: ...urrently broadcasting channels Standby Mode Upgrade On Off Press the ENTER button To continue software upgrade with master power on Select On by pressing the or button 45 minutes after entering standby mode a manual upgrade is automatically conducted Since the power of the unit is turned on internally the screen may be on slightly for the LCD product This phenomenon may continue for more than 1 ho...

Page 45: ...common interface slot Insert the CAM in the direction of the arrow right up to the end so that it is parallel with the slot 4 Check if you can see a picture on a scrambled signal channel Selecting the CI Common Interface Menu This enables the user to select from the CAM provided menu 1 Press the MENU button to display the menu Press the or button to select Digital Menu then press the ENTER button ...

Page 46: ...ferences returning all values to their default factory state 1 Press the MENU button to display the menu Press the or button to select Digital Menu then press the ENTER button 2 Press the or button to select Setup then press the ENTER button 3 Press the or button to select System then press the ENTER button 4 Press the or button to select Reset then press the ENTER button 5 The Enter PIN screen wi...

Page 47: ...ons of the selected menu are displayed Select the appropriate language by pressing the or button Press the ENTER button to confirm your choice If you change the language setting the Subtitle Language Audio Language and the Teletext Language of the Language menu refer to page 44 are automatically changed to the selected language The Subtitle Language Audio Language and the Teletext Language of the ...

Page 48: ... CEA 1920 x 1080p 67 500 60 000 148 500 When using an HDMI DVI cable connection you must use the HDMI IN 2 jack The interlace mode is not supported The set might operate abnormally if a non standard video format is selected Separate and Composite modes are supported SOG is not supported Too long or low quality VGA cable can cause picture noise at high resolution modes 1920x1080 or 1600x1200 Settin...

Page 49: ... Fine tune again After the noise has been reduced readjust the picture so that it is aligned on the center of screen Press the or button to select Coarse or Fine then press the ENTER button Press the or button to adjust the screen quality Press the ENTER button Position Adjust the PC s screen positioning if it does not fit the TV screen Press the or button to adjusting the Vertical Position Press ...

Page 50: ... them from damage or loss of data SAMSUNG is not responsible for any data file damage or data loss Please connect directly to the USB port of your TV If you are using a separate cable connection there may be a USB Compatibility problem Only MP3 and JPEG file formats are supported The Wiselink mp3 format only supports music files with a high sampling frequency 32 kHz 44 1 kHz or 48 kHz We recommend...

Page 51: ...remote control Press the W LINK button on the remote control to display a WISELINK menu Using the Remote Control Button in WISELINK Menu Button Operations Move the cursor and select an item ENTER Select the currently selected item Play the Slide Show or MP3 file Pause the Slide Show or MP3 file RETURN Return to the previous menu INFO Run various functions from the Photo and Music menus Stop the cu...

Page 52: ...played or button will let you see another photo image in the same folder Press the button when a Photo icon is selected to start a Slide Show Photos without EXIF information may not be displayed as thumbnail images in the PHOTO LIST depending on the picture quality and resolution Viewing a Slide Show 4 Press the INFO button to display the option Start Slide Show Select All 5 Press the or button to...

Page 53: ...INK mode press the W LINK button on the remote control When selecting a photo file the photo file information is displayed on the left side of the TV screen such as the resolution the date modified and the order of the file in the current directory e g 10th out of 15 Folder icon Photo icon Move to the previous folder stage icon Upper Folder 01 001 02 002 03 003 04 004 05 005 Select Move Enter Retu...

Page 54: ... pan up down left right in the zoomed in photo press the INFO button to exit option menu then press the and buttons Start Slide Show or Rotate is disabled when the Zoom option is selected x1 Restore a photo to its original size x2 Zoom in to a photo x2 x4 Zoom in to a photo x4 Move the zoomed in photo up down right left Rotate Press the or button to select Rotate then press the ENTER button Select...

Page 55: ...t displayed even if they are saved on the same USB device The selected file is displayed on the top with its playing time To adjust the music volume press the button on the remote control To mute the sound press the MUTE button on the remote control If the sound is odd when playing MP3 files exit WISELINK mode and adjust the Equalizer and SRS TS XT in the Sound menu An over modulated MP3 file may ...

Page 56: ...sic file to listen to Select an MP3 file as the background music Repeat Music Select to determine whether to repeat playing the music when all MP3 files in the current folder have been played Screen Saver Select to set the waiting time before the screen saver appears The screensaver will appear when no button is pressed for 1 5 or 10 minutes Slide Show Speed Normal Background Music On Background M...

Page 57: ... on your TV and Digital Audio Input on the receiver Connect only one receiver You can listen to 5 1 channel sound through the home theatre s speakers Otherwise you can only listen to 2 channel stereo sound in other cases Make sure to connect the Digital Audio IN Optical of the home theatre and the TV correctly to listen to TV sound through the home theatre However you cannot listen to sound from t...

Page 58: ...ss the ENTER button 2 Press the or button to select Yes then press the ENTER button The Auto turn off function is enabled If you select No the Auto turn off function is cancelled Press the EXIT button to exit The Select Device setting of the TV remote control is to be set to TV to use the Anynet function If you set Auto Turn Off to Yes connected external devices are also turned off when the TV is ...

Page 59: ...ted devices may take up to 2 minutes You cannot cancel the operation during the switching operation The time required to scan for devices is determined by the number of connected devices When the device scan is complete the number of found devices is not displayed Although the TV automatically scans devices when it is turned on using the POWER button devices connected when the TV is on or under a ...

Page 60: ...erating Status Available Buttons Anynet Device After switching to the device when the menu of the corresponding device is displayed on the screen Numeric buttons ENTER buttons Colour buttons EXIT button After switching to the device while playing a file Backward search Forward search Stop Play Pause Device with built in Tuner After switching to the device when you are watching a TV programme P but...

Page 61: ...ight problem listening through the receiver may not properly operate If there is a power interruption to the TV when the Receiver is set to On by disconnecting the power cord or a power failure the TV Speaker may be set to Off when you turn the TV on again see page 24 Recording You can make a recording of a TV programme using a recorder Press the button Recording begins Only when the Anynet enable...

Page 62: ... the SOURCE button on the TV remote control and select a device other than Anynet devices Press any of P and PRE CH such to change to the TV mode Note that the channel button operates only when a tuner embedded Anynet device is not connected The Configuring Anynet connection message appears on the screen You cannot use the remote control when you are configuring Anynet or switching to a view mode ...

Page 63: ...ext service Press it twice to overlap the teletext with the current broadcasting screen 7 0 mode Press to select the teletext mode LIST FLOF If you press it in the LIST mode it switches into the List save mode In the List save mode you can save teletext page into list using the 8 store button 8 1 sub page Used to display the available sub page 9 2 page up Used to display the next teletext page 0 3...

Page 64: ...nt page number or search indications Date and time Text Status information FASTEXT information Teletext information is often divided between several pages displayed in sequence which can be accessed by Entering the page number Selecting a title in a list Selecting a coloured heading FASTEXT system Press the TV DTV button to exit from the teletext display ...

Page 65: ...ress the INFO button to reset Press the or button to select Yes then press the ENTER button The position is initialized to the default setting 3 Press the blue button Press the and buttons to select a save mode from either Position 1 Position 2 or Position 3 in order to save the current position To not save the current position press the RETURN button When selecting a save mode you cannot use the ...

Page 66: ...our nearest dealer The auto wall mount will not work when Anynet and WISELINK are operating 37 40 and 46 inch models are not compatible with the old electrically powered wall mount model WMN5090A Using the Anti Theft Kensington Lock depending on the model The Kensington Lock is a device used to physically fix the system when using it in a public place The appearance and locking method may differ f...

Page 67: ...hese additionally 2 Remove the screws from the center back of the TV put the screws into the clamps and then fasten the screws onto the TV again Screws may not be supplied with the product In this case please purchase the screws of the following specifications Screw Specifications For a 17 29 Inch LCD TV M4 X 15 For a 32 40 Inch LCD TV M6 X 15 3 Connect the clamps fixed onto the TV and the clamps ...

Page 68: ...functions Replace the remote control batteries Clean the upper edge of the remote control transmission window Check the battery terminals Check signal cable message is displayed Check that the signal cable is firmly connected to the PC or video sources Check that the PC or video sources are turned on On PC mode Not Supported Mode message is displayed Check the maximum resolution and the frequency ...

Page 69: ...and 14 kg 16 kg Environmental Considerations Operating Temperature Operating Humidity Storage Temperature Storage Humidity 10 C to 40 C 50 F to 104 F 10 to 80 non condensing 20 C to 45 C 4 F to 113 F 5 to 95 non condensing Stand Swivel Left Right 0 Design and specifications are subject to change without prior notice This device is a Class B digital apparatus For the power supply and Power Consumpt...

Reviews: