background image

BASIC

User’s Guide

C267x series

BASIC

User’s Guide

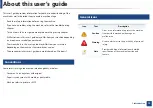
This guide provides information concerning installation, basic operation and 
troubleshooting on Windows.

ADVANCED

This guide provides information about installation, advanced configuration, operation and 
troubleshooting on various OS environments. 

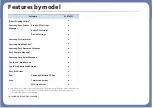
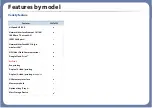
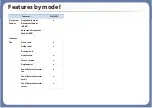
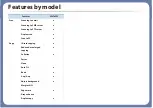
Some features may not be available depending on models or countries.

Summary of Contents for C267 Series

Page 1: ...on concerning installation basic operation and troubleshooting on Windows ADVANCED This guide provides information about installation advanced configuration operation and troubleshooting on various OS environments Some features may not be available depending on models or countries ...

Page 2: ...know before using the machine Key benefits 3 Features by model 6 Useful to know 12 About this user s guide 13 Safety information 14 Machine overview 20 Control panel overview 23 Turning on the machine 25 Installing the driver locally 26 Reinstalling the driver 28 ...

Page 3: ...NFC tag on your printer and get the print job done see Using the NFC feature on page 204 You can print on the go from your smartphone or computer using Google Cloud Print enabled appsG see Google Cloud Print on page 212 Easy Capture Manager allows you to easily edit and print whatever you captured using the Print Screen key on the keyboardG see Easy Capture Manager on page 296 Samsung Easy Printer...

Page 4: ...nts with words such as Confidential see Using advanced print features on page 260 You can print in various operating systems see System requirements on page 137 Your machine is equipped with a USB interface and or a network interface Supports various wireless network setting method Using the WPS Wi Fi Protected Setup button You can easily connect to a wireless network using the WPS button on the m...

Page 5: ...Key benefits Support XOA applications The machine supports XOA custom applications Regarding the XOA custom applications please contact your XOA custom application provider ...

Page 6: ...e Software You can install the printer driver and software when you insert the software CD into your CD ROM drive For windows select the printer driver and software in the Select Software to Install window Operating System C267xFW Windows Mac Linux Unix Software C267xFW SPL printer driver PCL printer driver PS printer drivera XPS printer drivera ...

Page 7: ...asy Document Creator Easy Capture Manager Samsung Easy Color Managera SyncThru Web Service SyncThru Admin Web Service Easy Eco Driver Fax Samsung Network PC Fax Scan Twain scan driver WIA scan driver a Download the software from the Samsung website and install it http www samsung com find your product Support or Downloads Before installing check whether your computer s OS support the software Soft...

Page 8: ... 10 100 1000 Base TX wired LAN IEEE 1284B porta Network Interface 802 11b g n wireless LANb NFC Near Field Communication Google Cloud Print AirPrint Eco printing Duplex 2 sided printing Duplex 2 sided printing manual cd USB memory interface Memory module Optional tray Tray2 Mass Storage Device e ...

Page 9: ...utomatic Document Feeder DADF Automatic Document Feeder ADF Handset Fax Multi send Delay send Priority send Duplex send Secure receive Duplex print Send Receive forward fax Send Receive forward email Send Receive forward server Features C267xFW ...

Page 10: ...nning to SMB server Scanning to FTP server Duplex scan Scan to PC Copy ID card copying Reduced or enlarged copying Collation Poster Clone Auto Fit Book 2 up 4 up Adjust background Margin shift Edge erase Gray enhance Duplex copy Features C267xFW ...

Page 11: ... b Depending on your country wireless LAN card may not be available For some countries only 802 11 b g can be applied Contact your local Samsung dealer or the retailer where you bought your machine c Available for Windows OS only d Only tray1 is supported e The machine is equipped with 4GB of SD secure digital card ...

Page 12: ... Check the meanings of LED indications in this manual and troubleshoot accordingly see Understanding the status LED on page 120 A paper jam has occurred Open and close the door see Front view on page 21 Check the instructions on removing jammed paper in this manual and troubleshoot accordingly see Clearing paper jams on page 111 Printouts are blurry The toner level might be low or uneven Shake the...

Page 13: ...urchased The screenshots in this user s guide may differ from your machine depending on the machine s firmware driver version The procedures in this user s guide are mainly based on Windows 7 1 Conventions Some terms in this guide are used interchangeably as below Document is synonymous with original Paper is synonymous with media or print media Machine refers to printer or MFP 2 General icons Ico...

Page 14: ...d is damaged or if the electrical outlet is not grounded This could result in electric shock or fire Do not place anything on top of the machine water small metal or heavy objects candles lit cigarettes etc This could result in electric shock or fire If the machine gets overheated it releases smoke makes strange noises or generates an odd odor immediately turn off the power switch and unplug the m...

Page 15: ...tric shock or fire If the plug does not easily enter the electrical outlet do not attempt to force it in Call an electrician to change the electrical outlet or this could result in electric shock Do not allow pets to chew on the AC power telephone or PC interface cords This could result in electric shock or fire and or injury to your pet Do not forcefully pull the paper out during printing It can ...

Page 16: ...he power off and disconnect all cords The information below are only suggestions based on the units weight If you have a medical condition that prevents you from lifting do not lift the machine Ask for help and always use the appropriate amount of people to lift the device safely Then lift the machine If the machine weighs under 20 kg 44 09 lbs lift with 1 person If the machine weighs 20 kg 44 09 ...

Page 17: ...e machine is not well ventilated this could result in fire Do not overload wall outlets and extension cords This can diminish performance and could result in electric shock or fire The machine should be connected to the power level which is specified on the label If you are unsure and want to check the power level you are using contact the electrical utility company a AWG American Wire Gauge Unplu...

Page 18: ...r fuser unit This could cause an explosion or uncontrollable fire When storing supplies such as toner cartridges keep them away from children Toner dust can be dangerous if inhaled or ingested Using recycled supplies such as toner can cause damage to the machine In case of damage due to the use of recycled supplies a service fee will be charged For supplies that contain toner dust toner cartridge ...

Page 19: ...fety information 19 1 Introduction When changing the toner cartridge or removing jammed paper be careful not to let toner dust touch your body or clothes Toner dust can be dangerous if inhaled or ingested ...

Page 20: ... Power cord Quick installation guide Software CDa a The software CD contains the print drivers user s guide and software applications Misc accessoriesb b Miscellaneous accessories included with your machine may vary by country of purchase and specific model ...

Page 21: ...ument Feeder DADF width guide 14 Document feeder output support 3 Duplex Automatic Document Feeder DADF input tray 15 Front cover handle 4 Duplex Automatic Document Feeder DADF output tray 16 Scanner lid 5 Control panel 17 Scanner glass 6 Control board cover 18 Paper width guides on a multi purpose tray 7 Front cover 19 Multi purpose support tray 8 Tray 1 20 Toner cartridge 9 Optional traya a This...

Page 22: ...ending on model or country see Features by model on page 6 1 Waster toner container 4 Power receptacle 7 USB port 10 Extension telephone socket EXT 2 Rear cover 5 Power switch 8 Network port 3 Rear cover handle 6 5V output port for IEEE 1284B Porta a The optional IEEE 1284B parallel connector can be used by plugging in both the USB port and the 5V output port 9 Telephone line socket LINE 1 2 3 4 5...

Page 23: ...ble depending on model or country see Features by model on page 6 Some buttons may not work depending on the mode copy fax or scan 1 Display screen Shows the current status and displays prompts during an operation 2 Numeric keypad Dials a number or enters alphanumeric characters see Keypad letters and numbers on page 253 3 Clear Deletes characters in the edit area 4 Stop Stops an operations at any...

Page 24: ...this button you can hear a dial tone Then enter a fax number It is similar to making a call using speaker phone see Receiving manually in Tel mode on page 288 8 Help Gives detailed information about this machine s menus or status 9 Reset Resets the current machine s setup 10 Wireless LED Shows the current status of the wireless network connection see Understanding the status LED on page 120 11 Sta...

Page 25: ...hine Illustrations on this user s guide may differ from your machine depending on its options or models Check your machine type see Front view on page 21 1 Connect the machine to the electricity supply first 2 Turn the power switch on 1 2 ...

Page 26: ...chine and interface in use Only use a USB cable no longer than 3 meters 118 inches 12 Windows 1 Make sure that the machine is connected to your computer and powered on 2 Insert the supplied software CD into your CD ROM drive If the installation window does not appear click Start All programs Accessories Run X Setup exe replacing X with the letter which represents your CD ROM drive and click OK For...

Page 27: ...pp from the Windows Store You need have a Microsoft account to use the Windows Store 1 From Charms select Search 2 Click Store 3 Search and click Samsung Printer Experience 4 Click Install If you install the driver using the supplied software CD V4 driver is not installed If you want to use the V4 driver in the Desktop screen you can download from the Samsung website www samsung com find your prod...

Page 28: ...er again see Installing the driver locally on page 26 From the Windows 8 Start Screen 1 Make sure that the machine is connected to your computer and powered on 2 Click on the Uninstall Samsung Printer Software tile in the Start screen 3 Follow the instructions in the window If you cannot find a Samsung Printer Software tile unintstall from the desktop screen mode If you want to uninstall Samsung s...

Page 29: ...er provides information about the overall menu structure and the basic setup options Menu overview 30 Machine s basic settings 37 Media and tray 39 Basic printing 53 Basic copying 60 Basic scanning 65 Basic faxing 66 Using USB memory device 70 ...

Page 30: ...odels If so it is not applicable to your machine Some menu names may differ from your machine depending on its options or the models The menus are described in the Advanced Guide see Useful Setting Menus on page 215 You can set menus easily using the touch screen The Main screen is shown on the touch screen on the control panel Some menus are grayed out depending on your options or models Some men...

Page 31: ...the display screen the Fax screen appears which has several tabs and lots of Faxing options Setup You can browse current machine settings or change machine values Job Status Job status shows the jobs currently running completed job or in queue Eco You can view the eco settings Direct USB Enters the USB menu when USB memory is inserted into the USB memory port on your machine Document Box You can s...

Page 32: ...tion Watermark ID Copy Darkness Color Mode Color Mono Auto Fit Copy Darkness Original Type Color Mode Collate Copy Duplex Darkness Color Mode Original Size Original Type N up Copy Duplex Darkness Color Mode Original Size Original Type N up Book Copy Darkness Color Mode Original Size Original Type Book Copy Memory Send Darkness Resolution Duplex Original Type Original Size Color Mode On Hook Dial D...

Page 33: ...ame SMB Destination Original Type Original Size Resolution Color Mode File Format PDF Encryptiona Duplex Darkness File Name FTP Destination Original Type Original Size Resolution Color Mode File Format PDF Encryptiona Duplex Darkness File Name Custom Email To Subject From CC BCC Original Type Original Size Resolution Color Mode File Format PDF Encryptiona Duplex Darkness File Name USB Original Typ...

Page 34: ...u set the eco mode on with a passwcode from the SyncThru Web Service Settings tab Machine Settings System Eco Settings or 6DPVXQJ DV 3ULQWHU 0DQDJHU Device Settings Eco the On force message appears You have to enter the passcode to change the eco mode status ...

Page 35: ...ration Supplies Information Demo Page Help List Address Book Fax Send Confirmation Fax Sent Email Sent Fax Received Fax Schedule Jobs Network Configuration PCL Font List PS Font List Usage Counter Account Fax Setup Send Forward Receive Forward Toll Save Secure Receive Prefix Dial Stmp Rcvd Name ECM Mode Modem Speed Image TCR Setup Wizard Network Setup Ethernet Speed TCP IP IPv4 TCP IP IPv6 802 1x ...

Page 36: ... Timeout Import Setting Export Setting Toner Status Alert Skip Blank Pages Job Timeout Altitude Adjustment Auto CR Firmware Version PDF Type ImageOverwrite Default Paper Size CLR Empty Msga Image Management Vapor Mode Paper Stacking Humidity a This option only appears when small amount of toner is left in the cartridge Admin Setup User Access Control Authentication Stamp Item Opacity Position Chan...

Page 37: ...tem Setup Machine Setup on the control panel Or select Setup Machine Setup Next Initial Setup on the touch screen 2 Select the option you want then press OK Language change the language that is displayed on the control panel Date Time When you set the time and date they are used in delay fax and delay print They are printed on reports If however they are not correct you need to change it for the c...

Page 38: ...e above sea levelU Before you set the altitude value determine the altitude where you areG see Altitude adjustment on page 250 3 Select the option you want then press OK 4 Press OK to save the selection 5 Press Stop Clear button or home icon to return to ready mode Refer to below links to set other settings useful for using the machine See Entering various characters on page 253 See Keypad letters...

Page 39: ...se the inkjet photo paper with this machine It could cause damage to the machine Using inflammable print media can cause a fire Use designated print mediaG see Print media specifications on page 131 The use of inflammable media or foreign materials left in the printer may lead to overheating of the unit andS in rare cases may cause a fire 2 Tray overview To change the size you need to adjust the p...

Page 40: ...ptions or models Check your machine type see Tray overview on page 39 If you do not adjust the guide it may cause paper registration image skew or jamming of the paper 3 Loading paper in the tray Illustrations on this user s guide may differ from your machine depending on its options or models Check your machine type see Front view on page 21 Tray 1 optional tray 1 Pull out the paper tray LGL 2 1 ...

Page 41: ...correct paper size slot marked at the bottom of the tray to adjust to the size see Tray overview on page 39 U 3 Flex or fan the edge of the paper stack to separate the pages before loading papers 4 After inserting paper into the tray squeeze the paper width guides and paper length guide 1 Paper length guide 2 Paper width guide 2 1 ...

Page 42: ... curl it may cause a paper jam or the paper can be wrinkled 5 Insert the tray back into the machine 6 When you print a document set the paper type and size for tray see Setting the paper size and type on page 48 Multi purpose or Manual feeder tray The multi purpose or manual feeder tray can hold special sizes and types of print material such as postcards note cards and envelopes see Print media sp...

Page 43: ...ations on page 131 Flatten any curl on postcards envelopes and labels before loading them into the multi purpose or manual feeder tray 1 Pull out the paper tray for manual feeding OR Press the push release of multi purpose tray and it down to open 2 Load the paper 3 Squeeze the multi purpose or manual feeder tray paper width guides and adjust them to the width of the paper Do not force them too mu...

Page 44: ...chine supports a display screen or touch screen you can set it from the control panel Then set the paper type from the Printing preferences window Paper tab Paper Type see Opening printing preferences on page 55 When using special media we recommend you feed one sheet at a time see Print media specifications on page 131 Illustrations on this user s guide may differ from your machine depending on i...

Page 45: ... Do not use stamped envelopes Do not use envelopes with clasps snaps windows coated lining self adhesive seals or other synthetic materials Do not use damaged or poorly made envelopes Be sure the seam at both ends of the envelope extends all the way to the corner of the envelope 1 Acceptable 2 Unacceptable Envelopes with a peel off adhesive strip or with more than one flap that folds over to seal ...

Page 46: ...rinted transparencies to prolonged sunlight Ensure that transparencies are not wrinkled curled or have any torn edges Do not use transparencies that separate from the backing sheet To prevent transparencies from sticking to each other do not let the printed sheets stack up as they are being printed out Recommended media Transparency for a color laser printer by Xerox such as 3R 91331 A4 3R 2780 Le...

Page 47: ...d stock Custom sized paper In the software application set the margins to at least 6 4 mm 0 25 inches away from the edges of the material Preprinted paper When loading preprinted paper the printed side should be facing up with an uncurled edge at the front If you experience problems with paper feeding turn the paper around Note that print quality is not guaranteed Must be printed with heat resista...

Page 48: ... from the Printing preferences window Paper tab Paper Type see Opening printing preferences on page 55 You can set the paper size and type from Device Settings in 6DPVXQJ DV 3ULQWHU 0DQDJHU program For Windows and Mac users you set from Samsung Easy Printer Manager Switch to advanced mode Device Settings see Device Settings on page 307 It may be necessary to press OK to navigate to lower level men...

Page 49: ...ee Front view on page 21 7 Preparing originals Do not load paper smaller than 142 x 148 mm 5 6 x 5 8 inches or larger than 216 x 356 mm 8 5 x 14 inches Do not attempt to load the following s of paper in order to prevent paper jam low print quality and machine damage Carbon paper or carbon backed paper Coated paper Onion skin or thin paper Wrinkled or creased paper Curled or rolled paper Torn paper...

Page 50: ... depending on its options or models Check your machine type see Front view on page 21 On the scanner glass Using the scanner glass you can copy or scan originals You can get the best scan quality especially for colored or gray scaled images GMake sure that no originals are in the document feeder If an original is detected in the document feeder the machine gives it priority over the original on th...

Page 51: ...canner lid until its hinges are caught by the stopper and then close the lid If the book or magazine is thicker than 30 mm start copying with the scanner lid open Be careful not to break the scanner glass You may get hurt Do not put hands while closing the scanner lid The scanner lid may fall on your hands and get hurt Do not look into the light from inside of the scanner while copying or scanning...

Page 52: ...ut tray Make sure that the bottom of the original stack matches the paper size marked on the document input tray 3 Adjust the document feeder width guides to the paper size Dust on the document feeder glass may cause black lines on the printout Always keep the glass clean see Cleaning the machine on page 97 ...

Page 53: ...on page 272 The following Printing Preferences window is for Notepad in Windows 7 1 Open the document you want to print 2 Select Print from the File menu 3 Select your machine from the Select Printer list 4 The basic print settings including the number of copies and print range are selected within the Print window To take advantage of the advanced printing features click Properties or Preferencesf...

Page 54: ... the print job is waiting in the print queue or print spooler cancel the job as follows You can access this window by simply double clicking the machine icon in the Windows task bar You can also cancel the current job by pressing Cancel or Stop Clear button on the control panel ...

Page 55: ...ended and an mark means you cannot select that option due to the machine s setting or environment 1 Open the document you want to print 2 Select Print from the file menu The Print window appears 3 Select your machine from the Select Printer 4 Click Properties or Preferences The screenshot may differ depending on model You can apply Eco features to save paper and toner before printing see Easy Eco ...

Page 56: ...tab 2 Enter a name for the item in the Favorites input box 3 Click Save 4 Enter name and description and then select the desired icon 5 Click OK When you save Favorites all current driver settings are saved To use a saved setting select it in the Favorites tab The machine is now set to print according to the settings you have selected To delete saved settings select it in the Favorites tab and cli...

Page 57: ...level menus for some models 1 Select Menu System Setup Machine Setup Eco Settings on the control panel Or press Eco on the control panel Or select Eco Settings Next on the touch screen 2 Select the option you want and press OK Default Mode Select this to turn on or off the eco mode Off Set the eco mode off On Set the eco mode on If you set the eco mode on with a passcode from the SyncThru Web Serv...

Page 58: ...sult simulator ResultSimulator shows the results of reduced emission of carbon dioxide used electricity and the amount of saved paper in accordance with the settings you selected The results are calculated on the basis that the total number of printed paper is one hundred without a blank page when the Eco mode is disabled Refers to the calculation coefficient about CO2 energy and paper from IEA th...

Page 59: ...ncThru Web Service website see Logging into SyncThru Web Service on page 300 3 Settings Machine Settings System RAM Disk 4 Enable RAM Disk This features may not appear on the display depending on options or models If so it is not applicable to your machine Printing secure documents from the control panel Accessing menus may differ from model to model see Menu overview on page 30 or Control panel o...

Page 60: ... 60 4 Enter the number of copies using the arrow or number keypad if necessary 5 Press Start If you need to cancel the copying job during the operation press Stop or Stop Clear button and the copying will stop 16 Changing the settings for each copy Your machine provides default settings for copying so that you can quickly and easily make a copy If you press the Stop or Stop Clear button twice whil...

Page 61: ...py job 1 Select copy Menu CopyFeature OriginalType on the control panel Or select Menu Copy Feature Original Type on the control panel Or select Copy Basic Copy settings Original Type on the touch screen 2 Select the option you want and press OK Text Use for originals containing mostly text Text Photo Use for originals with mixed text and photographs If texts in the printout is blurry select Text ...

Page 62: ... the option you want and press OK 3 Press Stop Clear button or home icon to return to ready mode To scale the copy by directly entering the scale rate 1 Select copy Menu Copy Feature Reduce Enlarge Custom on the control panel Or select Menu Copy Feature Reduce Enlarge Custom on the control panel Or select Copy Custom Copy settings Reduce Enlarge Custom on the touch screen 2 Enter the copy size you...

Page 63: ...ing on the model the operating procedure may differ 1 Press ID Copy on the control panel Or select Menu Copy Feature Layout ID Copy on the control panel Or select Copy ID Copy on the touch screen 2 Place the front side of an original facing down on the scanner glass where arrows indicate as shown Then close the scanner lid 3 Place Front Side and Press Start appears on the display 4 Press Start You...

Page 64: ...asic copying 64 2 Menu Overview and Basic Setup If you do not press the Start button only the front side will be copied If the original is larger than the printable area some portions may not be printed ...

Page 65: ... see Loading originals on page 50 2 Select scan Scan To PC on the control panel Or select Scan Local PC on the touch screen If you see Not Available message check the port connectionSGor select Enable Scan from Device Panel in 5COUWPI CU 2TKPVGT CPCIGT Switch to advanced mode Scan to 2 Settings 3 Select the scan destination you want and press OK Default setting is My Documents You can create and s...

Page 66: ...r 1 Line port 2 Micro filter 3 DSL modem Telephone line see Rear view on page 22 19 Preparing to fax Before you send or receive a fax you need to connect the supplied line cord to your telephone wall jack see Rear view on page 22 Refer to the Quick Installation Guide how to make a connection The method of making a telephone connection is different from one country to another 20 Sending a fax When ...

Page 67: ...lect Fax On Hook Dial settings on the touch screen 3 Adjust the resolution and the darkness to suit your fax needs see Adjusting the document settings on page 68 4 Press On Hook Dial on the control panel or lift the handset 5 Enter a fax number using the number keypad on the control panel 6 Press Start on the control panel when you hear a high pitched fax signal from the remote fax machine Sending...

Page 68: ...rs select No at the Another No prompt and press OK The machine begins sending the fax to the numbers you entered in the order in which you entered them Multi send report is printed after sending faxes 21 Receiving a fax Your machine is preset Fax mode at the factory When you receive a fax the machine answers the call on a specified number of rings and automatically receives the fax 22 Adjusting th...

Page 69: ...en your machine is set to Super Fine resolution and the fax machine with which you are communicating does not support Super Fine resolution the machine transmits using the highest resolution mode supported by the other fax machine Photo Fax Originals containing shades of gray or photographs Color Fax Original with colors Memory transmission is not available in this mode You can only send a color f...

Page 70: ...evice The USB memory port on the front of your machine is designed for USB V1 1 and USB V2 0 memory devices Your machine supports USB memory devices with FAT16 FAT32 and a sector size of 512 bytes Check your USB memory device s file system from your dealer You must use only an authorized USB memory device with an A plug connector Use only a metal shielded USB memory device Only use a USB memory de...

Page 71: ...emory device Scanning 1 Insert a USB memory device into the USB memory port on your machine 2 Place a single document face down on the document glass or load the documents face up into the document feeder see Loading originals on page 50 3 Select scan Scan To USB OK on the control panel Or select Scan USB Next Start on the touch screen The machine begins scanning After scanning is complete you can...

Page 72: ...is option you cannot select Mono in ColorG Mode Duplex Sets the duplex mode Darkness Sets the brightness level to scan an original File Name Sets the file name File Policy Sets the policy to save files between overwirting or renaming PDF Encryption Sets the encrypts PDF files 3 Select the desired status you want and press OK 4 Repeat steps 2 and 3 to set other setting options 5 Press Stop Clear bu...

Page 73: ...Yes appears to print another job and repeat from step 2 Otherwise press the left right arrow to select No and press OK 7 Press Stop Clear button or home icon to return to ready mode 27 Backing up data Data in the machine s memory can be accidentally erased due to power failure or storage failure Backup helps you protect the system settings by storing them as backup files on a USB memory device Bac...

Page 74: ...B memory You can delete image files stored on a USB memory device one by one or all at once by reformatting the device If you see or D in the front of a folder name there are one or more files or folders in the selected folder After deleting files or reformatting a USB memory device files cannot be restored Therefore confirm that you no longer need the data before deleting it Deleting an image fil...

Page 75: ...ormat and press OK 3 Select Yes 4 Press Stop Clear button or home icon to return to ready mode Viewing the USB memory status You can check the amount of memory space available for scanning and saving documents For touch screen model select Direct USB Show Space Next on the touch screen 1 Insert a USB memory device into the USB memory port on your machine and then press Direct USB 2 Select Check Sp...

Page 76: ...es 77 Available consumables 78 Available accessories 80 Available maintenance parts 81 Storing the toner cartridge 82 Redistributing toner 84 Replacing the toner cartridge 86 Replacing the waste toner container 89 Installing accessories 91 Monitoring the supplies life 95 Setting the toner low alert 96 Cleaning the machine 97 Tips for moving storing your machine 103 ...

Page 77: ... to obtain the list of available supplies and maintenance parts To order Samsung authorized supplies accessories and maintenance parts contact your local Samsung dealer or the retailer where you purchased your machine You can also visit www samsung com supplies and then select your country region to obtain the contact information for service ...

Page 78: ...ue to different configurations of toner cartridges and other supplies according to the specific country conditions Type Average yielda a Declared yield value in accordance with ISO IEC 19798 The number of pages may be affected by operating environment printing interval graphics media type and media size Part name Toner cartridge Average continuous black cartridge yield Approx 6 000 standard pages ...

Page 79: ...genuine Samsung toner cartridge such as refilled or remanufactured toner Samsung cannot guarantee non genuine Samsung toner cartridge s quality Service or repair required as a result of using non genuine Samsung toner cartridges will not be covered under the machine s warranty ...

Page 80: ...attach an additional 520a sheet tray a Plain paper 80 g m2 20 lb bond CLP S680A IEEE 1284 Portb b The optional IEEE 1284 port can be used by plugging in both the USB port and the 5V output port Allows you to use various interface When installing the printer driver with an IEEE1284B parallel connector the machine might not be found and after installing the printer driver only basic printing feature...

Reviews: