background image

M I C R O WAVE OVEN

CE104CF

Owner’s Instructions

1 CE104CF GB-1  2003.4.19  4:24 PM  Page 1

Summary of Contents for CE104CFC

Page 1: ...MICROWAVE OVEN CE104CF Owner s Instructions ...

Page 2: ...oking starts and at the end the oven beeps four times I want to defrost some food Place the frozen food in the oven Select the food category by pressing the AUTO DEFROST button one or more times Leave the food in the oven Press PLUS one or more times for each extra minute that you wish to add Select the weight by pressing the 1kg and 0 1 kg buttons as required Increase or decrease the time as requ...

Page 3: ...ng 13 Adjusting the Cooking Time 13 Using the Instant Cook Feature 14 Using the Auto Cook Feature 16 Using a Crusty Plate 18 DEFROSTING Using the Auto Defrost Feature 19 Setting a Standing Time 21 Multistage Cooking 21 TRADITIONAL COOKING METHODS Choosing the Heating Element Position 22 Choosing the Accessories 22 Preheating the Oven 23 Cooking by Convection 23 Grilling 24 Spit Roasting 25 GB You ...

Page 4: ... ALL TYPES OF COOKING Using the Memory Cook Feature 28 Using the Demonstration mode 28 Safety locking Your Microwave Oven 29 Switching the Beeper Off 29 RECOMMENDATIONS FOR USE Cookware Guide 30 Cleaning Your Microwave Oven 31 Storing and Repairing Your Microwave Oven 31 Technical Specifications 32 Oven 33 Control Panel 34 ...

Page 5: ...e energy a Under no circumstances should any attempt be made to operate the oven with the door open or to tamper with the safety interlocks door latches or to insert anything into the safety interlock holes b Do not place any object between the oven door and front face or allow food or cleaner residues to accumulate on sealing surfaces Ensure that the door and door sealing surfaces are kept clean ...

Page 6: ...t the oven going when it is empty DO NOT cover the side or rear ventilation slots with cloths or paper Reason The cloths or paper may catch fire as hot air is evacuated from the oven ALWAYS use oven gloves when removing a dish from the oven Reason Some dishes absorb microwaves and heat is always transferred from the food to the dish The dishes are therefore hot DO NOT touch heating elements or int...

Page 7: ...ode if overheated ALWAYS check the temperature of baby food or milk before giving it to the baby NEVER heat a baby s bottle with the teat on as the bottle may explode if overheated Be careful not to damage the power cable Do not immerse power cable or plug in water and keep power cable away from heated surfaces Do not operate this appliance if it has a damaged power cable or plug Stand at arm s le...

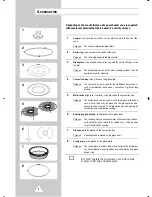
Page 8: ...r grill cooking modes 5 Metal racks High rack Low rack to be placed on the convection tray Purpose The metal racks can be used to cook two dishes at the same time A small dish may be placed on the glass plate and a second dish on the rack The metal racks can be used in grill convection and combination cooking 6 Roasting spit and stand to be placed on the glass bowl Purpose The roasting spit is a c...

Page 9: ...en work surface or shelf movable trolley table For your personal safety this appliance must be Properly earthed 3 pin plug Plugged into a standard 230 Volt 50 Hz AC earthed socket 1 Install the oven on a flat level stable surface Allow a clearance of at least 4 inches 10 cm on all sides for ventilation purposes 2 Never block the air vents as the oven may overheat and automatically switch itself of...

Page 10: ...oven Standing times specified in recipes and in this booklet must therefore be respected to ensure Even cooking of the food right to the centre The same temperature throughout the food Checking that Your Oven is Operating Correctly The following simple procedure enables you to check that your oven is working correctly at all times If you are in doubt refer to the section entitled What to Do if You...

Page 11: ...ght interference may be observed on televisions or radios when the oven is operating This is normal Solution Install the oven away from televisions radios and aerials If interference is detected by the oven s microprocessor the display may be reset Solution Disconnect the power plug and reconnect it Reset the time Problem Condensation inside the oven Air flow around the door and outer casing Light...

Page 12: ...the food in the centre of the glass plate Close the door Never switch the microwave oven on when it is empty 2 Press the MICROWAVE button Result The following indications are displayed microwave mode one stage cooking maximum cooking power 3 Select the appropriate power level by pressing the POWER LEVEL button until the corresponding percentage is displayed Refer to the power level table below for...

Page 13: ...el the cooking settings press the Stop button again Adjusting the Cooking Time Like traditional cooking you may find that depending on the food s characteristics or your tastes you have to adjust the cooking times slightly You can Check how cooking is progressing at any time simply by opening the door Increase or decrease the remaining cooking time To Then press Increase the cooking time PLUS once...

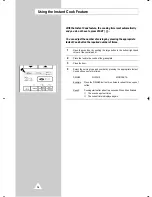
Page 14: ...shing the large button in the bottom right hand corner of the control panel 2 Place the food in the centre of the glass plate 3 Close the door 4 Select the serving type and number by pressing the appropriate Instant Cook button one or more times DRINKS QUICHE RICE PASTA Example Press the DRINKS button three times to reheat three cups of coffee Result Cooking starts after about two seconds When it ...

Page 15: ...er on the convection tray on the 1100 1200 g glass plate Rice Pasta Rice 250 g 5 10 mins Put rice in a bowl add 500ml cold water and stir Cook uncovered Stir before standing and cover during standing Stir before serving 500 g 5 10 mins Put rice in a bowl add 1000ml cold water and stir Cook uncovered Stir before standing and cover during standing Stir before serving Pasta 250 g 5 mins Put pasta in ...

Page 16: ...t the type of food that you are cooking by pressing the AUTO COOK button one or more times Refer to the table on the following page for a description of the various pre programmed settings 5 Select the size of the serving by pressing the Dish button one or more times 6 Increase or decrease the cooking time if necessary by pressing the PLUS or MINUS buttons respectively 7 Press START Result The foo...

Page 17: ...s 400 500 g 3 mins Take potatoes which are having a similar 2 550 650 g 4 mins size Wash and peel them and put them in a 3 700 800 g 5 mins glass bowl and add 150 200 ml of water Cover with a lid during cooking and standing 6 1 Fresh vegetables 200 250 g 2 mins Place the vegetables in a glass bowl and 2 400 500 g add 45 60 ml of water Cover with a lid 3 600 700 g during cooking Stir before leaving...

Page 18: ...n the glass plate in the microwave oven Never place the crusty plate in the oven without the glass plate 5 Select the appropriate Crusty Reheat programme by pressing the Crusty button one or more times Refer to the table below 6 Select the serving size by pressing the Dish button one or more times 7 Increase or decrease the cooking time if necessary by pressing the PLUS or MINUS buttons respective...

Page 19: ... the defrost time if necessary by pressing the PLUS or MINUS buttons respectively 6 Press START Result Defrosting begins The oven beeps half way through defrosting to remind you to turn the food over 7 Press START again to finish defrosting You can also defrost food manually To do so select the microwave cooking reheating function with a power level of 30 Refer to the section entitled Cooking Rehe...

Page 20: ...n the oven beeps You can defrost either whole chickens or chicken portions 3 Fish 0 2 2 0 kg 20 30 mins Shield the whole tail of the fish with aluminium foil Turn the fish over when the oven beeps This programme is well suited to trout plaice salmon and cod whether whole or in fillets 4 Fruit 0 2 0 5 kg 5 10 mins Spread the fruit out in a glass bowl Cover during defrosting and standing Stir carefu...

Page 21: ...e by pressing the 1 min button the appropriate number of times 1 minute in the example 3 Press GRILL and set the cooking time by pressing the 10min and 1min buttons the appropriate number of times 15 minutes in the example 4 Set the convection temperature by pressing the MW OVEN button the appropriate number of times 200 C in the example 5 Set the microwave power level by the pressing POWER LEVEL ...

Page 22: ...llel with the back wall Horizontal position Pull the heating element towards you convection cooking and grilling Push it upwards until it is parallel with the roof of the oven Choosing the Accessories Traditional convection cooking does not require any special cookware You should however use only cookware that you would use in your normal oven Microwave safe recipients are not usually suitable for...

Page 23: ... a traditional oven Microwaves are not used You can set the temperature as required in a range varying from 40 C to 250 C in eight preset levels The maximum cooking time is 60 minutes If you wish to preheat the oven see above Always use oven gloves when touching the recipients in the oven as they will be very hot You can get better cooking and browning if you use the low rack 1 Check that the heat...

Page 24: ...tal position unless you are using the roasting spit and that the appropriate rack is in position 2 Open the door and place the food on the rack 3 Press the GRILL button Result The following indications are displayed grill mode one stage cooking 4 Set the grilling time by pressing the 10 min 1 min and 10 s buttons The maximum grilling time is 60 minutes 5 Press the START button Result Grilling star...

Page 25: ... of the meat Example Push the spit between the backbone and breast of a chicken 3 Place the spit on its stand and place the stand onto the glass bowl and the glass bowl onto the convection tray 4 To help brown the meat brush it with cooking oil 5 Place the oven proof convection tray on the glass plate in the oven 6 Select combined microwave and grill power level and time For Refer to page Combined...

Page 26: ...ntrol panel Place the food on the convection tray and place it in the centre of the glass plate Close the door The heating element must be in the horizontal position 2 Press the MW OVEN button Result The following indications are displayed microwave mode convection mode one stage cooking power level 250 C temperature 3 Set the cooking time by pressing the 10 min 1 min and 10 s buttons The maximum ...

Page 27: ...d corner of the control panel Place the food on the rack best suited to the type of food to be cooked Place the rack on the convection tray Close the door 2 Press the MW GRILL button Result The following indications are displayed microwave mode grill mode one stage cooking power level 3 Set the cooking time by pressing the 10 min 1 min and 10 s buttons The maximum cooking time is 60 minutes 4 Sele...

Page 28: ...in the oven s memory Using the Settings 1 Place the food to be cooked in the oven 2 To select the Then press MEMORY First setting Once Second setting Twice 3 Press START Result The food is cooked as requested 28 Using the Memory Cook Feature Using the Demonstration Mode You can see or learn how to operate your oven without heating using the demostration function You should leave the demonstration ...

Page 29: ...is displayed 2 To unlock the oven press the Clock and START buttons again at the same time Result The letter L is no longer displayed The oven can be used normally You can switch the beeper off whenever you want 1 Press the START and STOP buttons at the same time Result The oven does not beep to indicate the end of a function 2 To switch the beeper back on press the START and STOP buttons again at...

Page 30: ...cups and Can be used to warm food Overheating may cause the containers polystyrene to melt Paper bags or newspaper May catch fire Recycled paper or metal trims May cause arcing Glassware Oven to table ware Can be used unless decorated with a metal trim Fine glassware Can be used to warm foods or liquids Delicate glass may break or crack if heated suddenly Glass jars Must remove the lid Suitable fo...

Page 31: ...n storing or having your microwave oven serviced The oven must not be used if the door or door seals are damaged Broken hinge Deteriorated seals Distorted or bent oven casing Only a qualified microwave service technician should perform repairs NEVER remove the outer casing from the oven If the oven is faulty and needs servicing or you are in doubt about its condition Unplug it from the wall socket...

Page 32: ... source 230 V 50 Hz AC Power consumption Maximum power 2950 W Microwave 1500 W Grill heating element 1400 W Convection heating element 1450 W Output power 90 W 900 W 10 levels IEC 705 Operating frequency 2 450 MHz Dimensions W x D x H Outside 547 x 487 x 339 mm Oven cavity 358 x 365 x 229 mm Weight Shipping 29 kg approx Net 25 kg approx Technical Specifications ...

Page 33: ...SAFETY INTERLOCK HOLES GLASS PLATE Oven 33 GB DOOR LATCHES VENTILATION HOLES HEATING ELEMENT VENTILATION HOLES CONTROL PANEL OPEN DOOR PUSH BUTTON ROLLER RING DOOR COUPLER ...

Page 34: ...ATURE SELECTION CRUSTY COOK SELECTION TIME SETTING WEIGHT SELECTION AND SERVING SELECTION START BUTTON STOP CANCEL BUTTON STANDING TIME SETTING COOKING TIME ADJUSTMENT BUTTONS CLOCK SETTING COMBINED MODE SELECTION MICROWAVE GRILL COMBINED MODE SELECTION MICROWAVE CONVECTION GRILL MODE SELECTION CONVECTION MODE TEMPERATURE SELECTION INSTANT COOK SELECTION ...

Page 35: ...35 GB ...

Page 36: ...THIS APPLIANCE IS MANUFACTURED BY Printed in Korea Code No DE68 60055A ...

Reviews: