background image

Samsung Electronics

2-9

Item

Descriptions

Code-No.

Q'TY

Remark

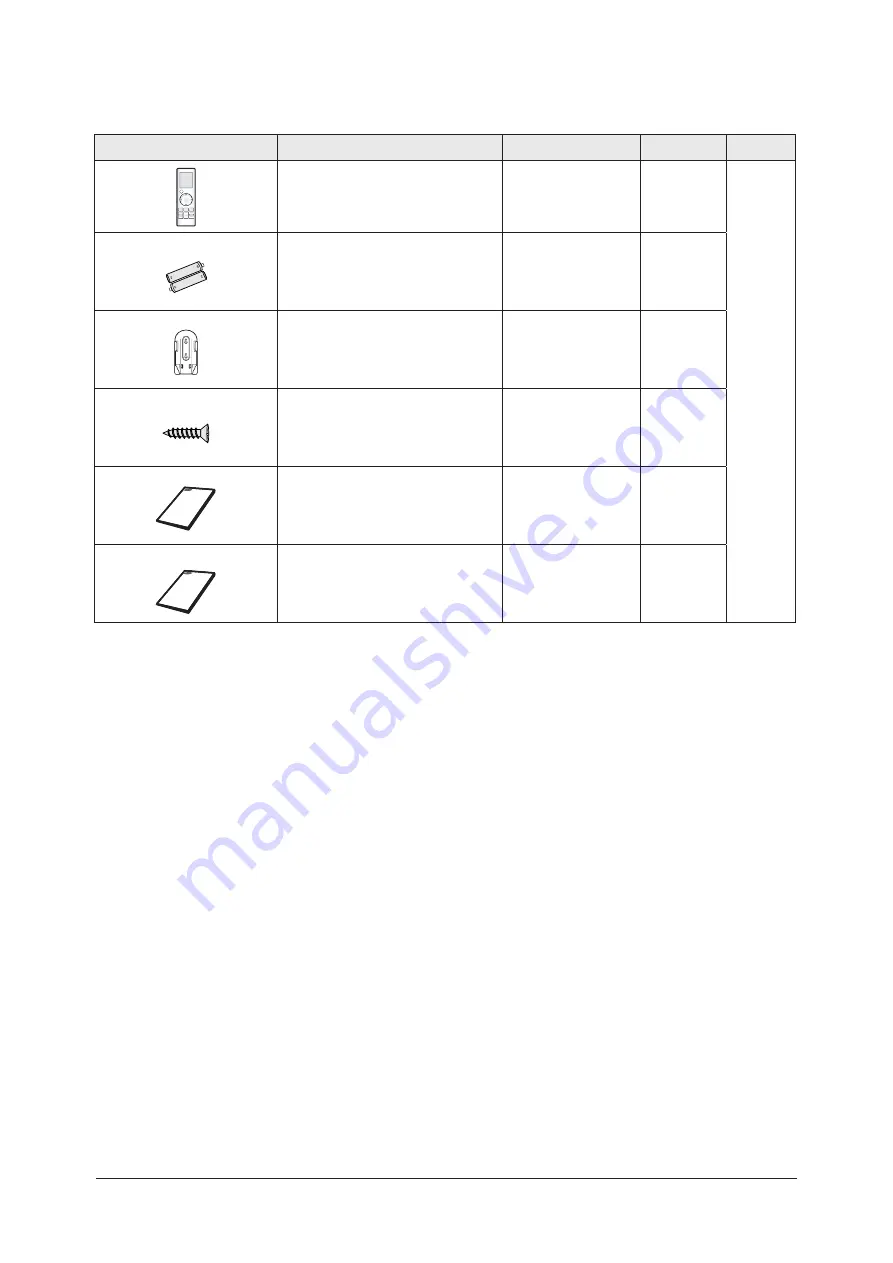
Wireless remote controller

DB93-04858C

(MR-BH01)

1

Battery 

DB47-90024A

2

Remote control holder

DB61-03147A

1

STS 2S-2x10 tapped screw

6002-000581

2

User's manual

DB98-27999A

1

Installation manual

DB98-27997A

1

Accessories(cont.)



Wireless Remote Controller Accessories

Summary of Contents for CH070EAV1

Page 1: ...AV1 CH090 105 140EAV UH070EAV1 UH090 105 140EAV Model Code CH070EAV1 CH090 105 140EAV UH070EAV1 UH090 105 140EAV UH090 105 140EAV CH070EAV1 CH090 105 140EAV 1 Precautions 2 Product Speci cations 3 Dis...

Page 2: ...ooting 3 1 4 1 Indoor Display Error and Check Method 4 1 4 2 Outdoor LED Error Display and Check Method 4 4 4 3 Setting Option Setup Method 4 5 4 4 Items to be checked first 4 18 4 5 Fault Diagnosis b...

Page 3: ...incorrect installation When installing the built in type air conditioner keep all electric cables such as the power cable and the connection cord in pipes ducts or cable channels to protect them from...

Page 4: ...o ISO standard for energy efficiency 1 3 During operation Do not repair the air conditioner at your discretion It is recommended to contact a service center directly Never spill any kind of liquid on...

Page 5: ...LDC inverter technology it makes a room cool with highly energy saving and arises the efficiency of air conditioner Long Piping Length Height It can give the benefit to the installers and aries the re...

Page 6: ...8x840 880x798x310 840x298x840 932x1128x375 inch 33 1x8 6x33 1 34 6x31 4x12 2 33 1x9 1x33 1 36 7x44 4x14 8 Weight Net kg 31 57 29 0 90 Compressor Model G8T260FUAEW G5T360FUAEK Motor Type TWIN BLDC TWIN...

Page 7: ...idthxHeightxDepth mm 840x298x840 932X1128X375 inch 33 1x9 1x33 1 36 7X44 4X14 8 Weight Net kg 29 0 90 0 Compressor Model G5T360FUAEK Motor Type TWIN BLDC Rated Output Oil Type FREOL 68ES T Ze GLES RB6...

Page 8: ...idthxHeightxDepth mm 840x298x840 932X1128X375 inch 33 1x9 1x33 1 36 7X44 4X14 8 Weight Net kg 29 0 94 0 Compressor Model G5T450FUAEX Motor Type TWIN BLDC Rated Output Oil Type FREOL 68ES T Ze GLES RB6...

Page 9: ...tive Model UH140EAV UH140GAV Design Outdoor Unit Indoor Unit Net Weight Indoor Unit 29 0kg 29 0kg Outdoor Unit 94 0kg 98 0kg Outer Dimension WidthxHeightxDepth Indoor Unit 840x298x840 mm 840x298x840 m...

Page 10: ...on drain in DB62 03440H 1 Insulation drain out DB62 03439H 1 Insulation Pipe Joint In 1 4 DB72 00143E 1 Insulation Pipe Joint In 1 2 DB72 00143G 1 Insulation Pipe joint out 1 4 DB62 03439J 2 Cable tie...

Page 11: ...Samsung Electronics 2 7 Item Descriptions Code No Q TY Remark Drain Plug DB67 00477A 1 Outdoor Unti Cap Drain DB63 10355C 1 Rubber bracket Wire DB73 00218A 2 Nut Flare DB60 30010B 1 Accessories cont...

Page 12: ...ireless remote controller DB93 00251G ARH 401 1 Battery DB47 90024A 2 Remote control holder DB61 00204A 1 STS 2S 2x10 tapped screw 6002 000581 2 User s manual DB98 05156A 1 Installation manual DB98 05...

Page 13: ...ireless remote controller DB93 04858C MR BH01 1 Battery DB47 90024A 2 Remote control holder DB61 03147A 1 STS 2S 2x10 tapped screw 6002 000581 2 User s manual DB98 27999A 1 Installation manual DB98 27...

Page 14: ...65 10088B 2 Cable clamp DB65 10074E 5 M4x16 tapped screw 6002 000474 7 Indoor unit power drawing cable DB39 00221A 1 Communication cable of the wired remote controller DB39 00933A 1 Wire joint DB39 90...

Page 15: ...ler Accessories Item Descriptions Code No Q TY Remark Centralized controller DB93 03425C MCM A202 1 Cable tie DB65 10088B 2 Cable clamp DB65 10074E 5 M4x16 tapped screw 6002 000474 7 User s manual DB9...

Page 16: ...ler Accessories Item Descriptions Code No Q TY Remark Function controller DB97 01077A MCM A100 1 Cable tie DB65 10088B 2 Cable clamp DB65 10074E 6 M4x16 tapped screw 6002 000474 7 User s manual DB98 2...

Page 17: ...sung Electronics 2 13 Transmitter Accessories Item Descriptions Code No Q TY Remark Transmitter DB97 00647P MIM B04A 1 Transmitter power cable DB39 00378D 1 Transmitter communication cable DB39 00253D...

Page 18: ...r Accessories Item Descriptions Code No Q TY Remark DMS DB93 03709B MIM D00 1 Cable tie DB65 01088B 2 Cable clamp DB65 010074D 2 M4x16 tapped screw 6002 000474 5 BOTTOM HOOK DB73 00320A 4 User s manua...

Page 19: ...Samsung Electronics 3 1 3 Disassembly and Reassembly Necessary Tools Item Remark SCREW DRIVER MONKE SPANNER...

Page 20: ...the tap on the Front Grille to open it 2 Disassembly of Front Grille 1 Open the Front Grille at about 45 degrees and draw it forward 2 Disassemble the Safety Clip 3 Filter Disassembly 1 Draw the Dust...

Page 21: ...y No Parts Procedure Remark 4 Open the corner cover slowly to disassemble it There are three hooks 5 Pull the corner cover forward carefully by using 2 hands 6 Loosen 4 bolts of the front panel slowly...

Page 22: ...se Screw Driver 2 Draw the both side hooks toward the arrow direction 9 Disassemble 2 cables between the indoor unit and Panel Stepping motor connector Receiving display unit connector wire 10 Hold on...

Page 23: ...Indoor and Outdoor Cables connected to the Terminal Board 1 Use Screw Driver 4 Fan Motor 1 Disassemble the Fan Motor Wire Connector Thermistor Wire Connector Drain Pump Wire Connector and Float Switch...

Page 24: ...the water in In this point you can check the Drain Pump Impeller operates well or not 5 Loosen 8 bolts in the mark 1 Use Screw Driver At first there are 2 bolts per one corner and when reassembly ther...

Page 25: ...s Procedure Remark 8 Take out the Washer 9 Lift the Fan to disassemble from the Motor 10 Loosen the screw and disassemble the Motor Connector to disassemble Motor Use Screw Driver 11 Loosen 4 screws i...

Page 26: ...Drain Pump 2 Loosen the 3 bolts to disassemble the Drain Pump from the Main Body Use Screw Driver 5 Heat Exchanger 1 Loosen 2 screws to disassemble the Cover Pipe beside the Main Body Use Screw Drive...

Page 27: ...emark 6 Front Panel PCB Part 1 Loosen 2 screws to disassemble the Cover PCB Use Screw Driver 2 Loosen the screw fixing the PCB to disassemble it Use Screw Driver 3 Disassemble the PCB Wire from the PC...

Page 28: ...osen the 2 screws fixing the Cover Side Use Screw Driver There are 4 Cover Side 2 Draw 2 hooks then lift up the Cover Side 3 Disassemble the Stepping Motor Wire Connected 4 Disassemble the Stepping Mo...

Page 29: ...amsung Electronics 3 11 No Parts Procedure Remark 1 Common Work 1 Loosen 1 fixing screw of the Cover Control and detach the Cover Control 2 Loosen each 7 fixing screws and detach the Cabinet Upper UH0...

Page 30: ...s 3 12 Samsung Electronics No Parts Procedure Remark 3 Loosen 1 screw fixed to assemble Control Box with Cabinet Side RH 4 Loosen fixing screws and detach the Cabinet Side RH 5 Loosen 2 screws fixed o...

Page 31: ...Product Specifications Samsung Electronics 3 13 No Parts Procedure Remark 6 Loosen fixing screws of the Cabinet Front...

Page 32: ...ach the Nut Flange like the picture on the right side Turn counter clockwise because the screw is right handed 2 Detach the Fan Propeller 3 Loosen 4 fixing screws to detach the Motor 4 Disconnect the...

Page 33: ...connectors from the PCB of ASS Control Out 3 Pull up the ASS Control Out 4 Heat Exchanger 1 Release the refrigerant at first 2 Loosen fixing screw on both sides 3 Disassemble the pipes in both inlet...

Page 34: ...Electronics No Parts Procedure Remark 5 Compressor 1 Loosen the fixing nut and detach the Compressor Lead Wire 2 Disassemble the Felt Compressor Sound 3 Loosen the 3 bolts at the bottom of Compressor...

Page 35: ...Loosen 2 fixing screws of the Cabi Front Rh and detach the Cabi Front Rh 2 Loosen each 8 fixing screws and detach the Cabi Top Cover 3 Loosen 2 screws fixed to assemble Control Box with Cabi Back Rh 4...

Page 36: ...3 18 Samsung Electronics No Parts Procedure Remark 5 Loosen 2 screws fixed on the Cabi Back Lf 6 Loosen fixing screws of the Cabi Front Lf...

Page 37: ...n the right side Turn clockwise because the screw is left handed Use Monkey Spanner 2 Detach the Fan Propeller 3 Loosen 4 fixing screws to detach the Motor Use Monkey Spanner 4 Disconnect the wire bet...

Page 38: ...m the Ass y Control Out 2 Detach several connectors from the PCB of Ass y Control Out 3 Pull up the Ass y Control Out 4 Heat Exchanger 1 Release the refrigerant at first 2 Loosen fixing screw on both...

Page 39: ...ure Remark 5 Compressor 1 Loosen the fixing nut and detach the Compressor Lead Wire Use Monkey Spanner 2 Disassemble the Felt Comp Sound 3 Loosen the 3 bolts at the bottom of Compressor like the pictu...

Page 40: ...3 22 Samsung Electronics MEMO...

Page 41: ...nsor X X X 1 No communication for 2 minutes between indoor units Communication error for more than 2 minutes 2 Indoor unit receiving the communication error from outdoor unit 3 Outdoor unit tracking 3...

Page 42: ...pressor Discharge Temp sensor Error Open Short Error Power cable miss connection error Indoor Float Switch 2nd Detection Self Diagnosys Error Outdoor unit indoor unit communication wire miss connectio...

Page 43: ...Protetion Control Error Outdoor unit Capacity Setup option error Communication error between Indoor unit and wired remote control Wired remote control error Communication error between Master and Sla...

Page 44: ...10 Discharge temperature sensor error 11 Current sensor error 12 Compressor Limit error 13 Coil temperature sensor error 14 1min Time out Communication 15 Fan error FAN1 FAN2 16 OTP error 17 Compress...

Page 45: ...sh the button to set the display panel to Every time you push the button the display panel reads repeatedly Push the button to set the display panel to Every time you push the button the display panel...

Page 46: ...lay part to and check the display part The display part shows Press the Mode Selection key to set the display part to and check the display part The display part shows Step 4 Pressing the ON OFF butto...

Page 47: ...n in the right then go to the step 2 Step 2 Method If the first digit of remote controller shows 0 go to the step 3 If it shows 1 press the Mode button one time to change it into 0 and then go to step...

Page 48: ...E311422852A311439421F Result If 1 is displayed go to the step 5 Step 5 Method Input the fourth digit of option code by pressing the High Fan button example 021E311422852A311439421F Result If E display...

Page 49: ...p 8 Step 8 Method After completion up to step 7 pressing Mode button 1 7 steps are saved internally If the first number is 1 at the time it is correct So go to step 9 If wanting to see the screen of 2...

Page 50: ...on example 021E311422852A311439421F Result If 2 displays go to step 11 Step 11 Method Input the tenth digit by pressing the High Fan button example 021E311422852A311439421F Result If 2 displays go to...

Page 51: ...If the On Off Timer and Fan indicator is flickering the wrong option code is input Put off the power of indoor unit and turn it on again and then input the option code again If the same error occurs i...

Page 52: ...on example 021E311422852A311439421F Result If A displays go to step 16 Step 16 Method Input the 15th digit by pressing the Low Temp button example 021E311422852A311439421F Result If 3 displays go to s...

Page 53: ...9 Step 19 Method Input the 18th digit by pressing the Cancel button example 021E311422852A311439421F Result If 4 displays go to step 20 Step 20 Method After completion up to step 20 pressing Mode butt...

Page 54: ...on example 021E311422852A311439421F Result If 9 displays go to step 22 Step 22 Method Input the 21th digit by pressing the Low Temp button example 021E311422852A311439421F Result If 4 displays go to s...

Page 55: ...blem with reference to the right side Error If the On Off Timer and Fan indicator is flickering the wrong option code is input Put off the power of indoor unit and turn it on again and then input the...

Page 56: ...nd turn it on again and then input the option code again If the same error occurs it is the EEPROM is defective or not inserted Replace the PCB If all of On Off Timer Fan and Filter Sign indicator are...

Page 57: ...4 17 OPTION ITEMS MODEL SEG1 SEG2 SEG3 SEG4 SEG5 SEG6 SEG7 SEG8 SEG9 SEG10 SEG11 SEG12 CH090EAV 0 4 5 7 7 7 1 E 8 2 0 A CH105EAV 0 4 5 7 7 7 1 1 C 2 2 A CH140EAV 0 4 6 7 7 7 1 3 C 2 4 E CH070EAV1 0 4...

Page 58: ...y of 3 minutes when the compressor is reoperated The same phenomenon occurs when a power is on As a phenomenon that the compressor is reoperated after a delay of 3 minutes the indoor fan is adjusted a...

Page 59: ...Check Inner wiring of outdoor unit Abnormal Check outdoor unit terminal block voltage on L N for indoor unit 230Vac nominal Check cable and connection of wire between indoor and outdoor unit Abnormal...

Page 60: ...RTER PCB Check and correct the wire or socket connection Check Fuses listed blow FUSE3 EMI PCB FUSE MAIN PCB No Is there miss connection of power and communication wire between indoor and outdoor Corr...

Page 61: ...tor case broken No Take off each Fan motor housing after 1 minutes from turning off the power Follow the check procedure of outdoor unit power supply error check No Is each resistance of FAN cable hou...

Page 62: ...ng of outdoor unit Outdoor unit cover Fan front obstruction etc 7 Is there no ventilation obstruction at the surrounding of indoor unit Overload condition in heating mode 2 Troubleshooting procedure N...

Page 63: ...the compressor in 3 minutes off Check the resistance value of 4 WA valve coil Go to the next page 4 WA valve main body error Attach the sensor correctly Over shortage of the refrigerant Connect the co...

Page 64: ...ected correctly Dose the voltage of DC300V apply to the connector of outdoor fan during the operation of outdoor unit The over shortage of refrigerant Insufficient Capacity Load estimation error Conne...

Page 65: ...Is the resistance value of sensor connection pull_up correct 2 Troubleshooting procedure Is the sensor connector connected correctly in accordance with a color Is the temperature sensor connected corr...

Page 66: ...nector connected correctly in accordance with a color Is the temperature sensor connected correctly without separation Does the both terminal of sensor satisfy the resistance value in accordance with...

Page 67: ...ector connected correctly in accordance with a color Is the temperature sensor connected correctly without separation Does the both terminal of sensor satisfy the resistance value in accordance with t...

Page 68: ...resistance value in accordance with temperature 4 Is the resistance value of sensor connection pull_up correct 2 Troubleshooting procedure Isn t the Fan locked Is the connector connected correctly Is...

Page 69: ...klist 1 Is the connection of R S T power wire normal 2 Are Relay R 21 and R200 on the INVERTER PCB mounted normally 2 Troubleshooting procedure es No Check and correct the wire connection Are connecti...

Page 70: ...he compressor wire connected to the compressor normally es es Exchange the compressor Reinstall and remove the obstruction Is the installation of outdoor unit good Reinstall and remove the obstruction...

Page 71: ...e and communication cable wiring error 2 Troubleshooting procedure es Restart after power off Is the communication error occurred again Isn t the power cable and communication cable wiring error Excha...

Page 72: ...dure es Restart after power off Is the restart error occurred again Is the interphase resistance value of compressor u v v w w u normal Is the connection cable for the compressor and power terminal no...

Page 73: ...edure es Restart after power off Is the lock error occurred again Is the interphase resistance value of compressor u v v w w u normal Is the connection cable for the compressor and power terminal norm...

Page 74: ...h contact es No Exchange M C Check and reconnecting the AC power cable wire Is the AC Power cable connection to the outdoor unit terminal block good Check and reconnecting the reactor wire at the TAB...

Page 75: ...Samsung Electronics 4 35 4 5 16 The others 1 Capacity miss match Check again the indoor unit option code...

Page 76: ...y PCB part LED lamps Switch Remocon module 1 INDOOR EMI PCB part Line filter Noise Capacitor and Varistor 3 The PCB is composed of the 3 part in the outdoor unit 1 EMI PCB part Line filter for electri...

Page 77: ...1 Is RED LED ON 2 Is GREEN LED Blinking once a second 3 Is LEDs displaying error code pattern MAIN PCB power trouble bad communication between indoor and outdoor unit error detection 5 Check LED displ...

Page 78: ...or Short Outdoor Unit Discharge Temperature Sensor Measure sensor resistance with a multimeter Normal At the normal temperature 563k 157k 0 C 30 C see 12 2 7 Abnormal 0 Open or Short Outdoor Unit BLD...

Page 79: ...Samsung Electronics 5 1 5 Exploded Views and Parts List 5 1 Indoor Unit 1 2 4 3 5 8 7 5 1 5 2 5 3 5 4 5 5 5 7 5 6 16 11 10 9 6 15 12 14 17 19 20 22 21 13 24 23 25 26 18 18 1 18 2 18 3 18 4...

Page 80: ...C M 2 2 2 SA 10 DB90 02692A ASS COVER PIPE ASS 1 1 1 SA 11 DB90 02690A ASS CABI FRONT ASS SGCC M 1 1 1 SA 12 DB90 01950B ASS COVER DRAIN PUMP ASS 1 1 1 SA 13 DB94 01078A ASS HOSE DRAIN ASS 1 1 1 SA 14...

Page 81: ...01734A CABI SIDE SGCC M 2 SA 10 DB90 02692A ASS COVER PIPE ASS 1 SA 11 DB90 03189A ASS CABI FRONT ASS SGCC M 1 SA 12 DB90 01950B ASS COVER DRAIN PUMP ASS 1 SA 13 DB90 01389A ASS HOSE DRAIN ASS 1 SA 14...

Page 82: ...Product Specifications 5 4 Samsung Electronics 5 2 Panel 19 24 18 14 15 16 17 23 22 11 10 28 5 6 8 7 9 1 2 20 25 26 13 27 21 12 3 4...

Page 83: ...03A LINK MOTOR A POM 1 SNA 13 DB66 01104A LINK MOTOR B POM 1 SNA 14 DB61 02711A HOLDER LINK BLADE ABS BLK 8 SNA 15 DB66 01105A LINK BLADE POM 7 SNA 16 DB66 01106A LINK UNIVERSAL JOINT POM 2 SNA 17 DB6...

Page 84: ...5 6 Samsung Electronics 5 3 Outdoor Unit 16 9 14 27 26 18 19 4 13 15 2 29 3 23 28 24 6 22 21 12 1 7 8 25 10 20 11 5 16 17 UH090 105 140EAV...

Page 85: ...2A ASS 4WA VALVE HP 3 8 5 8 G5T360FUAEK 1 1 1 SNA 14 G5T450FUAEX COMPRESSOR G5T450FUAEX 1 SNA G5T360FUAEK COMPRESSOR G5T360FUAEK 1 1 1 SNA 15 DB96 09431A ASS EEV VALVE ASS 1 SA DB96 09431B ASS EEV VAL...

Page 86: ...Product Specifications 5 8 Samsung Electronics UH070EAV1 20 18 19 10 5 6 4 16 3 2 12 12 1 1 1 7 1 15 15 1 15 3 15 4 15 10 15 7 15 5 15 6 15 2 15 11 15 8 15 9 11 14 9 19 13 1 13...

Page 87: ...63A GROMMET ISOLATOR NR 3 SNA 13 DB96 09352A ASS 4WA VALVE ASS 1 SNA 14 DB96 09445A ASS VALVE EEV ASS 1 SNA 15 DB93 05838B ASS CONTROL OUT ASS 1 SA 15 1 DB93 05700F ASS PCB MAIN ASS 1 SA 15 2 DB61 029...

Page 88: ...Product Specifications 5 10 Samsung Electronics 5 4 Assy control out UH090 105 140EAV...

Page 89: ...600V 35A 4P 600V 60A 2P 1 1 1 SA 14 DB61 01948A CASE SUB PCB ABS V0 1 1 1 SA 15 DB60 00321A FASTENER NUT CU 1 1 1 SA 16 6002 000536 SCREW TAPPING PH 2S M4 L10 7 7 7 SNA 17 6001 001683 SCREW HEX HWH M...

Page 90: ...Product Specifications 5 12 Samsung Electronics UH070EAV1...

Page 91: ...36 2 18 1 SA 24K BLDC INV Q P Chassis 9 DB61 02543A CASE DISPLA PCB UH026EAV ABS V0 T2 0 40 30 BLK BAC INV 1 SNA 10 DB62 01925D INSULATION CONTROL AS18BPBX FOAM LEX 2 210 50 WHT 1 SNA BOX TOP INVERTER...

Page 92: ...5 14 Samsung Electronics MEMO...

Page 93: ...ote Controller Power EEV Indoor Outdoor Communication BLDC MOTOR Wired Remote Controller Communication Thermistor Discharge EVA out sensor Indoor Pipe in Temperature Sensor Indoor RoomTemperature Sens...

Page 94: ...ICATION 1 2 TXD RXD_COMM CN60 5PIN BLU EEV 1 4 RXD_EEV Operating Signal 5 12V CN30 10PIN BLK DOWNLOADING CN31 7PIN WHT INVERTER PBA 1 TXD_MAIN 2 RXD_MAIN 3 GND 4 VCC 5 12V 6 INV_SMPS_RELAY 7 Not used...

Page 95: ...E TEMP SENSOR SIGNAL 1 OLP TEMP SENSOR SIGNAL 2 4 GND 3 TEMP TEMP SENSOR SIGNAL 1 4 RECEIVE SIGNAL FROM THE MAIN 1 7 7 SEGMENT SIGNAL 8 10 RECEIVE KE OPERATION SIGNALS FROM THE MAIN 1 12V 2 GND CN71 6...

Page 96: ...INDOOR UNIT POWER N phase N SKYBLU POWER N phase L IN WHT INDOOR UNIT POWER L phase L BRN POWER L phase CN01 3PIN WHT 1 N phase POWER of MAIN PBA 2 Not used 3 L phase POWER of MAIN PBA L1 BRN L phase...

Page 97: ...Product Specifications Samsung Electronics 6 5 OUTDOOR EMI PCB UH070EAV1 Cont AC L AC N L TAB POWER N TAB POWER 2 1...

Page 98: ...Sensing 6 FAN FG 7 FAN Backlash Sensing CN31 8PIN WHT SIGNAL MONITOR 1 16V 2 5V 3 LOADDACCS 4 CS_DAC1 5 CS_DAC2 6 CLK_DAC 7 DATA_DAC 8 GND CN70 4PIN WHT 1 TXD_MAIN 2 RXD_MAIN 3 GND 4 5V CN30 10PIN WH...

Page 99: ...Samsung Electronics 6 7 6 1 5 OUTDOOR DISPLAY PCB...

Page 100: ...6 8 Samsung Electronics MEMO...

Page 101: ...TP 1 SNA ZD102 0403 001285 DIODE ZENER BZX84 C11 10 4 11 6V 350mW SOT 23 TP 1 SNA CD101 0406 001105 DIODE TVS ST02D 170 155 170 185V 200W DO 214 1 SNA CD312 0406 001204 DIODE TVS SMBJ5 0CA 6 4 7 07V...

Page 102: ...SNA R911 2007 000300 R CHIP 10Kohm 5 1 8W TP 2012 1 SNA R912 2007 000300 R CHIP 10Kohm 5 1 8W TP 2012 1 SNA R913 2007 000300 R CHIP 10Kohm 5 1 8W TP 2012 1 SNA R914 2007 000300 R CHIP 10Kohm 5 1 8W T...

Page 103: ...0nF 80 20 50V 5V 2012 1 SNA C401 2203 000192 C CER CHIP 100nF 80 20 50V 5V 2012 1 SNA C402 2203 000192 C CER CHIP 100nF 80 20 50V 5V 2012 1 SNA C403 2203 000192 C CER CHIP 100nF 80 20 50V 5V 2012 1 SN...

Page 104: ...96MM STRAIGHT SN WHT 1 SNA CN60 3711 000577 HEADER BOARD TO CABLE BOX 10P 1R 2 5MM STRAIGHT SN WHT 1 SNA CN51 3711 000794 HEADER BOARD TO CABLE BOX 2P 1R 2 5mm STRAIGHT SN BLK 1 SNA CN83 3711 000796 H...

Page 105: ...1 10 4 11 6V 350mW SOT 23 TP 1 SNA CD101 0406 001105 DIODE TVS ST02D 170 155 170 185V 200W DO 214 1 SNA CD312 0406 001204 DIODE TVS SMBJ5 0CA 6 4 7 07V 600W SMB 1 SNA CD334 0406 001204 DIODE TVS SMBJ5...

Page 106: ...P 2012 1 SNA R210 2007 000468 R CHIP 1Kohm 5 1 8W TP 2012 1 SNA R211 2007 000468 R CHIP 1Kohm 5 1 8W TP 2012 1 SNA R221 2007 000468 R CHIP 1Kohm 5 1 8W TP 2012 1 SNA R350 2007 000468 R CHIP 1Kohm 5 1...

Page 107: ...ER CHIP 100nF 80 20 50V 5V 2012 1 SNA C801 2203 000192 C CER CHIP 100nF 80 20 50V 5V 2012 1 SNA C802 2203 000192 C CER CHIP 100nF 80 20 50V 5V 2012 1 SNA C806 2203 000192 C CER CHIP 100nF 80 20 50V 5V...

Page 108: ...R 2 5mm STRAIGHT SN BLK 1 SNA CN83 3711 000796 HEADER BOARD TO CABLE BOX 2P 1R 2 5MM STRAIGHT SN RED 1 SNA CN81 3711 000939 HEADER BOARD TO CABLE BOX 4P 1R 2 5mm STRAIGHT SN RED 1 SNA CN41 3711 000940...

Page 109: ...5 8mm 15 1 SNA F701_1 3601 000263 FUSE CARTRIDGE 250V 3 15A TIME LAG GLASS 5x20mm 1 SNA CN02 3711 000203 HEADER BOARD TO CABLE 1WALL 2P 3P 1R 7 92mm STRAIGHT SN WHT 1 SNA CN01 3711 003404 HEADER BOARD...

Page 110: ...823010B RIXBHF040B1 1 0mH 1 SNA FT02 DB27 00054A COIL CHOKE SSC4823010B RIXBHF040B1 1 0mH 1 SNA PCB BOARD DB41 00670A PCB SUB EMI GALAX 2 PJT FR 4 2 V2 2 T1 6 SSEC 1 SNA DB93 06338A ASS CONNECTOR WIRE...

Page 111: ...404 001220 SWITCH TACT 12V 50mA 160gf 6 1x6 1x5 0mm SPST 1 SNA CN952 3711 004067 HEADER BOARD TO CABLE BOX 4P 1R 2mm ANGLE SN NTR 1 SNA CN951 3711 004531 HEADER BOARD TO CABLE BOX 10P 1R 2mm ANGLE SN...

Page 112: ...03 003334 IC RESET S 801 SOT 23 5P 2 9x1 6mm PLASTIC 1 SNA IC100 1203 003527 IC PWM CONTROLLER TOP243 DIP 7P 9 83x6 6mm PLASTIC 1 SNA NTC700 1404 001377 THERMISTOR NTC 10ohm 4A 3100K 20mW C 15 BK 1 SN...

Page 113: ...7459 R CHIP 470KOHM 5 1 2W TP 5025 1 SNA R109 2007 007459 R CHIP 470KOHM 5 1 2W TP 5025 1 SNA C507 2201 000154 C CERAMIC DISC 10NF 80 20 2KV 5P TP 20X5MM 7 5 1 SNA C508 2201 000154 C CERAMIC DISC 10NF...

Page 114: ...SPST 1 SNA R 200 3501 001154 RELA MINIATURE 12Vdc 200mW 3000mA 1FormA 10mS 10mS 1 SNA R 501 3501 001248 RELA MINIATURE 12V 11 7MA DPDT 4MS 4MS 1 SNA F702 3601 001094 FUSE CARTRIDGE 250V 5A FAST ACTIN...

Page 115: ...300 200mW SOP TP 1 SA IC16 1203 000274 IC POSI FIXED REG 7805 TO 220 3P PLASTIC 4 8 5 1 SNA IC19 1203 000274 IC POSI FIXED REG 7805 TO 220 3P PLASTIC 4 8 5 1 SNA IC13 1203 002948 IC POSI ADJUST REG TL...

Page 116: ...R814 2007 000221 R CHIP 1 2Kohm 5 1 8W TP 2012 1 SNA R815 2007 000221 R CHIP 1 2Kohm 5 1 8W TP 2012 1 SNA R106 2007 000263 R CHIP 1 82Kohm 1 1 8W TP 2012 1 SNA R401 2007 000290 R CHIP 100ohm 5 1 8W T...

Page 117: ...6 2203 000206 C CER CHIP 100nF 10 50V X7R 2012 1 SNA C907 2203 000206 C CER CHIP 100nF 10 50V X7R 2012 1 SNA C411 2203 000239 C CER CHIP 0 1nF 5 50V C0G 2012 1 SNA C412 2203 000239 C CER CHIP 0 1nF 5...

Page 118: ...NA CN70 3711 004379 HEADER BOARD TO CABLE BOX 4P 1R 2mm STRAIGHT SN NTR 1 SNA CN71 3711 005206 HEADER BOARD TO CABLE BOX 3P 1R 2MM STRAIGHT SN BLU 1 SNA CN30 3711 005716 HEADER BOARD TO CABLE BOX 10P...

Page 119: ...4 IC POSI FIXED REG 7805 TO 220 3P PLASTIC 4 8 5 1 SNA IC13 1203 002948 IC POSI ADJUST REG TL431ACD SOP 8P 4 9X3 9MM PLASTIC 1 SNA IC11 1203 003527 IC PWM CONTROLLER TOP243 DIP 7P 9 83x6 6mm PLASTIC 1...

Page 120: ...00290 R CHIP 100ohm 5 1 8W TP 2012 1 SNA R403 2007 000290 R CHIP 100ohm 5 1 8W TP 2012 1 SNA R404 2007 000290 R CHIP 100ohm 5 1 8W TP 2012 1 SNA R405 2007 000290 R CHIP 100ohm 5 1 8W TP 2012 1 SNA R40...

Page 121: ...2203 000239 C CER CHIP 0 1nF 5 50V C0G 2012 1 SNA C416 2203 000239 C CER CHIP 0 1nF 5 50V C0G 2012 1 SNA C328 2203 000257 C CER CHIP 10nF 10 50V X7R TP 1608 1 SNA C407 2203 000260 C CER CHIP 10nF 10...

Page 122: ...E BOX 10P 1R 2mm STRAIGHT SN BLK 1 SNA CN22 3711 006053 HEADER BOARD TO BOARD BOX 2P 1R 7 92mm STRAIGHT SN BLU 1 SNA Q400 DB13 00003A IC DRIVER GATE SOT 23 1P 1P 0 2mm 2 93x1 3mm 1 SNA Q402 DB13 00003...

Page 123: ...XED REG 7805 TO 220 3P PLASTIC 4 8 5 1 SNA IC19 1203 000274 IC POSI FIXED REG 7805 TO 220 3P PLASTIC 4 8 5 1 SNA IC13 1203 002948 IC POSI ADJUST REG TL431ACD SOP 8P 4 9X3 9MM PLASTIC 1 SNA IC11 1203 0...

Page 124: ...m 5 1 8W TP 2012 1 SNA R106 2007 000263 R CHIP 1 82Kohm 1 1 8W TP 2012 1 SNA R401 2007 000290 R CHIP 100ohm 5 1 8W TP 2012 1 SNA R402 2007 000290 R CHIP 100ohm 5 1 8W TP 2012 1 SNA R403 2007 000290 R...

Page 125: ...nF 5 50V C0G 2012 1 SNA C412 2203 000239 C CER CHIP 0 1nF 5 50V C0G 2012 1 SNA C413 2203 000239 C CER CHIP 0 1nF 5 50V C0G 2012 1 SNA C414 2203 000239 C CER CHIP 0 1nF 5 50V C0G 2012 1 SNA C415 2203 0...

Page 126: ...3711 005206 HEADER BOARD TO CABLE BOX 3P 1R 2MM STRAIGHT SN BLU 1 SNA CN30 3711 005716 HEADER BOARD TO CABLE BOX 10P 1R 2mm STRAIGHT SN BLK 1 SNA CN22 3711 006053 HEADER BOARD TO BOARD BOX 2P 1R 7 92m...

Page 127: ...10K SOT 23 TP TR DIGITAL 1 SNA 0506 000175 IC51 2003 NPN 7 1W SOP 16 ST 1000 TR ARRA 1 SNA 0506 000175 IC52 2003 NPN 7 1W SOP 16 ST 1000 TR ARRA 1 SNA 0506 000175 IC53 2003 NPN 7 1W SOP 16 ST 1000 TR...

Page 128: ...007 000090 R560 10Kohm 5 1 10W TP 1608 R CHIP 1 SNA 2007 000090 R561 10Kohm 5 1 10W TP 1608 R CHIP 1 SNA 2007 000090 R562 10Kohm 5 1 10W TP 1608 R CHIP 1 SNA 2007 000090 R563 10Kohm 5 1 10W TP 1608 R...

Page 129: ...X7R TP 1608 C CER CHIP 1 SNA 2203 000125 C413 1 2nF 10 50V X7R TP 1608 C CER CHIP 1 SNA 2203 000125 C414 1 2nF 10 50V X7R TP 1608 C CER CHIP 1 SNA 2203 000125 C415 1 2nF 10 50V X7R TP 1608 C CER CHIP...

Page 130: ...V X7R 1608 C CER CHIP 1 SNA 2203 005249 C556 100nF 10 50V X7R 1608 C CER CHIP 1 SNA 2203 005249 C560 100nF 10 50V X7R 1608 C CER CHIP 1 SNA 2203 005249 C561 100nF 10 50V X7R 1608 C CER CHIP 1 SNA 2203...

Page 131: ...IC451 ACS712 5HP INVERTER 40 150 30A 8V Sinusoidal SENSOR MAG CT SENSOR 1 SNA DB32 00173A IC452 ACS712 5HP INVERTER 40 150 30A 8V Sinusoidal SENSOR MAG CT SENSOR 1 SNA DB32 00173A IC453 ACS712 5HP INV...

Page 132: ...This Document can not be used without Samsung s authorization 7 1 7 Wiring Diagram Samsung Electronics...

Page 133: ...ram 8 PCB Diagram Description 8 1 8 1 Indoor Unit ADDRESS OPTION SWITCH SET PART DISPLA PCB PART LOUVER CONTROL PART EEV SUB PCB PART TEMPERATURE SENSOR PART PCB POWER PART LOADING PART BLDC FAN MOTOR...

Page 134: ...8 2 Outdoor Unit This Document can not be used without Samsung s authorization MAIN PCB UH090 105 140EAV 8 2 Samsung Electronics...

Page 135: ...ecifications MAIN PCB UH070EAV1 TEMPERATURE SENSOR EEV PART DISPLA PART SMPS PART INVERTER PART COMMUNICATION PART PFC PART This Document can not be used without Samsung s authorization 8 3 Samsung El...

Page 136: ...This Document can not be used without Samsung s authorization INVERTER PCB 8 4 Samsung Electronics...

Page 137: ...EMI PCB UH090 105 140EAV This Document can not be used without Samsung s authorization Samsung Electronics 8 5...

Page 138: ...Product Specifications EMI PCB UH070EAV1 This Document can not be used without Samsung s authorization 8 6 Samsung Electronics...

Page 139: ...Indoor Unit Outdoor Unit 9 Preference Sheet 9 1 Refrigerating Cycle Diagram Samsung Electronics 9 1...

Page 140: ...0V 60Hz B TB 208 230V 60Hz C 200 220V 50Hz D 220 240V 50Hz E TE 220V 60Hz 3 F TF 380 415V 50Hz 3 G TG 127V 50Hz H 220 240V 50 60Hz 1 M 380V 60Hz 3 H Inverter 1 V Inverter 3 W Plant SEC None SSEC C TSE...

Page 141: ...CH070EAV1 CH090 105 140EAV UH070EAV1 UH090 105 140EAV Model Code CH070EAV1 CH090 105 140EAV UH070EAV1 UH090 105 140EAV UH090 105 140EAV CH070EAV1 CH090 105 140EAV 1 Precautions 2 Product Speci cation...

Page 142: ...onics Co Ltd Feb 2008 Printed in China Code No DB98 29264A 1 GSPN Global Service Partner Network Area Web Site North America http service samsungportal com Latin America http latin samsungportal com C...

Reviews: