


Wireless network setup
167
2. Using a Network-Connected Machine
Machines with a display screen
Connecting in PBC mode
1
Press and hold the
(WPS) button on the control panel for more than
2 seconds.
The machine starts waiting for up to two minutes until you press the WPS
(PBC) button on the access point (or wireless router).
2
Press the
WPS (PBC)
button on the access point (or wireless router).
The messages are displayed on the display screen in the order below:
a Connecting:
The machine is connecting to the access point (or
wireless router).
b Connected:
When the machine is successfully connected to the
wireless network, the WPS LED light stays on.
c AP
SSID:
After completing the wireless network connection process,
the AP’s SSID information appears on the display.
3
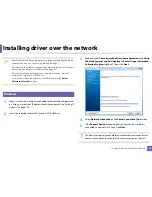
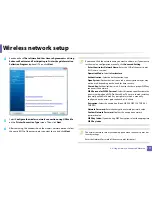
Insert the supplied software CD into your CD-ROM drive, and follow the
instructions in the window to set up the wireless network.
Connecting in PIN mode
1
Press and hold the
(WPS) button on the control panel for more than
2 seconds.
2
The eight-digit PIN appears on the display.
You need to enter the eight-digit PIN within two minutes on the
computer that is connected to the access point (or wireless router).
The messages are displayed on the display screen in the order below:
a Connecting:
The machine is connecting to the wireless network.
b Connected:
When the machine is successfully connected to the
wireless network, the WPS LED light stays on.
c SSID
Type:
After completing the wireless network connection
process, the AP’s SSID information is displayed on the LCD display.
3
Insert the supplied software CD into your CD-ROM drive, and follow the
instructions in the window to set up the wireless network.
Summary of Contents for CLX-330x/330xW Series
Page 82: ...Redistributing toner 82 3 Maintenance ...
Page 84: ...Replacing the toner cartridge 84 3 Maintenance ...
Page 86: ...Replacing the waste toner container 86 3 Maintenance ...
Page 88: ...Replacing the imaging unit 88 3 Maintenance ...
Page 93: ...Cleaning the machine 93 3 Maintenance 1 2 1 2 ...
Page 102: ...Clearing original document jams 102 4 Troubleshooting ...
Page 105: ...Clearing paper jams 105 4 Troubleshooting ...
Page 109: ...Clearing paper jams 109 4 Troubleshooting ...
Page 126: ...Specifications 126 5 Appendix Free HDD space 1 GB 2 GB Items Requirements ...
Page 140: ...Regulatory information 140 5 Appendix 27 China only ...


