background image

Summary of Contents for CLX-9252 Series

Page 1: ......

Page 2: ...ung Electronics Co Ltd PCL and PCL 6 are trademarks of Hewlett Packard Company Microsoft Internet Explore Windows Windows Vista Windows 7 and Windows 2008 Server R2 either registered trademarks or trademarks of Microsoft Corporation PostScript 3 is a trademark of Adobe System Inc UFST and MicroType are registered trademarks of Monotype Imaging Inc TrueType Mac and Mac OS are trademarks of Apple In...

Page 3: ...Copyright_ 2 ...

Page 4: ...ner cartridges 14 Installing the imaging units 16 CLX 9252 9352 Series 16 SCX 8230 8240 Series 21 Installing other options 26 Loading paper 27 Standard tray 27 Connecting a printer cable 32 Using a network cable 32 Turning the machine on 33 INITIAL SETTINGS AND TESTING OF THE MACHINE Initial setting 35 Print adjustment Dual cassette feeder or High capacity feeder 41 DADF skew test and adjustment 4...

Page 5: ...ion before using the machine If you have a problem using the machine refer to the troubleshooting chapter Refer to User s Guide on the User s Guide CD Use Index to find information All the illustrations in this installation guide may differ from your machine depending on its options or models The procedures in this user s guide are mainly based on Windows XP Tprocedures in this user s guide are ma...

Page 6: ...ving the scanner locking screw Putting the rubber packings Installing the toner cartridges Installing the imaging units Installing other options Loading paper Connecting a printer cable Turning the machine on Be sure to go through the following before setting up the hardware If you are installing the machine after moving it from a cold to warm location leave the machine unpacked for at least two h...

Page 7: ... 4 Kg 250 00 lbs to the maximum including the trays Use safe lifting and handling techniques If you need to move this machine you need at least four people Use the lifting handles as shown If less than four people attempt to lift the machine you can sustain back injury ...

Page 8: ...able vibration free surface on which to install the machine Select an area with adequate air circulation Avoid areas near windows with exposure to direct sunlight or sources of heat and air conditioning Avoid areas of high humidity and with possible exposure to dust or moisture e g rain Allow extra space to open doors and trays Place the machine on a flat stable surface in order to avoid tilting t...

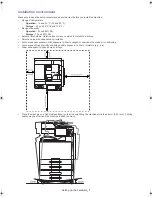
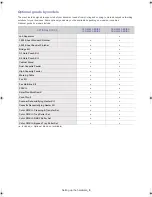
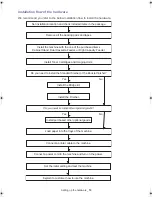
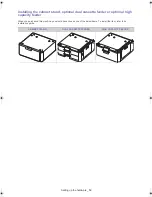
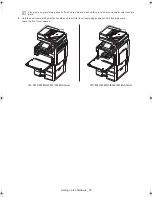
Page 9: ...Setting up the hardware_ 8 Machine configuration ...

Page 10: ... 9352 SERIES SCX 8230 SERIES SCX 8240 SERIES Job Separator o 1 250 Sheet Standard Finisher o o 3 250 Sheet Booklet Finisher o o Bridge Kit o o 2 3 Hole Punch Kit o o 2 4 Hole Punch Kit o o Cabinet Stand o o Dual Cassette Feeder o o High Capacity Feeder o o Working Table o o Fax Kit o o Fax Multiline Kit o o FDI Kit o o SmarThru Workflow X o o CounThru 2 o o Scanner Dehumidifying Heater Kit o o Cas...

Page 11: ... Bridge kit Install the Finisher Yes No Install purchased other optional goods Load paper into the trays of the machine Connect a printer cable to the machine Connect a power cord to the machine and turn on the power Set the initial setting and test the machine Explain to customer how to use the machine Install the machine with the one of the purchased items Cabinet Stand Dual Cassette Feeder or H...

Page 12: ... enclosed Make sure that yellow magenta cyan and black imaging units are enclosed If any items are missing or damaged notify your dealer immediately The appearance of the power cord may differ depending on your country s specifications The power cord must be plugged into a grounded power socket TONER CARTRIDGE IMAGING UNIT POWER CORD USB CABLE INSTALLATION GUIDE WARRANTY CARD SOFTWARE CD USER S GU...

Page 13: ...stand optional dual cassette feeder or optional high capacity feeder When you purchased this machine you would have chosen one of the below items To install the item refer to its installation guide CABINET STAND DUAL CASSETTE FEEDER HIGH CAPACITY FEEDER ...

Page 14: ... cannot use the copy and scan functions We recommend you keep the screw in the accessory box You need to lock the scanner when moving the machine or when the machine is not in use for a long time Putting the rubber packings If you need to install the optional standard finisher or booklet finisher do not put the rubber packings in the holes ...

Page 15: ...8240 8248NA Series Follow the steps below 1 Open the front cover 2 Take the new toner cartridges out from their packages 3 Thoroughly shake the new toner cartridge side to side five or six times to distribute the toner evenly inside the toner cartridge 4 Pull the sealed tape out of the toner cartridge carefully ...

Page 16: ...loth and wash clothing in cold water Hot water sets toner into fabric 5 Hold the new toner cartridge by the handle and slide it into its corresponding positions until it locks into place Leave the front cover opened CLX 9252 9258NA 9352 9358NA Series SCX 8230 8238NA 8240 8248NA Series ...

Page 17: ...ing the imaging units Follow the steps below CLX 9252 9352 Series 1 Squeeze the left right locking levers and push outward at the same time Then remove the waste toner container 2 Squeeze and push down the lever and open the inner cover ...

Page 18: ...ts out from their packages Do not use sharp objects such as a knife or scissors to open the imaging unit package You could damage the surface of the imaging unit 4 Remove the paper protecting the surface of the imaging unit 5 Remove the tape on the handle ...

Page 19: ...opper out of the developer 7 Remove the tape wrapped around the developer 8 Remove the tape on the imaging uint 9 Pull out the OPC protecting pad If toner gets on your clothing wipe it off with a dry cloth and wash clothing in cold water Hot water sets toner into fabric ...

Page 20: ... not expose the imaging unit to light for more than a few minutes Cover it with a piece of paper to protect it if necessary 10 Labels inside the machine identify each imaging unit s position Hold the handles on the new imaging unit and push the imaging unit until it locks into place 11 Close the inner cover ...

Page 21: ...Setting up the hardware_ 20 12 Insert the waste toner container until it locks in place 13 Close the front cover If the front cover is not completely closed the machine will not operate ...

Page 22: ...Setting up the hardware_ 21 SCX 8230 8240 Series 1 Lift the locking lever upward Then remove the waste toner container ...

Page 23: ...hardware_ 22 2 Open the right door 3 Remove the new imaging units from its package Do not use sharp objects such as a knife or scissors to open the imaging unit package You could damage the surface of the imaging unit ...

Page 24: ...loth and wash clothing in cold water Hot water sets toner into fabric Be careful not to scratch the surface of the imaging unit To prevent damage do not expose the imaging unit to light for more than a few minutes Cover it with a piece of paper to protect it if necessary 5 Remove the tape 6 Pull out the rubber stopper ...

Page 25: ...Setting up the hardware_ 24 7 Remove the paper protecting the surface of the imaging unit 8 Hold the handles on the new imaging unit and push the imaging unit until it locks into place ...

Page 26: ...Setting up the hardware_ 25 9 Close the right door 10 Insert the waste toner container until it locks in place ...

Page 27: ...featured multi function printer that has been optimized to meet most of the users needs Recognizing that each user may have different requirements Samsung makes many options available to enhance the machine s capabilities Refer to Supplies and Accessories guide on the User s Guide CD For details about how to install the options refer to the each option s installation guide ...

Page 28: ...dard tray contains two trays Tray 1 Tray 2 This standard tray holds up to 1 040 sheets of paper The process to load paper in tray 1 and tray 2 is the same If you have installed the optional dual cassette feeder tray 3 tray 4 or the optional high capacity feeder refer to the installation guide provided with them Using photographic paper or coated paper may cause problems requiring repairs Such repa...

Page 29: ...to the end of the tray 4 Squeeze the paper width guide and slide it to the end of the tray 5 Flex or fan the edge of the paper stack to separate the pages before loading papers When handling the paper be careful not to get a paper cut 1 Paper length guide 1 Paper width guide ...

Page 30: ...Setting up the hardware_ 29 6 Load paper with the print side facing up 7 Adjust the paper legnth guide to the desired paper length ...

Page 31: ...ss the guide too tightly to the edge of the paper the guide may bend the paper Do not push the paper width guide too far causing the media to warp If you do not adjust the paper width guide it may cause paper jams Do not overload the tray with paper Otherwise it may cause paper jams Make sure that the paper is below the maximum paper capacity guide inside the tray 1 Paper capacity guide ...

Page 32: ...ality of your printed documents Refer to User s Guide on the User s Guide CD If you have problems with paper feeding check the media specification Then try placing one sheet at a time in the multi purpose tray Refer to User s Guide on the User s Guide CD The settings made from the machine driver override the settings on the control panel Refer to User s Guide on the User s Guide CD For details abo...

Page 33: ..._ 32 Connecting a printer cable Using a network cable This machine has a bulit in network interface card You can connect your machine to a network using a network cable Connect your machine to the network with a network cable ...

Page 34: ... machine on Keep in mind that you should use the power cord supplied with the machine Otherwise it can cause damage or fire to the machine 1 Plug the power cord into the power receptacle 2 Plug another side into a properly grounded AC outlet ...

Page 35: ...when it is turned on or plugged in Doing so may give you an electric shock If you need to turn the machine off press the Power button for more than two seconds on the right side of the control panel When the confirmation window appears press Yes from the display screen then wait until power is turned off automatically If you turn the machine off directly using the power switch it could cause the h...

Page 36: ...t adjustment Dual cassette feeder or High capacity feeder DADF skew test and adjustment Initial setting When you turn the machine on after hardware installation you can see the initial setting menu on the display screen You need to follow the steps below You can also change the setting values on the control panel and SyncThruTM Web Service For the detailed information about setting up the machine ...

Page 37: ...n input area If necessary enter the information in the Administrator input area for the person to contact when any problem occurs on the machine 4 Press the Test button to verify the LAN connection When Connected appears after pressing Test press Next If Not connected appears make sure that the machine is connected to the network then verify the LAN connection again If a network connection problem...

Page 38: ...nment contact your network administrator 6 Press the Name input area a The pop up keyboard appears b The admin is entered as a default If you want to replace with another name remove admin and enter a new administrator name and then press OK c Press the New Password input area The pop up keyboard appears d Enter the password to use and then press OK This password is to be used for accessing the ad...

Page 39: ...he left right arrows Example for selecting the time offset If your local time is 4 hours faster than UTC Universal Time Coordinated press the right arrow until 4 shows b If you press IP go to step c If you press Host step e c Press the IP input area The pop up keyboard appears Enter a IP address which provides the time information and then press OK d Press the Port No input area The pop up keyboar...

Page 40: ...ss Next 9 Select an altitude level where the machine is installed The print quality is affected by atmospheric pressure which is determined by the height of the machine above sea level Then press Next Before you set the altitude value determine the altitude where you are 1 High 3 2 High 2 3 High 1 4 Normal 0 4 000 m 3 000 m 2 000 m 1 000 m 4 3 2 1 ...

Page 41: ...then enter a SNMP Community name and press OK Then set access permission using Read Access or Write Access If you do not know SNMP Community contact your network administrator Then press Finish If you want to skip this step just press Finish 11 The Completed window appears Press the Close button The machine restarts ...

Page 42: ...e Setup from the display screen 2 Press Machine Setup General Settings Machine Test 3 Press ID s input area The pop up keyboard appears Enter the name which is entered in the initial setting step 6 See Press the Name input area on page37 Then press OK on the pop up keyboard You can also select the ID pressing Recent users 4 Press Password s input area The pop up keyboard appears Enter the password...

Page 43: ...Initial settings and testing of the machine_ 42 7 Press Adjustment Print Adjustment Paper Supply Tray 8 Press Paper Size A3 Print 9 The machine prints the print test chart Press Next ...

Page 44: ... select Apply to all trays the trays that are not selected also have the print adjustment results appllied We recommend performing print adjustment for each tray individually to optimize each tray s settings Print adjustment results performed in this way will be better than using Apply to all trays 12 Follow the steps on the display screen When print adjustment is finished remove the print test ch...

Page 45: ...justment After initial setting is completed you need to conduct the DADF skew test and adjustment using the DADF test chart which supplied with DADF Skew test 1 Load the A4 or LTR DADF test chart face up into the DADF 2 Adjust the document width guides to the paper size ...

Page 46: ...ay screen 4 Press Start from the control panel to begin copying 5 Compare the condition of the printout with the DADF test chart For example the length of scale marks in the circles is equivalent acceptable range by less or more than 0 5 mm it means the DADF was installed well ...

Page 47: ...Initial settings and testing of the machine_ 46 Otherwise adjust the DADF using the screw at the backside and handle hinge as shown by the examples below ...

Page 48: ...Initial settings and testing of the machine_ 47 DADF adjustment 1 Load the A4 or LTR DADF test chart face up into the DADF 2 Adjust the document width guides to the paper size ...

Page 49: ... pop up keyboard You can also select the ID pressing Recent users 6 Press Password s input area The pop up keyboard appears Enter the password which is entered in the initial setting step 6 See Press the Name input area on page37 Then press OK on the pop up keyboard 7 Press Domain s input area The pop up keyboard appears Press L O C A L and press OK on the pop up keyboard You can also select the d...

Page 50: ... machine_ 49 9 Press Adjustment DADF Adjustment OK The machine adjusts the DADF automatically After the DADF skew test and adjustment the pop up window appears on the display screen Remove the the A4 or LTR DADF test chart from the DADF ...

Page 51: ...Initial settings and testing of the machine_ 50 ...

Page 52: ...location Samsung Easy Printer Manager combines device settings as well as printing environments settings actions and launching Samsung Eeasy Document Creator Samsung Easy Document Creator is an application to help users scan compile and save documents in multiple formats including XPS printer driver Use XML Paper Specification XPS printer driver to print documents for taking advantages in XPS prin...

Page 53: ...ntium IV 1 GHz 32 bit or 64 bit processor or higher 1 GB 2 GB 16 GB Support for DirectX 9 graphics with 128 MB memory to enable the Aero theme DVD R W Drive Windows Server 2008 R2 Pentium IV 1 GHz x86 or 1 4 GHz x64 processors 2GHz or faster 512 MB 2048 MB 10 GB OPERATING SYSTEM REQUIREMENTS RECOMMENDED CPU RAM FREE HDD SPACE Mac OS X 10 4 Intel Processors Power PC G4 G5 128 MB for a powerPC based...

Page 54: ...n installation window appear If the installation window does not appear click Start and then Run Type X Setup exe replacing X with the letter which represents your drive Click OK If you use Windows Vista click Start All programs Accessories Run Type X Setup exe replacing X with the letter which represents your drive and click OK If the AutoPlay window appears in Windows Vista click Run Setup exe i...

Page 55: ... 05 133 1999 www samsung com BOTSWANA 0800 726 000 www samsung com BRAZIL 0800 124 421 4004 0000 www samsung com BULGARIA 07001 33 11 normaltariff www samsung com CAMEROON 7095 0077 www samsung com CANADA 1 800 SAMSUNG 726 7864 www samsung com ca English www samsung com ca_fr French CHILE 800 SAMSUNG 726 7864 From mobile 02 482 82 00 www samsung com CHINA 400 810 5858 www samsung com COLOMBIA 01 8...

Page 56: ...ALA 1 800 299 0013 www samsung com latin_en English www samsung com latin Spanish HONDURAS 800 27919267 www samsung com latin_en English www samsung com latin Spanish HONG KONG 852 3698 4698 www samsung com hk Chinese www samsung com hk_en English HUNGARY 06 80 SAMSUNG 726 7864 www samsung com INDIA 1800 1100 11 3030 8282 1800 3000 8282 1800 266 8282 www samsung com INDONESIA 0800 112 8888 021 569...

Page 57: ...www samsung com latin Spanish PERU 0 800 777 08 www samsung com PHILIPPINES 1 800 10 SAMSUNG 726 7864 for PLDT 1 800 3 SAMSUNG 726 7864 for Digitel 1 800 8 SAMSUNG 726 7864 for Globe 02 5805777 www samsung com POLAND 0 801 1SAMSUNG 172 678 48 22 607 93 33 www samsung com PORTUGAL 808 20 SAMSUNG 808 20 7267 www samsung com PUERTO RICO 1 800 682 3180 www samsung com RUMANIA 08010 SAMSUNG 08010 726 7...

Page 58: ...KEY 444 77 11 www samsung com U A E 800 SAMSUNG 726 7864 www samsung com UGANDA 0800 300 300 www samsung com U K 0330 SAMSUNG 726 7864 www samsung com U S A 1 800 SAMSUNG 726 7864 www samsung com UKRAINE 0 800 502 000 www samsung ua Ukrainian www samsung com ua_ru Russian UZBEKISTAN 8 10 800 500 55 500 www samsung com VENEZUELA 0 800 100 5303 www samsung com VIETNAM 1 800 588 889 www samsung com Z...

Page 59: ...Contact SAMSUNG worldwide_ 58 ...

Page 60: ...equirements 52 loading paper in the standard tray 27 M machine configuration 8 Macintosh supplied softwares 51 system requirements 52 N network driver installation Windows 53 P placing a machine 11 spacing 11 R rubber packing 13 S scanner lock 13 service contact numbers 54 T test DADF skew 44 turn on machine 33 U Unix system requirements 53 W Windows driver installation for network connected 53 su...

Page 61: ......

Reviews: