background image

 GB

Safety Precautiones  (continued)

In the event of scalding, follow these FIRST AID instructions:
*

Immerse the scalded area in cold water for at least 10 minutes.

*

Cover with a clean, dry dressing.

*

Do not apply any creams, oils or lotions.

NEVER fill the container to the top and choose a container that is wider at the 
top than at the bottom to prevent the liquid from boiling over. Bottles with 
narrow necks may also explode if overheated.

ALWAYS check the temperature of baby food or milk before giving it to the 
baby.

NEVER heat a baby’s bottle with the teat on, as the bottle may explode if 
overheated.Tenga cuidado de no estropear el cable de alimentación.

9.

Be careful not to damage the power cable.

Do not immerse the power cable or plug in water and keep the power cable 
away from heated surfaces.

Do not operate this appliance if it has a damaged power cable or plug.

10. Stand at arm’s length from the oven when opening the door.

Reason:  The hot air or steam released may cause scalding.

11. Keep the inside of the oven clean.

Reason:  Food particles or spattered oils stuck to oven walls or floor can 

cause paint damage and reduce the efficiency of the oven.

12. You may notice a “Clicking” sound during operation(especially when the oven is in 

defrosting).
Reason:  This sound is normal when the electrical power output is changing.

13. When the microwave oven is operating without any load, the power will be cut off 

automatically for safety. You can operate the oven normally after letting it stand for 
over 30 minutes.

IMPORTANT SAFETY INSTRUCTIONS

During cooking, you should look into the oven from time to time when food is being 
heated or cooked in disposable containers of plastic, paper or other combustible 
materials.

IMPORTANT

Young children should NEVER be allowed to use or play with the microwave oven. Nor 
should they be left unattended near the microwave oven when it is in use. Items of 
interest to children should not be stored or hidden just above the oven

WARNING:

If the door or door seals are damaged, the oven must not be operated until it has been 
repaired by a competent person.

WARNING:

It is hazardous for anyone other than a comperent person to carry out any service or 
repair operation which involves the removal of a cover which gives protection against 
exposure to microwave energy.

WARNING:

Liquids and other foods must not be heated in sealed containers since they are liable 
to explode.

WARNING:

Only allow children to use the oven without supervicion when adequate instructions 
have been given so that the child is able to use the oven in a safe way and 
understands the hazards of improper use.

Installing Your Microwave Oven

This microwave oven can be placed almost anywhere (kitchen work 
surface or shelf, movable trolley, table).

1.

Install the oven on a flat, level, stable surface. Make sure there is adequate 
ventilation for your oven by leaving at least 10cm(four inches) of space 
behind, on the sides of the oven and 20cm(eight inches) of above.
(For stacking see page 17.)

2.

Never block the air vents as the oven may overheat and automatically switch itself 
off. It will remain inoperable until it has cooled sufficiently.

3.

Remove all packing materials inside the oven.

4.

For your personal safety, plug the cable into a 3-pin, 230 Volt, 50Hz, AC earthed 
socket. If the power cable of this appliance is damaged, it must be replaced by the 
manufacturer or its service agent or a similarly qualified person in order to avoid a 
hazard.

5.

This microwave oven has to be positioned so that plug is accessible.

Be sure to remove the protective film from outer case. The 
protective film is on the outer case to prevent scratches. When 
installing or before using, be sure to remove it.

Outdoor Use
This microwave oven is not designed for outdoor use.
You should use it indoors only.

During Air Cooling
Do not turn power off while the cooling fan is automatically air-cooling for 1min.

Recommendations

DO NOT install the microwave oven in hot or damp surroundings.
Example: Next to a traditional oven or radiator.

The power supply specifications of the oven must be respected and 
any extension cable used must be of the same standard as the power 
cable supplied with the oven.

Wipe the interior and the door seal with a damp cloth before using 
your microwave oven for the first time.

jtX`Y`†X]Y`†niU”GGwˆŽŒG[GGm™‹ˆ SGtˆ™ŠG\SGYWW[GGXWaY_Ght

Summary of Contents for CM1329

Page 1: ...Feature 7 Using 20sec Pad 8 Using the Defrost Feature 8 Memory Pads Programming 9 How to Operate Memory Cooking 11 Double Quantity Pad Programming 11 How to Operate Double Quantity Pad 12 Programming Air Filter Clean Time 13 Controlling Beep Tone 13 Error Codes 14 Hidden Keys 15 Care of Your Microwave Oven 15 Installation Instructions for Stacking 17 Replacement of Lamp 17 Cookware Guide 18 Cookin...

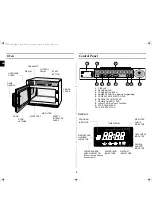
Page 2: ... 3 PROGRAM LOCK PAD 4 NUMBER PADS Time Memory Programming 5 POWER LEVEL SELECTOR PAD 6 DEFROST SELECTOR PAD 7 DOUBLE QUANTITY PAD 8 20sec PAD One Touch Cook Pad 9 STOP CANCEL PAD 10 10 START BUTTON POWER LEVEL INDICATORS DEFROST INDICATORS DOUBLE QUANTITY INDICATOR DATA CHECK INDICATOR POWER SOURCE CHECK INDICATOR When it shows heating does not work AIR FILTER CHECK INDICATOR TIME DISPLAY PROGRAM ...

Page 3: ...aled bottles jars containers Ex Baby food jars Airtight food Ex Eggs nuts in shells tomatoes Reason The increase in pressure may cause them to explode Tip Remove lids and pierce skins bags etc 3 DO NOT operate the microwave oven when it is empty Reason The oven walls may be damaged Tip Leave a glass of water inside the oven at all times The water will absorb the microwaves if you accidentally set ...

Page 4: ...aired by a competent person WARNING It is hazardous for anyone other than a comperent person to carry out any service or repair operation which involves the removal of a cover which gives protection against exposure to microwave energy WARNING Liquids and other foods must not be heated in sealed containers since they are liable to explode WARNING Only allow children to use the oven without supervi...

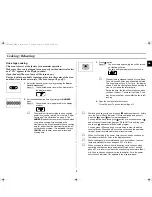
Page 5: ... If you leave the oven door open for more than 1 min the oven beeps once every minute and after 5 min the power source check indicator ON appears in the display window 1 Select the desired power level by pressing the Power Level Selector pad Result The selected power level will be displayed in the display window 2 Set the desired heating time by pressing the NUMBER pads Result The selected time is...

Page 6: ... the title Power Levels ans Time Variations The NUMBER pads will not operate or respond when you press a cooking time exceeding the maximum value It is not possible to set a cooking time for longer than the maximum time allowed on the chosen program It is advisable to press CANCEL and to enter a new power level and cooking time 3 Repeat steps 1 and 2 for II or III stage memory programming 4 Press ...

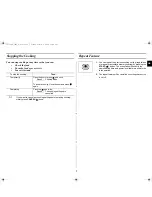
Page 7: ...ess pad once Result Cooking stops To resume cooking close the door and press again Completely Press the pad twice Result The cooking settings are cancelled 1 You can repeat the previous cooking setting regardless of manual or automatic memory heating by pressing the START button The oven starts with exactly the same heating time and power level that were used in the last operation 2 The repeat fea...

Page 8: ...e microwave safe Open the door Place the frozen food in the centre of the plate tray Close the door When the oven was operating for longer than 25 min under Defrosting cycle you can NOT change the power level from Defrosting to Heating Cooking Reheating mode Before operating the oven times can be increased decreased using either the time pads or 20sec button During the operating time may only be a...

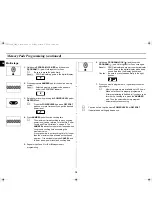
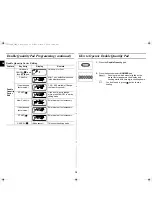
Page 9: ...riations on page 6 The NUMBER pads will not operate or respond when you press a cooking time exceeding the maximum value It is not possible to set a cooking time for longer than the maximum time allowed on the chosen program It is advisable to press CANCEL and to enter a new power level and cooking time 5 Hold down PROGRAM LOCK and then press PROGRAM pad Hold together for 2 sec once again Result P...

Page 10: ...R pads will not operate or respond when you press a cooking time exceeding the maximum value It is not possible to set a cooking time for longer than the maximum time allowed on the chosen program It is advisable to press CANCEL and to enter a new power level and cooking time 5 Repeat steps 3 and 4 for II or III stage memory programming 6 Hold down PROGRAM LOCK and then press PROGRAM pad Hold toge...

Page 11: ...and ON appears in the display window 2 Open the door The oven lamp will be turned on 3 Put the food into a suitable container place it in the centre of the oven and then close the door securely Result The oven lamp will go off 4 Press NUMBER pad Result The selected memory program automatically starts heating But NUMBER pad 1 2 3 operate after 2 seconds 1 Hold down and then press pad Hold together ...

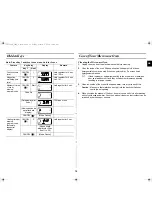
Page 12: ...START If you don t want to change more press CANCEL to exit the editing mode New Code No Skip this step if not necessary Input desired factor value Skip this step if not necessary START Skip this step if not necessary CANCEL Mode cancel This exits the editing mode 1 Press the Double Quantity pad 2 Press the desired memory NUMBER pad Result Cooking time which was multiplied by the preset factor app...

Page 13: ...eset by the manufacturer Default clean time is 500 hours in terms of pure oscillating time not the continuity time 2 Press NUMBER pads to set the desired clean time You can set up to 999 hours 3 Hold down PROGRAM LOCK and then press NUMBER 3 pad Hold together for 2 seconds in order to save the new value This completes the programming of the air filter clean time 4 Press CANCEL pad to return to coo...

Page 14: ... and check if the error code E41 appears again If the symptom persists contact the nearest service centre HVT II Power Error E42 One long beep for 2 sec The circuitry inside the oven is not working correctly Unplug the power cord and wait for 10 seconds Plug the power cord in again and check if the error code E42 appears again If the symptom persists contact the nearest service centre EEPROM Error...

Page 15: ...ot get into the back ventilation or control panel opening 4 When you clean the window of the door be sure to use a soft cloth after washing with very mild soap and water Do not use window cleaner as the front door can be scratched by harsh soap or cleaners Feature Key Entry Display Remark Key 1 Next Continuity time total CANCEL 1 Hold together for 2 sec Unit 10 hrs Magnetron oscillating time total...

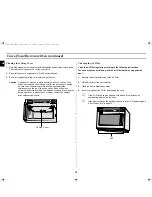
Page 16: ...e deformed abnormal symptom can happen such as arcing or sparks during operation In case of such problem contact the nearest after sales service centre Cleaning the Air Filter Clean the Air Filter regularly according to the following instructions The oven may have problems when the Air Filter becomes clogged with dust 1 Remove the bolt at both ends of the Air Filter 2 Lift the Air Filter off the p...

Page 17: ...ation 1 Stack two units together 2 Remove 6 screws as shown in the figure 3 Place the Bracket plate to join the two units 4 Attach and tighten 6 screws as shown in the figure here 5 Ensure the top oven is at a safe and workable height Replacement of Lamp Important 1 Remove a screw securing the lamp cover You don t need to remove outer panel to replace lamp 2 Remove the lamp by rotating it clockwis...

Page 18: ...aper bags or newspaper Recycled paper or metal trims Can be used to warm food Overheating may cause the polystyrene to melt May catch fire May cause arcing Glassware Oven to table ware Fine glassware Glass jars Can be used unless decorated with a metal trim Can be used to warm foods or liquids Delicate glass may break or crack if heated suddenly Must remove the lid Suitable for warming only Metal ...

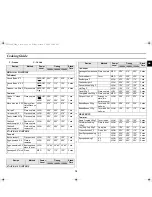
Page 19: ...ED 1 00 1 10 1 20 2 mins Recipe Method Power Level Timing Stand Time 1850W 1600W 1300W SNACK STARTERS To Reheat Sausages Cumberland F Place on plate MED 2 00 2 10 2 20 2 mins Full breakfast C Cover MED 2 30 2 40 2 50 1 min Beefburgers F HIGH 0 55 1 05 1 10 1 min Chickenburger F HIGH 0 55 1 05 1 10 1 min Donner kebab 162g F HIGH 1 00 1 10 1 20 1 min Hot Dog F HIGH 1 00 1 10 1 20 1 min Pizza 190g F ...

Page 20: ...HIGH 3 20 3 35 3 50 1 min Plated Meal 350g C Covered HIGH 2 00 2 15 2 30 1 min Plated Meal 700g C Covered HIGH 3 00 3 15 3 30 1 min Recipe Method Power Level Timing Stand Time 1850W 1600W 1300W FRESH VEGETABLES To cook 500g Beans green sliced 60ml 4tbsps water cover HIGH 3 00 3 15 3 30 2 mins Brocolli florets 60ml 4tbsps water cover HIGH 3 00 3 15 3 30 2 mins Cabbage shredded 10tbsps water cover H...

Page 21: ...juice on the plate tray and heat for three minutes at maximum power DO NOT spill water in the vents NEVER use any abrasive products or chemical solvents Take particular care when cleaning the door seals to ensure that no particles Accumulate Prevent the door from closing correctly Clean the microwave oven cavity right after each use with a mild detergent solution but let the microwave oven cool do...

Page 22: ...ntact the nearest after sales service centre Technical Specifications SAMSUNG strives to improve its products at all times Both the design specifications and these user instructions are thus subject to change without notice Model CM1929 CM1629 CM1329 Power source 230 V 50 Hz Power consumption Microwave 3200 W 3000 W 2600 W Output power 1850 W IEC 705 240 V 1850 W 230 V 1780 W 1600W IEC 705 240 V 1...

Page 23: ...GB 23 Memo jtX Y X Y niU GGw GYZGGm SGt G SGYWW GGXWaY_Ght ...

Page 24: ...jtX Y X Y niU GGw GY GGm SGt G SGYWW GGXWaY_Ght ...

Reviews: