background image


Summary of Contents for D300 - XGA DLP Business Projector

Page 1: ......

Page 2: ... outlets or damaged power cables z There is a danger of electric shock or fire Under no circumstances touch the power plug with wet hands z There is a danger of electric shock Do not plug multiple devices into a single wall outlet z There is a danger of fire Do not bend the power cord excessively or place heavy objects on it z There is a danger of electric shock or fire Before moving the product m...

Page 3: ... AT ALL TIMES z There is a danger of fire When installing the product in a cabinet or on a shelf make sure the front end of the base does not protrude z Dropping the product may damage it or cause injury Keep the power cord away from heaters z The coating of the power cord may melt and cause electric shock or fire Do not install the product in locations exposed to oil smoke moisture or water rainw...

Page 4: ...ing it z Doing so may cause damage or injury Keep the product out of children s reach z Make sure to keep the product out of the reach of children The product may fall and cause personal injury Power Related Installation Related Cleaning and Use Related Do not insert metal items such as chopsticks steel wire gimlets or inflammable objects such as matches or paper into the product through the venti...

Page 5: ...dren z If swallowed see a doctor immediately If the product emits smoke unusual noise or there is a burning smell disconnect the power plug immediately and contact a Service Center z There is a danger of electric shock or fire If the power plug pin or jack is exposed to dust water or alien substances clean it thoroughly z There is a danger of electric shock or fire When cleaning the product discon...

Page 6: ...iler where they purchased this product or their local government office for details of where and how they can take this item for environmentally safe recycling Business users should contact their supplier and check the terms and conditions of the purchase contract This product should not be mixed with other commercial wastes for disposal Correct disposal of batteries in this product alleen voor Eu...

Page 7: ......

Page 8: ...on video production Minimized fan noise and light leakage The airflow and fan installation structure are optimized to minimize fan noise and beam leakage Various Input Ports Connections to peripheral devices have been improved by adopting various input terminals such as an HDMI HDCP supported terminal a Component terminal and a MONITOR OUT terminal User adjustments This unit allows adjustment of e...

Page 9: ...rn the projector on or off 8 SOURCE Button Used to select input signals from the external sources 9 MENU Button Use this button to enter or exit a menu or to move forward in a menu 10 Select and Move Button Use this button to move to or select an item within a menu The buttons on the top of the projector are touch buttons Touch them lightly with your fingers to use them The label is attached to th...

Page 10: ...ature inside of the projector goes beyond the control limit Refer to Action 3 A problem has occurred when operating the DDP IC in the product Refer to Action 4 A problem has occurred with the operation of the lamp Refer to Action 5 The lifetime of the lamp has expired Refer to Action 6 The memory in the product is not operating normally Contact a service center The power for the product is not ope...

Page 11: ...urning off the projector Turn the power off wait for a sufficient amount of cooling time and then turn the power on to operate If the same problem occurs continually contact your product distributor or service center Action 6 When the screen becomes darker Check the lamp usage time on the Information Display screen If you need to replace the lamp contact your product distributor or service center ...

Page 12: ...ALL Button 16 P MODE Button 17 PC Button 1 ON Used to turn on the projector 2 AUTO Adjusts the Picture automatically Available in PC Mode Only 3 MENU Used to display Menu Screen 4 Move Used to move to or select each menu item 5 V KEYSTONE VERTICAL KEYSTONE Use this when video scenes are distorted or tilted 6 VIDEO Used to switch to VIDEO Mode 7 S VIDEO Used to switch to S VIDEO Mode 8 P SIZE Used ...

Page 13: ...nel Size 16 5 mm 0 65 inch Resolution XGA 1024 x 768 Manufacturer Texas Instrument Lamp Type 220W UHP Theater mode 172W Life Time 3 000 Hours Theater mode 3 250 hr Manufacturer Philips Color 18 9 M 1024 x 768 x 3 x 8bit Resolution Optimum resolution 1024 x 768 60Hz Maximum resolution 1280 x 1024 75Hz Input video signal Video S Video Component Analog PC HDMI Input synchronization signal Separate H ...

Page 14: ...cal Sync Pixel Frequency MHz Sync Type Frequency kHz polarity Frequency Hz polarity PC 640X350 31 47 P 70 1 N 25 18 Sep 37 86 P 85 1 N 31 5 Sep 640X400 37 86 N 85 P 31 5 Sep 640X480 31 47 N 60 N 25 175 Sep 35 00 N 66 7 N 30 24 Sep 37 86 N 72 8 N 31 5 Sep 37 5 N 75 N 31 5 Sep 43 27 N 85 N 36 Sep 720X400 31 47 N 70 P 28 322 Sep 800X600 35 16 P 56 3 N 36 Sep 37 88 P 60 P 40 Sep 48 08 P 72 2 P 50 Sep ...

Page 15: ...ze can be configured Source Picture Size Input Type Mode Normal Zoom1 Zoom2 16 9 HDMI HD 1080i O x x O 720p O x x O SD 576p O x x O 480p O x x O 576i O x x O 480i O x x O PC VESA x x Component HD 1080i O x x O 720p O x x O SD 576p O x x O 480p O x x O 576i O x x O 480i O x x O VIDEO S VIDEO SD 576i 480i PC HD 1080i x x 720p x x SD 576p x x 480p x x 576i x x 480i x x PC 16 9 Mode x x 4 3 Mode x x P...

Page 16: ... screen is not moved in PC input mode Source Picture Size Input Type Mode Normal Zoom1 Zoom2 16 9 HDMI HD 1080i x x x x 720p x x x x SD 576p x x x x 480p x x x x 576i x x x x 480i x x x x PC VESA x x x x Component HD 1080i O O O O 720p O O O O SD 576p O O O O 480p O O O O 576i O O O O 480i O O O O VIDEO S VIDEO SD 576i x O O x 480i x O O x PC HD 1080i x x x x 720p x x x x SD 576p x x x x 480p x x ...

Page 17: ...re on the screen will not be displayed clearly When installing the screen in bright surroundings use curtains You can install the projector in the following locations Front Floor Front Ceiling Rear Floor Rear Ceiling To view the installation position settings To view the picture when installing the projector behind the screen Install a semi transparent screen Select Menu Setup Install Rear Floor T...

Page 18: ...re quality If images are not clear adjust them using the Zoom Knob or Focus Ring or move the projector forward and backward Screen size M inch Horizental Vertical Max Min Offset X mm Y mm Z mm Z mm Y mm 30 609 6 457 2 1300 1110 57 40 812 8 609 6 1730 1480 76 50 1016 0 762 0 2150 1840 95 60 1219 2 914 4 2580 2210 114 70 1422 4 1066 8 3010 2570 133 80 1625 6 1219 2 3430 2940 152 90 1828 8 1371 6 386...

Page 19: ...perties Display Properties tab will appear 2 Click on Settings tab and set the Screen resolution by referring to Resolution described in the display mode table supported by this projector You do not have to change Color quality setup 3 Press the Advanced button Another property window will appear 4 Click on Monitor tab and set the Screen refresh rate by referring to Vertical Frequency described in...

Page 20: ...lor quality when it is used as a PC monitor Projected images may differ from the monitor depending on monitor manufacture or Windows versions When connecting the projector to a PC check that PC setup complies to display settings supported by this projector If not there may be signal problems Basic Settings Connecting the Power Connecting to video equipment 1 Rear of Projector Plug the power cord i...

Page 21: ...MI cable When the connection is finished connect the power of your projector and DVD player Cable Satellite box Using the Projector Turn on the projector and press the HDMI button to select HDMI Connecting a DVD player Cable Satellite Box via Component Connect the COMPONENT IN Y PB PR input port at the back of the projector to the Component port at the back of the DVD player Cable Satellite box wi...

Page 22: ...VIDEO IN input port of the projector Using the S VIDEO connection provides a higher visual quality When finishing connecting the devices connect the power of the projector and the VCR Using the Projector Turn on the projector and press the Video button to select Video or Press the S VIDEO button to select S Video Check that the projector and the video equipment are turned off before connecting cab...

Page 23: ...not available check PC video cable is in place Turn on the PC and set the PC Environment when necessary Adjust the screen Auto Adjustment Sound comes out from PC speakers Connecting Video Devices Monitor TV etc When using the D sub analog output through another video device monitor TV etc Connect the MONITOR OUT terminal of the projector and the D sub terminal of the video device using a D sub cab...

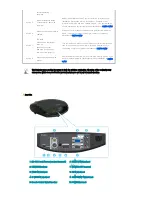
Page 24: ... PC IN input terminal ...

Page 25: ...e Screen Adjustment Description Play Stop Source List You can select a device connected to the projector to display 1 Component 4 PC 2 S Video 5 HDMI 3 Video Edit Name You can edit the names of devices connected to the projector 1 Component 4 PC 2 S Video 5 HDMI 3 Video Input Picture Setup Option ...

Page 26: ...in your customized screen Mode You can set this in Mode Save The initial value is set to the brightest screen level Mode 2 Contrast Used to adjust the contrast between the object and the background 3 Brightness Used to adjust brightness of the entire picture 4 Sharpness Used to adjust the sharpness of the picture 5 Color Used to adjust color lighter or darker You can only adjust Color in S Video a...

Page 27: ... the screen The Black Level can only be selected in Video S Video and HDMI modes For Video and S Video Modes For HDMI Mode 1 0 IRE Sets the light level of the darkest portion of the video signal to low If the setting does not match the input signal the dark screen looks milky white 2 7 5 IRE Sets the light level of the darkest portion of the video signal to high If the setting does not match the i...

Page 28: ...rizontally Reversed Image 4 Rear Ceiling Vertically Reversed Image Light Setting Used to set the image brightness by adjusting the amount of light generated by the lamp 1 Theater Using this function you can adjust the light level of the lamp so that you can comfortably watch pictures on the screen even when watching under dark conditions It also lowers power consumption and extends the life of the...

Page 29: ...ted in the PC environment 1 Auto Adjustment Used to adjust frequency and phase of PC screen automatically 2 Coarse Used to adjust frequency when vertical lines appear on PC screen 3 Fine Used to fine tune the PC screen 4 Zoom Used to extend PC screen from the center 5 Reset Using this function you can reset the PC menu settings to the factory default settings Auto Adjustment Coarse Fine Zoom Reset...

Page 30: ...you can turn all the LEDs off by turning off this function Turning the function on again will allow the LEDs to operate properly again according to the status of the projector 1 Off This mode disables the operating LED However the LED will come on regardless of the LED setting when the power is turned on or off or when the projector is in an abnormal state 2 On This mode enables the operating LED ...

Page 31: ...e sreen The Blue screen function causes the screen to change to the Blue screen if there is no signal input from the external device connected to your projector 1 Off 2 On Information You can check external source signals picture setup PC picture adjustment and lamp use time ...

Page 32: ...s z Be sure that the power cord of the projector is connected z Be sure that the proper input source is selected z Check that the connectors are properly connected to the ports at the back of the projector z Check the Remote Control batteries z Be sure that the Color Brightness settings are not at their lower limit Poor color z Adjust the Tint and Contrast Images are not clear z Adjust the focus z...

Page 33: ...Default from the menu ...

Page 34: ...ded lamp when replacing Lamp specifications are defined in the user s manual Replace with the same model provided with the projector Lamp Model Name 220W Philips fusion lamp Lamp Manufacture Philips Lighting Lamp Life Time 3000Hrs Lamp Type 220W UHP Check that the power cord is unplugged before replacing the lamp Even after the power cord has been disconnected the lamp will be hot Allow it to cool...

Page 35: ...re lift up the lamp handles by holding them and pull the lamp Assembling a new lamp is in the reverse order of the disassembly Care and Maintenance Contact SAMSUNG WORLDWIDE Other Authority If you have any questions or comments relating to Samsung products please contact a SAMSUNG customer care center North America U S A 1 800 SAMSUNG 726 7864 http www samsung com us CANADA 1 800 SAMSUNG 726 7864 ...

Page 36: ...27 515 http www samsung com fi FRANCE 3260 dites SAMSUNG 0 15 Min 0825 08 65 65 0 15 Min http www samsung com fr GERMANY 01805 SAMSUNG 7267864 0 14 Min http www samsung de HUNGARY 06 80 SAMSUNG 726 7864 http www samsung com hu ITALIA 800 SAMSUNG 726 7864 http www samsung com it LUXEMBURG 02 261 03 710 http www samsung com lu NETHERLANDS 0900 SAMSUNG 0900 7267864 0 10 Min http www samsung com nl NO...

Page 37: ...UNG 726 7864 02 5805777 http www samsung com ph SINGAPORE 1800 SAMSUNG 726 7864 http www samsung com sg THAILAND 1800 29 3232 02 689 3232 http www samsung com th TAIWAN 0800 329 999 http www samsung com tw VIETNAM 1 800 588 889 http www samsung com vn Middle East Africa SOUTH AFRICA 0860 SAMSUNG 726 7864 http www samsung com za TURKEY 444 77 11 http www samsung com tr U A E 800 SAMSUNG 726 7864 80...

Page 38: ...his is a grade of DMD panel DMD Digital Micromirror Device A DMD panel is an implementation of DLP technology It consists of microscopic mirrors where each mirror represents a pixel External Input External Input is connecting video devices such as a VCR camcorder DTV receiver DVD etc to the projector as a video source Gamma Mode Gamma Mode compensates the video signal produced for analog display d...

Page 39: ...erved Reproduction in any manner whatsoever without the written permission of Samsung Electronics Co Ltd is strictly forbidden Samsung Electronics Co Ltd shall not be liable for errors contained herein or for incidental or consequential damages in connection with the furnishing performance or use of this material ...

Reviews: