background image

11

iT

a

  c

OLL

egamen

T

i

connessioni

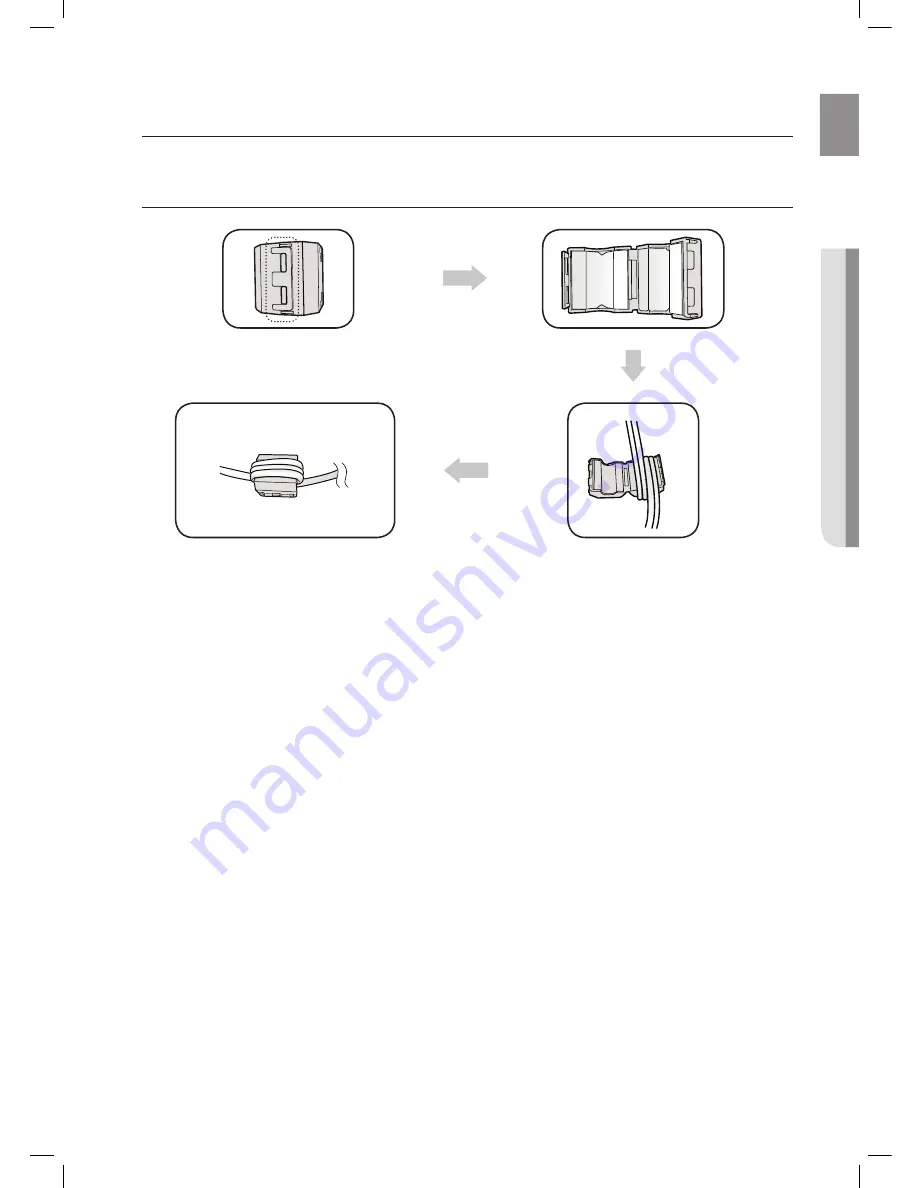
inSTaLLaziOne DeL nUcLeO TOROiDaLe in FeRRiTe SUL caVO 
Di aLimenTaziOne

Eseguire tre avvolgimenti del cavo di alimentazione 

attorno al nucleo.

(Iniziare ad avvolgere i cavi a 5-10 cm di distanza dai 

connettori)

Richiudere i fermi.

Sollevare i fermi per sbloccare il nucleo ed aprirlo.

Summary of Contents for DA-E651

Page 1: ...s Audio with Dock user manual imagine the possibilities Thank you for purchasing this Samsung product To receive more a complete service please register your product at www samsung com register DA E650 DA E651 ...

Page 2: ...ch as MP3 players USB flash memory etc using the Wireless Audio with Dock s USB HOST function Bluetooth Function Connect a Bluetooth device to the Wireless Audio with Dock and enjoy music from the device with high quality stereo sound all without wires aptX aptX enables high quality Bluetooth stereo audio delivering wired audio quality wirelessly License iPad iPhone iPod iPod nano iPod shuffle and...

Page 3: ...lue of the fuse is indicated on the pin face of the plug and if it requires replacing a fuse approved to BS1362 of the same rating must be used Never use the plug with the fuse cover removed If the cover is detachable and a replacement is required it must be of the same colour as the fuse fitted in the plug Replacement covers are available from your dealer If the fitted plug is not suitable for th...

Page 4: ... unit Protect the product from moisture i e vases and excess heat e g fireplaces or equipment creating strong magnetic or electric fields Disconnect the power cable from the AC supply if the unit malfunctions Your product is not intended for industrial use This product is for personal use only Condensation may occur if your product has been stored in cold temper atures If transporting the unit dur...

Page 5: ...he volume connections 11 11 Installing the Toroidal Ferrite on the Power Cable 12 Using Rubber 13 Connecting a device to the Dual Dock 14 Connecting an audio device using AUX IN 16 Connecting to Bluetooth devices playing 18 18 Using the TV mode Sound Share 18 Using the docking mode with Samsung Galaxy and Apple Devices 20 Using the Bluetooth mode 21 Using the USB mode functions 22 22 Basic functio...

Page 6: ...e page 3 2 If a problem occurs check Troubleshooting See page 25 Copyright 2012 Samsung Electronics Co Ltd All rights reserved no part or whole of this user s manual may be reproduced or copied without the prior written permission of Samsung Electronics Co Ltd getting started The appearance of the accessories may differ slightly from the illustrations above WHAT s inclUDED Check for the supplied a...

Page 7: ... Front Rear Panel ONLY FOR SERVICE AUX IN DC 14V 4A USB 5V 500mA ONLY FOR SERVICE AUX IN DC 14V 4A USB 5V 500mA ONLY FOR SERVICE AUX IN DC 14V 4A USB 5V 500mA ONLY FOR SERVICE AUX IN DC 14V 4A USB 5V 500mA 4 1 2 3 8 7 6 5 FRONT REAR ...

Page 8: ...ternal USB storage device such as an MP3 player here to play files located on the device 7 AUX IN Connect to the Analog output of an external device 8 ONLY FOR SERVICE This jack is for service only When you turn on this unit there will be a 4 to 5 second delay before it produces sound To upgrade the product s software through the USB Host jack you must use a USB memory stick This unit can connect ...

Page 9: ...und from this unit Press again to restore the sound to the previous volume level BASS BUTTON Optimise the sound based on your tastes Be careful not to catch your fingernail in the gap when you lift the cover You can damage your fingernail Installing battery in the Remote Control 1 Open the cover of the remote control by putting your fingernail into the gap between the cover and body of the remote ...

Page 10: ...om left to right when your turn the volume up and from right to left when you turn the volume down The LEDs do not light if you try to increase the volume when it has already been set to maximum or try to decrease the volume when it has already been set to minimum ONLY FOR SERVICE AUX IN DC 14V 4A USB 5V 500mA MUTE VOL BASS FUNCTION MUTE VOL BASS FUNCTION or Touch the button on the right side of t...

Page 11: ...s connections INSTALLING THE TOROIDAL FERRITE ON THE POWER CABLE Wind Power cable around the core three times Start winding at 5 10cm away from the plugs Close the lock back Lift up to release the lock and open the core ...

Page 12: ... Dual dock rUBBer SKin 1 Cover the Rubber Skin on the Dual dock 2 After cover the Rubber Skin on the Dual dock set your device to the Dual dock Use the product after removing the Rubber Skin attached to the product if you have the protection case for your device You can use this product only when the thickness of the protection case is under 1 5mm when you attach the Spacer cover to your device It...

Page 13: ...follows aUX LeD Off The selected mode is displayed in red in the Function Display 3 If you have a Samsung Galaxy device connect the device to the 5 pin smaller connector to connect to the Dual Dock If you have an Apple device connect the device to the 30 pin larger connector on the Dual Dock Turn on your Samsung Galaxy device before you attach it to the Dual Dock This unit doesn t support the simu...

Page 14: ...phone jack of the external device or audio device 2 Touch the button repeatedly until the function LEDs are off The AUX mode is active when no function LED is lit Before moving or installing this product be sure to turn off the power and disconnect the power cord ONLY FOR SERVICE AUX IN DC 14V 4A USB 5V 500mA ONLY FOR SERVICE AUX IN DC 14V 4A USB 5V 500mA ONLY FOR SERVICE AUX IN DC 14V 4A USB 5V 5...

Page 15: ...onnection is automatically cut off if the Bluetooth device moves out of range Even within range the sound quality may be degraded by obstacles such as walls or doors This wireless device may cause electric interference during its operation You may be required to enter a PIN code password when connecting the Bluetooth device to the Wireless Audio with Dock If the PIN code input window appears enter...

Page 16: ... proceed with Bluetooth pairing appears Select Yes on the TV screen then the pairing with the Wireless Audio with Dock will be completed The Wireless Audio with Dock Bluetooth pairing is complete To cancel pairing to your TV If you want to pair your Wireless Audio with Dock to a TV other than the connected TV you should cancel the existing pairing in the Wireless Audio with Dock It is possible to ...

Page 17: ...selection changes as follows AUX LED Off The selected mode is displayed in red in the Function Display 2 Select the Bluetooth menu on your Bluetooth device Refer to the Bluetooth device s user manual for instructions 3 Scan or search for All Devices or for Headsets You will see a list of devices 4 Select Samsung W_Audio XXXXXX from the searched list If the Bluetooth device fails to pair with the W...

Page 18: ...r 3 In the search bar type in the Samsung Wireless Audio with Dock and then search 4 In the search result list find and then tap Samsung Wireless Audio with Dock to start downloading 5 Tap install To play music follow these steps 1 1 If you start the app when the Wireless Audio with Dock is the only device for the Bluetooth connection selecting PLAY in your device automatically establishes the Blu...

Page 19: ...g sound 2 Select the Music menu in the main screen of the Apple device 3 Select and play the desired music The music will play through the Wireless Audio with Dock s speakers While playing a video with your device Play Pause Next Back operations may not be available Use the button on your source device to operate it Compatibility list Apple Device Docking mode compatible iPod iPhone iPad models Up...

Page 20: ...aired to the Wireless Audio with Dock may cause stuttering if operated while the Wireless Audio with Dock is playing back from AUX input To disconnect the Bluetooth device from the Wireless Audio With Dock You can cancel Bluetooth pairing from the Wireless Audio with Dock For instructions see the Bluetooth device s user manual The Wireless Audio with Dock will be disconnected To disconnect the Wir...

Page 21: ...onnect a USB device directly to the USB port of the product Otherwise you may encounter a USB compatibility problem Do not connect multiple storage devices to the product via a multi card reader It may not operate properly Digital camera PTP protocols are not supported Do not remove the USB device while it is being read DRM protected music files MP3 WMA from a commercial web site can not be played...

Page 22: ... Off Press an appropriate button on the remote control to select a desired mode or press to select from AUX LED Off Input mode Display BLUETOOTH TV Docking mode USB mode BLUETOOTH mode AUX input LED Off ONLY FOR SERVICE AUX IN DC 14V 4A USB 5V 500mA MUTE VOL BASS FUNCTION MUTE VOL BASS FUNCTION ...

Page 23: ...hen there is more than one file and you press the button the next file is selected When there is more than one file and you press the button the previous file is selected This function may not operate in certain mode Muting the sound This is useful when answering a doorbell or telephone call 1 To mute sound of this unit press the MUTE button of the remote control 2 Press MUTE on the remote control...

Page 24: ...ick SUPPORT on the top right of the page 3 Enter the product s model number into the search field and then click Find Product 4 Click Get downloads in the Center of the page below the Downloads header 5 Click Firmware in the Center of the page 6 Click the ZIP icon in the File column on the right side of the page 7 Click OK in the pop up that appears to download and save the firmware file to your P...

Page 25: ... function on Is the volume set to minimum Connect it correctly Press the Mute button to cancel the function Adjust the volume The remote control does not work Are the batteries drained Is the distance between remote control and main unit too far Replace with new batteries Operate closer to the main unit The Sound Share TV pairing failed Is your TV a supporting model Is your TV firmware the latest ...

Page 26: ...distortion separation and usable sensitivity are based on measurement using AES Audio Engineering Society guidelines Nominal specification Samsung Electronics Co Ltd reserves the right to change the specifications without notice Weight and dimensions are approximate For the power supply and Power Consumption refer to the label attached to the product Hereby Samsung Electronics declares that this W...

Page 27: ...ON HOWEVER CAUSED AND ON ANY THEORY OF LIABILITY WHETHER IN CONTRACT STRICT LIABILITY OR TORT INCLUDING NEGLIGENCE OR OTHERWISE ARISING IN ANY WAY OUT OF THE USE OF THIS SOFTWARE EVEN IF ADVISED OF THE POSSIBILITY OF SUCH DAMAGE Ogg Vorbis decoder Copyright c 2002 Xiph org Foundation Redistribution and use in source and binary forms with or without modification are permitted provided that the foll...

Page 28: ... not be mixed with other commercial wastes for disposal Area Contact Centre Web Site ALBANIA 42 27 5755 www samsung com AUSTRIA 0810 SAMSUNG 7267864 0 07 min www samsung com BELGIUM 02 201 24 18 www samsung com be Dutch www samsung com be_ fr French BOSNIA 05 133 1999 www samsung com BULGARIA 07001 33 11 www samsung com CROATIA 062 SAMSUNG 062 726 7864 www samsung com CZECH 800 SAMSUNG 800 726786 ...

Page 29: ... choisi cet appareil Samsung Pour obtenir une assistance plus complète veuillez enregistrer votre produit sur www samsung com register DA E650 DA E651 Wireless Audio with Dock Lecteur audio sans fil avec station d accueil guide d utilisation ...

Page 30: ...hiers musicaux à l aide de la fonction USB HOST du lecteur audio sans fil avec station d accueil Fonction Bluetooth Vous pouvez connecter un périphérique Bluetooth au lecteur audio sans fil avec station d accueil pour écouter de la musique stockée sur le périphérique avec un son stéréo de grande qualité le tout sans fil aptX aPtX permet d écouter un son stéréo Bluetooth de haute qualité en délivra...

Page 31: ...e ou de décharge électrique veuillez ne pas exposer cet appareil à la pluie ou à l humidité ATTENTION POUR ÉVITER LES RISQUES DE DÉCHARGE ÉLECTRIQUE VEILLEZ À FAIRE CORRESPONDRE LA BROCHE LA PLUS LARGE DE LA PRISE À L EMPLACEMENT LE PLUS LARGE EN L INSÉRANT COMPLÈTEMENT Cet appareil doit toujours être branché à une prise CA équipée d une broche de mise à la terre Pour débrancher l appareil il conv...

Page 32: ...e produit à l abri de la moisissure ex vases de toute chaleur excessive ex cheminées ou d appareils susceptibles de générer des champs magnétiques ou électriques importants Débranchez le câble d alimentation de l alimentation CA en cas de dysfonctionnement de l appareil Ce produit n est pas destiné à un usage industriel Cet appareil est destiné exclusivement à un usage personnel De la condensation...

Page 33: ...BRANCHEMENTS 11 11 Installation du tore de ferrite sur le câble d alimentation 12 Utilisation du caoutchouc 13 Branchement d un appareil au Double Dock 14 Branchement d un appareil audio au port AUX IN ENTRÉE AUX 16 Connexion aux peripheriques Bluetooth LECTURE 18 18 Utilisation du mode TV Sound Share 18 Utilisation du mode d accueil avec des appareils Samsung Galaxy et Apple 20 Lecture en mode Bl...

Page 34: ...2 En cas de problème reportez vous à la section Dépannage Voir page 25 Copyright 2012 Samsung Electronics Co Ltd Tous droits réservés il est interdit de reproduire ou de copier tout ou partie de ce manuel d utilisation sans l accord préalable écrit de Samsung Electronics Co Ltd mise en route L aspect des accessoires peut légèrement différer des illustrations ci dessus CONTENU Vérifiez que les acce...

Page 35: ...NNEAU ARRIÈRE FAÇADE PANNEAU ARRIÈRE ONLY FOR SERVICE AUX IN DC 14V 4A USB 5V 500mA ONLY FOR SERVICE AUX IN DC 14V 4A USB 5V 500mA ONLY FOR SERVICE AUX IN DC 14V 4A USB 5V 500mA ONLY FOR SERVICE AUX IN DC 14V 4A USB 5V 500mA 4 1 2 3 8 7 6 5 ...

Page 36: ... USB tel qu un lecteur MP3 pour lire les fichiers enregistrés sur le périphérique 7 AUX IN ENTRÉE AUX Permet la connexion à la sortie analogique d un périphérique externe 8 UNIQUEMENT POUR LES RÉPARATIONS Cette prise est destinée uniquement aux réparations Lorsque vous allumez l appareil le son n est émis qu au bout de 4 ou 5 secondes Pour mettre à niveau le logiciel du produit via la prise USB Ho...

Page 37: ...de l unité Appuyez à nouveau pour rétablir le son à son volume précédent BOUTON BASS BASSES Permet de régler le son à votre goût Faites attention à ne pas coincer votre ongle dans le jeu lorsque vous soulevez le couvercle Vous risqueriez d abîmer votre ongle Insertion de la pile dans la télécommande 1 Ouvrez le couvercle de la télécommande en insérant votre ongle dans le jeu entre le couvercle et ...

Page 38: ...ction s allume de gauche à droite lorsque le volume est augmenté et s allume de droite à gauche lorsque le volume est baissé La DEL s éteint si vous augmentez le volume lorsqu il est déjà réglé au maximum ou lorsque vous baissez le volume s il est déjà réglé au minimum ONLY FOR SERVICE AUX IN DC 14V 4A USB 5V 500mA MUTE VOL BASS FUNCTION MUTE VOL BASS FUNCTION ou Appuyez sur le bouton situé dans l...

Page 39: ...TION DU TORE DE FERRITE SUR LE CÂBLE D ALIMENTATION Enroulez trois fois le câble d alimentation autour du tore Commencez l enroulement à 5 10 cm des prises Verrouillez à nouveau le tore Soulevez pour déverrouiller et ouvrir le tore de ferrite ...

Page 40: ...n caoutchouc sur le double dock 2 Une fois que la membrane est placée sur le double dock installez votre appareil sur le double dock Utilisez le produit après avoir retiré la membrane en caoutchouc fixée au produit si vous disposez de la housse de protection de votre appareil Vous pouvez utiliser ce produit uniquement si l épaisseur de la housse de protection est inférieure à 1 5 mm lorsque vous f...

Page 41: ...L éteinte Le mode sélectionné s affiche en rouge sur l écran d affichage des fonctions 3 Si vous disposez d un appareil Samsung Galaxy branchez le périphérique au connecteur à 5 broches le plus petit pour le brancher au double dock Si vous disposez d un appareil Apple branchez l appareil au connecteur à 30 broches le plus grand du double dock Allumez votre appareil Samsung Galaxy avant de le conne...

Page 42: ...e audio pour le branchement à un périphérique audio ENTRÉE AUX 1 Branchez la prise pour écouteurs du périphérique externe ou du périphérique audio à la source AUX IN ENTRÉE AUX Audio située à l arrière de l unité 2 Appuyez plusieurs fois sur le bouton jusqu à ce que les DEL de fonction s éteignent Le mode AUX est actif lorsque aucune DEL de fonction n est allumée Avant de déplacer ou d installer l...

Page 43: ... déplacé hors de la portée Même si la distance est respectée il est possible que la qualité sonore soit détériorée par des obstacles ex murs portes Ce périphérique sans fil peut provoquer des interférences électriques durant son fonctionnement Il peut vous être demandé de saisir un code PIN mot de passe lors de la connexion du périphérique Bluetooth au lecteur audio sans fil avec station d accueil...

Page 44: ...ursuivre l appariement Bluetooth s affiche Sélectionnez Yes Oui sur l écran du téléviseur L appariement avec le lecteur audio sans fil avec station d accueil est alors terminé L appariement Bluetooth du lecteur audio sans fil avec station d accueil est terminé Annuler l appariement avec votre téléviseur Si vous souhaitez apparier votre lecteur audio sans fil avec station d accueil avec un télévise...

Page 45: ...ant AUX DEL éteinte Le mode sélectionné s affiche en rouge sur l écran d affichage des fonctions 2 Sélectionnez le menu Bluetooth sur votre périphérique Bluetooth Reportez vous au manuel d utilisation du périphérique Bluetooth pour obtenir les instructions 3 Balayez ou recherchez tous les périphériques ou les écouteurs Une liste d appareils s affiche 4 Sélectionnez Samsung W_Audio XXXXXX dans la l...

Page 46: ... Dock puis recherchez 4 Trouvez le dans la liste des résultats de la recherche puis tapez Samsung Wireless Audio with Dock pour lancer le téléchargement 5 Appuyez légèrement sur Install Installer Pour lire de la musique suivez ces étapes 1 1 Si vous démarrez l application alors que le lecteur audio sans fil avec station d accueil est le seul périphérique disponible pour la connexion Bluetooth la s...

Page 47: ...r de l écran principal de l appareil Apple 3 Sélectionnez et lisez la musique de votre choix La musique sera lue à travers les enceintes du lecteur audio sans fil avec station d accueil Lors de la lecture d une vidéo avec votre appareil il est possible que les fonctions Play Pause Next Back Lecture Pause Suivant Précédent ne soient pas disponibles Utilisez le bouton de votre appareil source pour a...

Page 48: ...l avec station d accueil est susceptible de provoquer des discontinuités s il est activé alors que le lecteur audio sans fil avec station d accueil est en cours de lecture depuis l entrée AUX Pour déconnecter le périphérique Bluetooth du lecteur audio sans fil avec station d accueil Vous pouvez annuler l appariement Bluetooth du lecteur audio sans fil avec station d accueil Pour les instructions r...

Page 49: ...ue USB directement au port USB du produit Dans le cas contraire vous pouvez rencontrer un problème de compatibilité USB Ne connectez pas plusieurs périphériques de stockage au produit via un lecteur à cartes multiples Il peut ne pas fonctionner correctement Les protocoles PTP des caméras numériques ne sont pas pris en charge Ne retirez pas le périphérique USB lorsqu il est en cours de lecture Les ...

Page 50: ...puyez sur le bouton de la télécommande correspondant au mode souhaité ou sur pour sélectionner l un des modes suivants AUX DEL éteinte Mode d entrée Affichage BLUETOOTH TV Mode d accueil Mode USB Mode BLUETOOTH Entrée AUX DEL éteinte ONLY FOR SERVICE AUX IN DC 14V 4A USB 5V 500mA MUTE VOL BASS FUNCTION MUTE VOL BASS FUNCTION ...

Page 51: ...on du son Cette fonction se révèle particulièrement utile lorsque vous devez ouvrir votre porte d entrée ou répondre à un appel téléphonique 1 Pour couper le son de cet appareil appuyez sur le bouton MUTE MUET de la télécommande 2 Appuyez à nouveau sur le bouton MUTE MUET de la télécommande ou appuyez sur VOLUME pour rétablir le son Fonction BASS BASSES Cette fonction vous permet de régler le son ...

Page 52: ...n supérieur droit de la page 3 Saisissez le numéro de modèle de l appareil dans le champ de recherche puis cliquez sur Find Product Rechercher le produit 4 Cliquez sur Get downloads Obtenir des téléchargements au centre de la page sous l en tête Downloads Téléchargements 5 Cliquez sur Firmware Micrologiciel au centre de la page 6 Cliquez sur l icône ZIP ZIP dans la colonne File Fichier sur le côté...

Page 53: ...um Branchez le correctement Appuyez sur le bouton Mute Muet pour désactiver la fonction Réglez le volume La télécommande ne fonctionne pas Les piles sont elles déchargées La télécommande est elle suffisamment près de l appareil Remplacez les piles Rapprochez vous de l appareil La fonction de partage du son Sound Share appariement du téléviseur a échoué Le modèle de votre téléviseur est il pris en ...

Page 54: ...nt basés sur des mesures effectuées à l aide des directives AES Audio Engineering Society Caractéristiques nominales Samsung Electronics Co Ltd se réserve le droit de modifier les caractéristiques sans préavis Le poids et les dimensions figurent à titre approximatif Pour les spécifications de l alimentation et de la consommation d énergie reportez vous à l étiquette apposée sur le produit Par la p...

Page 55: ...TION HOWEVER CAUSED AND ON ANY THEORY OF LIABILITY WHETHER IN CONTRACT STRICT LIABILITY OR TORT INCLUDING NEGLIGENCE OR OTHERWISE ARISING IN ANY WAY OUT OF THE USE OF THIS SOFTWARE EVEN IF ADVISED OF THE POSSIBILITY OF SUCH DAMAGE Ogg Vorbis decoder Copyright c 2002 Xiph org Foundation Redistribution and use in source and binary forms with or without modification are permitted provided that the fo...

Page 56: ...ter leurs fournisseurs et à consulter les conditions de leur contrat de vente Ce produit et ses accessoires ne peuvent être jetés avec les autres déchets professionnels et commerciaux Zone Centre de contact Site Internet ALBANIA 42 27 5755 www samsung com AUSTRIA 0810 SAMSUNG 7267864 0 07 min www samsung com BELGIUM 02 201 24 18 www samsung com be Dutch www samsung com be_ fr French BOSNIA 05 133 ...

Page 57: ...tation Bedienungsanleitung Unvorstellbare Möglichkeiten Vielen Dank dass Sie sich für dieses Produkt von Samsung entschieden haben Wenn Sie einen umfassenderen Service nutzen möchten registrieren Sie bitte Ihr Produkt unter www samsung com register DA E650 DA E651 ...

Page 58: ... USB Flash Speicher angeschlossen und die darauf enthaltenen Dateien wiedergegeben werden Bluetooth Funktion Nach dem Anschließen eines Bluetooth Geräts an das Kabellose Audio System mit Docking Station können Sie Musik von diesem Gerät in bester Stereo Klangqualität ganz ohne Kabel wiedergeben aptX aPtX Liefert hochwertigen Stereoklang über eine kabellose Bluetooth Verbindung mit einer Klangquali...

Page 59: ...WARNUNG Schützen Sie das Gerät vor Regen und Feuchtigkeit um die Gefahr von Bränden oder Stromschlägen zu verringern ACHTUNG ACHTUNGUM STROMSCHLÄGE ZU VERMEIDEN STECKEN SIE DEN STECKER FEST UND VOLLSTÄNDIG IN DIE STECKDOSE EIN Dieses Gerät muss stets an geerdete Steckdosen angeschlossen werden Entfernen Sie den Stecker aus der Steckdose um das Gerät vollständig abzuschalten Aus diesem Grund sollte...

Page 60: ...zen können zur Beschädigung des Geräts führen Das Gerät vor Feuchtigkeit z B keine Vasen auf das Gerät stellen und starker Hitze z B Feuerstellen oder vor starke Magnet bzw elektrische Felder erzeugenden Geräten schützen Ihr Produkt ist nicht für den gewerblichen Einsatz vorgesehen Dieses Produkt ist nur für den persönlichen Gebrauch bestimmt Wenn das Gerät bei kalten Temperaturen aufbewahrt wurde...

Page 61: ...einstellen ANSCHLÜSSE 11 11 Anbringen des ferrit rinkerns am netzkabel 12 Verwenden der Gummipolster 13 Anschließen eines Geräts an den Dual Dock 14 Ein Audiogerät an den AUX IN Eingang anschließen 16 Anschliessen eines Bluetooth geräts WIEDERGABE 18 18 Verwenden des TV modus Sound Share 18 Verwenden des docking modus mit Samsung Galaxy und apple geräten 20 Verwenden des Bluetooth Modus 21 Verwend...

Page 62: ...s ein Problem auftritt schlagen Sie im Kapitel zur Fehlerbehebung nach Siehe Seite 25 Copyright 2012 Samsung Electronics Co Ltd Alle Rechte vorbehalten Ohne vorherige schriftliche Genehmigung von Samsung Electronics Co Ltd ist das vollständige oder teilweise Reproduzieren oder Kopieren dieser Bedienungsanleitung nicht gestattet erste schritte Das Aussehen des Zubehörs kann leicht von den obigen Il...

Page 63: ...ÜCKSEITE DES GERÄTS VORDERSEITE RÜCKSEITE ONLY FOR SERVICE AUX IN DC 14V 4A USB 5V 500mA ONLY FOR SERVICE AUX IN DC 14V 4A USB 5V 500mA ONLY FOR SERVICE AUX IN DC 14V 4A USB 5V 500mA ONLY FOR SERVICE AUX IN DC 14V 4A USB 5V 500mA 4 1 2 3 8 7 6 5 ...

Page 64: ...SB Speichergerät wie einen MP3 Player an um die sich auf dem Gerät befindenden Dateien abzuspielen 7 AUX IN Für den Anschluss an den Analogausgang eines externen Geräts 8 NUR FÜR SERVICE Dieser Anschluss dient nur zu Servicezwecken Nachdem das Gerät eingeschaltet wurde vergehen 4 bis 5 Sekunden bis die Tonwiedergabe erfolgt Um die Software des Geräts über den USB Anschluss zu aktualisieren benötig...

Page 65: ...autstärke zu hören drücken Sie diese Taste erneut BASS TASTE Zur Anpassung des Klangs an Ihren Geschmack Geben Sie acht dass Sie Ihren Fingernagel beim Anheben des Verschlusses nicht im Spalt einklemmen Sie können dabei Ihren Fingernagel einreißen Batterien in die Fernbedienung einsetzen 1 Zum Öffnen der Fernbedienung den Fingernagel in den Spalt zwischen dem Verschluss und dem Gehäuse der Fernbed...

Page 66: ...unktions LED leuchtet von links nach rechts auf wenn die Lautstärke erhöht wird von rechts nach links wenn die Lautstärke reduziert wird Die LED leuchtet nicht wenn Sie versuchen die Lautstärke zu erhöhen oder zu verringern und diese bereits auf ihr Maximum bzw Minimum eingestellt ist ONLY FOR SERVICE AUX IN DC 14V 4A USB 5V 500mA MUTE VOL BASS FUNCTION MUTE VOL BASS FUNCTION oder Drücken Sie die ...

Page 67: ...RINGEN DES FERRIT RINKERNS AM NETZKABEL Wickeln Sie das Netzkabel drei Mal um den Kern Die Wicklung in einem Abstand von 5 10cm von den Steckern ausführen Schließen Sie den Verschluss wieder Den Verschluss anheben und den Kern öffnen ...

Page 68: ...ät in den Dual Dock ein GUMMiMAtte 1 Legen Sie die Gummimatte in den Dual Dock ein 2 Nachdem Sie die Gummimatte eingelegt haben können Sie Ihr Gerät in den Dual Dock einsetzen Sie können das Gerät ohne Gummimatte verwenden wenn Sie über eine Schutzhülle für Ihr Gerät verfügen Das Gerät kann jedoch nur dann ohne Abstandshalter verwendet werden wenn die Schutzhülle nicht dicker als 1 5 mm ist Wenn d...

Page 69: ...Led Aus Der ausgewählte Modus wird in Rot auf der Funktionsanzeige angezeigt 3 Wenn Sie über ein Samsung Galaxy Gerät verfügen schließen Sie es an den kleineren 5 Pin Anschluss des Dual Dock an Wenn Sie über ein Apple Gerät verfügen schließen Sie es an den größeren 30 Pin Anschluss an Schalten Sie Ihr Samsung Galaxy Gerät ein bevor Sie es an das Dual Dock System anschließen Samsung Galaxy und Appl...

Page 70: ... verfügt über eine analoge Anschlussbuchse für den Anschluss eines Audiogeräts AUX IN 1 Schließen Sie den Kopfhörerausgang des externen Geräts oder des Audiogeräts an die AUX IN Audio Buchse auf der Geräterückseite an 2 Tippen Sie die Taste wiederholt an bis die Funktions LEDs erlöschen Wenn keine Funktions LED leuchtet ist der AUX Modus ist aktiv Bevor Sie dieses Gerät installieren oder an einer ...

Page 71: ...b dieser Reichweite kann die Klangqualität durch Hindernisse wie Mauern oder Türen beeinträchtigt werden Dieses Funkgerät kann Interferenzen während des Betriebs verursachen Eventuell müssen Sie einen PIN Code Kennwort eingeben wenn die Verbindung zwischen dem Bluetooth Gerät und dem Kabellosen Audio System mit Docking Station hergestellt werden soll Wenn Sie zur Eingabe des PIN Codes aufgefordert...

Page 72: ...f dem Fernsehbildschirm Ja aus und der Verbindungsaufbau mit dem Kabellosen Audio System mit Docking Station wird abgeschlossen Die Bluetooth Verbindung mit dem Kabellosen Audio System mit Docking Station ist hergestellt Verbindungsaufbau zu Ihrem Fernsehgerät zurücksetzen Wenn Sie Ihr Kabelloses Audio System mit Docking Station mit einem anderen Fernsehgerät verbinden wollen als mit dem zu dem be...

Page 73: ...Modus wird in Rot auf der Funktionsanzeige angezeigt 2 Wechseln Sie auf ihrem Bluetooth Gerät in das Bluetooth Menü Weitere Informationen dazu finden Sie der Bedienungsanleitung des Bluetooth Geräts 3 Scannen oder suchen Sie nach Allen Geräten oder nach Headsets Es wird eine Liste der Geräte angezeigt 4 Wählen Sie in der Ergebnisliste Samsung W_Audio XXXXXX aus Wenn der Verbindungsaufbau zwischen ...

Page 74: ...ste nach Samsung Wireless Audio with Dock und tippen Sie diese Position an um den Download zu starten 5 Tippen Sie auf Installieren Um Musik wiederzugeben folgen Sie bitte diesen Schritten 1 1 Wenn Sie die Anwendung starten und das Kabellose Audio System mit Docking Station das einzige für die Bluetooth Verbindung konfigurierte Gerät ist wird durch die Betätigung von PLAY WIEDERGABE auf Ihrem Gerä...

Page 75: ...n Klingelton 2 Wählen Sie das Music Menü auf dem Bildschirm des Apple Geräts 3 Wählen Sie den gewünschten Titel und spielen Sie ihn ab Der Musiktitel wird über die Lautsprecher des Kabellosen Audio Systems mit Docking Station wiedergegeben Bei der Wiedergabe eines Videos mit Ihrem Gerät stehen die Wiedergabe Pause Vor Zurück Funktionen eventuell nicht zur Verfügung Benutzen Sie die Tasten auf dem ...

Page 76: ...ation angeschlossenen Bluetooth Geräts kann zu einer stotternden Wiedergabe führen wenn über den AUX Eingang des Kabellosen Audio Systems mit Docking Station gleichzeitig eine andere Wiedergabe erfolgt Das Bluetooth Gerät vom Kabellosen Audio System mit Docking Station abtrennen Die Bluetooth Verbindung zum Kabellosen Audio System mit Docking Station kann abgebrochen werden Die Anleitung hierzu fi...

Page 77: ...nterstützt Schließen Sie das USB Gerät direkt an den USB Anschluss des Geräts an Anderenfalls können Kompatibilitätsprobleme mit dem USB Gerät auftreten Schließen Sie nicht mehrere Speichergeräte über einen Mehrfach Kartenleser an das Gerät an Dies kann zu Fehlfunktionen führen Digital Kamera PTP Protokolle werden nicht unterstützt Das USB Gerät nicht während des Lesevorgangs abtrennen DRM geschüt...

Page 78: ...ie entsprechende Taste auf der Fernbedienung um den gewünschten Modus auszuwählen oder drücken Sie um zwischen den folgenden Modi auszuwählen AUX LED Aus Eingangsmodus Display BLUETOOTH TV Docking Modus USB Modus BLUETOOTH Modus AUX Eingang LED Aus ONLY FOR SERVICE AUX IN DC 14V 4A USB 5V 500mA MUTE VOL BASS FUNCTION MUTE VOL BASS FUNCTION ...

Page 79: ...ht zur Verfügung Stummschaltung Diese Funktion ist im Falle eines Telefonanrufs oder beim Ertönen einer Türglocke sehr hilfreich 1 Um den Ton dieses Geräts stumm zu schalten müssen Sie die MUTE Taste auf der Fernbedienung drücken 2 Drücken Sie die MUTE oder VOLUME Taste auf der Fernbedienung erneut um den Ton wieder eizuschalten Verwendung der BASS Funktion Mit dieser Funktion könne Sie den Bass a...

Page 80: ...en Sie die Webseite www samsung com 2 Klicken Sie am oberen Rand der Seite auf SUPPORT 3 Geben Sie den Produktnamen oder die Artikelnummer in das Suchfeld ein und klicken Sie anschließend auf Alle Ergebnisse 4 Klicken Sie im mittleren Teil der Seite auf den Tab Downloads 5 Klicken Sie auf Firmware 6 Klicken Sie in der Spalte Datei auf der rechten Seite auf das ZIP Symbol 7 Klicken Sie in dem angez...

Page 81: ...ichtig an Drücken Sie die Taste Mute um die Funktion zu deaktivieren Stellen Sie die Lautstärke ein Die Fernbedienung funktioniert nicht Überprüfen Sie ob die Batterien leer sind Ist die Entfernung zwischen Fernbedienung und Gerät zu groß Legen Sie neue Batterien ein Bedienen Sie das Gerät aus einer näheren Entfernung Das Ausführen der Sound Share Funktion Verbindungsaufbau mit dem Fernsehgerät is...

Page 82: ...Kanaltrennung und des übertragenen Frequenzbereichs Empfindlichkeit basieren auf den Richtlinien der AES Audio Engineering Society Nominelle Spezifikation Samsung Electronics Co Ltd behält sich das Recht auf unangekündigte Änderungen vor Gewicht und Abmessungen können von den Angaben abweichen Informationen zur Stromversorgung und Stromverbrauch finden Sie im Aufkleber am Produkt Samsung Electroni...

Page 83: ...WEVER CAUSED AND ON ANY THEORY OF LIABILITY WHETHER IN CONTRACT STRICT LIABILITY OR TORT INCLUDING NEGLIGENCE OR OTHERWISE ARISING IN ANY WAY OUT OF THE USE OF THIS SOFTWARE EVEN IF ADVISED OF THE POSSIBILITY OF SUCH DAMAGE Ogg Vorbis decoder Copyright c 2002 Xiph org Foundation Redistribution and use in source and binary forms with or without modification are permitted provided that the following...

Page 84: ... können Gewerbliche Nutzer wenden sich an ihren Lieferanten und gehen nach den Bedingungen des Verkaufsvertrags vor Dieses Produkt und elektronische Zubehörteile dürfen nicht zusammen mit anderem Gewerbemüll entsorgt werden Region Kontakt Zentrum Website ALBANIA 42 27 5755 www samsung com AUSTRIA 0810 SAMSUNG 7267864 0 07 min www samsung com BELGIUM 02 201 24 18 www samsung com be Dutch www samsun...

Page 85: ...dio wireless con dock manuale utente immagina le possibilità Grazie per avere acquistato questo prodotto Samsung Per ricevere un servizio più completo registrare il prodotto all indirizzo www samsung com register DA E650 DA E651 ...

Page 86: ...rodurre file musicali da dispositivi di memorizzazione USB esterni come lettori MP3 memorie flash USB ecc Funzione Bluetooth È possibile collegare un dispositivo Bluetooth all audio wireless con dock per ascoltare musica dal dispositivo con audio stereo di alta qualità tutto senza fili aptX aPtX assicura un audio stereo Bluetooth di alta qualità fornendo una qualità audio wireless come via cavo Li...

Page 87: ... incendio o di scosse elettriche non esporre questo apparecchio alla pioggia o all umidità ATTENZIONE PER EVITARE SCOSSE ELETTRICHE INSERIRE A FONDO LO SPINOTTO PIÙ LARGO DELLA SPINA NELLA RELATIVA PRESA Questa apparecchiatura deve essere sempre collegata a una presa di rete con collegamento a terra Per scollegare l apparecchio dalla corrente è necessario estrarre la spina dalla presa perciò la pr...

Page 88: ...icchi di alta tensione provocati dai fulmini potrebbero danneggiare l unità Tenere il prodotto lontano da fonti di umidità ad es vasi e calore eccessi vo ad es fuoco o da apparecchi che generano un forte campo magneti co o elettrico In caso di malfunzionamento dell unità scollegare il cavo di alimentazione dalla presa di corrente Il prodotto non è destinato all uso industriale Il prodotto è destin...

Page 89: ...SSIONI 11 11 Installazione del nucleo toroidale in ferrite sul cavo di alimentazione 12 Utilizzo dei rivestimenti in gomma 13 Collegamento di un dispositivo al dual dock 14 Collegamento di un dispositivo audio attraverso l ingresso AUX 16 Collegamento ai dispositivi Bluetooth RIPRODUZIONE 18 18 Uso del modo TV Sound Share 18 Utilizzo del modo dock con dispositivi Galaxy Samsung e Apple 20 Riproduz...

Page 90: ... Vedere a pagina 3 2 Se si verifica un problema consultare la sezione relativa alla risoluzione dei problemi Vedere a pagina 25 Copyright 2012 Samsung Electronics Co Ltd Tutti i diritti riservati è vietata la riproduzione o la copia di una parte o dell intero manuale utente senza previa autorizzazione scritta di Samsung Electronics Co Ltd per cominciare L aspetto degli accessori può variare legger...

Page 91: ...E POSTERIORE PARTE ANTERIORE PARTE POSTERIORE ONLY FOR SERVICE AUX IN DC 14V 4A USB 5V 500mA ONLY FOR SERVICE AUX IN DC 14V 4A USB 5V 500mA ONLY FOR SERVICE AUX IN DC 14V 4A USB 5V 500mA ONLY FOR SERVICE AUX IN DC 14V 4A USB 5V 500mA 4 1 2 3 8 7 6 5 ...

Page 92: ...B esterno come un lettore MP3 per riprodurre i file che si trovano sul dispositivo 7 AUX IN Per il collegamento di un dispositivo esterno all uscita analogica 8 ONLY FOR SERVICE Questo connettore è riservato all assistenza Dopo l accensione l unità impiega 4 5 secondi prima di produrre un suono Per aggiornare il software del prodotto attraverso il connettore host USB utilizzare una memory stick US...

Page 93: ...tare l audio al livello precedente TASTO BASS Ottimizza il suono in base alle preferenze personali Fare attenzione che l unghia non rimanga impigliata nel vano quando si solleva il coperchio L unghia può danneggiarsi Installazione della batteria nel telecomando 1 Aprire il coperchio del telecomando infilando un unghia tra il coperchio e il corpo del telecomando Quindi sollevare il coperchio e stac...

Page 94: ... il volume Il LED funzione si accende da sinistra verso destra se si alza il volume e da destra verso sinistra se lo si abbassa Il LED si spegne se si alza il volume dopo averlo impostato sul massimo o se lo si abbassa dopo averlo impostato sul minimo ONLY FOR SERVICE AUX IN DC 14V 4A USB 5V 500mA MUTE VOL BASS FUNCTION MUTE VOL BASS FUNCTION o Toccare il tasto sul lato destro del pannello anterio...

Page 95: ...O TOROIDALE IN FERRITE SUL CAVO DI ALIMENTAZIONE Eseguire tre avvolgimenti del cavo di alimentazione attorno al nucleo Iniziare ad avvolgere i cavi a 5 10 cm di distanza dai connettori Richiudere i fermi Sollevare i fermi per sbloccare il nucleo ed aprirlo ...

Page 96: ...MA 1 Applicare la base in gomma sul dual dock 2 Dopo aver applicato la base in gomma sul dual dock sistemare il dispositivo sul dual dock Rimuovere la base in gomma applicata al prodotto se il dispositivo è provvisto di custodia di protezione Se si applica la copertura del distanziale al dispositivo il prodotto può essere utilizzato soltanto se lo spessore della custodia di protezione del disposit...

Page 97: ...X LeD Off Il modo selezionato viene visualizzato in rosso nel display funzione 3 Se si dispone di un dispositivo Galaxy Samsung collegarlo al connettore a 5 pin più piccolo per connetterlo al dual dock Se si dispone di un dispositivo Apple collegare il dispositivo al connettore più grande a 30 pin del dual dock Accendere il dispositivo Galaxy Samsung prima di collegarlo al dual dock L unità non su...

Page 98: ...io L unità è provvista di un connettore analogico audio per collegare un dispositivo audio AUX IN 1 Collegare il jack auricolari del dispositivo esterno o del dispositivo audio al connettore AUX IN audio sul retro dell unità 2 Toccare ripetutamente il tasto finché i LED funzione si spengono Il modo AUX è attivo se non vi sono LED funzione accesi Prima di spostare o installare il prodotto spegnere ...

Page 99: ...nte se il dispositivo Bluetooth viene allontanato La qualità del suono si riduce in presenza di ostacoli quali pareti o porte anche entro la distanza adeguata Questo dispositivo wireless può provocare interferenze elettriche durante il funzionamento Per collegare il dispositivo Bluetooth all audio wireless con dock può essere richiesto di inserire un codice PIN password Se viene visualizzata la fi...

Page 100: ...ichiede di procedere con la connessione Bluetooth Selezionando Yes Sì sulla schermata del televisore la connessione all audio wireless con dock viene completata La connessione Bluetooth dell audio wireless con dock è completata Per annullare la connessione con il televisore Per collegare l audio wireless con dock ad un televisore diverso da quello collegato annullare la connessione esistente nell ...

Page 101: ...equenza indicata di seguito AUX LED Off Il modo selezionato viene visualizzato in rosso nel display funzione 2 Selezionare il menu del dispositivo Bluetooth Vedere il manuale utente del dispositivo Bluetooth per le istruzioni 3 Scorrere o cercare tutti i dispositivi o gli auricolari Viene visualizzato un elenco di dispositivi 4 Selezionare Samsung W_Audio XXXXXX nell elenco Se il dispositivo Bluet...

Page 102: ...rca digitare Samsung Wireless Audio with Dock quindi effettuare la ricerca 4 Nell elenco dei risultati di ricerca cercare e toccare Samsung Wireless Audio with Dock per avviare il download 5 Toccare Install Installa Per riprodurre la musica seguire i passi riportati di seguito 1 1 Se si avvia l applicazione quando l audio wireless con dock è l unico dispositivo per la connessione Bluetooth selezio...

Page 103: ...c Musica nella schermata principale del dispositivo Apple 3 Selezionare e riprodurre la musica desiderata La musica viene riprodotta attraverso i diffusori dell audio wireless con dock Durante la riproduzione di un video con il dispositivo le funzioni di riproduzione pausa avanti indietro potrebbero non essere disponibili Utilizzare il tasto sul dispositivo sorgente per attivarlo Elenco della comp...

Page 104: ...plicazione Il funzionamento del dispositivo Bluetooth collegato all audio wireless con dock può procedere a scatti se avviene durante la riproduzione dell audio wireless con dock dall ingresso AUX Per scollegare il dispositivo Bluetooth dall audio wireless con dock È possibile annullare il collegamento Bluetooth dall audio wireless con dock Per istruzioni vedere il manuale utente del dispositivo B...

Page 105: ...direttamente alla porta USB del prodotto In caso contrario può verificarsi un problema di compatibilità USB Non collegare più dispositivi di memorizzazione al prodotto attraverso un lettore multischede Potrebbe non funzionare correttamente I protocolli PTP per videocamere digitali non sono supportati Non rimuovere il dispositivo USB mentre viene letto I file musicali protetti da DRM MP3 WMA proven...

Page 106: ...ropriato del telecomando per selezionare il modo desiderato oppure premere il tasto per selezionare uno dei seguenti modi AUX LED Off Modo di inserimento Visualizzazione TELEVISORE BLUETOOTH Modo dock Modo USB Modo BLUETOOTH Ingresso AUX LED Off ONLY FOR SERVICE AUX IN DC 14V 4A USB 5V 500mA MUTE VOL BASS FUNCTION MUTE VOL BASS FUNCTION ...

Page 107: ...azione dell audio Questa funzione è utile se si deve rispondere al campanello o al telefono 1 Per disattivare l audio dell unità premere il tasto MUTE del telecomando 2 Premere nuovamente il tasto MUTE del telecomando oppure premere il tasto VOL per ripristinare l audio Utilizzo della funzione BASS Ottimizza l audio dei bassi in base alle preferenze personali Premere il tasto BASS del telecomando ...

Page 108: ...u SUPPORT SUPPORTO in alto a destra nella pagina 3 Inserire il codice del modello del prodotto nel campo di ricerca quindi fare clic su Find Product Trova il tuo prodotto 4 Fare clic sulla scheda Download Manuali e download al centro della pagina sotto l intestazione del download 5 Fare clic su Firmware al centro della pagina 6 Fare clic sull icona ZIP nella colonna File a destra nella pagina 7 Fa...

Page 109: ...ta Il volume è regolato sul minimo Collegarla correttamente Premere il tasto di disattivazione dell audio per ripristinarlo Regolare il volume Il telecomando non funziona Le batterie sono scariche Vi è eccessiva distanza tra il telecomando e l unità principale Sostituire le batterie Avvicinare il telecomando all unità principale Il Sound Share connessione TV non è riuscito Il televisore è un model...

Page 110: ...storsione separazione e sensibilità utile si basano sulla misurazione secondo gli standard AES Audio Engineering Society Specifica nominale Samsung Electronics Co Ltd si riserva il diritto di modificare le specifiche senza preavviso Peso e dimensioni sono approssimativi Per l alimentazione e il consumo di energia vedere l etichetta applicata al prodotto Samsung Electronics dichiara che il Audio wi...

Page 111: ...ER CAUSED AND ON ANY THEORY OF LIABILITY WHETHER IN CONTRACT STRICT LIABILITY OR TORT INCLUDING NEGLIGENCE OR OTHERWISE ARISING IN ANY WAY OUT OF THE USE OF THIS SOFTWARE EVEN IF ADVISED OF THE POSSIBILITY OF SUCH DAMAGE Ogg Vorbis decoder Copyright c 2002 Xiph org Foundation Redistribution and use in source and binary forms with or without modification are permitted provided that the following co...

Page 112: ...o invitati a contattare il proprio fornitore e verificare i termini e le condizioni del contratto di acquisto Questo prodotto e i relativi accessori elettronici non devono essere smaltiti unitamente ad altri rifiuti commerciali Area Centro di contatto Sito Web ALBANIA 42 27 5755 www samsung com AUSTRIA 0810 SAMSUNG 7267864 0 07 min www samsung com BELGIUM 02 201 24 18 www samsung com be Dutch www ...

Reviews: