background image

Operating


_33

02 
o

P

e

R

ating

Operating your SAMSUNG French 

Door Refrigerator

CHanging tHe inteRioR LigHts

Before changing any of interior lights, unplug the refrigerator from the power supply. If you are unsure 
about changing the lights after reading through these directions, contact a Samsung authorized service 
center for help.
The Replacement bulb for the freezer is available from your local home improvement or electronics store. 
Use replacement bulb size E26, maximum 60 watts. The refrigerator LED lamp must be changed by a 
Samsung authorized center.

Changing the interior Light in the Freezer Drawer

1. Unplug the power cord from the wall outlet.
2.  Remove the pull out drawer. Refer to ‘Remove Auto Pull Out drawer’ on page 31.
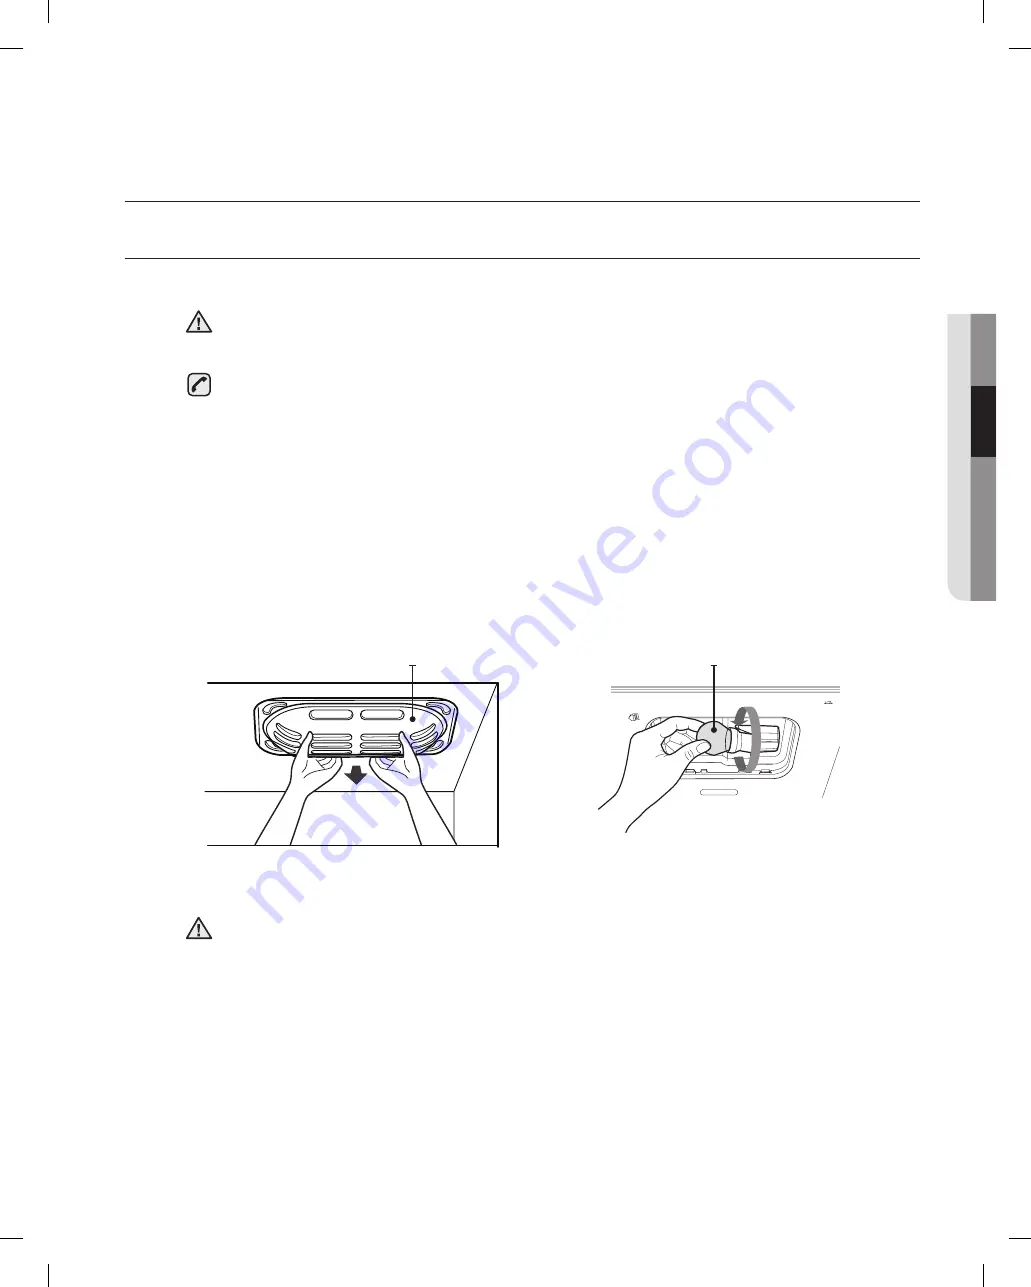
3. Pull the Light Cover to remove it.
4. Turn the bulb counterclockwise to remove it.
5. Assembly is the reverse order of disassembly.

Do not place your fingers inside the cover. The lamp may be hot.

CAUTION

CAUTION

Light Cover

Bulb

DA68-01812G.indb   33

2009.8.10   9:9:42 AM

Summary of Contents for DA68-01812G

Page 1: ...er manual imagine the possibilities Thank you for purchasing your Samsung product To receive more complete service please register your product at www samsung com register RF267 DA68 01812G indb 1 2009 8 10 9 7 33 AM ...

Page 2: ... a pizza box etc The wide freezer drawer also provides enough space for 2 3 turkeys Secure Auto Close The Secure Auto Close feature will automatically close a door that is slightly open Compact Ice Maker The Ice maker can dispense cubed or crushed ice Digital Display and Temperature Control Water Filtration System Door Alarm A helpful beeper alerts you if door is ajar Tilting Pocket The Tilting po...

Page 3: ...c safety precautions Do NOT attempt Do NOT disassemble Do NOT touch Follow directions explicitly Unplug the power plug from the wall socket Make sure the machine is grounded to prevent electric shock Call the service center for help These warning signs are here to prevent injury to you and others Please follow them explicitly Keep this manual in a safe place for future reference SEVERE WARNING SIG...

Page 4: ...efrigerator is plugged in may cause electric shock If you wish to dispose of the Refrigerator remove the doors and seals before throwing it away The doors and their seals can entrap a child if they climb into the Refrigerator Make sure that the doors are off and ensure that no one is suffocated by being locked inside The Refrigerator must be safely grounded Always make sure that you have grounded ...

Page 5: ...close the door the articles may fall and cause personal injury and or damage to surrounding objects Do not store pharmaceutical products scientific materials and temperature sensitive products in the refrigerator Products that require exact temperature controls should not be stored in the Refrigerator Do not allow children to climb stand or hang on shelves and handles of the Refrigerator They coul...

Page 6: ...ed service personnel If you have a long vacation planned empty the Refrigerator and turn it off Wipe excess moisture from the inside and leave the doors open to keep odor and mold from developing Service Warranty and Modification Any changes or modifications performed by a 3rd party on this finished appliance is not covered under Samsung warranty service nor can Samsung be responsible for safety i...

Page 7: ...oors 17 Adjusting the freezer drawer level 18 Checking the water dispenser line 19 Installing the water line 21 Using the control panel 22 Using the digital display 23 Controlling the temperature 24 Using the ice and cold water dispenser 26 Parts and Features 27 Storing food 28 Using the Cool Select Pantry 28 Using the tilting pocket 29 Removing the refrigerator accessories 30 Using the doors 31 R...

Page 8: ...ng open 8_ Setting Up First thing Make sure that you can easily move your Refrigerator to its final location by measuring doorways both width and height thresholds ceilings stairways etc The following chart details the exact height and depth of Samsung French Door Refrigerator Allow clearance to the right left back and top when installing This will help reduce power consumption and keep your energ...

Page 9: ...smoothly 4 After powering the Refrigerator it will take a few hours to reach the appropriate temperature You can store food and drinks in the Refrigerator after the temperature is sufficiently cool 01 SETTING UP Removing the refrigerator doors If the Refrigerator is too large to pass through your doorway easily you can remove the refrigerator doors Tools you will need Philips screwdriver 10mm Sock...

Page 10: ... to the lower left and right door hinges With an Allen Wrench 5mm remove the two hex head bolts 11 attached to the lower left and right door hinges Remove the lower left and right door hinges 12 7 8 9 10 12 11 3 4 5 6 Dispenser Door Tube Cabinet Tube Dispenser Door Tube Cabinet Tube Red Clip 1 4 Red Clip 1 4 3 2 Disconnect two connectors 3 at each side of the top cap and the one connector 4 on lef...

Page 11: ...e the tilting pocket 1 by pulling on both brackets 2 upward at the same time 3 Take out the lower basket 3 by lifting the basket up from rail system 1 Push the upper drawer until it reaches to the cabinet rear wall disassemble the freezer drawer 01 SETTING UP 1 2 3 Slot Slot DA68 01812G indb 11 2009 8 10 9 7 55 AM ...

Page 12: ...hex head bolts 11 into the lower left and right door hinges 2 Place the hole in the bottom of the door over the lower hinge 12 Be careful not to miss the hinge cap because it can be easily taken off 3 Insert the upper hinges 9 into the holes at the top of the doors With a Wrench 10mm insert and tighten the 3 hex head bolts 7 into the upper left and right door hinges With a Philips head screwdriver...

Page 13: ...the door opened reinsert the Top Table cap 1 and close the doors When reattaching the top table make sure that the wires are not pressed or damaged by the top table 2 1 4 Connect the water line 5 and then insert a clip on the coupler with pulling tube Connect the one connector 4 on left side door and two connectors 3 at each side of the top cap The clip is enveloped inside of the top cap The water...

Page 14: ...rawer pulled out fully insert the lower basket 6 into the rail system 5 Hook the ends of the tilting pocket 7 into both brackets 8 and push down until they lock into place Setting up your French Door Refrigerator 1 Pull out the rails to the full length on each side of the cabinet evenly 7 8 Slot Slot Slot Slot 6 Slot Slot DA68 01812G indb 14 2009 8 10 9 7 59 AM ...

Page 15: ...screwdriver into a notch on the left control lever turn it clockwise or counter clockwise to level the left door When the Left door is higher than the Right door Insert a flat blade screwdriver into a notch on the right control lever turn it clockwise or counter clockwise to level the right door We do not recommend making small adjustments with the control lever Instead refer to the next page for ...

Page 16: ...hex wrench 3 clockwise or counter clockwise when you turn the hex wrench counter clockwise the door will move up 1 After adjusting the doors please insert the supplied fastener ring 5 using a pair of pliers 6 in the gap between the hinge grommet 7 and the lower hinge 8 The number of fastener rings you ll need to insert depends on the gap Two fastener rings are enclosed with the refrigerator The th...

Page 17: ...s 2 slightly to loosen the door 2 Loosen the controller screw 3 with a Phillips screwdriver 3 Find the best level to align the door slope Freezer Drawer Adjustment part 1 2 3 Example The slope is about 2mm 0 08inch as shown below Rotate the Height Adjuster to 2 0 to reduce the door slope Slope Reference plane DA68 01812G indb 17 2009 8 10 9 8 6 AM ...

Page 18: ...low 20psi you can install a booster pump to compensate for the low pressure Make sure the water storage tank inside the Refrigerator is properly filled To do this press the water dispenser lever until the water runs from the water outlet 18_ Setting Up Water line installation kits are available at extra cost from your dealer We recommend using a water supply kit that contains copper tubing Connect...

Page 19: ...Sticker month indicator 1 Only connect the water line to a drinkable water source If you have to repair or disassemble the water line cut off 1 4 of the plastic tubing to make sure you get a snug leak free connection Do not use without the molded end Bulb of the plastic tubing Ⓑ 1 Slip the compression nut Ⓐ through the supplied plastic tubing Ⓐ 2 Tighten the compression nut Ⓐ onto the 1 4 compress...

Page 20: ...drip from the dispenser This means that there is still air in the line Setting up your French Door Refrigerator Turn until the labels are aligned Separation of red cap Cover filter 4 5 Reverse Osmosis Water Supply IMPORTANT The pressure of the water supply coming out of a reverse osmosis system going to the water inlet valve of the refrigerator needs to be between 35 and 120 psi 241 and 827 kPa If...

Page 21: ...pes of ice cube crushed ice After making a selection press the dispenser lever 3 Ice Water Button Press the Alarm Lighting button to turn off the door open alarm Initially the Alarm is set to on If you press and hold the Alarm Lighting button for 3 seconds the Dispenser LED Lamp will stay on 4 Alarm Lighting Button Press the Fridge Power Cool button to set the fridge to your desired temperature Yo...

Page 22: ...ilter Indicator will be Blue when you initially insert the water filter The filter Indicator will be Light Pink when you have used your water filter for 5 months The filter Indicator will be Red when you have used your water filter for 6 months After removing the old water filter and installing a new one see page 33 for instructions on how to do this reset the indicator by pressing and holding the...

Page 23: ...erature This will be reflected in the digital display The temperature of the Freezer or the Refrigerator may rise when you open the doors too frequently or if a large amount of warm or hot food is placed in either side This may cause the digital display to blink Once the Freezer and Refrigerator temperature return to their normal set temperatures the blinking will stop If the blinking continues yo...

Page 24: ...ot using the ice dispenser the ice cubes may clump together Pull the lock lever forward to throw away ice cubes or remove clumped ice from the bucket Push the bucket back until you hear a click Using the Water dispenser Place a glass underneath the water outlet and push gently against the water dispenser lever with your glass Make sure the glass is in line with the dispenser to prevent the water f...

Page 25: ...enser after taking out ice or water It comes back automatically Ice is made in cubes When you select Crushed the icemaker grinds the ice cubes into crushed ice Test button In case ice doesn t come out pull out the ice bucket and press test button located on the right side of ice maker Test Button Whenever all ice is used at one time the above step 3 and 4 must be repeated before dispense the first...

Page 26: ... Bin 9 Slide Shelf Ice Maker Foldable Shelf Slide Shelf 3 When closing the door make sure the Vertical Hinged Section is in the correct position to avoid scratching the other door If the Vertical Hinged Section is reversed put it back to the right position and close the door Moisture may occur at times on the Vertical Hinged Section The door handle may become loose over time If this happens tighte...

Page 27: ...hat they do not tip and fall out when the Refrigerator door is opened Do not place any large articles of food under the lamp in the Refrigerator An air sensor is located near the lamp and if the sensor is blocked your Refrigerator may become too cold Please place Vegetable and Fruits in the Vegetable and Fruits drawers to avoid freezing them If the foods in your Refrigerator become frozen please s...

Page 28: ...around 5 C This feature helps keep food fresh for a long time Pantry temperature can be maintained under recommended temperature setting Freezer 19 C Fridge 3 C 2 When Fresh is selected the temperature of the pantry can be kept around 3 C This feature helps keep food fresh for a longer time Pantry temperature can be maintained under recommended temperature setting Freezer 19 C Fridge 3 C 3 When Ch...

Page 29: ...f the shelf up and guide the shelf hooks into the slots at a desired height Then lower the front of the shelf so that the hooks can drop into the slots CAUTION The Tempered Glass shelves are heavy Use special care when removing them 3 Vegetable Fruit Drawers To remove Pull the drawer out to full extension Tilt up the front of drawer and pull straight out To relocate Insert the drawer into the fram...

Page 30: ... Tilt up the front side of pantry and pull straight out To relocate the pantry Push the rails to the back of the Refrigerator Place the drawer onto the rails and slide the pantry back until it is in place To remove the divider Pull the pantry completely out to full extension and raise the front side of the divider to unhook it from the rear wall of the pantry then lift the divider out To relocate ...

Page 31: ...er out to full extension Tilt up rear of drawer and lift straight out To relocate Place the drawer onto the rails by tilting it up Lower the drawer into place until it is horizontal and slide the drawer in 3 Freezer Drawer Bin To remove the drawer Pull the drawer out fully Tilt up the rear of the bin and lift it out to remove To replace the drawer Place the bin into the rail assembly To remove the...

Page 32: ...enzene Thinner or Clorox for cleaning They may damage the surface of the appliance and may cause fire Cleaning the Ice Water Dispenser Push down one end of the tray dispenser and remove it Wipe the Ice Water Dispenser with a clean and soft cloth CAUTION Do not spray the Refrigerator with water while it is plugged in as it may cause an electric shock Do not clean the Refrigerator with benzene thinn...

Page 33: ...ome improvement or electronics store Use replacement bulb size E26 maximum 60 watts The refrigerator LED lamp must be changed by a Samsung authorized center Changing the Interior Light in the Freezer Drawer 1 Unplug the power cord from the wall outlet 2 Remove the pull out drawer Refer to Remove Auto Pull Out drawer on page 31 3 Pull the Light Cover to remove it 4 Turn the bulb counterclockwise to...

Page 34: ... mark on the cover locking the filter in position Make sure to align the water filter label mark with the center of cover filter printing as illustrated Remember do not over tighten 4 Once you have completed this process press and hold the Ice Water button for 3 seconds to reset the filter schedule 5 Lastly run about six glassfuls of water through water dispenser to clean the water supply system M...

Page 35: ...ified Influent Challenge Concentration Units apply to each row Average Reduction Average Product Water Concentration Max Permissible Product Water Concentration NSF Reduction Requirements NSF Test Chlorine taste and odor 2 1 mg L 2 0 mg L 10 97 6 0 05 mg L NA 50 J 00029741 Particulate Class I Particle size 0 5 to 1 um 10 566 666 pt mL At least 10 000 particles mL 98 4 171 833 pts mL NA 85 J 000297...

Page 36: ...36_ Operating Water Filter Certification Operating your SAMSUNG French Door Refrigerator DA68 01812G indb 36 2009 8 10 9 9 56 AM ...

Page 37: ...recommended Yogurt 10 14 Days Not recommended Check date code Keep covered Frozen Yogurt na 2 Months EGGS Eggs uncooked 3 4 Weeks Not recommended Check date code Store eggs in coldest part of refrigerator and in their original container Eggs cooked 1 weeks Not recommended Store in covered container Leftover egg dishes 3 4 Days Not recommended Store in covered container FRESH FRUITS Apples 1 Month ...

Page 38: ... Months Steak 2 4 Days 6 9 Months Poultry 1 Day 12 Months Lunch meat 3 5 Days 1 Month Cooked Meat 2 3 Days 2 3 Months Check date code for use Store in coldest part of regrigerator in original packaging Package in moisture proof and vapor proof container for freezing Poultry 2 3 Days 4 5 Months Ham 1 2 weeks 1 2 Months Sources American Meat Institute Foundation 1994 Yellow pages answers to predicta...

Page 39: ...ndensation is occurring Some heat is normal as anti condensators are installed in the vertical hinged section of the Refrigerator to prevent condensation Is the Refrigerator door ajar Condensation can occur when you leave the door open for a long time Ice Maker is not producing ice Did you wait for 12 hours after installation of the water supply line before making ice Is the water line connected a...

Page 40: ...and from the Authorized Service Center is the responsibility of the customer Exclusions of the Warranty This warranty does not cover damage due to accident fire flood and or other Acts of God misuse incorrect line voltage improper installation improper or unauthorized repairs commercial use or damage that occurs during shipping Customer adjustments which are esplained in this owner s manual are no...

Page 41: ...memo DA68 01812G indb 41 2009 8 10 9 9 57 AM ...

Page 42: ...DA68 01812G indb 42 2009 8 10 9 9 57 AM ...

Page 43: ... possibilités Merci d acheter ce produit Samsung Pour recevoir un service plus complet veuillez enregistrer votre produit à Enregistrez vos produits Samsung en vous connectant sur www samsung com register RF267AB DA68 01812G indb 1 2009 8 10 9 9 58 AM ...

Page 44: ...oîtes de pizza etc Le Grand tiroir du congélateur fournit aussi de l espace pour 2 ou 3 dindes Fermeture automatique sécurisée La fonction Fermeture automatique sécurisée fermera automatiquement la porte si elle est à peine ouverte Machine à glace compacte Le Machine à glace peut distribuer des glaçons ou de la glace pilée Affichage numérique et contrôle de température Système de filtrage d eau Al...

Page 45: ... suivantes précautions de sécurité N essayez pas Ne démontez pas Ne touchez pas Suivez les instructions au pied de la lettre Débranchez la corde d alimentation de la prise murale Vérifiez que la machine est correctement reliée à la terre pour éviter des chocs électriques Si vous en avez besoin appelez le centre d assistance Ces signaux indiquant danger vous aideront à éviter des blessures à vous m...

Page 46: ...igérateur avant de changer l ampoule intérieure Changer l ampoule tandis que le réfrigérateur est branché peut produire un choc électrique Si vous voulez vous défaire de votre réfrigérateur enlevez les portes et les joints avant de le jeter Si des enfants entrent au réfrigérateur les portes et leurs joints peuvent les enfermer Vérifiez que les portes sont enlevées et que personne n est suffoqué en...

Page 47: ...pareil Les objets peuvent tomber lorsque vous ouvrez ou fermez la porte et produire des blessures et ou endommager les objets voisins Ne conservez pas de produits pharmaceutiques scientifiques ou sensibles à la température dans le réfrigérateur Les produits nécessitant un contrôle exact de la température ne doivent pas être gardés dans le réfrigérateur Ne permettez pas aux enfants de grimper march...

Page 48: ...un agent de service assistance agréé ou par du personnel qualifié Si vous envisagez des longues vacances videz le réfrigérateur et mettez le hors tension Séchez l excès d humidité l intérieure et laissez les portes ouvertes pour éviter le développement d odeurs et de moisissure Garantie service et modifications Tout changement ou modification entrepris par une troisième personne sur cet appareil t...

Page 49: ...congélateur 18 verifier l arrivée d eau au distributeur 19 installer la conduite d eau 21 utiliser le panneau de contrôle 22 utilisation de l affichage numérique 23 controle de la temperature 24 utilisation du distributeur de glace et d eau froide 26 piêces et particularités 27 conserver des aliments 28 utiliser THE COOL SELECT PANTRY 28 utilisation du compartiment inclinable 29 enlever les access...

Page 50: ...erture de la porte 8_ Installation D abord Vérifiez que vous pouvez bouger le réfrigérateur à sa place finale en mesurant les portes en largeur et en hauteur les seuils les plafonds les escaliers etc La carte suivante détaille la hauteur et la profondeur exactes du Réfrigérateur à portes françaises Samsung Lors de l installation laissez de l espace vers la gauche la droite le haut et l arrière Cel...

Page 51: ...indre la température appropriée Vous pouvez garder des aliments et des boissons dans le réfrigérateur une fois que la température sera suffisamment froide 01 Installation eNleveR leS poRteS du RéFRIgéRAteuR Si le réfrigérateur est trop large pour passer facilement à travers la porte vous pouvez en enlever les portes Outils indispensables Tournevis cruciforme Clé à douille 10 mm Allen Clé 5mm Tourn...

Page 52: ...oite Avec une clef Allen 5mm retirez les deux boulons à tête hexagonale 11 fixés aux charnières de porte inférieures gauche et droite Retirez les charnières de porte inférieures gauche et droite 12 7 8 9 10 12 11 2 Débranchez deux connecteurs 3 de chaque côté du capot supérieur ainsi que le connecteur 4 situé sur la porte gauche Enlevez le tube 5 en appuyant sur la pièce de couleur gris foncé 6 du...

Page 53: ... Compartiment inclinable 1 en tirant des deux supports 2 vers le haut en même temps 3 Enlevez le panier inférieur 3 en le relevant du système de glissières 1 Poussez le tiroir supérieur jusqu à ce qu il atteigne le mur arrière du meuble déMoNteR le tIRoIR du CoNgélAteuR 01 Installation 1 2 3 Slot Slot DA68 01812G indb 11 2009 8 10 9 10 18 AM ...

Page 54: ...s 11 dans les charnières inférieures des deux portes 2 Placez le trou dans le bas de la porte sur la charnière inférieure 12 Faites attention à ne pas perdre le capot de la charnière vu qu il peut y sortir facilement 3 Introduisez les charnières supérieures 9 dans les trous sur le haut des portes Avec une clé 10mm introduisez et serrez les 3 boulons six pans 7 dans les charnières supérieures des d...

Page 55: ...et Tube de la porte du distributeur Tube du coffret Étrier rouge 1 4 5 3 5 Positionnez la Table du haut 2 en place Introduisez les 3 vis dans la Table du haut et serrez avec un tournevis cruciforme Avec la porte ouverte réintroduisez le capot de la Table du haut 1 et fermez les portes Veillez à ce que les fils ne soient pas pincés ou endommagés en remettant le panneau supérieur 2 1 Le clip est env...

Page 56: ...tement les quatre boulons à tête hexagonale de 10 mm 4 Ayant tiré du tiroir complètement introduisez le panier inférieur 6 dans le système de glissières 5 Accrochez les extrêmes du Compartiment inclinable 7 dans les deux supports 8 et poussez vers le bas pour qu ils s enclenchent en place Installation de votre Réfrigérateur a portes françaises 7 8 Slot Slot Slot Slot 6 Slot Slot DA68 01812G indb 1...

Page 57: ... le levier de contrôle gauche et tournez le en sens horaire ou anti horaire pour niveler la portex gauche Si la porte gauche est plus haute que la porte droite Introduisez un tournevis plat dans une entaille dans le levier de contrôle droit et tournez le en sens horaire ou anti horaire pour niveler la porte gauche Nous ne conseillons pas de faire les petits ajustements avec le levier de contrôle P...

Page 58: ...nt la clé six pans 3 en sens horaire ou anti horaire lorsque vous tournez la clé six pans en sens anti horaire la porte bougera vers le haut 1 Après avoir ajusté les portes introduisez la cheville expansive fournie 5 au moyen de tenailles 6 dans l ouverture entre l entretoise 7 et la charnière inférieure 8 La quantité de chevilles expansives à introduire dépend de l ouverture Deux chevilles expans...

Page 59: ...r la porte 2 Lâchez la vis de contrôle 3 avec un tournevis cruciforme 3 Trouvez le meilleur niveau pour aligner la pente de la porte Tiroir du congélateur Pièce d ajustement 1 2 3 Exemple La pente est d environ 2mm 0 08 pouce comme il est montré dessous Faites tourner le régulateur de hauteur à 2 0 pour réduire la pente de la porte Slope Niveau de référence DA68 01812G indb 17 2009 8 10 9 10 27 AM...

Page 60: ...ur compenser la faible pression Vérifiez que le réservoir d eau dans le réfrigérateur est rempli correctement Pour cela pressez le levier du distributeur d eau jusqu à ce que l eau coule par la sortie d eau 18_ Installation Des kits d installation de conduite d eau sont disponibles avec des frais supplémentaires chez votre fournisseur Nous conseillons d utiliser un kit de d arrivée d eau contenant...

Page 61: ...lacer en septembre Comme ça vous saurez quand il est temps de changer le filtre Normalement un filtre dure 6 mois 2 3 Etiquette indicatrice du mois 1 Ne pas utiliser sans l extrémité moulée ampoule de la tuyauterie en plastique Ⓑ 1 Glissez le joint conique du raccord démontable Ⓐ à travers le tuyau en plastique Ⓑ fourni 2 Serrez le joint conique du raccord démontable Ⓐ dans le raccord à compressio...

Page 62: ...ir un égouttement d eau au distributeur Cela signifie qu il y a encore de l air dans les tuyaux Installation de votre Réfrigérateur a portes françaises Tournez jusqu à ce que les marques soient alignées Séparation du capot rouge Couvercle du filtre 4 5 Alimentation en eau osmosée inverse IMPORTANT La pression de l alimentation en eau en sortie d un osmoseur inverse allant à la soupape d admission ...

Page 63: ...rès avoir fait la sélection pressez le levier du distributeur 3 Touche Glace Eau Appuyez sur la touche Alarme Lumière pour éteindre l alarme d ouverture de porte Initialement l alarme est allumée Si vous appuyez et maintenez la touche Alarme Lumière pendant 3 secondes la lumière LED du distributeur restera allumée 4 Touche Alarme Lumière Appuyez sur la touche Réfrigérateur Refroidir vite pour régl...

Page 64: ...ne initialement au bleu lorsque vous introduisez le filtre d eau L indicateur du filtre tourne au rose lorsque vous avez utilisé le filtre d eau pendant 5 mois L indicateur du filtre tourne au rouge lorsque vous avez utilisé le filtre d eau pendant 6 mois Après avoir retiré le filtre à air usagé et installé le nouveau voir page 33 pour plus de détails sur la procédure réinitialisez l indicateur en...

Page 65: ...lée Cela est appréciable sur l affichage numérique Les températures du congélateur ou du réfrigérateur peuvent monter si vous ouvrez trop fréquemment les portes ou si beaucoup d aliments chauds y sont placés Cela peut produire que l affichage numérique clignote Une fois que le congélateur et le réfrigérateur retournent à leurs températures normales le clignotement s arrête Si le clignotement conti...

Page 66: ...ns peuvent fondre ensemble Tirez du levier de verrouillage pour jeter les glaçons ou la glace entassée du seau Renfoncez le seau jusqu à entendre un déclic Utilisation du distributeur d eau placez un verre sous le distributeur d eau et poussez doucement contre le levier du distributeur avec le verre vérifiez que le verre est en ligne avec le distributeur pour éviter que l eau éclabousse Si vous ve...

Page 67: ...re les étapes suivantes 1 Laissez votre réfrigérateur refroidir pendant 24 heures 1 jour complet 2 L attente de 24 heures permettra à votre machine à glace de se refroidir correctement 3 Faites couler 4 à 6 glaçons dans le verre 4 Après 8 et 16 heures faites couler un verre de glace complet à chaque fois Lorsque toute la glace est utilisée en même temps les étapes 3 et 4 ci dessous doivent être ré...

Page 68: ... Clayette glissante 3 Quand vous fermez la porte vérifiez que la Section verticale articulée est dans sa position correcte Sinon elle peut produire des éraflures sur l autre porte Si la Section verticale articulée est inversée remettez la sur pied et fermez la porte De l humidité peut apparaître sur la Section verticale articulée à cause de la chauffeuse installée dans l articulation pour éviter l...

Page 69: ...eurs et de moisissure Il faut garder les bouteilles serrées de façon à ce qu elles ne tombent ni soient renversées lorsque la porte du réfrigérateur est ouverte Ne placez pas des objets grands sous la lampe du réfrigérateur Il y a un senseur d air près de la lampe et s il est bloqué votre réfrigérateur peut se refroidir excessivement Placez fruits et végétaux dans leur compartiment pour éviter qu ...

Page 70: ... Ce réglage aide à conserver les aliments frais plus longtemps La température du tiroir peut être maintenue sous le réglage de température recommandée congélateur 19ºC réfrigérateur 3ºC 2 Si Frais est sélectionné la température du tiroir est d environ 3ºC Ce réglage aide à conserver les aliments frais pendant plus longtemps La température du tiroir peut être maintenue sous le réglage de températur...

Page 71: ... l avant de la clayette vers le haut et guidez ses crochets dans les rainures à la hauteur désirée Ensuite baissez l avant de la clayette pour que les crochets tombent dans les rainures ATTENTION Les clayettes en verre trempé sont lourdes Faites bien attention lors de les enlever 3 Bacs à fruits et légumes Pour enlever Tirez le bac dehors entièrement Inclinez l avant du bac et tirez directement Po...

Page 72: ...iroir et tirez directement dehors Pour replacer le tiroir Enfoncez les glissières vers l arrière du réfrigérateur Placez le tiroir dans les glissières et glissez le tiroir jusqu à ce qu il soit en place Pour enlever le diviseur Tirez dehors le tiroir complètement et levez l avant du diviseur pour le décrocher du mur arrière du tiroir ensuite soulevez dehors le tiroir Pour replacer le diviseur Accr...

Page 73: ...tension complète Relevez l arrière du tiroir et soulevez droit vers l extérieur Pour replacer Placez le tiroir sur les rails en le relevant Abaissez le tiroir à sa place jusqu à ce qu il soit horizontal et glissez le tiroir à l intérieur 3 Bac du tiroir du congélateur Pour enlever le tiroir Tirez le tiroir dehors entièrement Inclinez l arrière du bac et relevez le pour l enlever Pour replacer le t...

Page 74: ...ls peuvent endommager la surface de l appareil et produire un incendie Nettoyage du distributeur de glace et eau Poussez vers le bas l extrême du plateau du distributeur et enlevez le Essuyez le Distributeur à glace et eau avec un chiffon propre et doux ATTENTION N arrosez pas le réfrigérateur avec de l eau pendant qu il est branché puisque cela peut produire un choc électrique Ne nettoyez pas le ...

Page 75: ...ne ampoule de type E26 60 W maxi Les LED du réfrigérateur doivent en revanche être remplacées uniquement par un centre agréé Samsung Remplacer l ampoule du tiroir congélateur 1 Débranchez l appareil 2 Retirez le tiroir Reportez vous à la rubrique Retirer le tiroir congélateur auto en page 31 3 Enlevez le cache du système d éclairage en tirant dessus 4 Faites tourner l ampoule dans le sens inverse ...

Page 76: ... couvercle en enclenchant sa position Assurezvous d aligner la marque du filtre d eau et le centre de l impression sur le couvercle du filtre comme il est illustré Ne l oubliez pas ne serrez pas de trop 4 Une fois avoir complété ce processus appuyez et maintenez pendant 3 secondes la touche Glace Eau pour réinitialiser le calendrier du filtre 5 Finalement faites passer six verres pleins d eau à tr...

Page 77: ...minant Concentration affluante moyenne LeNSFaspécifiélesunités affluantesdeconcentration dedéfis appliquentà chaquerangée moyens de réduction Concentration moyenne en eau de produit Concentration permise maximale en eau de produit Conditions de réduction NSF Essai NSF Goût et odeur de chlore 2 1 mg l 2 0 mg l 10 97 6 0 05 mg l S O 50 J 00029741 Dimension particulaire de la classe I 0 5 à 1 µm 10 5...

Page 78: ...ur les contaminants relatifs à la santé suivants Contaminants microbiologiques et turbidité Contaminants inorganiques radiologiques Amiante Plomb Mercure Kystes Turbidité Contaminants organiques Benzène Carbofuranne p Di chlorobenzène Débit de service nominal 0 5 gal min Capacité de service nominale 300 gallons N utilisez pas de l eau microbiologiquement peu sûre ou de l eau de qualité inconnue sa...

Page 79: ... Non recommandé Crème à tremper ouvert 1 semaine Non recommandé Yaourt 10 à 14 jours Non recommandé Vérifiez la date Conservez couvert Yaourt surgelé S O 2 mois ŒUFS Œufs crus 3 4 semaines Non recommandé Vérifiez la date Stockez les œufs dans la zone la plus froide du réfrigéra teur et dans leur récipient d origine Œufs cuits 1 semaine Non recommandé Stockez dans un récipient couvert Plats de surp...

Page 80: ... Rôti 2 à 4 jours 6 à 12 mois Lard 1 à 2 semaines 1 à 2 mois Saucisse 1 2 Days 1 à 2 mois Bifteck 2 à 4 jours 6 à 9 mois Volaille 1 jour 12 mois Viande de déjeuner 3 à 5 jours 1 mois Cuit Viande 2 à 3 jours 2 à 3 mois Vérifiez la date avant utilisation Stockez dans la zone la plus froide du réfrigérateur dans l emballage d origine Emballez dans un emballage à l épreuve de la vapeur et de l humidit...

Page 81: ...leur est normale du fait que le système anti condensation est installé dans la section verticale articulée du réfrigérateur pour éviter la condensation La porte du réfrigérateur baille Il peut y avoir de la condensation si vous laissez longtemps la porte ouverte La Machine à glace ne produit pas de glace Avez vous attendu 12 heures après installer l arrivée d eau avant de faire de la glace La cond...

Page 82: ...heteur initial Le reçu de vente initial doit être conservé en tant que preuve d achat Il doit être présenté au Centre de service agréé avant qu un service de garantie ne soit effectué Pour tous les modèles portatifs le client est responsable du transport au et à partir du Centre de service agréé Exclusions de la garantie Cette garantie ne couvre pas les dommages occasionnés par un accident un ince...

Page 83: ...memo DA68 01812G indb 41 2009 8 10 9 12 17 AM ...

Page 84: ...Code No DA68 01812J REV 0 0 DA68 01812G indb 42 2009 8 10 9 12 17 AM ...

Reviews: