background image


 _1

imagine

 the possibilities

Thank you for purchasing a Samsung product.
To receive a more complete service,  
please register your product at

www.samsung.com/register

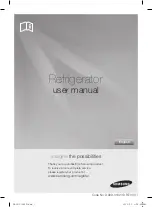
Refrigerator

user manual

English

Code No. DA99-01623D  REV(0.1)

DA99-01623D.indb   1

2010.5.7   9:33:45 AM

Summary of Contents for DA99-01623D

Page 1: ...ank you for purchasing a Samsung product To receive a more complete service please register your product at www samsung com register Refrigerator user manual English Code No DA99 01623D REV 0 1 DA99 01623D indb 1 2010 5 7 9 33 45 AM ...

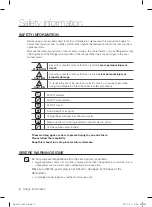
Page 2: ... basic safety precautions Do NOT attempt Do NOT disassemble Do NOT touch Follow directions explicitly Unplug the power plug from the wall socket Make sure the machine is grounded to prevent electric shock Call the service center for help These warning signs are here to prevent injury to you and others Please follow them explicitly Keep this manual in a safe place for future reference Before using ...

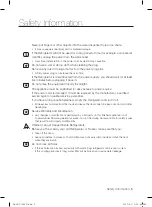
Page 3: ... Do not disassemble or repair the Refrigerator by yourself You run the risk of fire appliance malfunctions and or personal injury Call your nearest call center for help from a qualified service technician Unplug the Refrigerator before changing the interior light Changing the light while the Refrigerator is plugged in may cause electric shock If you wish to dispose of the Refrigerator remove the d...

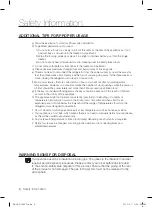
Page 4: ...cal products scientific materials and temperaturesensitive products in the refrigerator Products that require exact temperature controls should not be stored in the Refrigerator The appliance is not intended for use by persons including children with reduced physical sensory or mental capabilities or lack of experience and knowledge unless they have been given supervision or instruction concerning...

Page 5: ...ied service agent or qualified service personnel If you have a long vacation planned empty the Refrigerator and turn it off Wipe excess moisture from the inside and leave the doors open to keep odor and mold from developing Service Warranty and Modification Any changes or modifications performed by a 3rd party on this finished appliance is not covered under Samsung warranty service nor can Samsung...

Page 6: ...ith refrigerator the keys should be kept out of the reach of children and not in the vicinity of the appliance h The appliance might not operate consistently possibility of defrosting of contents or temperature becoming too warm in the frozen food compartment when sited for an extended period of time below the lower end of the range of temperatures for which the refrigerator was designed to operat...

Page 7: ...G THE SAMSUNG FRENCH DOOR REFRIGERATOR 20 20 Using the digital display 22 Controlling the temperature 23 Using the ice and cold water dispenser optional 24 Storing food 25 Storing food in refrigerator 25 Storing food in the freezer drawer 26 Using the cool select pantry 27 Using the tilting pocket 27 Removing the refrigerator accessories 28 Removing the freezer accessories 29 Cleaning the refriger...

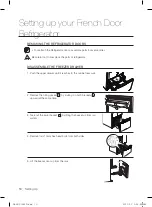
Page 8: ...sh of the flooring place the protection sheet such as packing carton under the refrigerator Philips head screwdriver Wrench 10mm Flat head screwdriver Pliers Allen wrench 4mm 8_ Setting Up CAUTION Selecting the best location for the Refrigerator A Location with easy access to the water supply A Location without direct exposure to sunlight A Location with level or nearly level flooring A Location w...

Page 9: ...e the upper left and right door hinges 9 4 Lift the door straight up to remove DISASSEMblE ThE REFRIGERATOR DOORS 1 With the door opened remove the Top Table cap 1 with a Flat head screwdriver and close the door Remove the 3 screws holding down the Top Table and remove the Top Table 2 2 1 2 Disconnect the electrical connector 3 above the upper right door hinge and the 3 electrical connectors 4 abo...

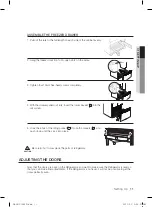
Page 10: ...until it reaches to the cabinet rear wall 2 Remove the tilting pocket 1 by pulling on both brackets 2 upward at the same time 1 2 3 Take out the lower basket 3 by lifting the basket up from rail system 4 Remove four 10mm hex head bolts from both sides 5 Lift the freezer door up from the rails 3 Slot Slot Setting up your French Door Refrigerator 10_ Setting Up CAUTION DA99 01623D indb 10 2010 5 7 9...

Page 11: ...the doors perfectly even 1 Pull out the rails to the full length on each side of the cabinet evenly 2 Hang the freezer door front onto open slots on the sides 3 Tighten four 10mm hex head screws completely 4 With the drawer pulled out fully insert the lower basket 6 into the rail system 5 Hook the ends of the tilting pocket 7 into both brackets 8 and push down until they lock into place Slot Slot ...

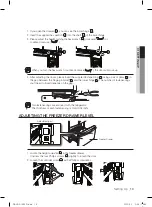
Page 12: ...turn it clockwise or counterclockwise to level the right door We do not recommend making small adjustments with the control lever Instead refer to the next page for the best way to make minor adjustments to the doors MAKING MINOR ADJUSTMENTS BETWEEN DOORS Remember a level Refrigerator is necessary for getting the doors perfectly even If you need help review the previous section on leveling the Ref...

Page 13: ...pair of pliers 6 in the gap between the hinge grommet 7 and the lower hinge 8 The number of fastener rings you ll need to insert depends on the gap Two fastener rings are enclosed with the refrigerator The thickness of each fastener ring is 1mm 0 04 inch ADJUSTING ThE FREEZER DRAWER lEVEl Adjustment part Freezer Drawer 1 Locate the height adjuster 1 in the freezer drawer Unscrew the four Phillips ...

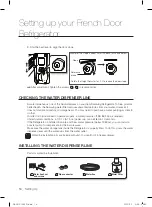
Page 14: ...rifying system to do that In order for the ice maker to operate properly a water pressure of138 862 Kpa is required Under normal conditions a 170 cc 5 75 oz paper cup can be filled in 10 seconds If the Refrigerator is installed in an area with low water pressure below 138Kpa you can install a booster pump to compensate for the low pressure Make sure the water storage tank inside the Refrigerator i...

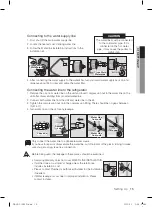
Page 15: ...vided water line 2 Connect both water line from the unit and water line in the kit 3 Tighten the compression nut onto the compression fitting There should be no gaps between A B C 4 Turn water on and check for any leakage Loosen a Remove cap Water Line from unit No gap Water Line from unit Only connect the water line to a drinkable water source If you have to repair or disassemble the water line c...

Page 16: ...o align the water filter label mark with center of cover filter printing as illustrated Remember do not over tighten 2 3 1 4 5 Sticker month indicator Separation of red cap Cover filter Turn until the labels are aligned You should remove the right side upper glass shelf before installing water filters Removing any residual matter inside the water supply line after installing the water filter 1 Tur...

Page 17: ...at the back of this user s guide If you have any further questions contact your Samsung Electronics call center 1 Place the Refrigerator in an appropriate location with reasonable clearance between the wall and the Refrigerator Refer to installation instructions in this manual 2 Once the Refrigerator is plugged in make sure the interior light comes on when you open the doors 3 Set the Temperature ...

Page 18: ...eezer to your desired temperature You can set the temperature between 14 C and 25 C 8 F and 14 F 4 Fridge Button Press the Fridge button to set the fridge to your desired temperature You can set temperature between 1 C and 7 C 34 F and 46 F 5 Power Cool Button Speeds up the time needed to cool products in the Refrigerator It can be helpful if you need to quickly cool easily spoiled items or if the...

Page 19: ...a selection press the dispenser lever 4 Alarm Lighting Button Press the Alarm Lighting button to turn off the door open alarm Initially the Alarm is set to on If you press and hold the Alarm Lighting button for 3 seconds the Dispenser LED Lamp will stay on 5 Fridge Power Cool Button Press the Fridge Power Cool button to set the fridge to your desired temperature You can set the temperature between...

Page 20: ...he Power freeze feature then press the button again to cancel the Power freeze mode After the lighting of Power freeze mode disappears the temperature of freezer compartment will return to its original setting Cubed Ice Crushed Ice Water Enjoy cubed or crushed ice by selecting your preference from the digital control panel If you don t need ice turn the feature off to save on water and energy cons...

Page 21: ... supply the power to the Refrigerator installing If condensation occurs on the doors turn the Energy Saver function off Lighting This icon will light up when you activate the Lighting feature In this case the dispenser light under the display will be on constantly If you would like the dispenser light to come on only when using the dispenser turn the Lighting feature off Alarm This icon will light...

Page 22: ...perature However this value will be changed to the new temperature Controlling the Refrigerator temperature The Refrigerator temperature can be set between 7 C 46 F and 1 C 34 F as your particular needs Press the Fridge button repeatedly until the desired temperature is shown in the temperature display The temperature control process for the Fridge works just like the Freezer process Press the Fri...

Page 23: ... away ice cubes or remove clumped ice from the bucket Push the bucket back until you hear a click If you have a long vacation or business trip close the water valve and shut off the water supply to the Refrigerator This will help prevent accidental leakages Do not put your fingers hands or any other unsuitable objects in the chute or ice maker bucket It may result in personal injury or material da...

Page 24: ... When closing the door make sure the Vertical Hinged Section is in the correct position to avoid scratching the other door If the Vertical Hinged Section is reversed put it back to the right position and close the door Moisture may occur at times on the Vertical Hinged Section The door handle may become loose over time If this happens tighten the bolts found on the inside of the door If you close ...

Page 25: ...rinks Circular marks on the glass surface are a normal phenomenon and can usually be wiped clean with a damp cloth 4 EGG CONTAINER Best place to keep eggs Place the container on the shelf for easy access 5 VEGETABLE FRUIT DRAWERS Used to preserve the freshness of your stored vegetables and fruits This drawer has been specifically designed to control the level of humidity within the compartment Kee...

Page 26: ...be kept around 3 C 38 F This feature helps keep food fresh for a longer time Pantry temperature can be maintained under recommended temperature setting Freezer 19 C 2 F Fridge 3 C 38 F 3 When Chilled is selected the temperature of the pantry can be kept around 1 C 34 F This feature also helps keep meat or fish fresh for a longer time Pantry temperature can be maintained under recommended temperatu...

Page 27: ...2 Pull the shelf out To relocate Tilt the front of the shelf up and guide the shelf hooks into the slots at a desired height Then lower the front of the shelf so that the hooks can drop into the slots 2 1 The Tempered Glass shelves are heavy Use special care when removing them Remove the shelves from the shipping position and replace shelves in the position you want 3 Vegetable Fruit Drawers To re...

Page 28: ... the back of the divider over the rear wall of the pantry and push the divider down 1 Tilting Pocket To remove Pull the brackets upward until you hear a clicking sound and remove the pocket To relocate Hook the ends of the pocket into both brackets and push down until it locks into place REMOVING ThE FREEZER ACCESSORIES 2 Auto Pull out Drawer To remove Pull the drawer out to full extension Tilt up...

Page 29: ...t helps ensure an even distribution of moisture to the surface The doors handles and cabinet surfaces should be cleaned with a mild detergent and then wiped dry with a soft cloth To keep your appliance looking its best the exterior should be polished once or twice a year Do not use Benzene Thinner or Clorox for cleaning They may damage the surface of the appliance and may cause fire Cleaning the I...

Page 30: ...Fridge compartment and size E27 maximum 40 Watts for the Freezer compartment Changing the Interior light in the Refrigerator 1 Unplug the power cord from the outlet 2 Pull the shield down while pushing it backwards to remove it 3 Turn the bulb counterclockwise 4 Assembly is the reverse order of disassembly Changing the Interior lights in the Freezer Drawer 1 Unplug the power cord from the outlet 2...

Page 31: ... current filter runs out Changing the filter on time provides you with the freshest cleanest water from your fridge 1 Remove the water filter from the box and put a month indicator sticker on the filter as shown Place a sticker on the filter that dates six months in the future For example if you are replacing the water filter in March put the SEP September sticker on the filter to remind you to re...

Page 32: ...is occurring Some heat is normal as anti condensators are installed in the vertical hinged section of the Refrigerator to prevent condensation Is the Refrigerator door ajar Condensation can occur when you leave the door open for a long time Ice is not dispensing Did you wait for 12 hours after installation of the water supply line before making ice Is the water line connected and the shut off valv...

Page 33: ...Memo 03 TROUBLESHOOTING DA99 01623D indb 33 2010 5 7 9 35 12 AM ...

Page 34: ...Memo DA99 01623D indb 34 2010 5 7 9 35 12 AM ...

Page 35: ...Memo DA99 01623D indb 35 2010 5 7 9 35 12 AM ...

Page 36: ... the rating plate NOTE Internal temperatures may be affected by such factors as the location of the fridge freezer ambient temperature and the frequency with which you open the door Adjust the temperature as required to compensate for these factors Class Symbol Ambient Temperature range C Extended Temperate SN 10 to 32 Temperate N 16 to 32 Subtropical ST 16 to 38 Tropical T 16 to 43 DA99 01623D in...

Reviews: