background image

- 10 -

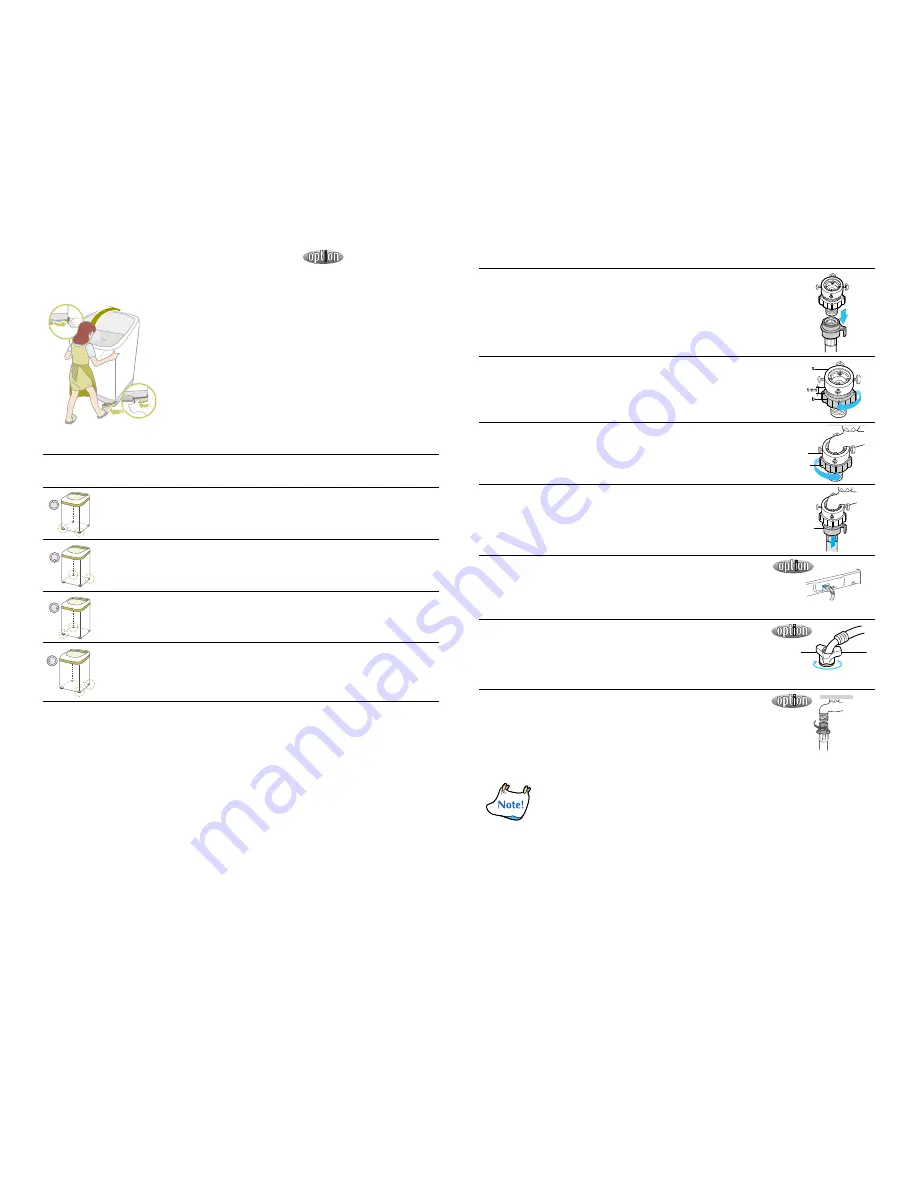
CONNECTING THE WATER SUPPLY HOSE

ADJUSTMENT THE HEIGHT OF THE MACHINE

Adjust the legs to level the washer
Be careful not to put in your hand under the legs.

Pull the handles located at the right and left of the 
front side and slide off.

Adjust the height of the machine upward or 
downward.

When the adjustment is finished, push the handles 
to fix the adjusting legs.

Waterdrop 
mark

Cause

How to level

The front part is 
lower

Level it by adjustable legs.

The back part is 
lower

Adjust the height by using the adjustable 
rubber or prop at the back.

The left part is 
lower

Adjust the left part by using the adjustable 
legs at the front and the adjustable rubber 
at the back.

The right part is 
lower

Adjust the right part of the washer by 
using the adjustable leg at the front and 
the adjustable rubber at the back.

1.    Remove the adaptor from the water supply hose.

2.    First, using a “+” type screw driver, loosen the four 

screws on the adaptor. Next, take the adaptor and turn 
part(b) following the arrow for gap about 5mm between 
them.

3.    Connect adaptor to the water tap by tightening the screws 

firmly. Then, turn part(b) following the arrow and put (a) 
and (b) together.

4.    Connect the water supply hose to the adaptor. Pull down 

the part (c) of the water supply hose. When the part (c) is 
released, the hose is automatically connected to the 
adaptor making a ‘click’ sound.

5.    Connect the other end of the water supply hose to 

the inlet water valve at the back of the washer. 
Screw the hose clockwise all the way in.

5-1. Connect the other end of the water supply hose to 

the inlet water valve at the top of the washer.

Screw the hose clockwise all the way in.

 If the water tap is a screw type, assemble a water 

supply hose that fits to the tap as shown.

After completing connection, if water leaks from the hose, then 
repeat the same steps.

Use the most conventional type of faucet for water supply.

In case the faucet is square or too big, remove the spacing ring 
before inserting the faucet into the adaptor.

a

b

c

Summary of Contents for DC68-01922A

Page 1: ...SHING AND CARING FOR GARMENTS 5 CONTROL PANEL 6 HOWTO WASH AUTOMATICALLY DEPENDS ONTHE LAUNDRY 7 MANUAL FUNCTIONS 9 INSTALLATION MAINTENANCE 9 Environment 9 Levelling 9 Connecting the water supply hose 10 Assembling the rat protection panel 11 How to connect the drain hose 11 How to add the fabric softener 12 How to put the detergent in 12 Water supply connector filter 12 Cleaning the filter 12 How ...

Page 2: ...nder the water surface It is this Waterfall Flow that enables this washing machine to effec tively wash large and heavy items such as bluejeans and blankets MAGIC FILTER This unique magic Filter ensures that all the lint inside the tub is captured for top quality filtering results to deliver consistently effective cleaning results SOFTENER DISPENSER The Softener Dispenser releases the fabric soften...

Page 3: ...rt your hands If it does not stop within 15 seconds after you open the lid call service agent immediately CAUTIONS There might be a slight injury or damage when you violate this instruction Don t install it in the area with moisture or outdoor where it has rain or snow An electric shock or a fire may take place Please unplug the power supply cord when you do not use it An electric shock or a fire ma...

Page 4: ...e to keep the lid closed during washing and spinning FILTER Lint will be collected in the filter during washing SPIN BASKET POWER CORD GROUND LEAD When the water pipe is metal make sure to cover the end of the ground wire WATER DRAIN HOSE SOUND ABSORPTION PANEL ADJUSTABLE LEGS Adjust the length of the legs when installing the washer FRONT CONTROL PANEL PULSATOR BLEACH INLET DETERGENT BOX WATERDROP ...

Page 5: ...ali Do sufficient rinsing because the powder detergent is easily remained on the garments causing bad odors If too much detergent is used or cold water is used it doesn t dissolve completely and remain on the garments hose or spin basket causing contamination on clothes In case of reserved washing detergents must be put in the detergent box If the powder detergents are spread on laundry directly it...

Page 6: ...nged clothes lase worked clothes bed cover sheet wool clothes into a laundry net before washing Put delicate clothes in the laundry net Use only those commercial laundry net for washing Curtains floating garments or blue jeans shall be pressed not to float on the water If they are floated on the water press Start Hold button to stop and press them to sock in the water If the washing goes on with cl...

Page 7: ...and press Start Hold button again This way is much more convenient If the softener is inserted in the softener dispenser it automatically adds in at the last rinsing cycle Put the laundry into the washer and add detergent too Be careful not to overload Use right detergent for the fabrics you are washing DIGITAL COURSE Selects the best washing course automatically 1 Press the POWER Button to ON 2 P...

Page 8: ...on Fasten buttons and turn inside out before washing Use the detergent indicated in the laundry When the degree of dirt is extreme soak the laundry in warm water for about 10 minutes before pressing the WOOL course button in order to enhance washing efficiency DELAY START How to reserve washing Select this course when you have to go out or do something else 1 Press the power button to ON 2 Press th...

Page 9: ...nce Water level is selected automatically Soaking Washing rinsing and spinning follow three times SOAK FUNCTION Press the POWER button Select the course Press the course button BLANKET ECO SPEEDY WOOL Press the FUNCTION button three times Press the START HOLD button once Water level is selected automatically Soaking Washing rinsing and spinning follow WASH ONLY Press the POWER button Press the FUN...

Page 10: ...river loosen the four screws on the adaptor Next take the adaptor and turn part b following the arrow for gap about 5mm between them 3 Connect adaptor to the water tap by tightening the screws firmly Then turn part b following the arrow and put a and b together 4 Connect the water supply hose to the adaptor Pull down the part c of the water supply hose When the part c is released the hose is autom...

Page 11: ... sure to join tightly the drain hose into the drain outlet on the back of the machine Be sure to join tightly the drain hose into the drain outlet on the side of the machine Install the drain hose in the position of about 90 100cm above the ground Rear side 90 100cm 1 After pressing the joint ring insert to the drain hose 2 After directing the drain hose to a drain join to the drain outlet of the ...

Page 12: ...ycle If added too early its effectiveness will decrease Do not leave the softener into the Softener Dispenser for a long time Because softner became stiff 1 Pull out the filter and wash well 2 Pull in the filter and connect the hose to the inlet water valve tightly 3 Check if there is a leakage Note to tighten up the connector Detergent Device Put the detergent in proportion to Water level Softene...

Page 13: ...bout 10 minutes Put a hot water towel on the drain hose connector If the drain hose defrosts connect again and check for proper water draining The water drains out immediately The drain is clogged with coins or pins The drain hose is hung over the drain hose hook Half fill the spin basket with water and try for spinning again Washing machine won t work Is the water tap opened Is the washer plugged ...

Page 14: ... off If the water supply is suspended turn off the faucet and power off Spinning makes loud noises and vibrations Check 1 Check if the laundry is spread evenly in the washer Spread out the laundry evenly and start again Check 2 Check if the washing machine levels on a sturdy flat floor Set the machine at level Check 3 Is the handle for leveling legs loose Adjust the legs on the feet for leveling C...

Reviews: