background image

GB-4

D

I

G

I

T

A

L


C

A

B

L

E


R

E

C

E

I

V

E

R

GB-5

DCB-9401R

GB

DCB-9401R

CONNECTING YOUR “STB”

1. LOCATION OF THE RECEIVER

Your STB should be placed under proper ventilation. 
Don’t put in completely enclosed cabinet that will restrict the flow of air, resulting in
overheating. The location should be safeguarded from direct sunlight, excess moisture,
rough handling or household pets. 
Avoid stacking other electronic components on the top of the receiver. 

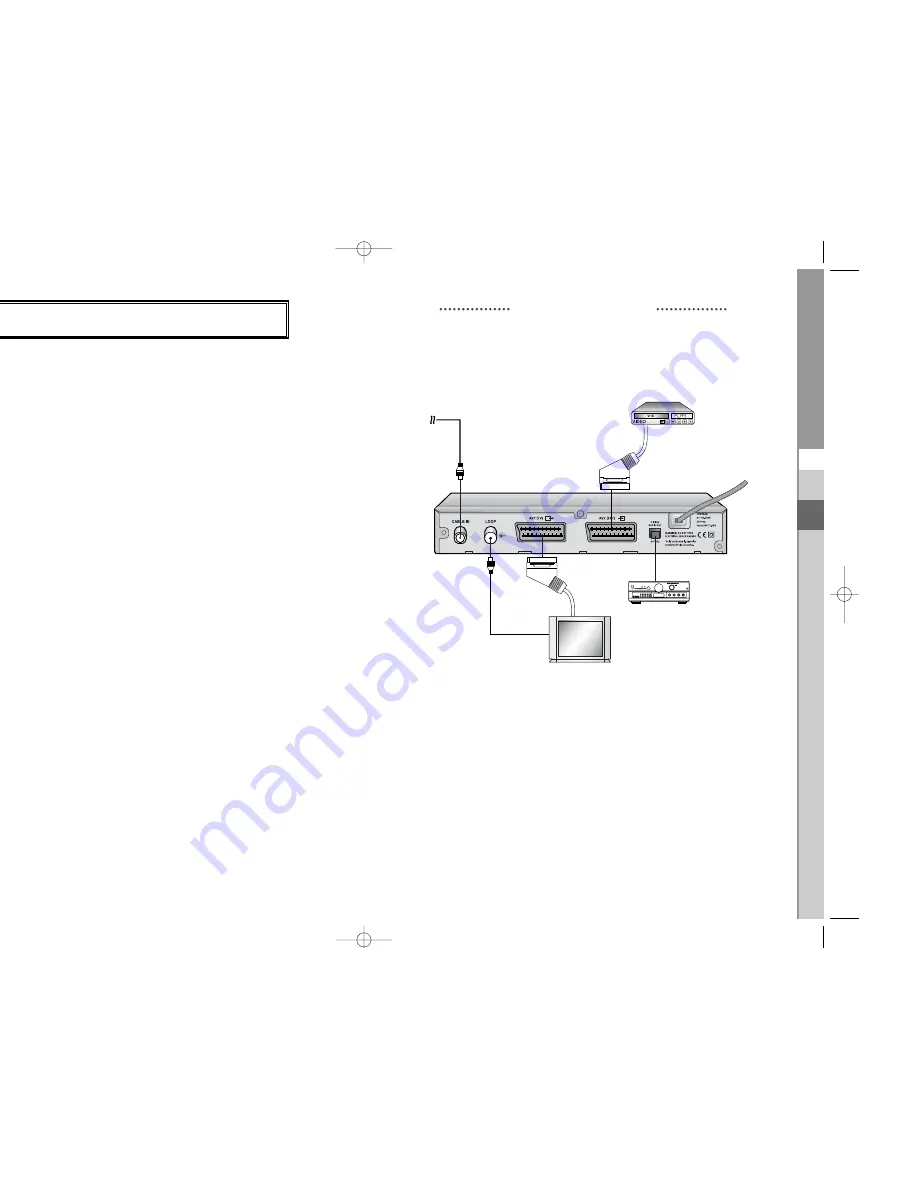
2. CONNECTING THE RECEIVER WITH CABLE SYSTEM

After installing your cable system, connect the coaxial cable to “CABLE IN” terminal
marked at the rear of the STB. 
All cable connectors should be finger tightened; do not use any kind of wrench while
tightening connectors. The cable should be 75ohm impedance coaxial cable.

3. CONNECTING THE RECEIVER TO TV

To connect the receiver with your television, you can use SCART Cable.
In the case of connecting your TV through SCART cable, connect the SCART
connector marked AV1 (TV) to the respective SCART port on the TV.

4. CONNECTING YOUR ANALOG RECEIVER

To facilitate the user using analog receiver to view analog channels, STB has
been provided with a loop through terminal marked as “LOOP”.
Connect the coaxial cable from this terminal to the IF input terminal of your analog
receiver. Now by keeping the STB in standby, you will be able to tune and view analog
channels from your analog receiver.

5. CONNECTING YOUR VCR or DVD

To connect a VCR or DVD player, the STB has been provided with SCART at the
rear marked “AV2 (EXT)”. 
Using a SCART connector, the VCR or DVD player can be connected to the receiver.

6. CONNECTING DIGITAL AUDIO SYSTEM

Connect a fiber optic cable between DIGITAL AUDIO OUT on the receiver and 
Optical SPDIF on the Digital Audio System.

Connecting Figure

Signal Cable

CONNECTING YOUR  "STB"

7. INSERTING SMARTCARDS FOR IRDETO SERVICES

In order to view a scrambled service, you need to have a valid Smartcard.
This STB has the Irdeto embedded to view Irdeto programmes.

N

No

otte

e

: Insert the Smartcard with the gold coloured chip facing downwards.

MF68-00340A_GB_1105  11/5/04  11:38 AM  Page 4

Summary of Contents for DCB-9401R

Page 1: ...B 9401R NED DIGITALE KABELONTVANGER REV 1 0 Gebruiksaanwijzing Gebruiksaanwijzing NED DCB 9401R DIGITAL CABLE RECEIVER Instructions for use Instructions for use GB MF68 OVER NED GB 10 22 04 4 09 PM Page 1 ...

Page 2: ...Gebruiksaanwijzing NED DCB 9401R ED GB 10 22 04 4 10 PM Page II ...

Page 3: ...DCB 9401R DIGITALE KABELONTVANGER NED Gebruiksaanwijzing _1105 11 5 04 11 37 AM Page b ...

Page 4: ...urt van een verwarming Plaats nooit andere elektronische apparatuur op de STB Plaats de STB op ten minste 30 mm van de muur AANSLUITINGEN Gebruik alleen door de fabrikant aanbevolen aansluitingen om gevaarlijke situaties of beschadiging van de apparatuur te voorkomen REPARATIES Probeer niet zelf reparaties uit te voeren De garantie vervalt als u dat toch doet Laat alle onderhoud over aan een gekwa...

Page 5: ... chnische specificaties 27 1 GEBRUIKERSGEDEELTE SOFTWAREDOWNLOADS VIA NETWERK EN PC BEVEILIGD GEAVANCEERDE ELEKTRONISCHE PROGRAMMAHANDLEIDING MEERTALIG SCHERMMENU MEERTALIGE ONDERTITELING EN TELETEKST VOLLEDIG FUNCTIONELE INFRARODE AFSTANDSBEDIENING SCART UITGANG LAAG STROOMVERBRUIK 4 VOORKEURSLIJSTEN AUTOMATISCH BIJGEWERKTE EPG PASS LOOP VOOR RGB SIGNAAL 15 TIMERS OM PROGRAMMA S GEBEURTENISSEN VO...

Page 6: ...ITEN het gebruik van de analoge ontvanger voor de weergave van analoge kanalen te eenvoudigen is de STB voorzien van lus via de uitgang die gemarkeerd is als LOOP t de coaxkabel van deze uitgang aan op de IF ingang van de analoge ontvanger or de STB standby te houden kunt u via uw analoge ontvanger afstemmen op loge kanalen en deze weergeven EORECORDER OF DVD SPELER AANSLUITEN de achterkant van de...

Page 7: ...deorecorder of dvd speler aansluiten 5 DIGITAL AUDIO OUT Op deze uitgang kunt u een digitale versterker aansluiten 6 LICHTNETAANSLUITING Hier wordt het netsnoer aangesloten Het apparaat is geschikt voor 100 240 V 50 Hz 60 Hz erm Wanneer het rode lampje brandt wordt de set top box STB in de standby stand gezet Wanneer het groene lampje brandt wordt de gebruiksstand geactiveerd Wanneer het gele lamp...

Page 8: ...s in de EPG als schakeltype geactiveerd gedeactiveerd Nadat u het EPG scherm met de toets EPG hebt geactiveerd kunt u de gewenste gebeurtenis het gewenste programma selecteren met de toetsen en Druk vervolgens op de toets TIMER Als deze gebeurtenis in de timer is gereserveerd wordt in de rechterhoek van de gebeurtenisnaam weergegeven EPG bij Herhaalde gebeurtenis Gebeurtenisherhaling in het menu T...

Page 9: ... weergeven moet u het apparaat eerst configureren m aanvankelijk alleen menuafbeeldingen te zien kanalen zijn geprogrammeerd wordt de volgende informatie weergegeven wanneer u naal kiest weergavemodus op de RODE toets i fstandsbediening op TV RADIO om te wisselen tussen tv en radioprogramma s programma informatie keer op de RODE toets i terwijl u een programma bekijkt eschreven balk wordt eerst we...

Page 10: ...g naar de huidige gebeurtenis door op de toets LAST te drukken tijdens lopende gebeurtenissen op dit kanaal Als u in het EPG scherm bent en op de TIMER toets van de afstandsbediening drukt terwijl er voor het huidige kanaal een gebeurtenis gaande is wordt de timer onmiddellijk ingesteld en wordt de ingestelde timer op het EPG scherm weergegeven Een op deze manier ingesteld programma wordt weergege...

Page 11: ...tekst VBI Wanneer er voor het huidige programma Teletekst VBI beschikbaar is drukt u twee keer op de GROENE toets TEXT om de huidige lijst met talen voor teletekst weer te geven De teletekst wordt op het tv scherm weergegeven als de tv teletekst ondersteunt Een in de rechterhoek van de balk geeft aan dat teletekst voor deze gebeurtenis dit programma beschikbaar is Zelfs als er op de balk een wordt...

Page 12: ...evraagd een PIN code voor het kinderslot op te geven Als u alle diensten wilt blokkeren selecteert u ALLES GEBLOKKEERD De standaardinstelling voor alle diensten is NIETS GEBLOKKEERD Voer de PIN code in Deze melding wordt getoond als een dienst met het kinderslot is geblokkeerd Geef de PIN code van vier cijfers op om het verzoek te sluiten en de programma inhoud weer te geven De PIN code is in de f...

Page 13: ...s FAV Wanneer u op de toets TV RADIO drukt wisselt u tussen de lijsten TV en Radio Druk op de toets FAV om een andere voorkeurenlijst te selecteren Kanalen uit een Voorkeurengroep verwijderen Selecteer de te verwijderen kanalenlijst met of PG PG of met de cijfertoetsen Druk op de RODE toets i en verwijder het geselecteerde kanaal uit de voorkeurskanalen O Op pm me er rk ki in ng g één voorkeurenli...

Page 14: ... groen Kleurenschema 3 Verandert het menu in donkerblauw Aangepast De gebruiker kiest zelf een kleur EPG kleuren Hiermee worden de kleuren in het EPG menu ingesteld O Op pm me er rk ki in ng g De kleurenschema s 1 2 en 3 kunnen in toekomstige software upgrades worden gewijzigd DE ONTVANGER BEDIENEN ode wijzigen code met de tweede optie PIN code wijzigen at u naar het volgende menu deze optie de hu...

Page 15: ...agelijks Elke maandag Elke dinsdag enzovoort De kortste herhalingsgebeurtenis heeft voorrang Wanneer u bijvoorbeeld timers instelt voor Eenmalig en Dagelijks wordt Eenmalig op de betreffende dag uitgevoerd Als de timer loopt wordt de melding Wordt uitgevoerd samen met een timernummer weergegeven in Timer DE ONTVANGER BEDIENEN gebruiker gedefinieerde modus of de EPG kleurenmodus instellen e GROENE ...

Page 16: ...oders zijn verstuurd aximaal 10 berichten worden opgeslagen 6 Irdeto Menu Met dit menu kunt u informatie weergeven over de smartcard en de STB Druk op OK om het submenu te openen 6 1 CA Status Hiermee kunt u de CA status weergeven Smart Card EMM ECM informatie 6 2 IRD Status U kunt de IRD status weergeven technische informatie over de IRD CA smartcard en erin geladen software 6 3 Loader Status U k...

Page 17: ...oer eelden De ontvanger staat in de Zet de ontvanger op Aan standby stand Controleer de aansluiting De SCART is niet goed op de video uitgang van de televisie aangesloten Er is op de televisie een Controleer het kanaal en de onjuist kanaal of een video uitgang zie de handleiding onjuiste video uitgang van uw tv geselecteerd De audiokabel is onjuist Controleer de aansluiting aangesloten Het volume ...

Page 18: ...Instructions for use GB DCB 9401R ED GB 10 22 04 4 10 PM Page IV ...

Page 19: ...Instructions foruse DCB 9401R DIGITAL CABLE RECEIVER GB 1105 11 5 04 11 38 AM Page b ...

Page 20: ...ck other electronic equipment on top of the STB Place the STB at least 30mm from the wall ATTACHMENTS Do not use any attachment that is not recommended by the manufacturer it may cause a hazard or damage the equipment SERVICING Do not attempt to service this product yourself Any attempt to do so will make the warranty invalid Refer all servicing to a qualified service agent LIGHTNING If the STB is...

Page 21: ...g 26 sposal 26 chnical Specifications 27 1 USER SECTION SOFTWARE DOWNLOAD VIA Network PC Secured ADVANCED ELECTRONIC PROGRAM GUIDE MULTI LANGUAGE SUPPORTED FOR OSD SUBTITLE TELETEXT OSD VBI SUPPORTED WITH MULTI LANGUAGE FULL FUNCTION INFRARED REMOTE CONTROL UNIT SCARTS OUTPUT LOW POWER CONSUMPTION 4 FAVORITE LISTS AUTO UPDATED EPG PASS LOOP FOR RGB SIGNAL 15 TIMERS TO RESERVE PROGRAMS EVENTS FOR T...

Page 22: ... nector marked AV1 TV to the respective SCART port on the TV CTING YOUR ANALOG RECEIVER acilitate the user using analog receiver to view analog channels STB has n provided with a loop through terminal marked as LOOP nnect the coaxial cable from this terminal to the IF input terminal of your analog eiver Now by keeping the STB in standby you will be able to tune and view analog nnels from your anal...

Page 23: ...ect to your TV 4 AV2 EXT This is used to connect to your VCR or DVD 5 DIGITAL AUDIO OUT Output for connection to a digital amplifier 6 AC MAINS This is to plug in the AC mains power cord The input AC voltage range is 100V to 240V 50Hz 60Hz supply lay When the Red LED lights the set top box enters standby mode When the Green LED lights it enters the operation mode When the Yellow LED lights it star...

Page 24: ...n start end time of event This key activates deactivates timer s in EPG as toggle type After activating EPG screen by pressing EPG key you can select the interesting event program using the keys and keys Then press TIMER key If this event is reserved in the timer is displayed on the right corner of this event name EPG on event Repetition in Time Timer Settings menu is displayed too However if ther...

Page 25: ...elevision program you must perform the installation u will see only menu images at first vision channels have been programmed you will see the following picture banner u switch channels RED i key in view mode ess TV RADIO key on the Remote Control Unit TV and RADIO program are toggled gram information RED i key twice while you are viewing a program see the banner described above D i key is pressed...

Page 26: ...atch this channel Current event can be returned by pressing LAST key during moving events on this channel When the TIMER key on the remote control is pressed in the EPG screen if the current channel involves an event timer is set immediately and the set timer is indicated on the EPG screen A program that has been set in this way is indicated on Timer Field of Time Timer Setting List key to while y...

Page 27: ...letext VBI When the current broadcasting program provides Teletext VBI press the GREEN TEXT key two times to see the current language list for Teletext This Teletext will be displayed to the screen by TV which supports Teletext at the right corner on the banner shows that Teletext is available on this event program Even is displayed on the banner Teletext may not be available due to broadcasting T...

Page 28: ...t to enter Parental Rating PIN code will be shown If you want blocked all services select ALL BLOCKED By default all services are UNBLOCKED Please enter the PIN Code This banner is shown if service is rated for age greater than set in Parental Control menu Enter four digits PIN code to hide this banner and show service content Factory PIN Code is 0000 and you can change it in Change PIN Code menu ...

Page 29: ...dio list by the TV RADIO key and change favorite list by the FAV key When you press the TV RADIO key TV list and Radio list are toggled Press the FAV key to select another favorite list To delete channels from Favorite Group Select a channel list to delete with or PG PG keys or numeric keys Press the RED i key to delete the selected channel from the favorite channels N No ot te e One favorite list...

Page 30: ...e menu to dark brown color User defined Sets the color according to user preference EPG colors Sets the color in the EPG menu N No ot te e Color scheme 1 2 and 3 may be changed in the future by upgrading software OPERATING THE RECEIVER ge PIN Code e PIN Code select the second option Change e you to the following menu you need to enter the current PIN Code at r and at the second cursor enter the de...

Page 31: ...io program are toggled Even you can set timers on Daily and Every Monday or Every Sunday etc The priority has the repetition event which is less For example when you set timers on Once and daily Once will work in stead of Daily at that day If the timer is running Running message with a timer number is displayed on Timer OPERATING THE RECEIVER defined mode or EPG color mode GREEN TEXT key hich you ...

Page 32: ...individual decoders the maximum 10mail messages 6 Irdeto Menu The menu provides the information of the smartcard and the STB Press the OK key to enter the sub menu 6 1 CA Status You can see the CA status Smart Card EMM ECM information 6 2 IRD Status You can see the IRD status technical information about the IRD CA Smart Card and software loaded into it 6 3 Loader Status You can see the information...

Page 33: ...gged in correctly ply n the screen Receiver in Standby mode Set receiver to On SCART not connected tightly Check connection and correct to video output of television incorrect channel or video Check channel and video output and output selected on television correct TV instruction manual Audio cord connected Check connection and correct incorrectly Loudness level 0 Increase loudness on television s...

Reviews: