background image

Summary of Contents for DMT400 series

Page 1: ...installing this dishwasher Please call 1_800_SAMSUNG 726 7864 for assistanCe Wwwlsamsung com the possibilities Thank you for purchasing this Samsung product To recewe more complete service please register your product at www samsung com register DMT800_installation_DD68 00046A indb 1 2010 05 04 d 4 07 00 ...

Page 2: ...tly After reading this section keep it in a safe place for future reference Read all instructions before using the appliance Install and store the dishwasher inside away from exposure to weather z_Do not install the dishwasher near electrical components Keep the dishwasher away from oAoT o open flames Do NOT install the dishwasher on a carpet as this is a fire hazard Do NOT install the dishwasher ...

Page 3: ...ly between 120 F 49 C 149 F 65 C This temperature range provides the best washing result and shortest cycle time Temperature should not exceed 149 F 65 C to prevent damage to dishes Ensure that the water supplied to the dishwasher does not freeze Frozen water can damage the hoses valves pump or other components Certified residential dishwashers are not intended for licensed food establishments NSF...

Page 4: ... 18 STEP 1 Checking the parts and tools 2 Selecting the best location for the dishwasher 3 Water supply requirements 4 Electrical requirements 5 Preparing the dishwasher 6 Placing the dishwasher and connecting water supply line 7 Leveling the dishwasher 8 Securing the dishwasher 9 Connecting the drain hose 10 Wiring connections 11 Completing the installation SPECIFICATIONS s 4 contents ...

Page 5: ...Side view DMT700 series The water supply line power cable and drain hose should go through this space CUTOUT DIMENSIONS _ This dishwasher is designed to be enclosed on top and on both sides by a standard residential kitchen unit 24 610 mm minimum 24 610 mm minimum preparng the dishwasher enclosure 5 ...

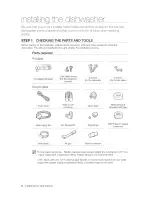
Page 6: ... 2Flat Head screws E0rthe installation bracket 2 screws forthe side walls 2screws forthe kiCk plate Power cable Water Supply line Twist on wire Strain relief connector 90i ElboW 3 81 Tubefittings EleCtriCal tape Standard duct tape TeflonFtape O r sealing compound Hose clamp Air gap Rubberconnector For the water supply line Flexible stainless steel braided supply line or Minimum 3 8 O D copper tubi...

Page 7: ...afety glasses Gloves Flashlight Adjustable wrench Wire stripper Pliers Nipper i A Tape measure Pencil Phillips screwdriver Flat screwdriver Tubing cutter Cutting knife H0ie cutter Level Terx t20 Hex Dwrench instaling the dshwasher 7 ...

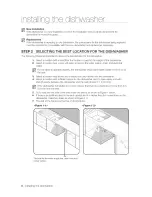
Page 8: ... outlet For the drain to operate properly the dishwasher should be installed within 9 8 ft 3 m of the sink 3 Select a location that allows you to easily load your dishes into the dishwasher 4 Select a location with sufficient space for the dishwasher door to open easily and with enough space between the dishwasher and the wall at least 0 1 in 2 mm If the dishwasher is installed in a corner ensure ...

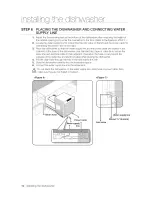
Page 9: ...alve is turned off before connecting the water supply line to the dishwasher 3 Seal the water supply line connections using teflon tape or sealing compound to stop any water leakage 4 The water supply line should be placed in the channels at the base of the dishwasher as shown in Figure 2 Do not place the dishwasher on the water supply line 5 The drain hose connected to the dishwasher must be run ...

Page 10: ...ust plug into a mating three prong grounded outlet located in the cabinet next to the dishwasher opening Outlet must meet your local codes and ordinances Use a U L listed CSA certified power cord kit 1 The dishwasher must be connected with the correct rated voltage supply marked on the rating plate of the unit 2 Ensure that the Circuit Breaker connected to the dishwasher is off 3 The power cable m...

Page 11: ...lve use Teflon tape or sealing compound to prevent water leakage To prevent blocking the inlet valve make sure that the Teflon tape or sealing compound does not enter the valve 4 Remove the junction box cover located at the bottom right at the front of the dishwasher using a screwdriver and then Install the strain relief Make sure to keep the junction box cover you removed as it is used in STEP 10...

Page 12: ...ated in the channels at the base of the dishwasher Use standard duct tape or cable tie to secure the water line and electrical cable to their adjacent channels in the base It can prevent the squeeze of the water line and electrical cable when placing the dishwasher 4 Pull the drain hose through the hole in the side wall to the sink 5 Slide the dishwasher carefully into the installation space 6 Con...

Page 13: ...t If not rotate the leveling legs at the bottom front of the dishwasher If the leveling legs are rotated to the left counter clockwise they are loosened and the front of the dishwasher is raised If they are rotated to the right clockwise they are tightened and the front of the dishwasher is lowered Toadjusttheheightofarearleg turntheHexbolt at _ _ the front of the base to the left to raise the bac...

Page 14: ...t the screws into both sides of the tub except for the tub spacer cap and secure the dishwasher to the side walls by fastening them as shown in Figure 9 At this time fasten the screws and ensure that the tub is not distorted After fastening the screws place the tub spacer caps into original location of the dishwasher The screws or tub spacer cap may fall into the dishwasher while you are working w...

Page 15: ...ain hose into the drain hose connector of the sink as shown in the following figures Connecting the drain outlet must be done in accordance with the water pipe installation regulations in your region Figure 10 Case 1 Without disposal Drain hose _ Hose clamp Hose clamp Case 2 With disposal __ Hose clamp Hose clamp installing the dishwasher 15 ...

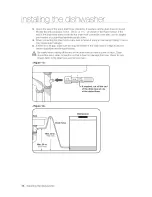
Page 16: ...se clamp Failing to do so may cause water leakage 5 If there is no air gap make sure to hang the middle of the drain hose in a high location to prevent backflow see the figure below _Be careful when cutting off the end of the drain hose as there is a risk of injury Clean around the sink s drain connection so that it does not damage the hose Check for any foreign items in the drain hose and remove ...

Page 17: ...he power cable to the dishwasher Twist and connect each wire using wire connectors When using wire connectors insert each wire as shown in Figure 14 and rotate the wire connector Recheck whether the power cable is connected correctly Each colored wire should be connected to its opposite wire of the same color White should be connected to white black to black and green to green Replace the junction...

Page 18: ...ge while the dishwasher is operating If no errors occur while it is operating turn off the dishwasher and proceed with the following If an error has occurred turn off the dishwasher close the water supply valve and refer to the user manual or contact a service center 1 800 SAMSUNG 726 7864 Z_ Make sure to check water leakage from both ends of water supply line and drain hose OAUT ON connector 5 Ch...

Page 19: ...3Ax 337 8in 605 x 627 x 860 mm WidthxDepthxHeight Nominal inlet water temperature 120 F 49 C Specifications are subject to change without notice for quality improvement purposes The actual appearance of the dishwasher may differ from the illustrations in this manual specfcatons 19 ...

Page 20: ...QUESTIONS OR COMMENTS USA 1 806 SAMSUNG 726 7864 www samsung com CANADA 1 806 SAMSUNG 726 7864 www samsung com Code No DD68 00046A_EN ...

Reviews: