


DSR 9500A FT
A, CI, EM VIA, VIA CI
GB-18
D
I
G
I
T
A
L
S
A
T
E
L
L
I
T
E
R
E
C
E
I
V
E
R
DSR 9500A FT
A, CI, EM VIA, VIA CI
GB
GB-19
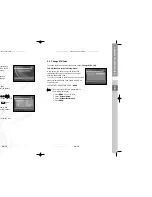
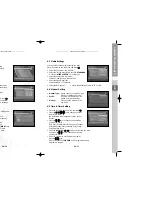
1.4 Auto Scanning
The sub menu “
Auto Scanning
” will enable download
the channels automatically from the preprogrammed satellites.
To download channels automatically:
You can select All/Off/Only Free option mode in
each satellite.
Off :
No Scan
All :
Scan all the channels
Only Free :
Scan free channels
●
Press key.
Auto Scanning menu will be displayed.
All the channels in the list from the selected satellite will be
automatically downloaded.
After scanning you will see "
Your digital receiver found...
" .
Afterwards you return to Auto Scanning menu.
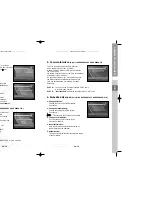
1.5 Manual Scanning
To tune-in new channels and weak signals, the DSR 9500A has been provided with
the option "
Manual Scanning
" where the channel data can be entered by the user.
After selecting the "
5. Manual Scanning
" from the Installation Menu,
the following screen will be displayed:
●
Select the target satellite for manual search.
●
Load a transponder.
This option will enable the user to load any
transponder from the preprogrammed list
available within the receiver.
N
No
otte
e
:
When you enter Frequency after setting
Load TR to New, the entered information
must include at least one channel to make
channel save possible.
●
Input the frequency of the transponder you want to find.
●
Input the symbol rate of the transponder you want to find.
1.2.2 Installer Mode
After checking the positioner’s state, installer should use
this menu. He should set the “
Disable Limits
” before
using User mode.
●
Select the Drive Motor West/East and use the /
keys to drive motor.
key drives to west and key drives to east.
●
Select “
Enable Limit
”, in order to enable “
Set Limit
”.
●
Select “
Disable Limit
”, in order to disable “
Set Limit
”.
●
Select “
Reset Positioner
” and
key to reset positioner.
1.3 Solarsat Setting
This menu is only for the Solarsat antenna.
When you press this menu, you will get this message,
“
This menu is only for the Solarsat antenna.
If you have one-press OK, otherwise-press EXIT
.”
You can set the value according to your location.
●
To set the Value of Date and Time, use the
/
keys to change the value.
●
Use the / keys to change position.
●
Use the
/
keys to move each filed.
OPERATING THE RECEIVER
OPERATING THE RECEIVER
DSR 9500A_GB_10.10 10/12/02 9:15 AM Page 18


