background image

SETUP

Display Indicators 

10

11

1. Indicates a disc is being played.

2. Play / Pause / Forward play

3. Disc type indicator

4. Displays various messages concerning operations such as PLAY, STOP, LOAD,  ...

no DISC : No disc loaded.

OPEN : The disc tray is open.

LOAD : Player is loading disc information.

5. Disc indicator

• Indicates which numbered disc is playing.

1 2 3 4 5

1

2

3

4

5

Front Panel Display

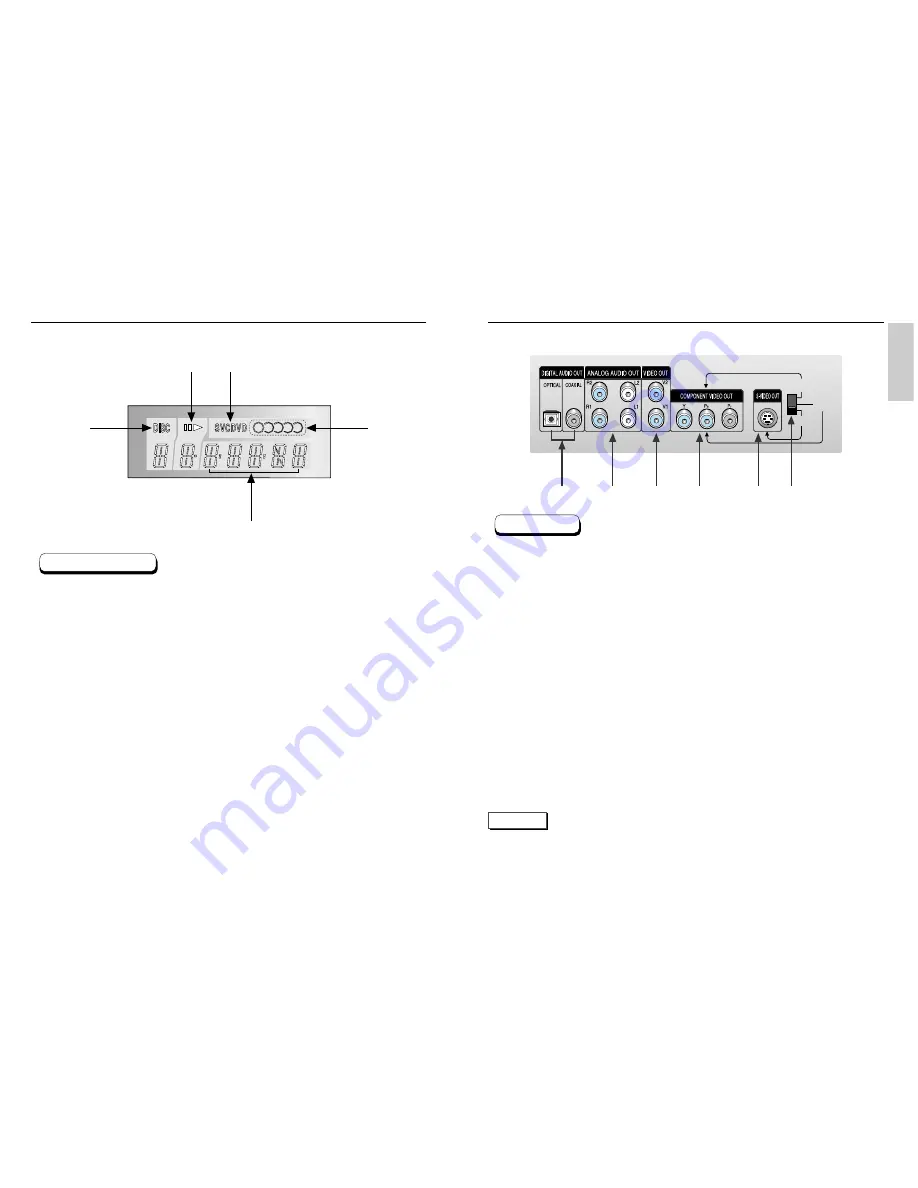
Description-Rear Panel

S-VIDEO

525i

(480i)

525P

(480P)

1

2

3

4

5

6

Rear Panel

1. DIGITAL AUDIO OUT JACKS

• Use either an optical or coaxial digital cable to connect to a compatible Dolby Digital receiver. 

Use to connect to an A/V Amplifier that contains a Dolby Digital or DTS decoder.

2. ANALOG AUDIO OUT JACKS

• Connect to the Audio input jacks of your television, audio/video receiver.

3. VIDEO OUT JACKS

• Use a video cable to connect to the Video input jack on your television.
• The VIDEO OUT SELECT switch must be set to the S-VIDEO position.

4. COMPONENT VIDEO OUT JACKS

• Use these jacks if you have a TV with Component Video in jacks. These jacks provide Pr, Pb and Y video.

Along with S-Video, Component Video provides the best picture quality.  

• If 525P(480P) VIDEO is selected, progressive scan mode will work.
• If 525i(480i) VIDEO is selected, interlaced scan mode will work.

5. S-VIDEO OUT JACK

• Use the S-Video cable to connect this jack to the S-Video jack on your television for a higher quality

picture. 

• The VIDEO OUT SELECT switch must be set to the S-VIDEO position.

6. VIDEO OUT SELECT SWITCH

• Use this switch to set video out.
• If 525P(480P) VIDEO is selected, VIDEO and S-VIDEO will not work.

NOTE

• Consult your TV User’s Manual to find out if your TV supports Progressive Scan. 

If Progressive Scan is supported, follow the TV User’s Manual’s instructions regarding Progressive Scan
settings in the TV’s menu system.

• If 525P(480P) VIDEO OUT is selected, VIDEO and S-VIDEO will not work.
• Select the VIDEO OUT SELECT switch in the Stop or Power Off mode.

Summary of Contents for DVD-C631P

Page 1: ...5 Disc DVD Changer DVD C631P CA CA AK68 00148C www samsung ca...

Page 2: ...sures Reorient or relocate the receiving antenna Increase the separation between the equipment and receiver Connect this equipment into an outlet on a circuit different from that to which the receiver...

Page 3: ...Wipe the cabinet with a soft cloth Before You Start If remote doesn t operate properly Remote Control AH59 00092W Batteries for Remote Control AA Size 4301 000117 User s Manual AK68 00148C Video Audio...

Page 4: ...as those with violence adult subject matter etc Various On Screen Menu Functions You can select various languages Audio Subtitle and screen angles while enjoying movies Progressive Scan Progressive sc...

Page 5: ...n and close the disc tray 8 DISC EXCHANGE Press this button when you want to change a disc without stopping playback of the current disc 9 DISC SKIP Use to skip a disc in order 10 REMOCON RECEIVER 11...

Page 6: ...EO OUT SELECT switch must be set to the S VIDEO position 4 COMPONENT VIDEO OUT JACKS Use these jacks if you have a TV with Component Video in jacks These jacks provide Pr Pb and Y video Along with S V...

Page 7: ...EAR Button Use to remove menus or status displays from the screen 11 BOOKMARK Button 12 MENU Button Brings up the DVD player s setup menu 13 OPEN CLOSE Button To open and close the disc tray 14 3D But...

Page 8: ...ith S Video Input Jack The VIDEO OUT SELECT switch must be set to the S VIDEO position DVD Player TV with Component Video Jacks The VIDEO OUT SELECT switch must be set to the 525i 480i position DVD Pl...

Page 9: ...u stop disc play the player remembers where you stopped so when you press PLAY again it will pick up where you left off unless the disc is removed the STOP button is pressed twice or the player is unp...

Page 10: ...press the button it moves to the beginning of the track One more press makes it move to the beginning of the previous track If a track exceeds 15 minutes when playing a VCD and you press the button it...

Page 11: ...e chapter or to start the playback from the desired time To make the screen disappear press the INFO button again Most DVD discs are recorded in chapters so that you can quickly find a specific passag...

Page 12: ...f Press ENTER then press the PLAY PAUSE button Off Off Chapter Title A B ENTER Off Track Disc A B ENTER NOTE DVD repeats play by chapter or title CD repeat play by disc or track Depending on the disc...

Page 13: ...The screen size changes when the button is pressed repeatedly The screen zoom mode operates differently depending on the screen setting in the initial setup menu To ensure correct operation of the EZ...

Page 14: ...s you slowly repeat scenes containing sports dancing musical instruments being played etc so you can study them more closely When playing a DVD During play press the PLAY PAUSE button Press the button...

Page 15: ...o have the same subtitle language come up whenever you play a DVD Refer to Setting Up the Language Features on page 40 1 2 3 28 29 Changing the Camera Angle Press the ANGLE button to see if an ANGLE m...

Page 16: ...mark During play press the BOOKMARK button on the remote Use the LEFT RIGHT buttons to select the bookmark number you want to delete Press the CLEAR button to delete a bookmark number Press the BOOKMA...

Page 17: ...ill be played Press the MODE button to switch between the RANDOM and PROGRAM modes See page 35 for more information on these modes Program Random playback MP3 WMA Play Function 1 2 Using the Zoom 3D S...

Page 18: ...and avoid the use of special characters including Use a decompression transfer rate of at least 128 Kbps when recording MP3 files Sound quality with MP3 files basically depends on the rate of compres...

Page 19: ...the menu to view a Photo CD Use the UP DOWN or LEFT RIGHT buttons on the remote controller to select the picture you want to view and then press the ENTER button Press the PLAY PAUSE button if you wa...

Page 20: ...N buttons then press the RIGHT or ENTER button Select Disc Menu using UP DOWN buttons then press the RIGHT or ENTER button Use the UP DOWN buttons to select English Select Others if the language you w...

Page 21: ...Theater Systems Inc 1 2 3 4 NOTE Setting Up the Language Features With the unit in Stop mode press the MENU button Select Setup using UP DOWN buttons then RIGHT or ENTER button Select Language Setup...

Page 22: ...a TV with a 4 3 ratio screen Black bars will appear at the top and bottom of the screen 2 4 3 Pan Scan Select this for conventional size TVs when you want to see the central portion of the 16 9 screen...

Page 23: ...icated on the display Press the DOWN button to select Parental Press ENTER and the Create Password display will appear You can now set your rating level and change your password to a new number Go to...

Page 24: ...this product falls to operate properly within the specified warranty period and the failure is due to improper workmanship or defective materials SECA will repair or replace the product at its option...

Reviews: