background image

2

S

afety Information

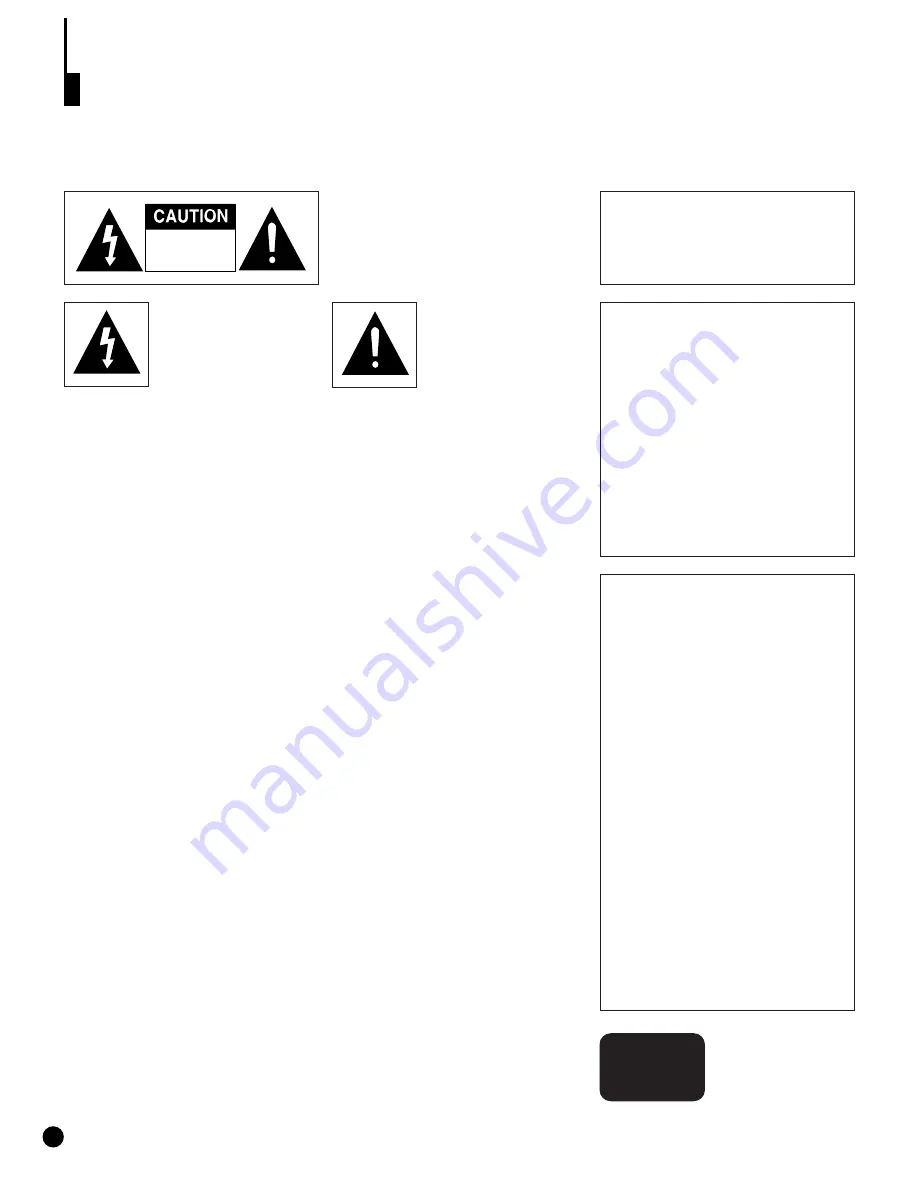
TO REDUCE THE RISK OF ELECTRIC
SHOCK, DO NOT REMOVE THE
COVER(OR BACK). 
NO USER-SERVICEABLE PARTS ARE
INSIDE. REFER SERVICING TO QUALI-
FIED SERVICE PERSONNEL.

This symbol indicates “dan-
gerous voltage” inside the
product that presents a risk
of electric shock or person-
al injury.

CAUTION:

DVD PLAYERS USE AN INVISIBLE LASER BEAM WHICH CAN CAUSE
HAZARDOUS RADIATION EXPOSURE IF DIRECTED. 
BE SURE TO OPERATE PLAYER CORRECTLY AS INSTRUCTED.

This symbol indicates
important instructions
accompanying the product.

CAUTION

THIS PRODUCT UTILIZES A
LASER. USE OF CONTROLS OR
ADJUSTMENTS OR PERFOR-
MANCE OF PROCEDURES
OTHER THAN THOSE SPECIFIED
HEREIN MAY RESULT IN HAZ-
ARDOUS RADIATION EXPOSURE.
DO NOT OPEN COVER AND DO
NOT REPAIR YOURSELF. REFER
SERVICING TO QUALIFIED PER-
SONNEL.

Note:

• This unit can be used only where the

power supply is AC 120V, 60Hz. It
cannot be used elsewhere.

• This DVD player is designed and

manufactured to respond to the
Region Management Information. If
the Region number of a DVD disc
does not correspond to the Region
number of this DVD player, this DVD
player cannot play the disc.

• This device is protected by U.S.

patent numbers 4,631,603 and
4,577,216 and 4,819,098 and other
intellectual property rights. The use
of Macrovision’s copy protection
technology in the device must be
authorized by Macrovision and is
intended for home and other limited
pay-per-view uses only, unless other-
wise authorized in writing by
Macrovision. Reverse engineering or
disassembly is prohibited.

CAUTIONS

Caution:

To prevent electric shock, match wide blade of plug to wide slot, fully insert.

Attention:

Pour éviter les chocs électriques, introduíre la lame la plus large de la fiche
dans la borne correspondante de la prise et pousser jusqu au fond.

This product satisfies FCC regulations when shielded cables and connectors are used to
connect the unit to other equipment. To prevent electromagnetic interference with electric
appliances, such as radios and televisions, use shielded cables and connectors for connec-
tions.

FCC NOTE (for U.S.A):

This equipment has been tested and found to comply with the limits for a Class B digital
device, pursuant to Part 15 of the FCC rules. These limits are designed to provide reason-
able protection against harmful interference in a residential installation. This equipment
generates, uses and can radiate radio frequency energy and, if not installed and used in
accordance with the instructions, may cause harmful interference to radio or television
reception, which can be determined by turning the equipment off and on, the user is
encouraged to try to correct the interference by one or more of the following measures.

• Reorient or relocate the receiving antenna.
• Increase the separation between the equipment and receiver.
• Connect this equipment into an outlet on a circuit different from that to which the receiver

is connected.

• Consult the dealer or an experienced radio/TV technician for help.

This class B digital apparatus meets all requirements of the Canadian Interference --
Causing Equipment Regulations.

RISK OF ELECTRIC SHOCK

DO NOT OPEN

WARNING

To reduce the risk of fire or shock haz-
ard, do not expose this DVD player to
rain or moisture.

CLASS1
LASER
PRODUCT

Summary of Contents for DVD-C700

Page 1: ...ted CAUTIONS Caution To prevent electric shock match wide blade of plug to wide slot fully insert Attention Pour éviter les chocs électriques introduíre la lame la plus large de la fiche dans la borne correspondante de la prise et pousser jusqu au fond This product satisfies FCC regulations when shielded cables and connectors are used to connect the unit to other equipment To prevent electromagnet...

Page 2: ...anything other than the disc in the disc tray Exterior interference such as lightning and static electricity can affect normal opera tion of this player If this occurs turn the player off and on again with the POWER button or disconnect and then reconnect the AC power cord to the AC power outlet The player will operate normally Be sure to remove the disc and turn off the player after use Disconnec...

Page 3: ...4 TABLE OF CONTENTS ...
Page 4: ...play Function 19 Repeat Play 20 Using the A B Repeat Function 21 Program Playback in a Specific Order 22 Using the Disc View Function 23 Selecting Audio 24 Selecting the Subtitle Language 25 Selecting the Desired Screen Angle 26 Using the Bookmark Function 27 Using the Zoom and 3D Sound Functions 28 Using the Setup Menu 29 Setting Up the Language Features 30 Setting Up the Parental Level 32 Settin...

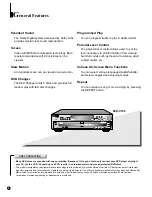
Page 5: ... languages Audio Subtitle and screen angles while enjoying movies Repeat You can repeat a song or movie simply by pressing the REPEAT button DIGITAL VIDEO DVD VIDEO CD CD PLAYER DVD C700 DVD C700 COPY PROTECTION Many DVD discs are encoded with copy protection Because of this you should only connect your DVD player directly to your TV not to a VCR Connecting to a VCR results in a distorted picture ...

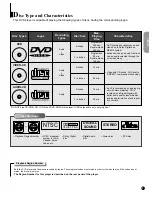
Page 6: ...egion Number for this player is described on the rear panel of the player 5 inches 31 2 inches Single sided 240 min Double sided 480 min Single sided 80 min Double sided 160 min Audio Video Audio Video Audio An LP is recorded as an analog sig nal with more distortion CD is recorded as a Digital Signal with better audio quality less distortion and less deterioration of audio qual ity over time Vide...

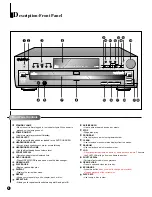
Page 7: ...egin or pause disc play DISPLAY Displays the current disc mode REPEAT Allows you to repeat play a title chapter track or disc REPEAT A B Allows you to repeat sections between point A and point B SKIP SEARCH Use to skip or search a scene or music STOP Stops disc play PROGRAM Use to play back a disc in programmed order CLEAR Use to remove menus or status displays from the screen RANDOM Use to play b...

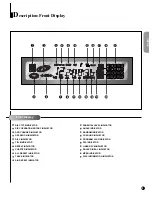
Page 8: ...INDICATOR CHAPTER INDICATOR ALL REPEAT INDICATOR TRACK INDICATOR A B REPEAT INDICATOR PARENTAL LEVEL INDICATOR ANGLE INDICATOR RANDOM INDICATOR 3D SOUND INDICATOR PROGRAM PLAY INDICATOR DTS INDICATOR LINEAR PCM INDICATOR DOLBY DIGITAL INDICATOR MPEG INDICATOR DISC INFORMATION INDICATOR SETUP 9 Description Front Display Front Display ...

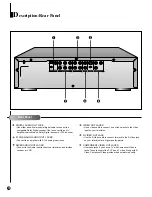
Page 9: ... MIXED AUDIO OUT JACKS Connect to the Audio input jacks of your television audio video receiver or VCR VIDEO OUT JACKS Use a video cable to connect one of these jacks to the Video input on your television S VIDEO OUT JACK Use the S Video cable to connect this jack to the S Video jack on your television for a higher quality picture COMPONENT VIDEO OUT JACKS Use these jacks if you have a TV with Com...

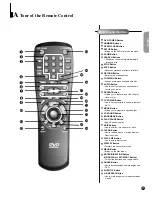
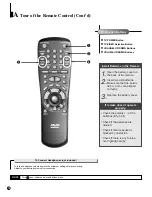
Page 10: ...at play a title chapter track or disc TV POWER Button Use to set the remote to control a compati ble TV MODE Button Allows you to program a specific order 3D SOUND Button BOOKMARK Button PLAY PAUSE Button Begin Pause disc play SKIP Buttons Use to skip the title chapter or track CLEAR Button Use to remove menus or status displays from the screen DISC SKIP Button Use to skip a disc in order DISPLAY ...

Page 11: ...mote 2 Insert two AA batteries Make sure that the polari ties and are aligned correctly 3 Replace the battery cover Check the polarity of the batteries Dry Cell Check if the batteries are drained Check if remote sensor is blocked by obstacles Check if there is any fluores cent lighting nearby Install Batteries in the Remote To Connect Headphones not included Turn the headphone volume down to the m...

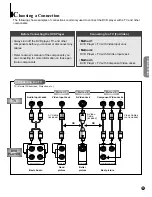
Page 12: ...put Jack Method 2 DVD Player TV with S Video Input Jack Method 3 DVD Player TV with Component Video Jacks Always turn off the DVD player TV and other components before you connect or disconnect any cables Refer to owner s manual of the components you are connecting for more information on those par ticular components TV Normal Widescreen Projection etc Audio Input Jacks Good picture Basic Audio OR...

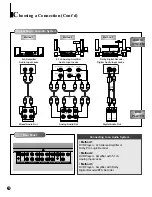
Page 13: ...Panel Method 1 DVD Player 2ch Stereo Amplifier or Dolby Pro Logic Decoder Method 2 DVD Player Amplifier with 5 1ch Analog Input Jacks Method 3 DVD Player Amplifier with Dolby Digital Decoder DTS Decoder Method 1 Method 2 Method 3 Mixed Audio Out Analog Audio Out Audio Input Jacks Audio Input Jacks 5 1ch Analog Amplifier Dolby Digital Decoder Digital Audio Input Jacks 2ch Amplifier Digital Audio Ou...

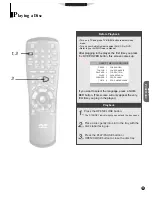
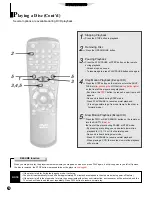
Page 14: ... only appear the very first time you plug in the player Playing a Disc D D D D V V V V D D D D V V V V C C C C D D D D C C C C D D D D 1 1 Press the OPEN CLOSE button The STANDBY indicator light goes out and the tray opens 2 2 Place a disc gently into slot in the tray with the disc s label facing up 3 3 Press the PLAY PAUSE button or OPEN CLOSE button to close the disc tray SELECT MENU LANGUAGE PR...

Page 15: ...turn the SHUTTLE dial on the front of the player during PAUSE or STEP mode By pressing or shuttling you can select slow motion playback for 1 2 1 4 or 1 8 of normal speed No sound is heard during slow mode Press PLAY PAUSE to resume normal playback When playing a VCD the reverse slow motion playback will not work Several options are available during DVD playback RESUME function When you stop disc ...

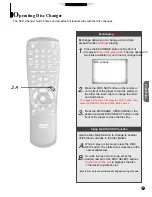
Page 16: ...the platter to the other two slots Load or change the third and fourth discs To change all the discs first press the STOP button then press the OPEN CLOSE and DISC SKIP buttons 3 3 Press the EXCHANGE OPEN CLOSE or the desired number s DISC SELECT button on the front of the player to close the disc tray Use the Disc Skip function to change to another of the discs currently in the disc platter A A W...

Page 17: ...IP button it moves forward 5 minutes If you press BACK SKIP button it moves backward 5 minutes When playing a VCD 2 0 in the MENU MODE or Track View function if you press NEXT SKIP button it moves to the next MENU or the next Track View display If you press BACK SKIP button it moves to the previous MENU or the previous Track View dis play Refer to page 23 1 1 Press the FWD or REV SEARCH button on ...

Page 18: ...FT RIGHT button to select a track Use the UP DOWN button or Number buttons to enter a different track number To enter the time from which you want to start use the LEFT RIGHT button to select then use the Number buttons to enter the time and then press the ENTER button Use the LEFT RIGHT button to select a master volume Use the UP DOWN button to select the desired volume and then press the ENTER b...

Page 19: ...e chapter that is playing TITLE Repeats the title that is playing TRACK Repeats the track that is playing DISC Repeats all tracks on the disc ALL DISCS Repeats all discs in the tray To clear the repeat function A A To return to normal play press REPEAT again until OFF is selected You can also press the CLEAR button to resume normal playback NOTE DVD repeats playback by chapter or title CD and VCD ...

Page 20: ...peat Function The A B Repeat function lets you mark a section to repeat between the beginning A and the end B of the section you want to review D D D D V V V V D D D D V V V V C C C C D D D D C C C C D D D D To set up A B Repeat To clear A B Repeat NOTE The A B Repeat function works on the same title or track If the title or track is completed before marking the end B the end of title or track bec...

Page 21: ...p 4 5 5 Press the PLAY PAUSE button The disc will be played back in programmed order e g To program chapters 5 and 7 in order on the 2nd Disc on DVD PROGRAM RANDOM When you make a wrong selection during programming Press the CLEAR button to delete the last track or chapter or title in the pro gram order 4 D 4 D 1 A 1 A a a 2 B 2 B 3 C 3 C a b a b NOTE Depending on the disc the Program Playback fun...

Page 22: ...tton and the TRACK VIEW will be displayed directly When you press TOP MENU button during DVD playback The disc s TITLE MENU function will come up A disc must have at least two titles for the TITLE MENU function to work When you press TOP MENU button during CD playback The unit enters the INTRO SCAN mode INTRO SCAN lets you listen to the beginning of each track for about 10 seconds When you hear a ...

Page 23: ...V V D D D D V V V V C C C C D D D D C C C C D D D D Using the Menu Button Using the Audio Button When playing a DVD A A Press the MENU button B B Use the UP DOWN button to select AUDIO informa tion An example of a disc menu C C Press the ENTER button D D Use the UP DOWN button to select ENGLISH An example of a disc menu E E Press the ENTER button When playing a VCD In disc version 2 0 the MENU but...

Page 24: ...TLE button A A Press the MENU button B B Use the UP DOWN button to select SUBTITLE infor mation An example of a disc menu C C Press the ENTER button D D Use the UP DOWN button to select the desired lan guage An example of a disc menu E E Press the ENTER button When playing a VCD In disc version 2 0 the MENU button works as a conversion switch between MENU ON and MENU OFF mode When playing a VCD 1 ...

Page 25: ...ay example 3 3 Use the LEFT RIGHT button to determine whether or not the ANGLE mark will be dis played 26 Selecting the Desired Screen Angle When a DVD contains multiple angles of a particular scene you can select the Angle function Using the ANGLE button D D D D V V V V D D D D NOTE This function is disc dependent and may not work with all DVDs This function does not work when a DVD has not been ...

Page 26: ...time D D D D V V V V D D D D V V V V C C C C D D D D Recalling a Marked Scene A A During playback press the BOOKMARK button on the remote B B Use the LEFT RIGHT but ton to select a marked scene C C Press the PLAY PAUSE button to skip to the marked scene Clearing a Bookmark a a During playback press the BOOKMARK button on the remote b b Use the LEFT RIGHT but ton to select the bookmark number you w...

Page 27: ...on to select the part of the screen you want to zoom 3 3 Press the ENTER button During DVD playback press ENTER to zoom in 2X 4X 2X normal in order During VCD playback press ENTER to zoom in 2X normal in order 1 1 A A 2 3 B 2 3 B NOTE 3D Sound is possible only on discs recorded using DOLBY SURROUND or DOLBY DIGITAL However some of these discs do not contain rear channel sound signals Depending on ...

Page 28: ...o lence X rating etc AUDIO OPTIONS Setup of the Audio Options See P33 Use to set up the audio options such as speaker setup DISPLAY OPTIONS Setup of the Display Options See P35 Use to select which type of screen you want to watch and several display options 2 2 Use the UP DOWN button on the remote to access the different features 3 3 Press the ENTER button to access the sub features To make the se...

Page 29: ...U 3 3 Press the ENTER button 4 4 Use the UP DOWN button to select ENG LISH 5 5 Press the ENTER button ENGLISH is selected and the screen returns to SETUP MENU To make the SETUP MENU disappear press the RETURN button 1 1 2 3 4 5 2 3 4 5 e g Setting up in ENGLISH SETUP MENU 1 PLAYER MENU ENGLISH 2 DISC MENU ENGLISH 3 AUDIO ENGLISH 4 SUBTITLE AUTOMATIC 5 PARENTAL UNLOCKED 6 AUDIO OPTIONS 7 DISPLAY OP...

Page 30: ...TUP MENU a a Press the SETUP button when in play or stop mode b b Use the UP DOWN button to select SUBTITLE c c Press the ENTER button d d Use the UP DOWN button to select ENGLISH Select AUTOMATIC if you want the subtitle language to be the same as the language selected as the audio preference Select OTHERS if the language you want is not listed Some discs may not contain the language you select a...

Page 31: ... button 5 5 Enter the new password After entering the new password re enter it one more times to make sure the password works The Parental Level function is com patible only with parental level encoded discs 1 A 1 A 2 B 2 B 3 C 3 C 4 D 4 D 5 E 5 E How to make the SETUP MENU disappear or return to menu screen during set up Press RETURN button e g Setting up in LEVEL 6 PARENTAL CONTROL 1 RATING LEVE...

Page 32: ...on 3 3 Use the UP DOWN button to select the desired item Then press the ENTER button DIGITAL OUTPUT A digital surround sound format that is recorded by Dolby Digital Select the suitable output signal type of digital audio output Bitstream PCM during playback DTS This program features discrete 5 1 channel sound track and must be played through DTS capable equipment When played through DTS equipment...

Page 33: ...tem FRONT L CENTER FRONT R SUBWOOFER SURROUND R SURROUND L Surround Sound Speaker Setup D D D D V V V V D D D D 1 1 Press the SETUP button in play or stop mode 2 2 Press the UP DOWN button to select AUDIO OPTIONS Then press the ENTER button 3 3 Use the UP DOWN button to select SPEAKER SETUP Then press the ENTER button SPEAKER MODE You can set a mode in the system that s currently used Initially it...

Page 34: ...ically converted SCREEN MESSAGES Use this feature to turn the on screen displays on or off that appear in screen FRONT DISPLAY BRIGHT It makes the Front Panel Display bright DIM It makes the Front Panel Display dim AUTO DIM It makes the Front Panel Display dim automati cally when playing a DVD BLACK LEVEL Adjust the brightness of screen 1 2 3 1 2 1 1 2 3 2 3 1 1 Press the SETUP button in play or s...

Page 35: ... the same brand if the first code does not work 5 5 To operate the TV use the TV Function Buttons described on page 12 TV Codes CODE 0 1 2 3 4 5 6 7 8 9 SETUP DISPLAY BRAND SAMSUNG A SHARP B SONY MAGNAVOX SANYO A LG B RCA LG A TOSHIBA HITACHI JVC PANASONIC A CODE OPEN CLOSE AUDIO SUB TITLE DVD POWER ANGLE TOP MENU MENU RETURN REV SEARCH REPEAT FWD SEARCH BACK SKIP BRAND MITSUBISHI SAMSUNG B SAMSUN...

Page 36: ...er of the DVD This player cannot play CD ROMs DVD ROMs CD R etc Insert a DVD a VIDEO CD or a CD 5 1 channel sound is reproduced only when the following conditions are met 1 The DVD player is connected with the proper amplifier 2 The disc is recorded with 5 1 channel sound Check whether the disc being played has the Dolby 5 1 ch mark on the outside Check if your audio system is connected and workin...

Page 37: ...11 45 ft sec Approx Play Time Single Sided Single Layer Disc 135 min Reading Speed 3 9 to 4 6 ft sec Maximum Play Time 74 min Reading Speed 3 9 to 4 6 ft sec Maximum Play Time 20 min Reading Speed 3 9 to 4 6 ft sec Maximum Play Time 74 min Video Audio 2 channel 1 0 Vp p 75 Ω load Y 1 0 Vp p 75 Ω load Pr 0 70 Vp p 75 Ω load Pb 0 70 Vp p 75 Ω load Luminance Signal 1 0 Vp p 75 Ω load Color Signal 0 2...

Page 38: ...his warranty gives you specific legal rights and you may also have other rights which vary from state to state Samsung Electronics Canada Inc SECA warrants that this product is free from defective material and workmanship SECA further warrants that if this product falls to operate properly within the specified warranty period and the failure is due to improper workmanship or defective materials SE...

Reviews: