background image

ENG-9

ENG-8

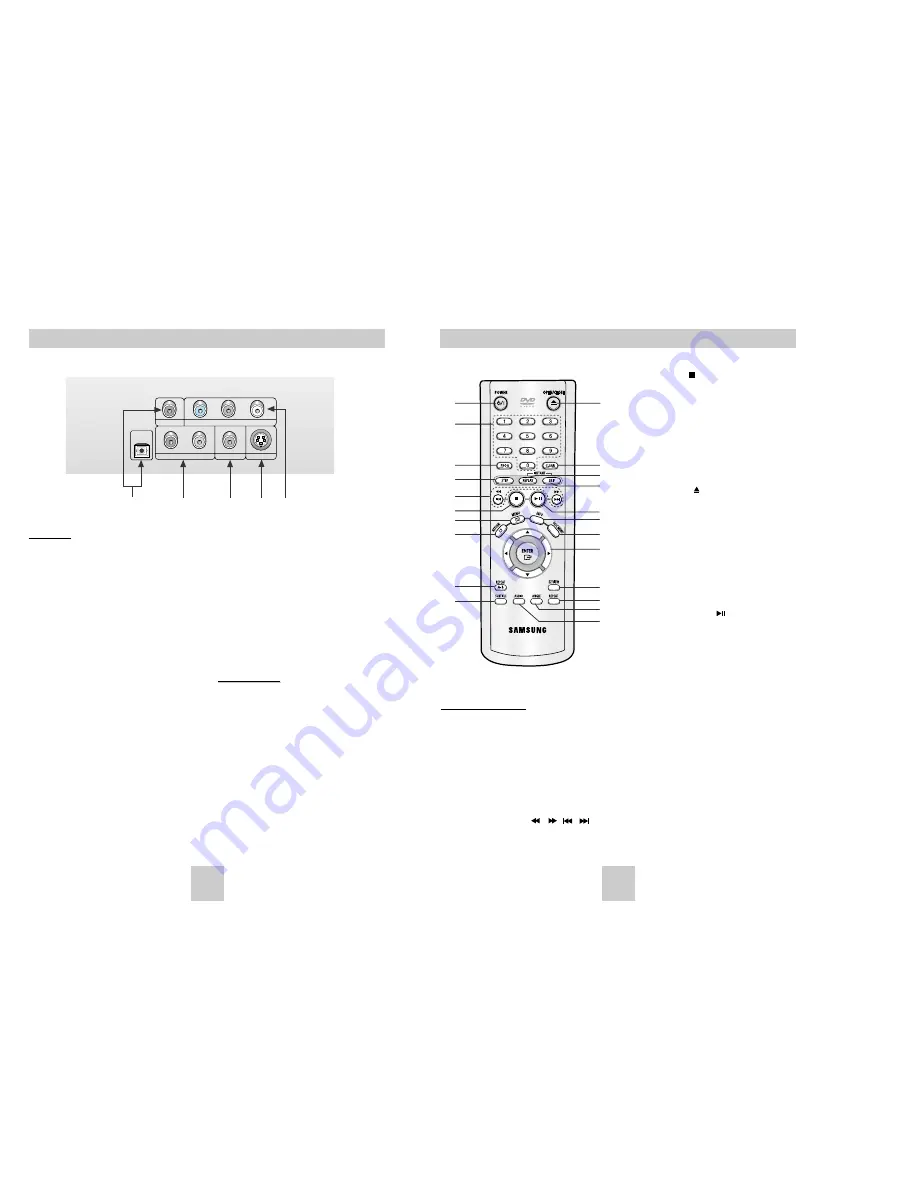
6. STOP Button (      )

7. MENU Button

• Brings up the DVD player’s setup menu.

8. RETURN Button

• Returns to a previous menu.

9. REPEAT A-B Button

• Use to mark a segment to repeat between A and B.

10. SUBTITLE Button

11. OPEN/CLOSE (     ) Button

• To open and close the disc tray.

12. CLEAR Button

• Use to remove menus or status displays from the

screen.

13. INSTANT REPLAY Button

• This function is used to replay the previous 10

seconds of the movie from the current position.

14. INSTANT SKIP Button

• This function skips playback ahead 10 seconds.

15. PLAY/PAUSE Button (      )

• Begin/Pause disc play.

16. INFO Button

• Displays the current disc mode.

17. DISC MENU Button

• Brings up the Disc menu.

18. ENTER/DIRECTION Button

(UP/DOWN or LEFT/RIGHT Buttons)

• This button functions as a toggle switch.

19. EZ VIEW Button

• Easy View can convert Letter Box images to full

screen viewing on your conventional TV.

20. REPEAT Button

• Allows you to repeat play a title, chapter, track, or

disc.

21. ANGLE Button

• Use to access various camera angles on a DVD.

22. AUDIO Button

• Use this button to access various audio functions

on a disc.

DVD Function Buttons

1. DVD POWER Button

• Turns the power on or off.

2. NUMBER Buttons

3. PROG Button

• Allows you to program a specific order.

4. STEP Button

• Advances play one frame at a time.

5. SEARCH/SKIP Buttons (      /      ,       /      )

• Allows you to search forward/backward through 

a disc. Use to skip the title, chapter or track.

Tour of the Remote Control

1

11

12
13
14

15
16

17

18

19

20
21
22

2

3

4

5

6
7

8

9

10

DVD-P246A

Description-Rear Panel

OPTICAL

COAXIAL

R

Pr

Pb

Y

L

S-VIDEO OUT

VIDEO OUT

ANALOG AUDIO OUT

COMPONENT VIDEO OUT

Rear Panel

1. DIGITAL AUDIO OUT JACKS

• Use either an optical or coaxial digital cable to

connect to a compatible Dolby Digital receiver. 
Use to connect to an A/V Amplifier that contains
a Dolby Digital or DTS decoder.

2. ANALOG AUDIO OUT JACKS

• Connect to the Audio input jacks of your 

television, audio/video receiver.

3. VIDEO OUT JACK

• Use a video cable to connect to the Video input

jack on your television.

• The Video Output in Setup Menu must be set to

the Component(I-SCAN) or S-Video.

4. S-VIDEO OUT JACK

• Use the S-Video cable to connect this jack to

the S-Video jack on your television for a higher 
picture quality. 

• The Video Output in Setup Menu must be set to

the S-Video.

5. COMPONENT VIDEO OUT JACKS

• Use these jacks if you have a TV with

Component Video in jacks. These jacks provide
Pr, Pb and Y video. Along with S-Video,
Component Video provides the best picture
quality.  

• If Component(P-SCAN) Video Output is select-

ed in Setup Menu, progressive scan mode will
work.

• If Component(I-SCAN) Video Output is selected

in Setup Menu, interlaced scan mode will work.

Important Note

Important Note

• Consult your TV User’s Manual to find out if your

TV supports Progressive Scan. 
If Progressive Scan is supported, follow the TV
User’s Manual’s instructions regarding Progressive
Scan settings in the TV’s menu system.

• If Component(P-SCAN) Video Output is selected

in Setup Menu, Video and S-Video will not work.

• See page 32 to get more information on how to

use the Setup Menu.

1

2

3

4

5

Summary of Contents for DVD-P246A

Page 1: ...DVD Player DVD P246A DVD P246K ENG AK68 00435J ...

Page 2: ...on forms inside the player due to sharp changes in temperature the player may not operate correctly If this occurs leave the player at room temperature until the inside of the player becomes dry and operational 4 Disc Do not clean record cleaning sprays benzene thinner or other volatile solvents that may cause damage to the disc surface Do not touch the disc s signal surface Hold by the edges or b...

Page 3: ...ain U S patents and other intellectual property rights owned by Macrovision Corporation and other rights owners Use of this copyright protection technology must be authorized by Macrovision Corporation and is intended for home and other limited viewing uses only unless otherwise authorized by Macrovision Corporation Reverse engineering or disassembly is prohibited PROGRESSIVE SCAN OUTPUTS 525p 625...

Page 4: ...anel Controls 1 STANDBY ON When the unit is first plugged in the indica tor lights When STANDBY ON is pressed on again the light goes out and the player is turned on 2 SKIP SEARCH Allows you to search backward through a disc Use to skip the title chapter or track 3 STOP Stops disc play 4 PLAY PAUSE Begin or pause disc play 5 SKIP SEARCH Allows you to search forward through a disc Use to skip the t...

Page 5: ...7 18 19 20 21 22 2 3 4 5 6 7 8 9 10 DVD P246A Description Rear Panel OPTICAL COAXIAL R Pr Pb Y L S VIDEO OUT VIDEO OUT ANALOG AUDIO OUT COMPONENT VIDEO OUT Rear Panel 1 DIGITAL AUDIO OUT JACKS Use either an optical or coaxial digital cable to connect to a compatible Dolby Digital receiver Use to connect to an A V Amplifier that contains a Dolby Digital or DTS decoder 2 ANALOG AUDIO OUT JACKS Conne...

Page 6: ...en 13 INSTANT REPLAY Button This function is used to replay the previous 10 seconds of the movie from the current position 14 INSTANT SKIP Button This function skips playback ahead 10 seconds 15 PLAY PAUSE Button Begin Pause disc play 16 INFO Button Displays the current disc mode 17 DISC MENU Button Brings up the Disc menu 18 ENTER DIRECTION Button UP DOWN or LEFT RIGHT Buttons This button functio...

Page 7: ... pause mode it will stop If the player is left in the stop mode for more than 30 minutes the power will automatically shut off Automatic Power Off Function DVD P246A Only If the player is left in the stop mode for more than one minute without any user interaction a screen saver will be activated Press the PLAY button to resume normal play This icon indicates an invalid button press Choosing a Conn...

Page 8: ... During play press the INFO button on the remote 2 Use the UP DOWN buttons to select the desired item 3 Use the LEFT RIGHT buttons to make the desired setup and then press ENTER You may use the number buttons of the remote control to directly access a title chapter or to start the playback from the desired time 4 To make the screen disappear press the INFO button again Using the Search Skip Functi...

Page 9: ...B repeatedly at the speed you chose To terminate the function press the CLEAR button A B REPEAT does not allow you to set point B until at least 5 seconds has elapsed after point A has been set When in VCD 2 0 mode MENU ON mode this function does not work See page 14 PROGRAM RANDOM PROGRAM RANDOM PROGRAM 01 Track 05 06 07 08 09 10 11 12 13 14 15 16 Program Order 01 02 03 04 ENTER RETURN CLEAR Slow...

Page 10: ...scs Wide Screen Displays the content of the DVD title in 16 9 aspect ratio Screen Fit The top and bottom of the screen are cut off When playing a 2 35 1 aspect ratio disc the black bars at the top and bottom of the screen will disappear The picture will look vertically stretched Depending on the type of disc the black bars may not disappear completely Zoom Fit The top bottom left and right of the ...

Page 11: ...When in VCD 2 0 mode MENU ON mode this function does not work See page 14 Depending on the disc the Bookmark function may not work Using the Instant Replay Skip Function Changing the Camera Angle When a DVD contains multiple angles of a particular scene you can select the Angle function Using the ANGLE button Press the ANGLE button to see if an ANGLE mark is present at the upper left hand corner o...

Page 12: ...sion in the current folder Random Song files which have the same extension will be played in random order To resume normal play press the CLEAR button 00 00 23 1_mp3 O f f B e c a u s e Yo u C a c t u s S a d D a y Clips Menu for MP3 WMA JPEG 1 Open the disc tray 2 Place the disc on the tray Place the disc with the labeled side up 3 Close the tray The tray closes and you should get a screen that l...

Page 13: ...tton To see the previous 6 pictures press the button Each time the ENTER button is pressed the picture rotates 90 degrees clockwise Each time the ENTER button is pressed the picture is enlarged up to 4X Normal 2X 4X 2X Normal The unit enters slide show mode Before the Slide Show begin the picture interval must be set When this icon is selected and ENTER is pressed the pictures change automatically...

Page 14: ...ic Vocal Left stereo music 1 CH CH1 RIGHT Right stereo music Vocal Right stereo music Vocal 2 CH CH2 LEFT Left stereo music 2 CH CH2 RIGHT Right stereo music It is the function to reserve the desired song in advance by use of Karaoke function Sequence of reservation 1 Playback the Karaoke Disc containing the wanted songs 2 Press the KARAOKE button 3 Select the Request using the LEFT RIGHT buttons ...

Page 15: ...u Note Note If the selected language is not recorded on the disc the original pre recorded language is selected How to make the SETUP menu disappear or return to menu screen during set up Press RETURN or LEFT button Arabic AUDIO LANGUAGE Original Others Audio Arabic Using the Disc Menu Language This function changes the text language only on the disc menu screens 1 With the unit in Stop mode press...

Page 16: ...L Black Level Off TV ASPECT 4 3 Pan Scan 16 9 Wide 4 3 Letter Box DISPLAY SETUP Still Mode Auto Screen Messages On Video Output S Video TV Aspect 4 3 L Box TV System PAL Black Level Off 1 With the unit in Stop mode press the MENU button 2 Select Setup using UP DOWN buttons then RIGHT or ENTER button 3 Select Audio Setup using UP DOWN buttons then press the RIGHT or ENTER button 4 Use the UP DOWN b...

Page 17: ... types of DVDs that your family watches There are up to 8 rating levels on a disc 1 With the unit in Stop mode press the MENU button 2 Select Setup using UP DOWN buttons then RIGHT or ENTER button 3 Select Parental Setup using UP DOWN buttons then press the RIGHT or ENTER button 4 Use RIGHT or ENTER to select Yes if you want to use a password The Enter Password screen appears 5 Enter your password...

Page 18: ...r inside the remote to reset it Reinstall batteries and try to operate the remote again Ensure that the disc is installed with the label side facing up Check the region number of the DVD 5 1 channel sound is reproduced only when the following condi tions are met 1 The DVD player is connected with the proper amplifier 2 The disc is recorded with 5 1 channel sound Check whether the disc being played...

Reviews: