background image

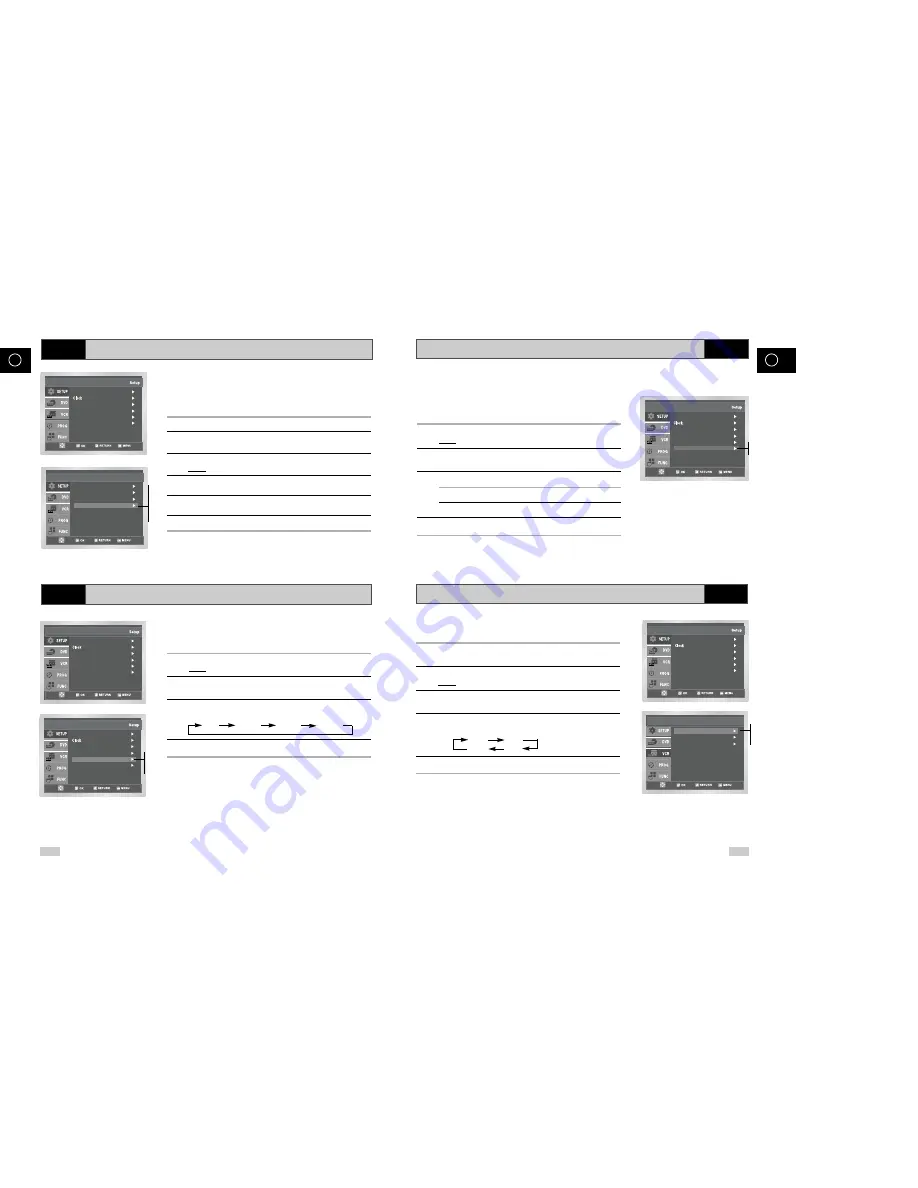
Auto Power Off

28

29

GB

GB

VCR

Screen Messages

Selecting the Cassette Type

The Auto Power Off feature automatically turns off your DVD-VCR
if no signal is received and you do not press any button for the
selected time.  

1

After pressing the MENU, press the OK or 

.

Result:

The Setup menu is displayed.

2

Press the corresponding 

or

buttons, until the 

Auto Power

Off

option is selected.

3

Press the OK or 

buttons, until you select the time of Auto Power

Off interval. 

Off               1Hour             2Hour              3Hour

4

On completion, press RETURN twice to exit the menu.

Language                    :  English

User Set                       

Screen Messages       :  On    

Install

Auto Power Off           :  Off    

Language                    :  English

User Set                       
Auto Power Off           :  Off    
Screen Messages       :  On    

Install

Your DVD-VCR displays most information both on the DVD-VCR
and the television.
You can choose to display or hide this information on the television
screen (except for the SEARCH, Programming MENU and 
Timer functions, which cannot be hidden).

1

After pressing the MENU, press the OK or 

.

Result:

The Setup menu is displayed.

2

Press the corresponding 

or

buttons, until the 

Screen

Messages

option is selected.

3

To...

Press OK or

, until...

Display on-screen information

On

is displayed.

Hide on-screen information

Off

is displayed.

4

On completion, press RETURN twice to exit the menu.

Language                    :  English

User Set                       
Auto Power Off           :  Off    

Install

Screen Messages       :  On    

Language                    :  English

User Set                       
Auto Power Off           :  Off    
Screen Messages       :  On    

Install

Repeat Play                :  Off  
S-VHS                           :  Off  

VCR Setup

Tape Select                     :  E180

On
Off

If you wish to use the tape counter to display the time remaining on
a cassette, you must indicate the type of cassette inserted.

1

After pressing the MENU press the corresponding 

,

buttons

to select the 

VCR 

option.

2

Press the OK or 

buttons to select this option.

Result:

The 

VCR Setup

menu is displayed.

3

Press the corresponding 

or

buttons, until the 

Tape

Select

option is selected.

4

Press the OK or 

buttons as many times as required, until the

correct cassette length is displayed.

E180            E240
E 300           E260 

5

Press RETURN twice to exit the menu.

Off
1Hour
2Hour
3Hour

E180
E240
E260
E300

VCR

To prevent delays or over-runs the VCR has a function called
ShowView EXTEND allowing you to extend the recording time by
up to 60 minutes.  

Only use if PDC is not available or set to Off.

1

After pressing the MENU, press the OK or 

.

2

Press the corresponding 

,

buttons to select the

User Set

option.

3

Press the OK or 

buttons to select this option.

Result:

The 

User Set

menu is displayed.

4

Press the corresponding 

or

buttons, until the 

ShowView Extend

option is selected.

5

Press the OK or

buttons to set the 

ShowView Extend

time

by increments of 10 minutes. 

6

To turn off, press OK or 

buttons repeatedly until 

Off

shows. 

Colour System               :  Auto
NICAM                         :  On  
IPC                               :  On  
ShowView Extend      :  Off  

User Set

Language                    :  English

User Set                       
Auto Power Off           :  Off    
Screen Messages       :  On    

Install

Off

10
20
30
40
50
60 

VCR

ShowView Extend 

(DVD -V80 /DVD -V85 Only)

VCR

Summary of Contents for DVD-V 80

Page 1: ...DVD VCR DVD VCR Magnétoscope Lecteur DVD DVD V70 80 85 PAL SECAM Instruction Manual Manual del usuario Mode d emploi www samsungvcr com EJECT STANDBY ON DVD PROG VCR AUX OPEN CLOSE STANDBY ON OK F Es GB ...

Page 2: ...Function 57 Changing the Camera Angle 58 Selecting the Subtitle Language 58 Repeat Play 59 Selecting the Audio Language 60 Using the Mark Function 61 MP3 WMA Play 62 Program Play Random Play 64 Picture CD Playback 65 Contents FOREWORD Safety Instructions 5 Disc Type and Characteristics 6 DVD VCR OVERVIEWS Front View of the DVD VCR 7 Rear View of the DVD VCR 8 Infrared Remote Control 9 Display Indi...

Page 3: ...t ning unplug the DVD VCR from the mains socket and aerial If the remote control is not used for a long period of time remove the batteries and store it in a cool dry place The following illustrations represent precautions This manuel is divided into two sections one describing the VCR the other the DVD Prior to undertaking anything please verify in which section you actually are by checking eithe...

Page 4: ...an analog signal with more distortion CD is recorded as a Digital Signal with better audio quality less distortion and less deterioration of audio quality over time VIDEO CD AUDIO CD 12 Cm 8 Cm 74 min 20 min 12 Cm 8 Cm 74 min 20 min Disc Types Logos Recording Types Disc Size Max Playing Time Characteristics DVD STANDBY ON DVD PROG VCR AUX VIDEO CASSETTE COMPARTMENT AUX VIDEO INPUT JACK PLAY STILL ...

Page 5: ... IN OUT SCART EURO 21 SOCKET AUDIO L R OUT SOCKETS DIGITAL AUDIO OUT SOCKET COAXIAL S VIDEO OUT JACK VIDEO OUT SOCKET DVD V70 DVD V80 DVD V85 1 STANDBY ON 2 SHUTTLE 3 CLEAR 4 DVD VCR SELECT 5 AUDIO 6 TRK 7 REWIND SKIP BACK 8 STOP 9 SUBTITLE 10 MENU 11 UP 12 LEFT 13 DOWN 14 SPEED SP LP 15 RECORD 16 TIMER 17 ANGLE IPC 18 OPEN CLOSE 19 0 9 20 TV VCR 21 INPUT SEL 22 F ADV STEP 23 PROG 24 FAST FORWARD ...

Page 6: ...k is loaded 7 The Hi Fi track of a VHS tape is playing The current TV show or video is broadcast in Stereo 8 A Timer Recording is programmed or in progress 10 11 GB GB Infrared Remote Control 1 STANDBY ON 2 SHUTTLE 3 CLEAR 4 DVD 5 TV MUTE AUDIO 6 VOLUME 7 REWIND SKIP BACK 8 STOP 9 SUBTITLE 10 MENU 11 UP 12 LEFT 13 DOWN 14 SPEED SP LP 15 RECORD 16 TIMER 17 ANGLE IPC 18 OPEN CLOSE 19 0 9 20 TV VCR 2...

Page 7: ...l be visible on the screen when the DVD VCR is switched off Make sure that both the television and the DVD VCR are switched off before connecting the cables 1 Connect the coaxial cable as indicated in the above section 2 Connect one end of the SCART cable to the AV1 EURO AV socket on the rear of the DVD VCR 3 Plug the other end into the appropriate connector on the television Aerial SCART Cable RF...

Page 8: ...ssing the INPUT SEL button for the AV2 input sources 2 By means of RF Coaxial Cable After making this connection you must preset the station received through the satellite tuner RF output channel of the satellite receiver should be adjusted away from channel 36 which is used by the DVD VCR e g re adjust to channel 39 Satellite Receiver or other Equipment 1 AV1 EURO AV By means of 21 pin Scart Cabl...

Page 9: ...ol to select and watch DVD Tuning Your Television for the DVD VCR OPEN CLOSE STANDBY ON 2 4 You must tune your television for the DVD VCR only if you are not using a Scart cable To view pictures from your DVD VCR when a Scart cable is used the television must be set to the audio video mode AV 1 Switch on the television 2 Switch on the DVD VCR by pressing STANDBY ON on the front of the DVD VCR or S...

Page 10: ... not be set automati cally In this case they should be set manually Do not forget to reset the time when you change clocks from winter to summer time and vice versa 1 After pressing the MENU press the OK or Result The Setup menu is displayed 2 Press the corresponding buttons to select the Clock option 3 Press the OK or to select this option Result The Clock Set menu is displayed 4 Press or to sele...

Page 11: ...r of stations automatically stored by the DVD VCR depends on the number of stations that it has found 6 If you wish to cancel the auto scanning before the end press the MENU button to exit the menu The time and date are set automatically from the broadcast signal If the signal is weak or ghosting occurs the time and date may not be set automati cally In this case they should be set manually see pa...

Page 12: ...r to select this option Result The Install menu is displayed 4 Press the corresponding or buttons until the Manual Setup option is selected 5 Press the OK or to select a Manual Setup option Result The TV STATION TABLE menu is displayed 6 Press the or buttons to select a programme number as required 7 Press the button to preset the station Result The MANUAL TUNING menu is displayed 8 Press the or b...

Page 13: ...es Also you can change the DVD VCR output channel to adjust the frequency in which information is displayed on the screen 1 After pressing the MENU press the OK or Result The Setup menu is displayed 2 Press the corresponding buttons to select the Install option 3 Press the OK or to select this option Result The Install menu is displayed 4 Press the or buttons until the VCR Output CH option is sele...

Page 14: ...cord the standard mono sound during a NICAM broadcast if the stereo sound is distorted due to inferior reception conditions NICAM mode On is displayed On Normally set at this position 6 On completion press RETURN three times to exit the menu Language English User Set Auto Power Off Off Screen Messages On Install Colour System Auto NICAM On IPC On ShowView Extend Off User Set The Intelligent Pictur...

Page 15: ...e English User Set Auto Power Off Off Screen Messages On Install Repeat Play Off S VHS Off VCR Setup Tape Select E180 On Off If you wish to use the tape counter to display the time remaining on a cassette you must indicate the type of cassette inserted 1 After pressing the MENU press the corresponding buttons to select the VCR option 2 Press the OK or buttons to select this option Result The VCR S...

Page 16: ...g The recording is of a slightly lower quality To record a cassette Press the SPEED button on the remote control until In standard play mode SP is displayed In long play mode LP is displayed The DVD VCR allows you to playback high quality S VHS tapes 1 During S VHS play mode after pressing the MENU press the corresponding buttons to select the VCR option 2 Press the OK or buttons to select this op...

Page 17: ...r that the opening created by a broken safety tab is covered with adhesive tape If you reach the end of the tape while recording the cassette rewinds automatically OK 7 OK 6 4 4 5 This function enables you to record up to nine hours LP of programmes Your DVD VCR stops automatically after the requested length of time 1 Switch on the television 2 To monitor the programme being recorded select the te...

Page 18: ...gramme your videorecorder instantly with the remote control Tap in the ShowView code for the programme you wish to record ShowView is a trademark of Gemstar Development Corporation The ShowView system is manufactured under licence from Gemstar Development Corporation Timer Method If you want to set the timer program press the key ShowView Code Code 0 9 Correct Standard ShowView Timer Method OK OPE...

Page 19: ...button 16 Press the STANDBY ON button to activate the timer Result Before starting recording the DVD VCR compares the timer duration with the remaining time on the cassette Auto Tape Speed Select The DVD VCR s Auto Tape Speed Select function compares the duration of the timer recording to the actual recording time remaining on the tape loaded If there is insufficient tape to complete a timer recor...

Page 20: ...ou can select the mode in which the sound is reproduced on the loudspeakers and AV outputs The following options are available Option Description L Used to listen to the sound on the left Hi Fi channel R Used to listen to the sound on the right Hi Fi channel MIX Used to listen to the mixed sound of the Hi Fi and normal channels MONO Used to listen to the sound on the normal mono channel L R Used t...

Page 21: ...uence Each time you record a cassette on this DVD VCR an index is automatically marked on the tape when recording starts The Search function allows you to fast forward or rewind to a specific index and start playback from that point Depending on the direction selected the indexes are numbered as follows This DVD VCR uses a standard indexing system VISS As a result it will recognize any indexes mar...

Page 22: ...amme is located 4 These Index searches can be made forwards press or backwards press 20 0 20 5 To cancel an Index search simply press the II or button 2 2 VCR The tape counter Indicates the elapsed time in the play and record modes hours minutes and seconds Is reset when a cassette is inserted in the DVD VCR Allows you to find the beginning of a sequence easily If the remaining time is to be calcu...

Page 23: ...ess the ll button 4 Press the F ADV STEP button again as often as necessary to advance frame by frame until the exact recording position is located 5 While the DVD VCR is in still mode hold the REC button down for a while to activate the Assemble Edit function 6 Select the source from which you wish to record by pressing The PROG or buttons for television channels The INPUT SEL button for the AV1 ...

Page 24: ...rand Codes SAMSUNG 01 to 06 PHILIPS 02 20 22 AKAI 09 23 SABA 13 14 22 to 24 GRUNDIG 09 17 21 SONY 15 16 LOEWE 02 THOMSON 13 14 24 PANASONIC 08 23 to 27 TOSHIBA 07 16 to 19 21 Result If your television is compatible with the remote control it will switch off It is now programmed to operate with the remote control If several codes are indicated for your television brand try each one in turn until yo...

Page 25: ... using buttons then press the OK or button 5 Press the buttons to select English Select Original if you want the default soundtrack language to be the original language the disc is recorded in Select Others if the language you want is not listed 6 Press the OK button English is selected and the screen returns to DVD menu 1 With the unit in Stop mode press the MENU button 2 Select DVD using buttons...

Page 26: ...tton Manufactured under license from Dolby Laboratories Dolby and the double D symbol are trademarks of Dolby Laboratories DTS and DTS Digital Out are trademarks of Digital Theater Systems Inc DTS Dolby Digital Out MPEG 2 Digital Out PCM Down Sampling Setup Setup Setup Display Setup Setting Up the Display Options 1 With the unit in Stop mode press the MENU button 2 Select DVD using buttons then OK...

Page 27: ...t the Change Password Use to select Change Password Press OK The Change Password screen appears Ok your new password Re Enter the new password again How to make the SETUP menu disappear or return to menu screen during set up Press RETURN or button If you have forgotten your password see Forget Password in the Troubleshooting Guide DVD Setup Setup Setup Display Setup Use Password Parental Setup No ...

Page 28: ...ump forward and backward through disc chapters tracks Skip Forward will jump to the next chapter track Skip Back will jump to the beginning of the current chapter track Press Skip Back again to jump to the beginning of the previous chapter track Search Forward Back While a disc is in Play mode press and hold the Forward Back buttons on the remote control or front panel to visually search forward b...

Page 29: ...op and bottom of the screen will disappear The picture will look vertically stretched Depending on the type of disc the black bars may not disappear completely Zoom Fit The top bottom left and right of the screen are cut off and the central portion of the screen is enlarged For 4 3 aspect ratio discs Normal Wide Displays the content of the DVD title in 16 9 aspect ratio The picture will look horiz...

Page 30: ...lar to tracks on an audio CD What is a Title A DVD may contain several different titles For example if a disc contains four different movies each might be considered a title When Playing a DVD VCD CD TITLE CHAPTER TIME AUDIO SUBTITLE 3DSOUND Adjusting the Aspect Ratio EZ View DVD If you are using a 4 3 TV For 16 9 aspect ratio discs 4 3 Letter Box Displays the content of the DVD title in 16 9 aspe...

Page 31: ... Chapter Title A B Off Track Disc A B DVD VCD CD OK 1 When playing a DVD 58 59 GB GB Selecting the Subtitle Language DVD You can select a desired subtitle quickly and easily with the subtitle button 1 Press the SUBTITLE button 2 Use the buttons to select the desired subtitle language 3 Use the buttons to determine whether or not the subtitle will be displayed Initially the subtitling will not appe...

Page 32: ...he CLEAR button to delete a mark number Press the MARK button to turn off the display Up to three scenes may be marked at a time When in VCD 2 0 mode MENU ON mode this function does not work Depending on the disc the mark function may not work Using the Mark Function DVD VCD Recalling a Marked Scene Clearing a Mark 1 CLEAR OK 1 Selecting the Audio Language You can select a desired language quickly...

Page 33: ...ed trade mark of Microsoft Inc and SDMITM registered trade mark of The SDMI Foundation You cannot copy such files Important The above recommendations cannot be taken as a guarantee that the DVD player will play MP3 recordings or as an assurance of sound quality You should note that certain technologies and methods for MP3 file recording on CD Rs prevent optimal playback of these files on your DVD ...

Page 34: ... interval The pictures change automatically with about an 12 second interval The pictures change automatically with about an 18 second interval Depending on the file size each interval between images may take longer or shorter than the manual suggests When the banner is being appeared press the RETURN button to return to the album screen If no buttons on the remote controller pressed for 10 second...

Page 35: ...y 500 JPEG file can be played If a number of folders in 1 Disc is over 300 only JPEG files in 300 folders can be played CD R JPEG Discs Rated voltage 110 240V 50 60Hz Power consumption 23 Watts Weight 4 5 Kg General Size 430mm X 265mm X 94mm Operating ambient temperature 5 C 35 C Installation conditions Operation position Horizontal Relative humidity Below 75 Input Video input Rear Euro Scart sock...

Page 36: ... Re tune your TV to the DVD VCR again by following instructions Tuning Your Television for the DVD VCR page 16 6 If the problem still exists repeat steps 1 to 5 moving several more channels away from the original setting If you are unable to solve the problem after reading the above instructions note The model and serial number on the rear of your DVD VCR The warranty information A clear descripti...

Page 37: ...ESPAÑOL ...

Page 38: ...o seleccionar el idioma de subtítulos 58 Repetición de la reproducción 59 Para selecionar el audio 60 Para utilizar la función MARK Marcador 61 Reproducción de MP3 WMA 62 Para programar en el orden deseado 64 Reproducción de Picture CD 65 INTRODUCCION Instrucciones de seguridad 5 Tipo y características del disco 6 DIAGRAMAS Diagrama frontal del aparato de vídeo 7 Diagrama Posterior del aparato de ...

Page 39: ...cia durante un período prolongado retire las baterías y colóquelo en un lugar fresco y seco SOLUCION DE PROBLEMAS Características técnicas 67 Problemas y Soluciones VCR 68 Posibles problemas y sus soluciones DVD 69 Nota Importante Mantenga pulsado Pulse apriete Símbolos 1 1 1 Número de paso Este manual está dividido en dos secciones una que describe el VCR y la otra el DVD Antes de empezar por fav...

Page 40: ...D AUDIO CD 12 Cm 8 Cm 74 min 20 min 12 Cm 8 Cm 74 min 20 min Tipo del disco Marca Type d enregis trement Tipos de la grabación Tiempo máximode reproducción Características DVD STANDBY ON DVD PROG VCR AUX STANDBY ON DVD PROG VCR AUX COMPARTIMIENTO PARA VIDEOCASETE DE VIDEO CONECTOR ENTRADA VIDEO RCA BOTON DE REPRODUCIR PAUSA BOTON DE PARADA BOTON DE EZ VIEW BOTON DE REBOBINADO TECLA DE REBOBINADO B...

Page 41: ...MINAL DE SALIDA DIGITAL AUDIO COAXIAL SALIDA S VIDEO DVD V 70 DVD V 80 DVD V 85 CONECTORES DE SALIDA VIDEO CONECTOR DE SALIDA AL TELEVISOR AV1 EUROCONECTOR EURO 21 DE ENTRADA SALIDA SALIDA S VIDEO CONECTORES DE SALIDA VIDEO 1 STANDBY ON 2 SHUTTLE 3 CLEAR 4 DVD VCR SELECT 5 AUDIO 6 TRK 7 REWIND SKIP BACK 8 STOP 9 SUBTITLE 10 MENU 11 UP 12 LEFT 13 DOWN 14 SPEED SP LP 15 RECORD 16 TIMER 17 ANGLE IPC ...

Page 42: ... 6 Se ha cargado un DVD con sonido DTS 7 Se esta reproduciendo una cinta en STEREO Se muestra si la emisión de televisión o video es difundida en STEREO 8 El temporizador de grabación se encuentra programado o en uso 1 STANDBY ON 2 SHUTTLE 3 CLEAR 4 DVD 5 TV MUTE AUDIO 6 VOLUME 7 REWIND SKIP BACK 8 STOP 9 SUBTITLE 10 MENU 11 UP 12 LEFT 13 DOWN 14 SPEED SP LP 15 RECORD 16 TIMER 17 ANGLE IPC 18 OPEN...

Page 43: ...conectar los cables 1 Conecte el cable coaxial tal y como se indica en la sección anterior 2 Conecte un extremo del cable SCART a la toma AV1 EURO AV situada en la parte posterior del VCR 3 Enchufe el otro extremo en el conector del televisor apropiado Decisión sobre la forma de conectar su aparato de vídeo Para conectar los diversos sistemas de sonido o vídeo debe tener en cuenta varios factores ...

Page 44: ...n seleccione la fuente pulsando el botón de INPUT SEL para fuentes de entrada AV2 2 Por medio del Cable Coaxial RF Después de realizar esta conexión debe preseleccionar el programa recibido a través del sintonizador de satélite El canal de salida RF del receptor de satélite debe ser ajustado desde el canal 36 lo cual es usado por el aparato de vídeo y reajustado al canal 39 Si el equipo dispone de...

Page 45: ... SEL de su mando a distancia para seleccionar y ver el DVD Teclas de control Sintonización de su televisor para el aparato de DVD VCR Deberá sintonizar su televisor para el aparato de vídeo solamente si no utiliza un cable euroconector Para ver imágenes procedentes de su aparato de vídeo con el cable antes mencionado su televisor deberá estar en modo sonido vídeo AV 1 Encienda el televisor 2 Encie...

Page 46: ...ón cuando se preseleccionan las estaciones No se olvide de ajustar la hora al pasar de la hora de verano a la de invierno y viceversa 1 Después de pulsar el menú pulse OK o en el mando a distancia Resultado Se visualiza el menú Configuración 2 Pulse los botones correspondientes para seleccionar la opción Reloj 3 Pulse el botón OK para seleccionar esta opción Resultado Aparece el menú Fijar Reloj 4...

Page 47: ...o del idioma deseado después pulse el botón OK 4 Presione los botones o para seleccionar la lengua que usted desea Coloque la flecha de la selección al lado de su lengua deseada y luego presione el botón ACEPTAR 5 Al terminar esta operación pulse dos veces RETURN para salir Setup Idioma Español Reloj Instalacion Aiustes Usuario Apagado Auto Mensajes Pantalla No Si English Français Deutsch Español ...

Page 48: ... parpadea en la pantalla de televisor Aparecen y se almacenan la primera frecuencia rastreada y la primera estación encontrada El aparato de DVD VCR busca la segunda estación y así sucesivamente Una vez finalizado el rastreo automático el aparato de vídeo sintoniza automáticamente el programa 1 El número de programas almacenados automáticamente por el aparato de DVD VCR dependerá del número de emi...

Page 49: ...el botón para preselección manual de programas Resultado Aparece el menú Sintonia Manual 8 Pulse los botones o para iniciar el rastreo Resultado Se rastrea la banda de frecuencia y aparece la primera emisión encontrada 9 Pulse los botones o hasta que el cursor esté situado frente a la opción NOMBRE El nombre se establecerá automáticamente a partir de la señal de emisión 10 Para modificar el nombre...

Page 50: ...or se colo que delante del programa de TV predefinido Resultado La emisora seleccionada aparecerá al mismo tiempo en la pantalla del televisor 7 Para cambiar el número de programa asignado a una emisora pulse el tecla OK del mando a distancia por ejemplo para pasar una emisora de TV del programa 1 al programa 3 8 Repita esta operación desde el paso 6 hasta almacenar todas las emisiones que desee 9...

Page 51: ...y Negro 6 Al terminar esta operación pulse el botón RETURN tres veces para salir del menú Los programas NICAM están divididos en 3 tipos NICAM estéreo NICAM mono y Bilingüüe transmisión en dos idiomas Por favor consulte la página 39 para más detalles 1 Después de pulsar el menú pulse OK o en el mando a distancia Resultado Se visualiza el menú Configuración 2 Pulse los botones correspondientes para...

Page 52: ...ultado Se visualiza el menú CONFIGURACION 2 Pulse los botones correspondientes hasta que se seleccione la opción Mensajes en la Pantalla 3 Para Pulse OK o hasta que Mostrar información en pantalla que aparezca Si Ocultar información en pantalla que aparezca No 4 Al terminar esta operación pulse dos veces RETURN para salir Para prevenir retrasos en la programación o en caso de que un programa dure ...

Page 53: ...hasta que el cursor se encuentre frente a la opción Repetición 5 Para Pulse OK o hasta que Repetir la reproducción que aparezca Si No repetir la reproducción que aparezca No 6 Al terminar esta operación pulse dos veces RETURN para salir del menú Setup Idioma Español Reloj Instalacion Aiustes Usuario Apagado Auto Mensajes Pantalla No Si Configura cìón Video Selec Cinta Repetición S VHS E180 No No 1...

Page 54: ...es grabados Los videocasete de vídeo tienen una pestaña de protección para evitar que se borren accidentalmente Si se retira esta pestaña no se puede grabaren el videocasete 1 Si desea proteger un videocasete rompa la pestaña utilizando un destornillador pequeño 2 Para volver a grabar en un videocasete protegido con la pestaña de protección rota cubra el agujero con cinta adhesiva Grabación inmedi...

Page 55: ...producción SP Reproducción larga LP VCR Utilización de la función ShowView Sólo DVD V80 DVD V85 Antes de realizar las preselecciones en su aparato de DVD VCR Encienda el televisor y el aparato de vídeo Revise que la fecha y la hora sean correctas Introduzca el videocasete en el que vaya a grabar el programa con la pestaña de protección intacta Puede preseleccionar hasta seis programas 1 Para entra...

Page 56: ...r Resultado Aparece el menú TEMPORIZADOR 3 Pulse para seleccionar la fuente de entrada 4 Seleccione la estación deseada pulsando los botones para seleccionar las fuentes de entrada AV1 AV2 o AUX 5 Pulse para seleccionar el día de grabación 6 Seleccione el día deseado pulsando los botones o 7 Pulse para seleccionar la hora de inicio de la grabación 8 Seleccione la hora deseada pulsando los botones ...

Page 57: ...ra minimizar dicho efecto Si ha estado utilizando la función de cámara lenta por más de cinco minutos el aparato de vídeo se detendrá automáticamente para proteger el videocasete los cabezales de vídeo VCR Reproducción de videocasete Esta función le permite reproducir cualquier videocasete ya grabado 1 Encienda el televisor y el aparato de DVD VCR 2 Introduzca el videocasete que desea reproducir S...

Page 58: ...l reproducir cuadro por cuadro no se oye el sonido 1 Pulse II para comenzar a reproducir el videocasete II para detener la cinta en un cuadro determinado F ADV STEP para avanzar cuadro por cuadro 2 Para volver a velocidad normal pulse II Si ha estado utilizando la función de cámara lenta por más de cinco minutos el aparato de vídeo se detendrá automáticamente para proteger el videocasete y los cab...

Page 59: ...2 Introducción de Exploración 1 Después de presionar el botón BÚSQUEDA presione los botones correspondientes o hasta que la opción Exploración de Introducción se seleccione 2 Presione el botón ACEPTAR o 3 Pulse los botones o según la dirección donde se localiza su programa deseado 4 Cuando la marca del índice se encuentra el DVD VCR reproducirá la cinta durante 5 segundos Después de lo cual contin...

Page 60: ...detalles véase la pág 13 2 Introduzca un videocasete virgen en su aparato de vídeo 3 Introduzca el videocasete grabado en la otra fuente de vídeo aparato de vídeo o cámara 4 Pulse el botón INPUT SEL para seleccionar la entrada adecuada en su aparato de vídeo AV1 y AV2 para la entrada salida de euroconector AUX para la entrada RCA 5 Inicie la reproducción del videocasete que desea copiar 6 Mantenga...

Page 61: ... SABA 13 14 22 to 24 GRUNDIG 09 17 21 SONY 15 16 LOEWE 02 THOMSON 13 14 24 PANASONIC 08 23 a 27 TOSHIBA 07 16 to 19 21 Resultado Si su televisor es compatible con el mando a distancia se apagará Ahora estará programado para funcionar con el mando a distancia Si se indican varios códigos para su marca de televisor pruebe cada uno hasta que encuentre uno que funcione Cuando cambie las baterías del m...

Page 62: ...os 1 Con la unidad en modo Stop pulsar el tecla MENU del mando a distancia 2 Seleccione DVD utilizando los teclas direccionales ARRIBA ABAJO y luego presione el tecla DE o OK 3 Seleccione Configuración idioma utilizando los teclas direccionales ARRIBA ABAJO y luego presione el tecla DE o OK 4 Seleccione Audio utilizando los teclas direccionales ARRIBA ABAJO y luego presione el tecla DE o OK 5 Util...

Page 63: ...ción o volver a la pantalla de menú de configuración Pulse la tecla RETURN o IZQ Fabricado con licencia de Dolby Laboratories Los símbolos Dolby y Double D representan marcas registradas de Dolby Laboratories DTS y DTS Digital Out son marcas registradas de Digital Theater Systems Inc Cómo ajustar las opciones de pantalla 1 Con la unidad en modo Stop pulsar el tecla MENU del mando a distancia 2 Sel...

Page 64: ... tecla DE o OK 3 Seleccione Calificación utilizando los teclas direccionales ARRIBA ABAJO y luego presione el tecla DE o OK 4 Use IZQ DE para seleccionar Sí si Ud quiere usar contraseña Aparece la pantalla de crear contraseña 5 Introducir la contraseña A continuación aparece la pantalla Re ok Password para confirmar la contraseña Volver a introducirla Aparece la pantalla Parental Control Sobre el ...

Page 65: ...o pista en curso Presione Skip Back de nuevo para saltar al principio del capÌtulo pista anterior Búsqueda hacia Adelante Atrás Mientras el disco está en modo de Reproducción presione y mantenga presionado los botones Forward Back en el control remoto o en el panel frontal para buscar visualmente hacia delante o hacia atrás a velocidades de 2X 4X 8X 16X 32X 128X Presione el botón de ll Play Still ...

Page 66: ...remos superior e inferior de la pantalla desaparecerán La película se verá alargada verticalmente Dependiendo del tipo de disco las franjas negras pueden no desaparecer completamente Ajuste Zoom Los extremos superior inferior izquierdo y derecho de la pantalla se eliminan y la parte central de la pantalla se agranda Para los discos grabados en formato 4 3 Ancho Normal Presenta el contenido del DVD...

Page 67: ...é es un título Un DVD tiene diferentes títulos por ejemplo si un disco contiene cuatro películas diferentes cada uno es considerado como un título Funciones de DVD Menú Titulo Menú del Disco Información Zoom Marcador Repetir EZ View Durante la reproducción de un DVD VCD CD Ajuste de la relación de aspecto EZ View DVD Si está utilizando una TV de formato 4 3 Para los discos grabados en formato 16 9...

Page 68: ...co A B DVD VCD CD OK 1 Cuando tocando el DVD 58 59 Es Es Cómo seleccionar el idioma de subtítulos DVD Cuando un DVD está grabado con subtítulos Ud puede utilizar la característica de subtítulos para ver los subtítulos en la pantalla 1 Pulse la tecla SUBTITLE 2 Utilice la teclas IZQ DE para seleccionar el idioma de subtítulos deseado 3 Utilice la teclas ARRIBA ABAJO para determinar si los subtítulo...

Page 69: ... marcador que desea borrar 3 Pulse la tecla CLEAR para borrar un número de marcador Pulse la tecla MARK para hacer desaparecer la imagen Hasta tres escenas pueden marcarse al mismo tiempo En el modo VIDEO CD 2 0 modo menú ON esta función no es posible Dependiendo del disco la función MARK Marcador puede no funcionar Utilizando la función MARK Marcador DVD VCD Para que aparezca una escena marcada P...

Page 70: ...DMI Foundation Usted no puede copiar dichos archivos mportante Las recomendaciones anteriormente citadas no se pueden tomar como garantía de que el reproductor de DVD reproducirá grabaciones MP3 o como seguridad de buena calidad de sonido Debe notar que ciertas tecnologías y métodos para la grabación de archivos MP3 en los CD R no permiten una reproducción óptima de estos archivos en su reproducto...

Page 71: ...s imágenes cambian automáticamente a un intervalo de 12 segundos Las imágenes cambian automáticamente a un intervalo de 18 segundos Dependiendo del tamaño de los archivos el intervalo podría ser mayor o menor que lo que sugiere el manual Cuando se está apareciendo la pancarta pulse el botón de VUELTA para volver a la pantalla del álbum Si no se presiona ningún tecla en el control remoto durante 10...

Page 72: ...vos sólo se podrán reproducir 500 archivos JPEG Si un disco contiene más de 300 carpetas sólo se podrán reproducir los archivos JPEG de las 300 carpetas Discos CD R JPEG Voltage AC110 240V 50 60Hz Consumo 23Watts Peso 4 5Kg General Tamaño 430mm X 265mm X 94mm Temperatura ambiente operativa 5 C 35 C Condiciones de Instalacion Posicion de operación Horizontal Humedad Relativa Inferior 75 Entradas En...

Page 73: ...intonizar TV al DVD VCR otra vez de acuerdo a las siguientes instrucciones Sintonización de su Televisor para el Aparato de Vídeo página 16 6 Si siguen habiendo problemas repita pasos 1 a 5 moviendo varios canales más desde lo ajustado originalmente Si no ha podido resolver el problema tras leer las instrucciones precedentes anote El modelo y número de serie situados en la parte posterior de su ap...

Page 74: ...FRANÇAIS ...

Page 75: ... la langue des sous titres 58 Répétez une séquence 59 Sélectionnez la langue d écoute 60 Utilisation des signets 61 Sommaire AVANT PROPOS Précautions d utilisation 5 Types et caractéristiques des disques 6 VUES DU MAGNÉTOSCOPE DVD Façade 7 Panneau arrière 8 Télécommande à infrarouges 9 Afficheur 11 Accessoires 11 CONNECTEZ VOTRE MAGNÉTOSCOPE DVD Décidez comment connecter votre magnétoscope DVD 12 ...

Page 76: ...ri de la chaleur FONCTIONS DU DVD Lisez des fichiers MP3 WMA 62 Programmation de la lecture dans un ordre choisi 64 Lisez des images gravées sur CD 65 SPÉCIFICATIONS TECHNIQUES 67 PROBLEMES ET SOLUTIONS Problèmes et solutions magnétoscope 68 Problèmes et solutions lecteur DVD 69 Ce manuel comporte deux sections une section réservée à la partie magnétoscope et une section réservée à la partie DVD A...

Page 77: ...PARTIMENT DE LA CASSETTE VIDÉO CHANGEMENT DES CHAÎNES LECTURE PAUSE ARRÊT RETOUR RAPIDE ENREGIS TREMENT ÉJECTION OUVERTURE FERMETURE DU TIROIR TOUCHE DE SÉLECTION MAGNÉTOSCOPE TOUCHE DE SÉLECTION DVD TIROIR À DISQUE MARCHE ARRÊT CONNECTEUR CINCH D ENTRÉE VIDÉO CONNECTEURS CINCH D ENTRÉE AUDIO G D DVD V80 STANDBY ON DVD PROG VCR AUX COMPARTIMENT DE LA CASSETTE VIDÉO CHANGEMENT DES CHAÎNES LECTURE P...

Page 78: ...INDEX RECHERCHE 33 RÉPÉTITION PARTIELLE A B RÉPÉTITION OPEN CLOSE STANDBY ON OK 1 2 3 4 5 6 7 8 9 10 11 12 13 14 15 16 17 18 19 20 21 22 23 24 25 26 27 28 29 30 31 32 33 8 9 F F Panneau arrière TV AV2 DEC EXT AV1 EURO AV ENTRÉE ANTENNE PRISE DU CORDON ANTENNE DU TÉLÉVISEUR PRISE PÉRITEL POUR DÉCODEUR OU SOURCE EXTERNE AV2 PRISE PÉRITEL ENTRÉE SORTIE AV1 SORTIE VIDÉO CONNECTEURS CINCH SORTIE AUDIO ...

Page 79: ...u en cours 10 11 F F OPEN CLOSE STANDBY ON OK 1 2 3 4 5 6 7 8 9 10 11 12 13 14 15 16 17 18 19 20 21 22 23 24 25 26 27 28 29 30 31 32 33 DVD V80 DVD V85 Télécommande à infrarouges STEREO 1 2 3 4 5 6 7 8 1 MARCHE ARRÊT 2 NAVIGATION 3 ANNULER 4 SELECTION DU MODE DVD 5 SELECTION DU MODE AUDIO 6 REGLAGE DU VOLUME 7 REMBOBINAGE SAUT ARRIERE 8 ARRÊT 9 SOUS TITRE 10 MENU 11 HAUT 12 GAUCHE 13 BAS 14 VITESS...

Page 80: ...e Cinch Sortie Sortie vidéo LINE Autre téléviseur AUX Façade Cinch Entrée Caméscope audio vidéo Chaîne Hi Fi stéréo Magnétoscope Hi Fi stéréo Sortie Panneau arrière Prise Sortie Téléviseur S vidéo S VIDEO Sortie S vidéo DVD uniquement Sortie audio Panneau arrière Optique Sortie Sortie audio numérique numérique coaxial vers amplificateur audio numérique DVD uniquement Prise téléviseur Panneau arriè...

Page 81: ...rce en appuyant sur la touche INPUT SEL Branchement et installation automatique Votre magnétoscope est équipé d une fonction d installation automatique des chaînes Dès que l appareil est branché sur une prise secteur celui ci recherche classe et mémorise toutes les chaînes de télévision émettant dans votre région Cette procédure demande quelques minutes de patience votre magnétoscope sera ensuite ...

Page 82: ...ons du DVD décrites aux pages 45 à 64 appuyez sur la touche DVD de la télécommande pour sélectionner le mode DVD 16 F Vous devez régler votre magnétoscope DVD en fonction du téléviseur uniquement si vous n utilisez pas de cordon Péritel Pour visualiser l image provenant du magnétoscope lors de l utilisation d un cordon Péritel le téléviseur doit être en mode audio vidéo entrée AV sélectionnée 1 Me...

Page 83: ...affiche 2 Appuyez sur les touches ou pour sélectionner l option Horloge 3 Appuyez sur la touche OK pour valider cette option Résultat le menu Réglage Horloge s affiche 4 Appuyez sur ou pour sélectionner l heure les minutes le jour le mois et l année Résultat L option sélectionnée apparait en surbrillance 5 Appuyez sur ou pour augmenter ou diminuer le chiffre Résultat le jour de la semaine s affich...

Page 84: ...ETOUR pour sortir du menu La date et l heure sont réglées automatiquement à partir du signal reçu Si le signal est faible ou s il y a beaucoup de parasites ce réglage automatique sera peut être impossible Dans ce cas vous devez les régler manuellement en suivant les instructions de la page 18 À la fin de la recherche automatique il se peut que certaines chaînes soient mémorisées plusieurs fois Dan...

Page 85: ...le décodeur pour cette chaîne si vous la recevez à l aide d un décodeur externe 12 Appuyez sur ou pour sélectionner NOM Le nom de la chaîne est affiché automatiquement à partir du signal d émission 13 Pour changer le nom de la station appuyez sur la touche Résultat la première lettre du nom de la chaîne clignote 14 Pour alors sélectionner un caractère appuyez sur ou jusqu à ce que dans le nom le c...

Page 86: ...ez sur la touche pour valider cette option Résultat le menu LISTE STATIONS TV s affiche 6 Appuyez sur les touches ou pour sélectionner le numéro de station requis PR 7 Appuyez sur la touche EFFACER 8 Si vous souhaitez supprimer d autres chaînes reprenez la procédure à partir de l étape 6 jusqu à ce que toutes les chaînes voulues aient été supprimées 9 Lorsque vous avez fini appuyez trois fois sur ...

Page 87: ...canal de sortie du magnétoscope DVD à cassettes VCR Choisissez le mode de son G K correspondant au téléviseur connecté au magnétoscope DVD 1 Appuyez sur la touche SETUP de la télécommande Résultat le menu de programmation s affiche 2 Appuyez sur les touches ou pour sélectionner l option Installation 3 Appuyez sur la touche OK pour sélectionner cette option Résultat le menu Installation s affiche 4...

Page 88: ... Oui Non Avant de lire ou d enregistrer une cassette vous pouvez sélectionner la norme de réception appropriée L option Auto permet cependant de sélectionner la norme de réception automatiquement en fonction de l émission reçue Lors de la lecture d une cassette la norme est sélectionnée automatiquement par le magnétoscope DVD Lors de la lecture d une cassette enregistrée NTSC effectuez un réglage ...

Page 89: ...ge Installation Réglages Utilisateur Veille Auto Messages Ecran Non Oui Setup La fonction ShowView étendue permet de résoudre les problèmes liés aux retards ou aux rallongements des émissions en prévoyant volontairement un temps d enregistrement plus important Vous pouvez ainsi ajouter jusqu à 60 minutes La fonction ShowView n est pas disponible sur le modèle SV DVD40 Utilisez cette fonction uniqu...

Page 90: ...u pour valider ce menu Résultat le menu Réglages de la fonction VCR s affiche 4 Appuyez sur les touches ou pour sélectionner l option S VHS 5 Pour appuyez sur OK ou jusqu à ce que Lecture en mode S VHS Oui s affiche Lecture en mode non S VHS Non s affiche répéter la 6 Lorsque vous avez fini appuyez deux fois sur RETOUR pour sortir du menu Pour regarder les cassettes S VHS activez le mode S VHS dan...

Page 91: ...JECT STANDBY ON DVD PROG VCR AUX 3 OK 6 4 4 5 Enregistrez une émission avec arrêt automatique VCR Les cassettes vidéo sont munies d une languette de protection contre un effacement accidentel Lorsque cette languette est brisée il n est plus possible d enregistrer sur la cassette 1 Si vous souhaitez protéger la cassette contre l effacement brisez la languette à l aide d un petit tournevis 2 Pour ré...

Page 92: ...cassette sur laquelle vous souhaitez enregistrer l émission la languette de protection doit être intacte Vous pouvez programmer jusqu à six enregistrements 1 Pour programmer en ShowView appuyez sur la touche PROGRAMMATEUR Appuyez sur les touches et OK ou pour sélectionner l option ShowView Résultat un message apparaît et vous permet d entrer le code ShowView Si vous avez déjà programmé six enregis...

Page 93: ... 1 Insérez la cassette et appuyez sur la touche PROGRAMMATEUR de la télécommande Résultat le menu de type de programmation s affiche 2 Appuyez sur la touche pour sélectionner l option Normal Résultat le menu de programmation simplifiée s affiche 3 Appuyez sur la touche pour sélectionner la source d entrée 4 Pour choisir la chaîne à enregistrer appuyez sur ou SEL ENTREE pour sélectionner les source...

Page 94: ... les touches SAUT ou pour atténuer cet effet Après cinq minutes de fonctionnement au ralenti le magnétoscope DVD désactive automatiquement cette fonction pour protéger la cassette les têtes de lecture L R MIX L R MONO 2 2 1 1 Sélectionnez le mode de sortie audio Lisez une cassette au ralenti VCR VCR Cette fonction vous permet de lire une cassette préenregistrée 1 Allumez le téléviseur et le magnét...

Page 95: ... les touches SAUT pour atténuer cet effet Vous pouvez faire varier la vitesse à l aide de la fonction Shuttle jusqu à atteindre neuf fois la vitesse normale Exemple vous souhaitez analyser la technique d un sportif en mouvement La fonction de lecture à vitesse variable est disponible sur la télécommande Le son est coupé lorsque vous lisez une cassette à vitesse variable 1 Appuyez sur ll lorsque vo...

Page 96: ...elle ci est atteinte 1 Après avoir appuyé sur la touche SEARCH appuyez sur les touches ou correspondantes jusqu à ce que l option Go To 0 00 00 soit sélectionnée 2 Appuyez sur OK ou Recherche des blancs Cette fonction permet de rechercher un emplacement vide sur une cassette Lorsque la lecture est arrêtée appuyez sur la touche Le magnétoscope recherche un blanc et s arrête automatiquement dès qu i...

Page 97: ... 2 Utilisez le compteur de bande Recherchez un passage à l aide des index Recherche d index 1 Après avoir appuyé sur la touche SEARCH appuyez sur les touches ou correspondantes jusqu à ce que l option Intro Scan soit sélectionnée 2 Appuyez sur OK ou 3 Appuyez sur la touche ou selon la direction où votre programme recherché se situe 4 Lorsque un index est trouvé le DVD VCR lit la cassette pendant 5...

Page 98: ...ancer image par image jusqu à l endroit précis où vous souhaitez démarrer l enregistrement 5 En mode pause maintenez la touche ENREG appuyée pendant plusieurs secondes pour activer la fonction de montage Résultat l indicateur d enregistrement clignote sur l afficheur 6 Sélectionnez la source d enregistrement en appuyant sur les touches PROG ou pour choisir une chaîne de télévision la touche SEL EN...

Page 99: ...ir de la télécommande du magnétoscope pour contrôler le téléviseur La compatibilité multi marque de la télécommande n est pas disponible sur le modèle SV DVD40 Pour déterminer si votre téléviseur est compatible procédez comme suit 1 Allumez votre téléviseur 2 Orientez la télécommande vers le téléviseur 3 Tout en maintenant la touche TV appuyée entrez le code à deux chiffres correspondant à la marq...

Page 100: ...née vous retournez au menu de réglage Si la langue que vous choisissez n est pas enregistrée sur le disque la langue originale sera choisie par défaut Pour quitter le menu de réglage ou retourner à l écran précédent pendant la configuration appuyez sur la touche RETOUR ou Choix de la langue de la bande sonore Choix de la langue des sous titres Langue Français L horloge Installation Réglages Utilis...

Page 101: ...n des options audio 1 Aucun disque n étant inséré dans le lecteur appuyez sur la touche MENU 2 Sélectionnez le menu DVD à l aide de la touche ou puis appuyez sur la touche OK ou 3 Sélectionnez Options Audio à l aide de la touche ou puis appuyez sur la touche OK ou 4 Utilisez la touche ou pour choisir l option voulue Validez ensuite le format désiré à l aide de la touche OK ou Dolby Digital 1 PCM C...

Page 102: ...ne avec les DVD sur lesquels un niveau de contrôle est enregistré Huit niveaux de contrôle différents sont disponibles 1 Aucun disque n étant inséré dans le lecteur appuyez sur la touche MENU 2 Sélectionnez le menu DVD à l aide de la touche ou puis appuyez sur la touche OK ou 3 Sélectionnez l option Cont Parental à l aide de la touche ou puis appuyez sur la touche OK ou 4 Si vous voulez utiliser u...

Page 103: ...errompue Pour retourner à une lecture normale appuyez sur la touche ll Au bout de 5 minutes en mode Pause le lecteur repasse automatiquement en mode Lecture 2 Avance image par image En mode Pause appuyez sur la touche I de la télécommande pour passer d une image à la suivante La fonction Audio est désactivée en mode Avance image par image Pour retourner à une lecture normale appuyer sur la touche ...

Page 104: ...ges pour un CD audio Qu est ce qu un titre Un DVD peut contenir plusieurs titres si un disque contient par exemple 4 films différents chaque film est considéré comme un titre OK 1 Fonction du DVD Titre du Menu Menus du Disque Info Zoom signet Répétition EZ View ENG 5 1CH ENG Non ENG 5 1CH ENG Non ENG 5 1CH ENG Non Utilisation de la fonction d affichage d informations Lecture d un DVD VCD CD Réglag...

Page 105: ...re ou par plage tandis que celle d un CD ou d un VCD se fait par disque ou par plage La lecture répétée peut ne pas s appliquer sur certains disques Avec un VCD 2 0 mode MENU ON cette fonction n est pas disponible Lecture de DVD OK 1 DVD VCD CD DVD 58 F Sélectionnez la langue des sous titres Vous pouvez sélectionner rapidement et facilement un sous titrage avec la touche SOUS TITRE 1 Appuyez sur l...

Page 106: ...ivent en abrégé 3 Utilisez la touche de direction ou pour sélectionner Stéréo Droite ou Gauche VCD CD L utilisation de cette fonction dépend de la langue enregistrée sur le disque et n est pas disponible sur tous les lecteurs DVD Un disque DVD peut proposer jusqu à 8 langues d écoute Pour configurer une même langue d écoute chaque fois que vous démarrez le lecteur DVD voir la rubrique Configuratio...

Page 107: ...re appuyez sur la touche INDEX 2 Utilisez la touche ou pour sélectionner le numéro du signet auquel vous voulez accéder 3 Appuyez sur ll pour passer à la séquence marquée 1 Pendant la lecture appuyez sur la touche INDEX 2 Utilisez la touche ou pour sélectionner le numéro du signet que vous voulez supprimer 3 Appuyez sur EFFACER pour supprimer le numéro du signet Appuyez sur INDEX pour effacer le m...

Page 108: ...M marque déposée de Microsoft Inc et SDMITM marque déposée de la SDMI Foundation Leur copie est impossible Important Les recommandations ci dessus n offrent aucune garantie quant à la bonne restitution des enregistrements MP3 ou n en certifient pas la qualité sonore Vous noterez que certaines des technologies et méthodes d enregistrement de fichiers MP3 sur CD R n offrent pas une restitution optim...

Page 109: ... affichage des photos Les photos s affichent automatiquement l une après l autre à intervalle de six secondes Les photos s affichent automatiquement l une après l autre à intervalle de 12 secondes Les photos s affichent automatiquement l une après l autre à intervalle de 18 secondes L intervalle d affichage réel peut légèrement varier selon la taille du fichier Lorsque la bannière a disparu appuye...

Page 110: ...uls 500 fichiers JPEG peuvent être lus Si le nombre de dossiers sur un disque dépasse la limite de 300 seuls 300 dossiers JPEG peuvent être lus Images format JPEG Alimentation AC 110 240 V 50 60 Hz Consommation 23 Watts Poids 4 5 kg Généralités Dimensions 430 mm x 265 mm x 94 mm Température de fonctionnement 5 C 35 C Conditions d installation Position horizontale Humidité de fonctionnement inférie...

Page 111: ...us Problème Explication Solution Page Avant de contacter le service après vente de SAMSUNG il convient d effectuer les vérifications suivantes P 6 P 45 P 48 P 46 64 P 46 50 P 49 P 48 P 50 Problèmes et solutions magnétoscope Avant de contacter le service après vente de SAMSUNG il convient d effectuer les vérifications suivantes Problème Explication Solution Absence d alimentation Vérifiez que le co...

Page 112: ...r nos produits notre service consommateurs est à votre disposition au Vous pouvez également vous connecter à notre site Internet http www samsung fr Cet appareil est garanti un an pièces et main d œuvre pour la France métropolitaine La facture d achat faisant office de bon de garantie www samsung com www samsungvcr com www samsung es AK68 00169U ELECTRONICS ...

Reviews: