background image

GB

13

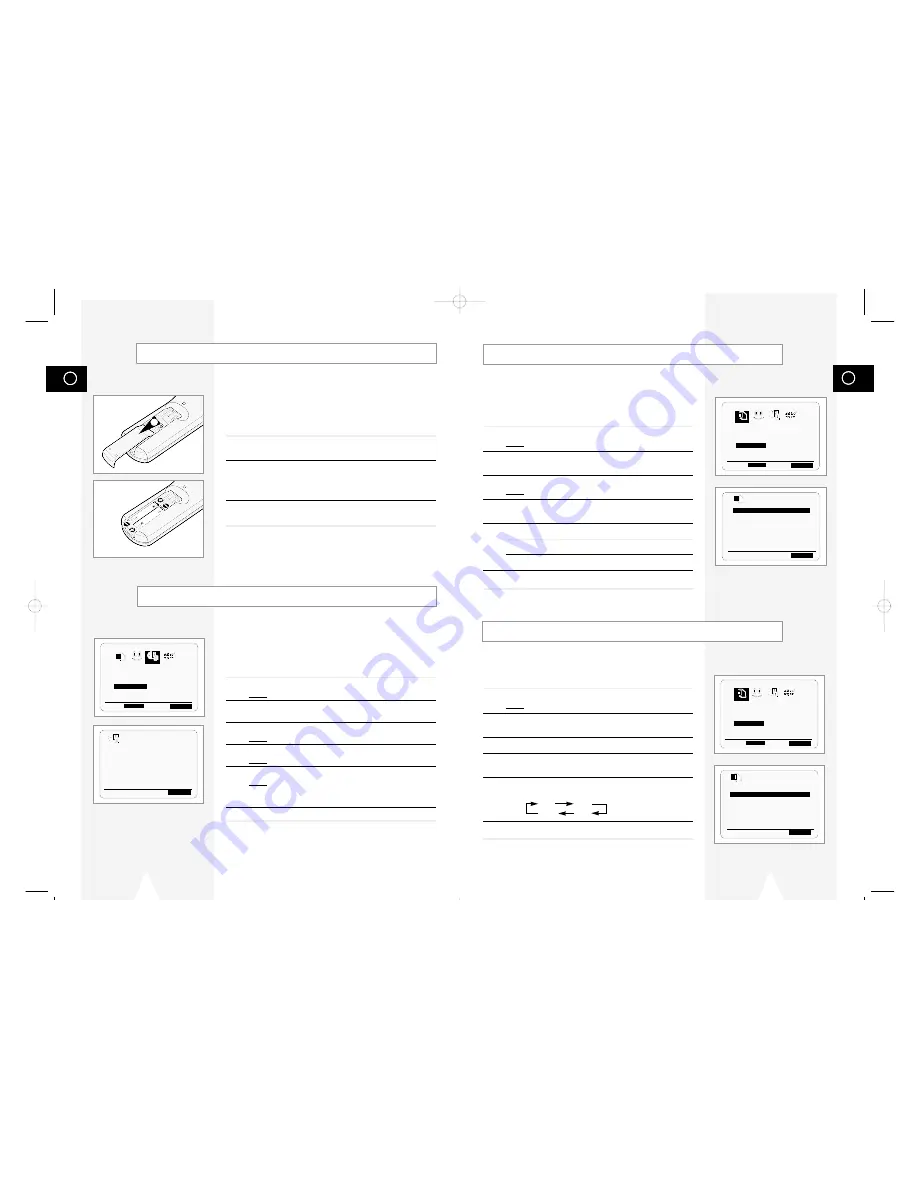
Selecting the Cassette Type

If you wish to use the tape counter to display the time remaining on
a cassette, you must indicate the type of cassette inserted.

1

Press SETUP on the remote control.
Result:

The programming menu is displayed.

2

Press the corresponding 

or 

buttons to select the  

USER SET

option.

3

Press the ENTER button to select this option.

4

Press the corresponding 

$

or

buttons, until the  

TAPE

SELECT

option is selected.

5

Press the 

or 

buttons as many times as required, until the

correct cassette length is displayed.

E180            E240
E 300           E260 

6

Press RETURN twice to exit the menu.

 OPTIONS 

OSD

:ON

TAPE SELECT

:E180

COLOUR SYSTEM

:AUTO

IPC

:ON

$

END:

RETURN

Displaying/Hiding On-Screen Information

Your DVD-VCP displays most information both on the DVD-VCP
and the television.
You can choose to display or hide this information on the television
screen.

1

Press SETUP on the remote control.
Result:

The programming menu is displayed.

2

Press the corresponding 

or 

buttons to select the 

USER SET

option.

3

Press the ENTER button to select this option.
Result:

The 

USER SET

menu is displayed.

4

Press the corresponding 

$

or

buttons, until the 

OSD

option is

selected.

5

To...

Press 

or

, until...

Display on-screen information

ON

is displayed.

Hide on-screen information

OFF

is displayed.

6

On completion, press RETURN twice to exit the menu.

USER SET

 OPTIONS     CLOCK       BONUS         LANG

OPTIONS    

➛!!❿!!

ENTER

END:

RETURN

 OPTIONS 

USER SET

 OPTIONS     CLOCK       BONUS         LANG

OPTIONS    

➛!!❿!!

ENTER

END:

RETURN

OSD

:ON

TAPE SELECT

:E180

COLOUR SYSTEM

:AUTO

IPC

:ON

$

END:

RETURN

GB

12

You must insert or replace the batteries in the remote control when
you:

Purchase the DVD-VCP

Find that the remote control is no longer working
correctly

1

Push the tab in the direction of the arrow to release the battery
compartment cover on the rear of the remote control.

2

Insert two AA, R6 or equivalent batteries, taking care to respect
the polarities:

+ on the battery with + on the remote control

– on the battery with – on the remote control

3

Replace the cover by aligning it with the base of the remote
control and pushing it back into place.

Do not mix different battery types (manganese and
alkaline for example).

You must set the date and time when:

You purchase the DVD-VCP

The power supply remains off for more than 60 seconds

Do not forget to reset the time when you change
clocks from winter to summer time and vice versa.

1

Press SETUP on the remote control.
Result:

The programming menu is displayed.

2

Press the corresponding 

or 

buttons to select the 

CLOCK

SET

option.

3

Press the ENTER button to select this option.
Result:

The 

CLOCK SET

menu is displayed.

4

Press 

or

to select the hour, minutes, day, month and year.

Result:

The option selected flashes.

5

Press the 

$

or

buttons to increase or decrease the value.

Result:

The day of the week is displayed automatically.

You can hold the 

$

or

buttons down to scroll more 

quickly through the values.

6

On completion, press RETURN twice to exit the menu.

Setting the Date and Time

Inserting Batteries in the Remote Control

1

CLOCK SET

 OPTIONS     CLOCK       BONUS         LANG

    CLOCK      

➛!!❿!!

ENTER

END:

RETURN

ONUS      

➛❿!!!!!!!!!!!

$

END:

RETURN

12:00   1/JAN/2001

MON

01718A DVD-V12000MC-GB2  5/24/02 9:52 AM  Page 12

Summary of Contents for DVD-V12000MC

Page 1: ...F F OPEN CLOSE EJECT PLAY 2 3 4 5 6 7 8 9 0 TRK AUTO TRK SHUTTLE OPEN CLOSE STANDBY ON ZOOM 3D SOUND S FIT DVD TV VIEW VCP ANGLE VOLUME ECHO KARAOKE REC DISC MENU SETUP ENTER TITLE SUBTITLE AUDIO MARK RETURN MODE REPEAT SPEED STEP F ADV DISPLAY CLOCK COUNTER CLEAR KARAOKE SEARCH PAL NTSC 01718A DVD V12000MC GB1 5 24 02 9 50 AM Page 1 ...

Page 2: ...eshooting Guide DVD 49 Note Important Hold down Press push Symbols 1 1 1 Step number Contents FOREWORD Safety Instructions 4 DVD VCP OVERVIEWS Front View of the DVD VCP 5 Rear View of the DVD VCP 5 Infrared Remote Control 6 Display Indicators 7 Accessories 7 CONNECTING YOUR DVD VCP Deciding How to Connect DVD VCP 8 Connecting DVD VCP to the TV using the RCA Cable 9 Connecting the Audio Output Cabl...

Page 3: ...N COPY BUTTON ECHO BUTTON The following illustrations represent precautions The lightning bolt is a warning sign alerting you to dangerous voltage inside the product DO NOT OPEN THE DVD VCP Refer to service personnel H H 5 C 40 C 10 75 THIS DEVICE IS NOT FOR USE IN INDUSTRIAL ENVIRONMENTS Safety Instructions Do NOT expose the DVD VCP to extreme temperature condi tions below 5 C and above 40 C or t...

Page 4: ...S INSTRUCTIONS Infrared Remote Control 2 3 4 5 6 7 8 9 0 TRK AUTO TRK SHUTTLE OPEN CLOSE STANDBY ON ZOOM 3D SOUND S FIT DVD TV VIEW VCP ANGLE VOLUME ECHO KARAOKE REC DISC MENU SETUP ENTER TITLE SUBTITLE AUDIO MARK RETURN MODE REPEAT SPEED STEP F ADV DISPLAY CLOCK COUNTER CLEAR KARAOKE SEARCH 1 2 3 4 5 6 7 8 9 10 11 12 13 14 15 16 17 18 19 20 21 22 23 24 25 26 27 28 29 30 31 32 33 34 35 1 STANDBY O...

Page 5: ...plify the setting up procedure of your DVD VCP Make sure that both the television and the DVD VCP are switched off before connecting the cables 1 Connect one end of the RCA cable to the LINE OUT on the rear of the DVD VCP 2 Plug the other end into the appropriate connector on the television RCA Cable 1 TV Deciding How to Connect DVD VCP You must take into account various factors when connecting au...

Page 6: ...LOSE EJECT PLAY COPY VOLUME KEY ECHO MIC1 DVD TV VIEW VCP ANGLE VOLUME ECHO KARAOKE REC DISC MENU 1 2 3 4 4 Deck Control Keys The DVD VCP uses one set of controls to operate both decks The following keys are helpful in successfully controlling each deck 1 STANDBY ON Button Press the STANDBY ON button on the remote control or front panel to turn on the DVD VCP 2 DVD Button Press the DVD button on t...

Page 7: ...SELECT E180 COLOUR SYSTEM AUTO IPC ON END RETURN GB 12 You must insert or replace the batteries in the remote control when you Purchase the DVD VCP Find that the remote control is no longer working correctly 1 Push the tab in the direction of the arrow to release the battery compartment cover on the rear of the remote control 2 Insert two AA R6 or equivalent batteries taking care to respect the po...

Page 8: ...d of the RCA audio cable into the AUDIO sockets on the Rear of the VCP Take care to respect the colour coding of the left and right channels 4 Plug the other end of the audio cable into the appropriate output connectors on the other system VCP camcorder or Hi Fi sound system Connecting an RCA Audio Video Input Cable AUDIO AUDIO OUT COM VIDEO R R L L LINE IN LINE OUT DVD VCR AUDIO AUDIO OUT COMPONE...

Page 9: ...deo input connectors on the rear of your DVD VCP as indicated on page 8 2 Insert a blank cassette in your DVD VCP 3 Insert the pre recorded cassette in the other video source VCP or camcorder 4 Start playing back the cassette to be copied 5 Hold REC down for a while to start recording on your DVD VCP 6 When you have finished recording press on both VCP and DVD VCP This function enables you to reco...

Page 10: ...cally 6 To adjust the sharpness manually press the button to turn the IPC mode OFF 7 Press the or buttons until the picture is displayed according to your preferences If you do not press a button within ten seconds the PICTURE menu disappears automatically 8 On completion press the RETURN button again PICTURE IPC OFF SOFTEN SHARPEN ON OFF OPTIONS OSD ON TAPE SELECT E180 COLOUR SYSTEM AUTO IPC ON E...

Page 11: ...on Playing a Sequence Frame by Frame Playing a Sequence at Variable Speeds 2 3 4 5 6 7 8 9 0 TRK AUTO TRK SHUTTLE ZOOM 3D SOUND S FIT MODE REPEAT SPEED STEP F ADV DISPLAY CLOCK COUNTER CLEAR REC DISC MENU SETUP ENTER 7 8 9 0 3D SOUND S FIT DVD TV VIEW VCP ANGLE KARAOKE REPEAT STEP F ADV CLEAR 1 1 1 1 REVERSE REVERSE REVERSE SLOW SLOW PLAY PLAY PLAY PLAY PLAY PLAY STILL MOTION MOTION PLAY X3 X7 X9 ...

Page 12: ...utton to select this option Result The EASY OPERATION menu is displayed 4 Press the corresponding or buttons until the REPEAT PLAY option is selected 5 To Press or until Repeat play ON is displayed Do not wish to repeat play OFF is displayed 6 On completion press RETURN twice to exit the menu Auto Repeat Play You can set Interval Repeat Play so that the cassette is repeated a number of times accor...

Page 13: ...ARAOKE button on the remote control Press the or button to select KARAOKE mode ON 3 To adjust the Mic volume and ECHO level press the VOLUME and ECHO or keys 4 To sing with accompaniment 1 Press the KARAOKE button on the remote control 2 Press the corresponding or buttons to select the SCORE mode 3 Press the or buttons to select the SCORE mode ON 4 Score will pop up whenever a song is completed Us...

Page 14: ... on the rear panel of the player Playback Region Number PAL 12 Cm 8 Cm Single sided 240 min Double sided 480 min Single sided 80 min Double sided 160 min Audio Video Audio Video Audio DVD contains excellent sound and video due to Dolby Digital and MPEG 2 system Various screen and audio functions can be easily selected through the on screen menu Video with CD sound VHS quality MPEG 1 compression te...

Page 15: ...e following show examples of connections commonly used to connect the DVD VCP player with a TV and other components It is only available for DVD The VCP out can not watch by this connection Dolby Digital Decoder Digital Audio Input Jack TV Component Video Jacks Digital Audio out Jack Component Cable 01718A DVD V12000MC GB3 5 24 02 9 54 AM Page 27 ...

Page 16: ... Using the Search Skip Functions VOLUME ECHO REC DISC MENU REC DISC MENU SETUP ENTER 2 2 1 1 GB 28 REC DISC MENU SETUP ENTER REC DISC MENU SETUP ENTER 1 3 5 5 2 3 4 5 6 TRK AUTO TRK SHUTTLE OPEN CLOSE STANDBY ON ZOOM SPEED DISPLAY VOLUME ECHO REC DISC MENU SETUP Playing a Disc Before Playback Turn on a TV and press the TV VIDEO button to select video mode Turn on your Audio System and select AUX C...

Page 17: ...LAY button on the remote Current title chapter number and elapsed time will be displayed Use the button to select a title or a chapter number Use the button or Number buttons to enter a different title or chapter number then press the ENTER button To enter the time from which you want to start use the button to select then use the Number buttons to enter the time Then press the ENTER button 2 Pres...

Page 18: ...w Disc View TRACK VIEW 04 07 02 05 08 03 06 09 01 example ENTER INDEX VIEW 04 07 02 05 08 03 06 09 01 example TITLE SUBTITLE AUDIO MARK RETURN KARAOKE SEARCH 1 Program Play DVD VCD CD 1 Press the MODE button 2 Use the button to select PROGRAM Press the ENTER button 3 Use the button to select the first chapter or track to add to the program Press the ENTER button The selection numbers appear in the...

Page 19: ...VD The audio and subtitle languages are represented by abbreviations 3 Use the button to select STEREO R CHANNEL or L CHANNEL On VCD CD You can select a desired subtitle quickly and easily with the SUBTITLE button 1 Press the SUBTITLE button 2 Use the button to select the desired subtitle language 3 Use the button to determine whether or not the subtitle will be displayed Initially the subtitling ...

Page 20: ...als Depending on the disc the Zoom and 3D Sound function may not work 3D Sound Function Using the Zoom DVD VCD 2 3 4 5 6 7 8 9 0 TRK AUTO TRK SHUTTLE ZOOM 3D SOUND S FIT MODE REPEAT SPEED STEP F ADV DISPLAY CLOCK COUNTER CLEAR Off 3D 1 3D TITLE SUBTITLE AUDIO MARK RETURN KARAOKE SEARCH ENTER 1 PLAY CLEAR 1 Using the Mark Function DVD VCD The Mark function lets you select parts of a DVD or VCD MENU...

Page 21: ...he top and bottom of the screen when a movie is playing in the Widescreen format 16 9 Screen Fit will not work when the Zoom mode is active you can not remove the black bars on the screen However Zoom mode will work when Screen Fit is active Various aspect ratios are available only in multiple screen format discs This function does not work when a DVD has been recorded in a multi camera angle form...

Page 22: ...ain Depending on the disc some Setup Menu selections may not work ENTER RETURN SETUP MENU 1 Player Menu English 2 Disc Menu English 3 Audio English 4 Subtitle Automatic 5 Parental Unlocked 6 Audio Options 7 Display Options Pressing the KARAOKE button twice displays the following in Karaoke ON mode The function to make the music only sound by cancelling vocal when playing a Karaoke disc VOCAL FADER...

Page 23: ...ge ENTER RETURN AUDIO LANGUAGE 1 English 2 Français 3 Deutsch 4 Español 5 Italiano 6 Nederlands 7 Original 8 Others ENTER RETURN SUBTITLE LANGUAGE 1 Automatic 2 English 3 Français 4 Deutsch 5 Español 6 Italiano 7 Nederlands 8 Others GB 42 If you set the player menu disc menu audio and subtitle language in advance it will come up automatically every time you watch a movie Using the Player Menu 1 Wi...

Page 24: ...ital Out PCM 2 MPEG 2 Digital Out PCM 3 DTS Off 4 Dynamic Compression On 5 2X Scan Audio On GB 44 The Parental Control function works in conjunction with DVDs that have been assigned a rating which helps you control the types of DVDs that your family watches There are up to 8 rating levels on a disc 1 With no disc playing press SETUP The Setup Menu screen appears 2 Use to select Parental Press ENT...

Page 25: ...on 3 Use the button to select the desired item Then press the button TV ASPECT 4 3 LETTER BOX Select when you want to see the total 16 9 ratio screen DVD supplies even though you have a TV with a 4 3 ratio screen Black bars will appear at the top and bottom of the screen 4 3 PAN SCAN Select this for conventional size TVs when you want to see the central portion of the 16 9 screen Extreme left and ...

Page 26: ... current problem and follow the procedure once again If the problem still cannot be solved please contact your nearest authorized service center Problem Action Page Before requesting service troubleshooting P26 P29 32 P34 37 P46 47 P46 P45 P44 GB 48 Problems and Solutions VCP Before contacting the Samsung after sales service perform the following simple checks Problem Explanation Solution No power...

Page 27: ...THIS APPLIANCE IS DISTRIBUTED BY www samsungvcr com AC68 01718A 01 ELECTRONICS 01718A DVD V12000MC GB4 5 24 02 9 57 AM Page 50 ...

Reviews: