background image

T

ROUBLESHOOTING 

& M

AINTENANCE

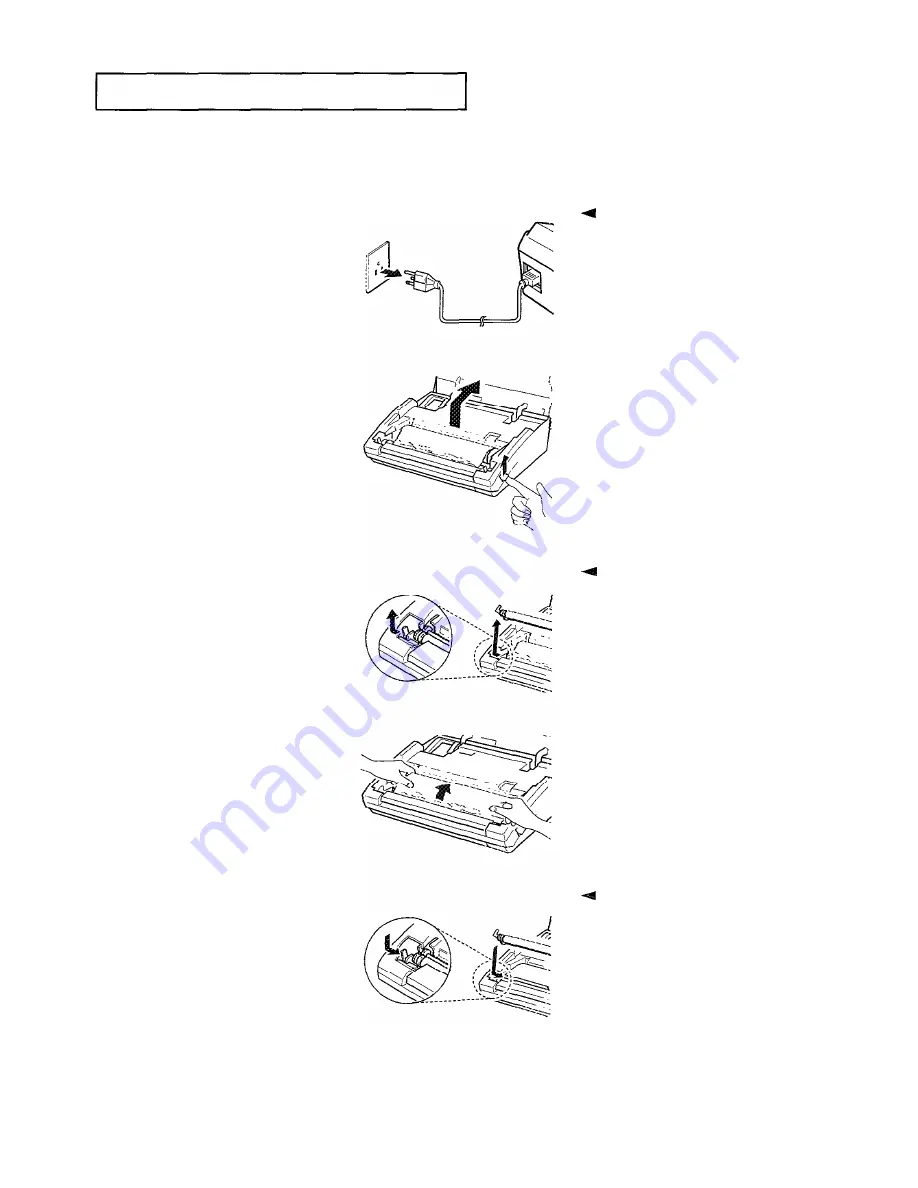
Paper Jams During Reception

1

 If the fax paper jams while you are

receiving, do 

NOT 

pull it out. Doing so

Unplug the power cord.

 could harm the fax machine.

2

Open the Cover by lifting
up the Release Lever on

the side of the fax
machine.

.

3

Raise the Roller.

 While pushing outward on each

white tab, lift the Roller and out of

the  machine.

4

Remove the jammed

 Make sure it locks into place.

5

Replace the Roller following
the reverse order of step
3.

C

HAPTER 

F

IVE 

T

ROUBLESHOOTING 

& M

AINTENANCE 

5.

3

Summary of Contents for FX100

Page 1: ...Operator s Guide FACSIMILE FX100 Please read this guide before you use this equipment ...

Page 2: ......

Page 3: ...e of power that is supplied to your home or office call your electric company Grounding It must be plugged into a grounded outlet for your safety If you can t insert the plug into your wall outlet easily the outlet should be inspected by a qualified electrician Overload Don t plug too many electrical devices into a wall outlet or extension cord An overloaded outlet is a fire and electrical shock h...

Page 4: ...stions about your telephone line such as how many pieces of equipment you can connect to it the telephone company will provide this information upon request In certain circumstances it may be necessary for the telephone company to request information from you concerning the equipment you have connected to your telephone line Upon request of the telephone company provide the FCC Registration Number...

Page 5: ...this information into your fax machine you should complete the steps on page 2 7 If a Problem Arises If any of your telephone equipment is not operating properly you should immediately remove it from your telephone line as it may cause harm to the telephone network If the telephone company notes a problem it may temporarily discontinue service When practical the telephone company will notify you i...

Page 6: ...acility designated by the supplier Any repairs or alterations made by the user to this equipment or equipment malfunctions may give the telecommunications company cause to request the user to disconnect the equipment Users should ensure for their own protection that the electrical ground connections of the power utility telephone lines and internal metallic water pipe system if present are connect...

Page 7: ...oute réparation d un appareil certifié devrait être effechée dans un centre d entretien approuvé par le fournisseru Toute réparation ou modification apportée par l utilisateur à son appareil ou tout problème de fonctionnement purrait forcer votre compagnie téléphonique àdébrancher votre appareil L utilisateur devrait s assurer que les raccordements de mise à la terre de l alimentation des lignes t...

Page 8: ...r Name and Number 2 7 Using the Keypad to Enter Letters 2 9 Keypad Character Assignments 2 9 Checking Dial Type 2 10 Sending a Fax 3 1 Preparing a Document 3 1 Setting Resolution and Contrast 3 2 Loading a Document 3 3 Dialing a Number 3 3 Confirming the Transmission 3 5 Canceling Transmission 3 5 Receiving a Fax 3 6 Reception Modes 3 6 Receiving in TEL Mode 3 6 Receiving in FAX Mode 3 7 Receiving...

Page 9: ...ng a Number 4 6 Searching Memory for a Number Directory Dialing 4 7 Using Chain Dialing 4 8 Using REDIAL PAUSE 4 9 Using TONE 4 10 Using FLASH 4 11 User Options 4 12 Setting an Option 4 12 Setting Fax Options 4 13 User Reports 4 14 Printing Reports 4 14 Clearing Memory 4 16 Clearing Jams 5 1 Document Jams During Transmission 5 1 Paper Jams During Reception 5 3 Understanding Error Messages 5 5 Clea...

Page 10: ...C h a p t e r O n e ...

Page 11: ...ine check to make sure that you have all the parts shown here If any piece is missing or broken call your dealer Handset Main Body Handset Cord Power Cord This Manual Thermal Paper Roll Quick Reference Guide Phone Line Cord Name Card CHAPTER ONE YOUR NEW MACHINE 1 1 ...

Page 12: ...your new machine by looking at the pictures on the next few pages LCD display Handset Use this as you would use a telephone handset Control Panel Cover Release Lever Slide upward to open the paper cover Recording Paper Exit C o p y a n d f a x p r i n t o u t s this slot Feed the document to fax or copy 1 2 CHAPTER ONE YOUR NEW MACHINE ...

Page 13: ...is socket Speaker Phone Socket TEL LINE The telephone line cord connects to Handset Socket This is where you connect the Handset to the machine Extension Socket EXT LINE Connect a normal phone or an answering machine whichever you need CHAPTER ONE YOUR NEW MACHINE 1 3 ...

Page 14: ...ame Card Attach this card and write down the names and numbers stored in the One Touch buttons One Touch Buttons 1 5 Press to make calls and send documents simply by pressing one button INS Press to insert one letter or number when editing a number or name DEL Press to delete one letter or number when editing a number or name LCD Shows the date and time or what the machine is doing TONE Press to t...

Page 15: ...de or to move the cursor to the digit you want to edit STOP Press to stop the machine in the middle of a job clear an error display or eject your original document START COPY ENTER Press to start a job or copy a document SPEED DIAL Press to make calls and send documents by entering a 2 digit number 01 to 30 Press to search for a number in the autodialer FLASH Press to transfer a call in a PABX Pri...

Page 16: ...C h a p t e r T w o ...

Page 17: ...enings aren t blocked It s at least 4 inches away from other objects Its cords won t get in the way of people or other equipment It can t be knocked off a table or dropped 1 Connect the coiled Handset cord Plug one end of coiled cord into the jack on the Handset Then plug the other end into the HANDSET jack on the left side of the machine 2 Connect the telephone line 4 Plug one end of the telephon...

Page 18: ...ntact an electrician to replace the obsolete outlet Installing Paper 1 Unplug the power cord 2 Open the Cover by lifting the Release Lever on the side of the fax machine 3 Insert the paper roll 4 If there is an adhesive sticker sealing the paper roll remove it completely Be sure the paper exits from the top of the roll as shown The outer diameter of the paper roll should not exceed 2 05 in total l...

Page 19: ... machine 5 Close the Cover 4 Press down on the Cover using both hands until it snaps into place 6 Connect the AC power cord Copy a document to make sure that the machine is working properly 1 Choose a document you want to copy For information on preparing a document see page 3 1 CHAPTER Two INSTALLATION AND SETUP 2 3 ...

Page 20: ...the copy quality copy Press CONTRAST and then DIRECTION 4 or to compensate for light or dark documents For more information on resolution and contrast see page 3 2 5 Press START COPY The document feeds through the machine as a copy is made 4 When copy completes the fax machine sounds several beeps To copy more documents insert the next sheet while the fax machine is beeping The fax machine makes a...

Page 21: ...hine s Ringer volume by pressing VOLUME 4 of on the Control Panel in Standby mode The LCD shows Ringer volume level 4 The indicates the current Ringer volume level Pressing increases the volume and 4 decreases it Setting Date and Time 1 Press FUNCTION 2 Press 2 The LCD shows 2 DATE TIME 2 D A T E T I M E 4 The LCD sequentially shows the different settings you can change ...

Page 22: ...The LCD shows the preset date and time 1 0 0 3 9 5 0 7 0 5 6 4 In either format the day and month should each be entered as a two Use the Number Keypad to digit number 01 to 31 and 01 to 12 enter date and time and time should be entered as 24 hour through Number Keypad format that is to set 7 o clock p m You can also move the press 1900 cursor under the digit you want to change by pressing DIRECTI...

Page 23: ...1 1 5 1 0 3 0 F A X Setting the Terminal ID Your Name and Number Your Terminal ID will be printed at the top of each page sent from your machine a The LCD sequentially shows the different settings you can change Press FUNCTION 2 Press 1 The LCD asks you if you want to set the Terminal 1 TERM ID ID 1 CHAPTER TWO INSTALLATION AND SETUP 2 7 ...

Page 24: ...ing the Number Keypad enter your number Press ENTER when the number in the LCD IS correct The LCD asks you for the name NAME 4 You may enter up to 20 digits You can also include special characters space hyphen or plus sign in the number to help improve readability Press REDIAL PAUSE for a space for hyphen and for plus sign If you have previously set the Terminal ID the machine displays the current...

Page 25: ... press 6 labeled MNO Each time you press 6 the display shows a different letter first M then N O and finally 6 4 To insert one letter move the cursor to the position where you want to insert and press INS then enter new letter To delete one letter move the blinking cursor to the position you want to delete press DEL 4 Select additional letters in the same way If you enter a wrong letter press DIRE...

Page 26: ... 4 12 User Options and 4 13 Setting Fax Options and set the Dial Type to MF Tone Then 1 Pick up the Handset and dial any digit between 2 and 9 2 If the dial tone disappears you have properly set your machine s dial type option and hang up the phone If the dial tone is still present hang up the Handset and proceed to step 3 below 3 If the dial tone did not disappear in step 2 set the Dial Type to D...

Page 27: ......

Page 28: ...Chapter Three The Fax Machine ...

Page 29: ...lue lines on a ruled pad don t fax well The unit can transmit documents with the following sizes 8 5 Maximum up to a maximum of 59 DO NOT attempt to feed the following document types into the unit as they may jam Instead make a photocopy and send the copy Wrinkled or creased Curled or rolled paper paper or fax paper Torn paper Carbon or carbon backed paper Coated paper Too thin less than 0 003 or ...

Page 30: ... documents containing a lot of detail When FINE is selected the indicator lights PHOTO is used for faxing photographs or other documents containing color or shades of gray When PHOTO is selected the indicator flashes Press CONTRAST and then DIRECTION 4 or to compensate for light or dark documents If you press the CONTRAST button with a document loaded the indicator lights While the LCD display sho...

Page 31: ...es and pulls in the document The LCD shows the message DOCUMENT LOADING DOCUMENT LOADING The resolution and 4 For more information on resolution contrast settings appear in NORMAL and contrast see page 3 2 the LCD Dialing a Number 1 Pick up the handset The LCD shows the message PHONE PHONE I For hands free operation you can use OHD CHAPTER THREE THE FAX MACHINE 3 3 ...

Page 32: ...n For more information see pages 4 3 4 4 4 If a person answers the telephone ask him her to press the START button so that you can send the document 4 You can send or receive a Voice Request while sending a fax For more information on the Voice Request feature see page 3 10 If you want to send more documents insert the next sheet while the fax machine is beeping The LCD shows the message SENDING S...

Page 33: ...r messages and their meanings see page 5 5 If you get an error message press STOP to clear the message and try to send the document again You can set your machine to print a Confirmation Report automatically after each transmission For more information see page 4 12 Canceling Transmission 1 Press STOP at any time to cancel transmission The fax transmission is canceled and the machine returns to St...

Page 34: ... machine In AUTO mode the machine answers incoming faxes automatically If no fax signal is detected the machine gives a secondary ringing tone to advise you of an incoming call When the machine is in Standby mode the LCD shows the current reception mode If you rarely use the fax line for voice conversation set the fax machine to receive faxes automatically by selecting either FAX or AUTO mode Rece...

Page 35: ...the reception is complete Receiving in FAX Mode 1 Press RECEIVE repeatedly until FAX appears in the LCD FAX appears in the LCD and the RECEIVE indicator 11 15 10 30 FAX lights 4 When you get a call in FAX mode the machine answers the call on the second ring and starts receiving a fax You can change this number of rings For more information see page 4 12 When reception is complete the machine retur...

Page 36: ... off or is not connected to your fax machine the fax machine will automatically go into receive mode after 6 rings Receiving in AUTO Mode 1 Press RECEIVE repeatedly until AUTO appears in the LCD a When you get a call in AUTO mode the machine answers the call on the second ring and starts receiving a fax when detected fax tone You can change this number of rings For more information see page 4 12 I...

Page 37: ...chine receives the fax 2 Hang up the extension telephone Canceling Reception 1 Press STOP at any time to cancel reception The fax reception is canceled and the machine STOP PRESSED returns to Standby mode Q Press the buttons slowly in sequence If you still hear the fax tone from the remote machine try pressing 9 once again 9 is the Remote Receive Start Code preset at the factory The first and the ...

Page 38: ...e rings pick up the Handset and answer it 3 When you are finished hang up the Handset 4 You can t talk with the other person and send a fax at the same time If you can t seem to alert the other person it may be because the remote fax machine doesn t have the Voice Request feature The person on the remote end has 15 seconds to pick up the Handset If no one answers your machine returns to Standby mo...

Page 39: ...e original document is not in the office The person who wants to receive the document calls the machine holding the original and requests that the document be sent In other words it polls the machine holding the original Lift the Handset or press OHD 2 Enter the number of the remote machine 4 There should be no documents loaded in your machine and the remote machine must be ready for your call tha...

Page 40: ...ines from the remote machine from different manufacturers Therefore press V REQ POLL polling may fail in some cases even when poll code is not used Your machine starts to receive the document other fax machines cannot poll a Your fax machine cannot be polled so document from your machine The LCD shows POLLING POLLING 3 12 CHAPTER THREE THE FAX MACHINE ...

Page 41: ......

Page 42: ...C h a p t e r F o u r ...

Page 43: ...o remind you how to set a particular function Print Out the Help List 1 Press HELP while in Standby mode The machine prints the Help list Using Function Menu 4 If you press a button while the LCD is cycling through the function menu the machine assumes you want to change the function setting corresponding to that button choice If you don t press any buttons the LCD display cycles through all choic...

Page 44: ...E next function 2 When the function you want appears in the LCD press ENTER You will be guided through the setup choices 3 Press STOP at any time to exit the function menu 4 If you press a button while the LCD is cycling through the function menu the machine assumes you want to change the function setting corresponding to that button choice If you don t press any buttons the LCD display cycles thr...

Page 45: ...sks you for a te ephone number 2 Enter the number you want to store by using the Number Keypad 4 If there is a number or name already assigned in the selected One Touch button the number or name is displayed If you want to change the number or name enter new number or name over the old If not press STOP STORE ONE TOUCH 3 TEL TONE 3 When the number appears correctly in the LCD press ENTER The LCD a...

Page 46: ... returns to Standby mode If necessary start over again Storing a Number for Speed Dialing 1 4 You can store up to 30 telephone or Press and hold SPEED DlAL fax numbers into 2 digit Speed Dial until STORE SPEED DIAL memory appears in the LCD If there is a number or name already assigned to the selected Speed Dial button the number or name is displayed If you want to change the number or name enter ...

Page 47: ...lay This P will cause a few seconds pause when dialing If you make a mistake use DIRECTION 4 or to move the cursor to the incorrect digit and enter new one over it You can also use INS or DEL buttons 4 If you assign a name to the number you can take advantage of the Directory dialing feature of your machine For information on Directory dialing see page 4 7 You can enter up to 20 letters For inform...

Page 48: ...SSIGNED appears in the LCD To store a number see page 4 3 4 If you picked up the Handset or pressed OHD DIALING will not be shown in LCD It directly dials the number stored in that button If a document is loaded and you press a One Touch button without pressing OHD or picking up the Handset the machine automatically sends the document 1 4 For hands free operation use OHD If there is no number stor...

Page 49: ...y 1 Press SPEED DIAL The LCD asks you to enter the Speed Dial number SPD N0 01 30 2 Q Pressing allows you to search forward through the memory in Speed Press DIRECTION or Dial number order from 01 to 30 and to move backward or forward through the 4 allows you to search in reverse order directory until you find the number you want 3 When the number you want appears press ENTER to dial the number CH...

Page 50: ...a document using Chain Dialing load a document face down into the Document Feeder If you have pulse dialing service be sure to include a pulse to tone mode change in front of the numbers that you want to dial after the computer service answers The LCD shows the message PHONE PHONE 2 4 For example your long distance carrier s number using either Number Enter a telephone number Keypad One Touch butt...

Page 51: ...ot be redialed by pressing REDIAL PAUSE For example you dialed 1234 and conversation FLASH 5678 and conversation and hung up the phone After a moment when you press REDIAL PAUSE to redia1 5678 your fax machine will actually dial 1234 not 5678 4 If a document is loaded and you press a REDIAL PAUSE without pressing OHD or picking up the Handset the machine automatically sends the document With some ...

Page 52: ...u have pulse service you can still send tone signals by following steps Dial the number using pulse dialing 2 When the special service answers press TONE Any numbers you press are sent by tone not pulse for the remainder of the call 4 TONE can be stored in memory One Touch Speed Dial Redial When you dial the number in memory dialing stops at the TONE entry To dial the remaining numbers press REDIA...

Page 53: ...andset and dialing the number of that person Call Waiting Call Waiting service offered by most U S and Canadian telephone companies allows you to hear an alert tone or beep when a third party dials your number and you are already in a conversation with another party If you happen to be conduction a regular voice conversation and hear the alert tone in the telephone receiver or on the speaker depre...

Page 54: ...t how the options are currently set print the System Data List For more information on printing a report see page 4 14 Setting an Option 1 Press FUNCTION 2 Press 3 on the Number Keypad for user options The LCD shows 3 SYSTEM DATA 3 SYSTEM DATA 3 Press ENTER to set user options The LCD shows the message CONFIRM REPORT COMFlRM REPORT 4 12 CHAPTER FOUR SPECIAL FEATURES ...

Page 55: ...mote Receive Code The Remote Receive Code allows you to initiate a fax receive from an extension phone plugged into the EXT LINE jack If you pick up the extension and hear a fax tone you can enter the Remote Receive Code and the fax will start receiving The password is preset to 9 at factory The first and the last s are fixed but you can change the middle character from 0 to 9 Enter the number you...

Page 56: ...s of the most recent transmissions and receptions the phone numbers that were called etc System Data List This list shows the status of the user selectable options After you change the settings print this list to confirm your changes Tel Number List This list shows all numbers currently stored in One Touch and Speed Dial numbers Before changing or adding automatic dial numbers print this report to...

Page 57: ...R The LCD shows CONFIRM REPORT C O N F I R M R E P O R T The LCD shovvs the name of the report you have selected TX RX JOURNAL Lists available CONFIRM REPORT TX RX JOURNAL SYSTEM DATA LIST TEL NUMBER LIST 5 Press ENTER The specific list is printed CHAPTER FOUR SPECIAL FEATURES 4 15 ...

Page 58: ...emory 1 Press FUNCTION 2 Press 5 3 Press ENTER 4 Select the desired menu by using DIRECTION 4 or b The LCD shows the menu you have selected Menus available TERM ID TERM ID TX RX JOURNAL SYSTEM DATA ONE TOUCH DIAL SPEED DIAL 4 16 CHAPTER FOUR SPECIAL FEATURES The LCD shows 5 MEMORY CLEAR ...

Page 59: ... to clear the ARE YOU SURE memory 6 If you want to clear the memory press ENTER The LCD shows the message MEMORY CLEARED 4 Then the machine returns to Step 4 MEMORY CLEARED SO that you can select other memory locations to clear Press STOP to return to Standby mode CHAPTER FOUR SPECIAL FEATURES 4 17 ...

Page 60: ......

Page 61: ... 1 Unplug the power cord 4 If a document jams during transmission do NOT pull the document out of the slot Doing so could harm the fax machine Open the Cover by lifting up the Release lever on the side of the fax machine 4 While pushing outward on each white tab lift the Roller up and out of the machine 4 Remove the jammed document CHAPTER FIVE TROUBLESHOOTING MAINTENANCE 5 1 Clearing Jams 2 3 Rai...

Page 62: ...he Roller following the reverse order of step 3 Make sure it locks into place 6 Close the Cover firmly 4 Press down on the Cover using both hands until it snaps into place Plug in the power cord 7 5 2 CHAPTER FIVE TROUBLESHOOTING MAINTENANCE ...

Page 63: ...ld harm the fax machine 2 Open the Cover by lifting up the Release Lever on the side of the fax machine 3 Raise the Roller 4 While pushing outward on each white tab lift the Roller and out of the machine 4 Remove the jammed a Make sure it locks into place 5 Replace the Roller following the reverse order of step 3 CHAPTER FIVE TROUBLESHOOTING MAINTENANCE 5 3 ...

Page 64: ...TROUBLESHOOTING M AINTENACE 6 Close the Cover firmly Press down on the Cover using both hands until it snaps into place 7 Plug in the power cord 5 4 CHAPTER FIVE TROUBLESHOOTING MAINTENANCE ...

Page 65: ...ecording paper or Cover is open Understanding Error Messages This may happen when several all black copies are received When the machine cools down it will automatically return to Standby mode The Handset has been accidentally lifted after sending or receiving is completed Alarm tone sounds along with the error message Replace the Handset or press STOP Your unit cannot connect with the called mach...

Page 66: ...y are dirty documents sent to other fax machines won t be clear 2 Open the Cover 3 Release the Guide using both hands by pulling it in the direction of arrow 4 Raise the Roller 5 Wipe the Roller surface with fax cleaning wipes 4 While pushing outward on each white tab lift the Roller up and out of the machine 1 Unplug the power cord 5 6CHAPTER FIVE TROUBLESHOOTING MAINTENANCE ...

Page 67: ...fax cleaning wipe 7 Replace the Roller following the reverse order of step 4 8 Replace the Guide 9 Close the Cover firmly Plug the power cord back in 4 Press down on the Cover using both hands until it snaps into place CHAPTER FIVE TROUBLESHOOTING MAINTENANCE 5 7 10 ...

Page 68: ...per can produce poor results and even damage your fax machine Contact your dealer for more information on paper Store rolls in a cool dark place at or below 76 F and avoid humidity higher than 65 To keep fax pages from darkening and fading keep them out of direct sunlight Avoid temperatures above 105 F Don t let them come in contact with blueprints diazo copies plastic films or transparent tape Ke...

Page 69: ......

Page 70: ...A p p e n d i x ...

Page 71: ...g CIS Contact Image Sensor Printer Thermal Print Head Input Document Width 8 5 in 216mm Effective Scanning Width 8 27 in 210mm f 1 Recording Width 8 5 in 216mm Thermal Paper Roll Size 98 4ft x 8 5 in 30m x 216mm wide 0 5 in 12 7mm diameter core Power Requirement 120V AC 60 Hz Power Consumption Standby 5 Watt Maximum when in use 120 8 Watt Temperature Range 50 to 95ºF 10 to 35ºC Humidity Range 20 t...

Page 72: ... and is the only acceptable proof of purchase It must be presented to the authorized service center at the time service is requested Exclusions This warranty does not cover damage due to accident fire flood and or other acts of God misuse incorrect line voltage improper or unauthorized repairs commercial use or damage that occurs in shipping Exterior and interior finish batteries lamps and glass a...

Page 73: ......

Page 74: ......

Page 75: ......

Page 76: ...Printed in Korea P N JF68 60011A ...

Reviews: