


54
Creating Contacts
1.
From a Home screen, tap
(
Apps
)
➔
(
Contacts
).
2.
Tap
(
New
) to create a contact.
3.
Tap an account or
Device
.
4.
Tap the
Photo ID to set up a photo to identify the contact.
• Album
: Choose a photo from the Gallery.
• Take photo
: Display the Camera and take a photo of the contact.
5.
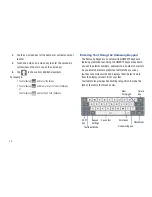
Tap contact fields to display the keyboard and enter
information:
Tip:
Tap the screen and swipe up or down to display additional fields or tap
Next
on the keypad to move to the next field.
• Given name
: Enter a first name for the contact.
• Family name
: Enter a last name for the contact. Tap
to enter a
Name prefix
,
Middle name
, and
Name suffix
.
• Phone number
: Enter a telephone number, then tap the
Label
tab to choose a label from
Mobile
,
Home
,
Work
,
Work Fax
,
Home
Fax
,
Pager
,
Other
,
Custom
(to create a custom label), or
Callback
.
Note:
These labels entries can change and are dependant on the selected
destination type (ex: Callback might not appear with a Google account
destination type).
• Internet call
: Enter an Internet call number.
: Enter an email address, then tap the
Label tab to
choose a label from
Work
,
Home
,
Other
, or
Custom
to create a
custom label.
• Instant messenger
: Enter an IM address, then tap the
Label
tab to choose a label from
Google Talk
,
AIM
,
Windows Live
,
Yahoo
,
Skype
,
,
ICQ
,
Jabber
, and
Custom
.
• Groups
: Assign the contact to a group, then tap the
Label tab
to choose a group from
Not assigned, Co-workers
,
Family
,
Friends
, and so on. For more information about Groups, see
“Groups”
on page 61.
• Address
: Enter an address, then tap the
Label tab to choose a
label from
Home
,
Work
,
Other
, or
Custom
to create a custom
label.
• Organization
: Enter a company name and job title.


