58
Joining Contact Information
Most people now maintain multiple email accounts, social
networking logins, and other similar account information. For
example, a Facebook account login name might differ from a
corporate email account login because they are maintained
separately and for different groups of people.
Your device can synchronize with multiple accounts, including
Google, Corporate Exchange, and other email providers. When
you synchronize contacts from these accounts with your device,
you may have multiple contacts for one person.
Linking, or joining, imported contact records allows you to see all
the contact’s numbers and addresses together in one contact
entry. Linking also helps you keep your contacts updated,
because any changes that your contacts make to their
information in the respective accounts is automatically updated
the next time you synchronize with the account.
Joining Contacts
1.
From a Home screen, tap
(
Apps
)
➔
(
Contacts
).
2.
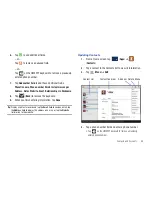
Tap a contact in the
Contacts
list to view its information.
3.
Tap
(
Menu
)
➔
Join contact.
4.
Tap the selected contact entries from the list on the left
(the entry in which to link).
Note:
The information is still maintained in both entries, but displays in one
record for easier viewing when you link the contacts.
Important!:
It is the second contact image that is displayed for both, but the
first contact’s name that is used.
For example: If Amy (original entry) is joined with Julie (second
entry). Julie appears to disappear and only Amy remains. Tap the
Amy entry (showing the Julie image) to view both.
5.
Assign a primary entry by tapping
Set as primary
. For more
information, refer to
“Marking a Contact as Primary”
on
page 59.
6.
Tap
Join
.These contacts are now linked with the first and
the account information is merged into one screen.
The joined contact’s information is displayed with the
original contact’s information.
Unjoining a Contact
1.
From a Home screen, tap
(
Apps
)
➔
(
Contacts
).
2.
Tap a contact in the
Contacts
list to view its information.


