background image

ENG - 4

03  CONNECTING THE SOUNDBAR

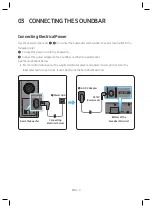
Connecting Electrical Power

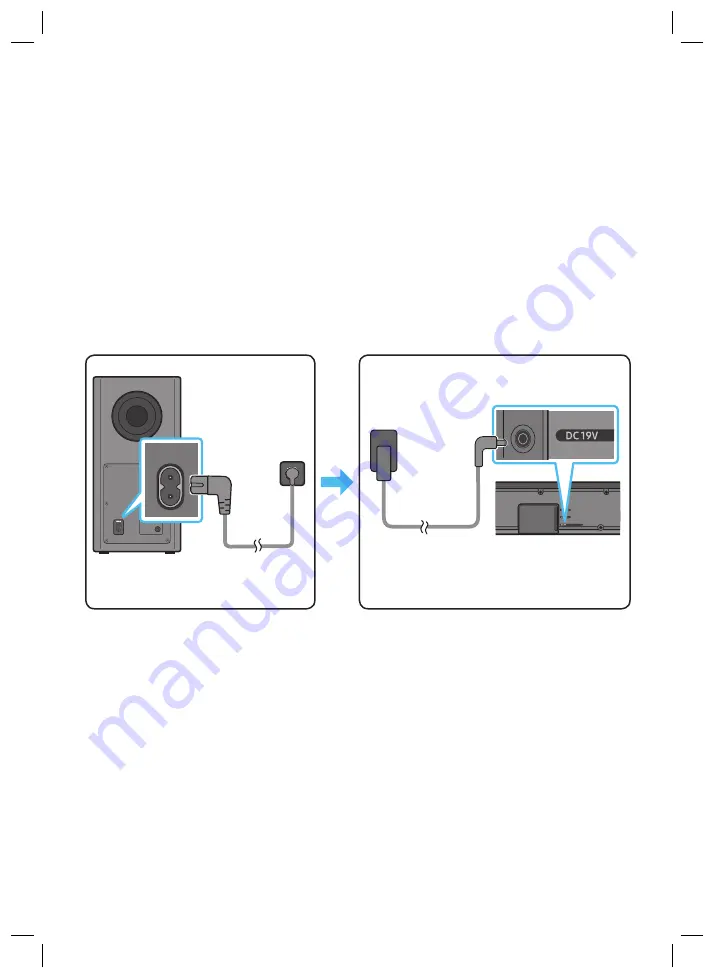
Use the power components (

1

2

) to connect the Subwoofer and Soundbar to an electrical outlet in the 

following order:  

Connect the power cord to the Subwoofer.

Connect the power adapter to the Soundbar and then to a wall socket.

See the illustrations below.


For more information about the required electrical power and power consumption, refer to the 
label attached to the product. (Label: Bottom of the Soundbar Main Unit)

POWER

Rear of Subwoofer

1


Power Cord

Connecting 

Electrical Power

Bottom of the 

Soundbar Main Unit

AC/DC Adapter

DC 19V 

(Power Jack)

Summary of Contents for Harman Kardon HW-Q7CR

Page 1: ...USER MANUAL HW Q7CR...

Page 2: ...is symbol instructs the user to consult the user manual for further safety related information WARNING To reduce the risk of fire or electric shock do not expose this appliance to rain or moisture To...

Page 3: ...and receiver Connecting the equipment to an outlet that is on a different circuit than the radio or TV Consulting the dealer or an experienced radio TV technician for help FCCRadiationExposureStatemen...

Page 4: ...ot covered Do not place the unit on amplifiers or other equipment which may become hot This unit is designed for continuous use To fully turn off the unit disconnect the AC plug from the wall outlet U...

Page 5: ...ion components connections and product specifications FULLMANUAL You can access the FULL MANUAL on Samsung s on line customer support center by scanning the QR code on the left To see the manual on yo...

Page 6: ...r and the Soundbar 5 Manually connecting the Subwoofer if automatic connection fails 6 Connecting an SWA 8500S Sold Separately to your Soundbar 7 04 ConnectingtoyourTV 9 Method 1 Connecting with a Cab...

Page 7: ...20 Adjusting the Soundbar volume with a TV remote control 23 08 InstallingtheWallMount 24 Installation Precautions 24 Wallmount Components 24 09 InstallingtheHolder Feet 26 Holder Feet Components 26 1...

Page 8: ...ower consumption refer to the label attached to the product Label Bottom of the Soundbar Main Unit The power components are labelled 1 2 For more information about power connections see page 4 To purc...

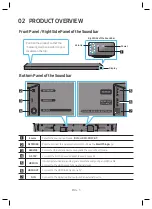
Page 9: ...HDMI WIFI BT NETWORK Press to connect to a wireless network Wi Fi via the SmartThings app SERVICE Connect a USB storage device to upgrade the product s software DC19V Connect the AC DC power adapter...

Page 10: ...to the Subwoofer 2 Connect the power adapter to the Soundbar and then to a wall socket See the illustrations below For more information about the required electrical power and power consumption refer...

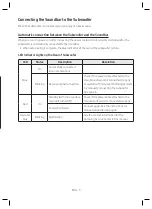
Page 11: ...ofer LED Status Description Resolution Blue On Successfully connected normal operation Blinking Recovering the connection Check if the power cable attached to the main Soundbar unit is connected prope...

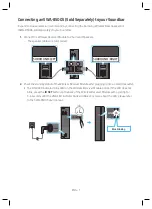
Page 12: ...rns off and the blue indicator blinks 5 Sec RearofSubwoofer 2 Press and hold the Upbutton on the remote control for at least 5 seconds The IDSET message appears on the display of the Soundbar for a mo...

Page 13: ...3 SURROUND RIGHT SURROUND LEFT SURROUND RIGHT 2 Check the standby status of the Wireless Receiver Module after plugging it into an electrical outlet The LINK LED indicator blue LED on the Wireless Re...

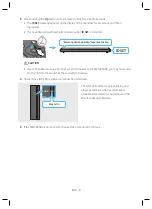
Page 14: ...ardon logoisonthetop CAUTION If your Soundbar was playing music when it connects to the SWA 8500S you may hear some stuttering from the woofer as the connection finalizes 4 Check if the LINK LED is so...

Page 15: ...r TV is set to PCM we recommend that you change the setting to Dolby Digital When the setting on the TV is changed you will experience better sound quality The TV menu may use different words for Dolb...

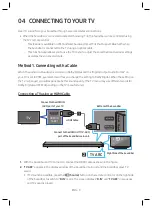
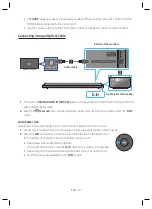
Page 16: ...2 Press the Source button on the right side panel or remote control and then select the D IN mode AutoPowerLink Auto Power Link automatically turns on the Soundbar when the TV is turned on 1 Connect t...

Page 17: ...pears press and hold the Source button on the right side panel of the Soundbar for more than 5 seconds to display BTPAIRING 2 Select Bluetooth mode on the TV For more information see the TV s manual 3...

Page 18: ...utton on the remote control or press and hold the Source button on the right side of the Soundbar for more than 5 seconds while the Soundbar is in BT mode NOTES If asked for a PIN code when connecting...

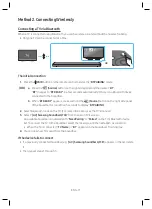
Page 19: ...e When using selected Samsung TVs 2016 2018 Samsung Smart TVs that support Bluetooth If you select WIFI mode when the TV is turned on the TV screen displays a pop up window providing instructions on h...

Page 20: ...r Q7CR Wi Fi ForTVsreleasedin2016 Home Settings Sound Select Speaker AV Samsung Soundbar Q7CR Wi Fi ForTVsreleasedin2015 Menu Sound Speaker List ForTVsreleasedin2014 Menu Sound Speaker Settings Multir...

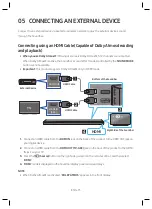
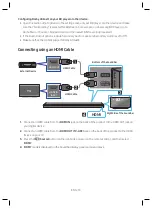
Page 21: ...tant This product supports Dolby Atmos only in HDMI mode HDMI OUT HDMI IN ARC HDMICable HDMICable BottomoftheSoundbar HDMI ExternalDevice RightSideoftheSoundbar 1 Connect an HDMI cable from the HDMIIN...

Page 22: ...o is set to Off Make sure that the content supports DolbyAtmos ConnectingusinganHDMICable HDMI OUT HDMI IN ARC HDMICable HDMICable BottomoftheSoundbar HDMI ExternalDevice RightSideoftheSoundbar 1 Conn...

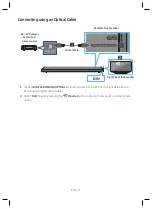
Page 23: ...IN RightSideoftheSoundbar BD DVDplayer Set topbox Gameconsole 1 Connect DIGITALAUDIOIN OPTICAL on the main unit to the OPTICAL OUT jack of the Source Device using a digital optical cable 2 Select D IN...

Page 24: ...rs press and hold the Source button on the right side panel of the Soundbar for more than 5 seconds to display BTPAIRING 2 On your device select AV SamsungSoundbarQ7CR from the list that appears When...

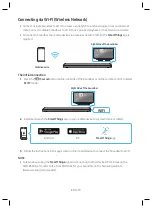
Page 25: ...Theinitialconnection 1 Press the Source button on the right side of the Soundbar or on the remote control to select WIFI mode RightSideoftheSoundbar WIFI 2 Install and launch the SmartThings app on yo...

Page 26: ...FER SOUND MODE PAIR Press the Mute button to mute the sound Press it again to unmute the sound SOUNDMODE VOL WOOFER SOUND MODE PAIR You can select the desired sound mode by choosing STANDARD SURROUND...

Page 27: ...or off Anynet and Auto Power Link are turned on and turned off by the Right and Left buttons respectively Anynet If the Soundbar is connected to a Samsung TV through an HDMI cable you can control you...

Page 28: ...d then use the Up Down buttons to adjust the volume within a 6 to 6 range The VIRTUAL Speaker function can be turned ON OFF by using the Up Down buttons SYNC is only supported for some functions VOL W...

Page 29: ...s remote push up and hold the WOOFER button for 5seconds repeatedly until ALL TVREMOTE appears in the display Then use your TV s menu to select external speakers S O U N D M O D E V O L W O O F E R S...

Page 30: ...unting screws according to the type and thickness of the wall you want to mount the Soundbar on Diameter M5 Length 1 3 8 inches or longer recommended Connect cables from the unit to external devices b...

Page 31: ...wall at each marking If the markings do not correspond to the positions of studs make sure you insert appropriate anchors or mollies into the holes before you insert the support screws If you use anc...

Page 32: ...Wall Mounts down so that the Bracket Wall Mounts rest securely on the Holder Screws 09 INSTALLINGTHE HOLDER FEET Holder FeetComponents x 2 x 2 Holder Foot AH81 09722A Holder Support AH81 09721A x 2 S...

Page 33: ...l Mount assembly on the bottom panel of the Soundbar 10 SOFTWARE UPDATE When the Soundbar is connected to the Internet software updates automatically occur even when the Soundbar is turned off To use...

Page 34: ...teries Isthedistancebetweentheremotecontroland Soundbarmainunittoofar Move the remote control closer to the Soundbar main unit TheredLEDonthesubwooferblinksand thesubwooferisnotproducingsound Thisissu...

Page 35: ...for details 12 LICENSE Manufactured under license from Dolby Laboratories Dolby Dolby Atmos Dolby Audio Dolby Digital Plus Pro Logic and the double D symbol are trademarks of Dolby Laboratories For DT...

Page 36: ...ngineer is called out to your home at your request and there is no defect in the product b You bring the unit to a repair center and there is no defect in the product You will be advised of the amount...

Page 37: ...403 0 mm AMPLIFIER Rated Output power 160W NOTES Samsung Electronics Co Ltd reserves the right to change the specifications without notice Weight and dimensions are approximate Dispose unwanted elect...

Page 38: ...service problems incorrect electrical line voltage fluctuations and surges customer adjustments and failure to follow operating instructions cleaning maintenance and environmental instructions that ar...

Page 39: ...OMMENTS COUNTRY IN THE US 1 800 SAMSUNG 726 7864 www samsung com us support Samsung Electronics America Inc 85 Challenger Road Ridge eld Park NJ 07660 CALL OR VISIT US ONLINE AT WRITE Certi cation mod...

Reviews: