background image

Figures and illustrations in this User Manual are provided for reference only and may differ from actual product 

appearance. Product design and specifications may be changed without notice.

Introduction

This TV B2B (Business to Business) model is designed for hotels or the other hospitality businesses, supports a variety of special functions, 

and lets you limit some user (guest) controls.

Operational Modes

This TV has two modes: Interactive and Stand-alone mode.


y

Interactive mode: In this mode, the TV communicates with and is fully or partially controlled by a connected Set Back Box (SBB) or Set 

Top Box (STB) provided by a hospitality SI (System Integration) vendor. When the TV is initially plugged in, it sends a command that 

attempts to identify the SSB or STB connected to it. If the TV identifies the SBB or STB and the SBB or STB identifies the TV, the TV gives 

full control to the SBB or STB.


y

Stand-alone mode: In this mode, this TV works alone without an external SBB or the STB.

The TV has a Hotel (Hospitality) Menu that lets you easily set its various hospitality functions. Please see pages 21 to 26.

The Menu also lets you activate or de-activate some TV and hospitality functions so you can create your optimal hospitality configuration.

Still image warning

Avoid displaying still images (such as jpeg picture files) or still image elements (such as TV channel logos, panorama or 4:3 format images, 

stock or news bars etc) on the screen. Displaying still pictures continually can cause uneven screen wear, which will affect image quality. To 

reduce the chance that this effect will occur, please follow the recommendations below:


y

Avoid displaying the same TV channel for long periods.


y

Always try to display a full screen image.


y

Reduce brightness and contrast to help prevent the occurrence of after-images.


y

Frequently use all TV features designed to reduce image retention and screen burn-in. Refer to the proper user manual section for details.

Ensuring Proper Ventilation

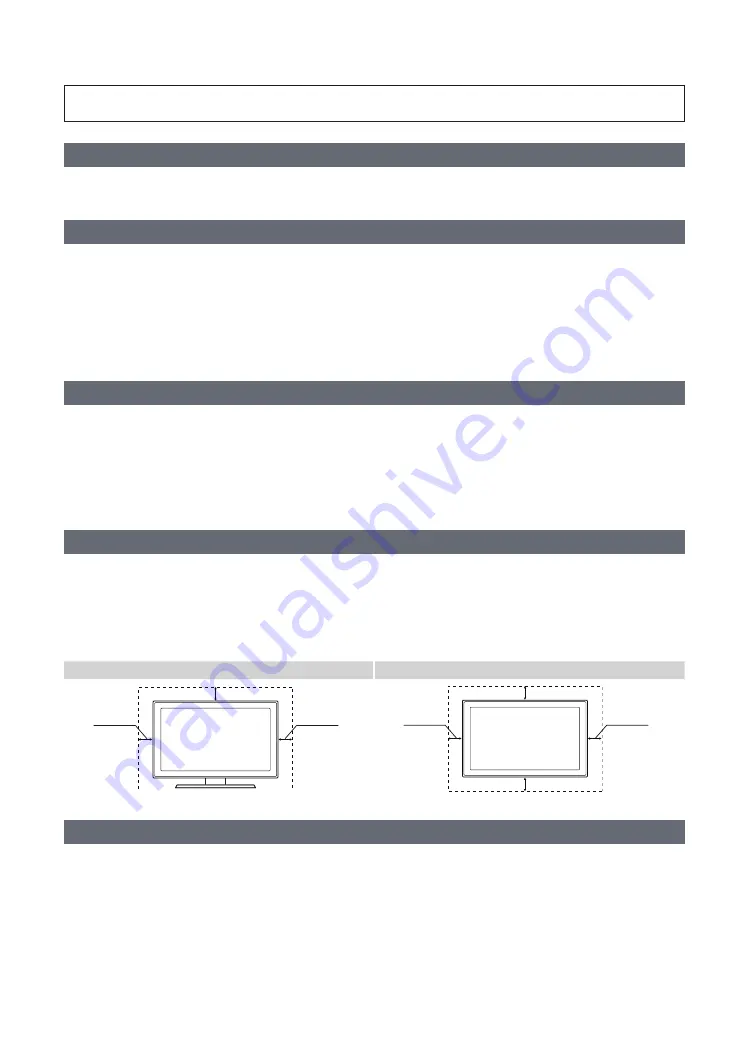
When you install the TV, maintain a distances of at least 4 inches between the TV and other object (walls, cabinet sides, etc.) to ensure 

proper ventilation.

Failing to maintain proper ventilation may result in a fire or problems with the product caused by an increase in its internal temperature.


When using a stand or wall-mount, use parts provided by Samsung Electronics only.


Using parts provided by another manufacturer may cause difficulties with the product or result in injury caused by the product 

falling.

Installation with a stand.

Installation with a wall-mount.

inches

inches

inches

inches

inches

inches

inches

Additional Information


The appearance of the TV and its accessories may differ from the illustrations in this manual, depending on the TV.


Be careful when you touch the TV. Some parts can be hot.

English

Summary of Contents for HG32NJ470

Page 1: ...Thank you for purchasing Samsung product To receive more service please registeryour product at www samsung com Model Serial No LED TV Installation manual ...

Page 2: ... jpeg picture files or still image elements such as TV channel logos panorama or 4 3 format images stock or news bars etc on the screen Displaying still pictures continually can cause uneven screen wear which will affect image quality To reduce the chance that this effect will occur please follow the recommendations below y y Avoid displaying the same TV channel for long periods y y Always try to ...

Page 3: ...oller 13 y y Connecting the TV to the Lodgenet game controller or a STB of a SI vendor 15 y y Connecting the Audio Output to an Audio Amplifier 17 y y Connecting the MediaHub HD 18 y y Connecting the RJP Remote Jack Pack 19 y y Setting the Hotel Option Data 21 y y Installing the Wall Mount 44 y y Securing the TV to the Wall 45 y y Anti theft Kensington Lock 46 y y Specifications and Other Informat...

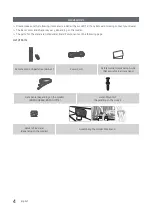
Page 4: ...n the model The parts for the stand are listed under Stand Components on the following page List of Parts Remote Control Batteries AAA x 2 Power Cord Safety Guide Quick Setup Guide Not available in all locations Data Cable depending on the model BN39 00865B BN39 01011E Hotel Mount Kit depending on the model Holder Wire stand depending on the model Assembling the HolderWire Stand ...

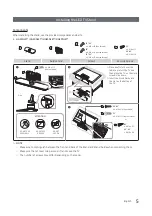
Page 5: ...e to protect the TV and then place the TV on the cloth screen side down Insert the Stand Guide into the slot on the botton of the TV 1 DO NOT USE GREASE ATTENTION DO NOT USE CHEMICALS DO NOT USE OIL Side 2 3 S S S S S S 40 49 x 4 M4 x L14 fine thread C 32 x 4 M4 x L12 coarse thread 32 x 4 M4 x L12 40 49 x 4 M4 x L14 or C D S S S S A B x 4 M4 x L12 coarse thread C NOTE Make sure to distinguish betw...

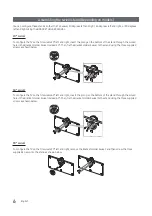
Page 6: ... Bracket Holder Swivel marked 20 Then fix the Bracket Holder Swivel to the stand using the three supplied screws as shown below 60 swivel To configure the TV so that it swivels 60 left and right insert the prong on the bottom of the stand through the curved hole in the Bracket Holder Swivel marked 60 Then fix the Bracket Holder Swivel to the stand using the three supplied screws as shown below 90 ...

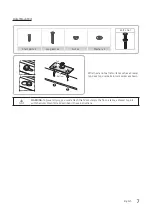
Page 7: ...Bolt Nut Top Bottom Affix the stand to a flat surface such as a dresser top desk top or entertainment center as shown WARNING To prevent injury you must attach this TV securely to the floor a table a dresser top etc with the Hotel Mount Kit as described in these instructions ...

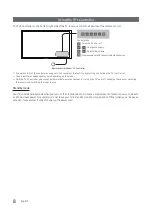
Page 8: ...y pressing and holding the TV s controller The product color and shape may vary depending on the model With the TV s Controller you cannot perform other operations except for turning the TV on or off changing the channel adjusting the volume and switching the input source Standby mode Your TV enters Standby mode when you turn it off and continues to consume a small amount of electric power To be s...

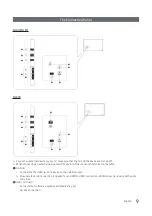
Page 9: ...2 4 6 8 5 GAME CONTROL DATA Connect an external device to your TV make sure that the TV and the device are turned off When connecting an external device match the color of the connection terminal to the cable 1 HDMI IN Connects to the HDMI jack of a device with an HDMI output No separate sound connection is needed for an HDMI to HDMI connection HDMI connections carry both audio and video 2 USB CLO...

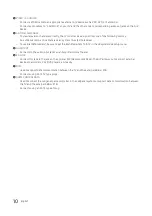
Page 10: ...78 models be sure to set the Blan Mode item to ON in the Hospital mode setup menu 5 AUDIO OUT Connects to the audio input jacks on an Amplifier Home Theater 6 EX LINK Connect this jack to the jack on the optional RJP Remote Jack Pack The RJP allows you to connect external devices Camcoders PCs DVD players etc easily 7 DATA Used to support data communication between the TV and the external SBB or S...

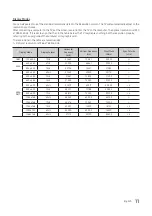
Page 11: ...e table are recommended Optimal resolution is 1366 x 768 60 Hz Display Mode Display Format Horizontal Frequency kHz Vertical Frequency Hz Pixel Clock MHz Sync Polarity H V IBM 720 x 400 70Hz 31 469 70 087 28 322 MAC 640 x 480 67Hz 35 000 66 667 30 240 832 x 624 75Hz 49 726 74 551 57 284 VESA DMT 640 x 480 60Hz 31 469 59 940 25 175 640 x 480 72Hz 37 861 72 809 31 500 640 x 480 75Hz 37 500 75 000 31...

Page 12: ...68 60Hz 48 363 60 004 65 000 1024 x 768 70Hz 56 476 70 069 75 000 1024 x 768 75Hz 60 023 75 029 78 750 1152 x 864 75Hz 67 500 75 000 108 000 1280 x 720 60Hz 45 000 60 000 74 250 1280 x 800 60Hz 49 702 59 810 83 500 1280 x 1024 60Hz 63 981 60 020 108 000 1280 x 1024 75Hz 79 976 75 025 135 000 1366 x 768 60Hz 47 712 59 790 85 500 1440 x 900 60Hz 55 935 59 887 106 500 1600 x 900RB 60Hz 60 000 60 000 ...

Page 13: ... Turns the 3D function on or off Not available CC VD Controls the caption decoder Cut off the sound temporarily Press to directly access channels Adjust the volume Display the channel list on the screen Display the main on screen menu HOME Switch to the HOME Screen HD478 none Quickly select frequently used functions Return to the previous menu Use these buttons in a specific feature Select on scre...

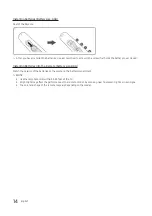
Page 14: ...osed Installing Batteries into the Remote battery size AAA Match the polarity of the batteries to the symbol in the batter compartment NOTE y y Use the remote control within 23 33 feet of the TV y y Bright light may affect the performance of the remote control Avoid using near fluorescent lights or neon signs y y The color and shape of the remote may vary depending on the model ...

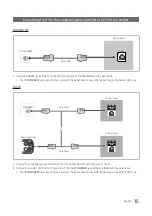
Page 15: ...ata Cable to may differ depending on the SBB or STB type NJ478 GAME CONTROL DATA ETH MODEM GAME CONTROL DATA TV Rear Panel TV Rear Panel Data Cable Data Cable Game Controller or 1 Connect the LodgeNet game controller to the TV s GAME CONTROLLER DATA jack of the TV 2 Connect the GAME CONTROL DATA jack of the TV to the ETH MODEM jack of the STB SBB with the data cable The ETH MODEM jack name that yo...

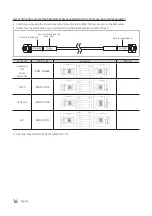
Page 16: ...he code label on the data cables y y Contact your nearest dealer oryour SI Vendor to buy the data cable not included in the TV Confirm the code on the Code Label Note the labeled end Note the labeled end SI Vendor Cable code Pin assign Remark Samsung OCC Enseo Guest Tek BN39 00865B NXTV BN39 01011B nStreams BN39 01110A MTI BN39 01011C Operation Specification of Data Cable RJ12 TTL ...

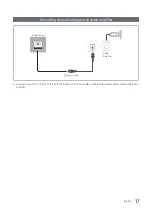
Page 17: ...e Audio Output to an Audio Amplifier AUDIO OUT AUDIO IN 1 Stereo cable TV Rear Panel Audio Amplifier 1 Connect the AUDIO OUT port of the TV to the Audio In port of an audio amplifierwith a stereo cable Stereo cable not provide ...

Page 18: ...he HDMI port of the MediaHub HD y y MediaHub HD The MediaHub HD is a hardware module that has different Audio Video inputs A V Audio PC HDMI and USB and corresponding outputs The corresponding output sources connect from MediaHub to the TV MediaHub communicates with the TV via RS232 Hot Plug Play is a function that allows hotel guests to connect an external source to the MediaHub MediaHub communic...

Page 19: ...LINK ANTIN AIR CABLE DATA USB HDMI S VIDEO RCA AUDIO PC RS 232 5V 0 5A CLONING DATA 3 HDMI Cable 2 Video Audio Cable 1 PC Audio cable 4 EX LINK TV Rear Panel 1 Connect the AUDIO OUT port of the TV to the PC AUDIO port of the RJP 2 Connect the AV IN VIDEO L AUDIO R port of the TV to the RCA port of the RJP 3 Connect the HDMI IN port of the TV to the HDMI port of the RJP 4 Connect the EX LINK port o...

Page 20: ...rn off any LEDs after 5 minutes to avoid unnecessary light pollution in the hotel room The LEDs that were turned off will turn on again if the guest touches any of the buttons and the 5 minute timer will restart If the guest then touches another source button the TV will change to the selected source and the corresponding LED will be lit y y After an RJP Reset or a TV Power OFF ON it takes approxi...

Page 21: ...menu item Press the RETURN or MENU button to exit the current menu item and go to a higher menu level or the Main menu To exit a Hotel mode menu turn off the TV and then turn it on again Any changes you made are saved except changes to SI Vendor For changes to SI Vendor you must turn the TV off wait until the Standby light glows steadily then unplug the TV wait for the Standby light to go off and ...

Page 22: ...nel it was displaying when it was turned off Power On Channel Num When the TV is turned on it switches automatically to this channel Power On Channel Type y y Select channel band AIR analog air band DTV digital air band CATV analog cable band CDTV digital cable band Power On Volume Last Saved y y User Defined Lets you set the Power On Volume manually See Power On Volume below y y Last Saved When t...

Page 23: ... DTV channels in Channel Editor but additional DTV channel program number update is not supported Mychannel Enable or disable the My Channel feature Menu OSD Picture Menu Lock OFF Enable or disable the Picture Menu Menu Display ON y y ON The Main Menu is displayed y y OFF The Main Menu is not displayed Tools Display OFF y y ON The Tools quick acess is displayed y y OFF The Tools quick acess is not...

Page 24: ...nal Source Banner ON If set to On the TV displays the External Source Banner information when you change the TV source to another external input press the Info key or turn the TV on y y ON The External Source information is displayed on the TV screen y y OFF The External Source information is not displayed on the TV screen Auto Source OFF y y ON When an external input source is connected to the TV...

Page 25: ...CKER content is displayed y y OFF The TICKER content is not displayed REACH Update Time Lets you set when data such as updated SW cloning files and S LYNC REACH contents is downloaded from the REACH server to the TV y y 1hour Every hour y y 2hour Every 2 hours y y 12 00 am every12 00 a m y y 2 00 am every 2 00 a m y y 12 00 pm every12 00 p m y y 2 00 pm every 2 00 p m REACH Update Immediate y y ON...

Page 26: ... failed and communication with the SI STB or SBB has failed first check your SI STB or SBB If your SI STB or SBB does not have a problem contact to Samsung Service SW Update Lets you upgrade the TV SW with a USB memory stick See Page 36 Service Pattern OFF Lets you check the state of the TV picture by displaying picture test patterns Press the Menu button to turn off the test patterns and exit ATV...

Page 27: ...up to 25 characters long and edit it in the Hotel Service menu Welcome Message supports the following characters Capital Letters from A to Z You can edit the Welcome Message by using the remote s navigation color and Enter buttons in the Edit Welcome Message OSD See the illustration below Move Enter Return a b Move to Left Move to Right Leave Black Done W E L C O M E T O O U R H O T E L _ Edit Wel...

Page 28: ...spitality Logo image is displayed or not Initial value is OFF Can be set to OFF or ON When set to ON the Logo Download and Logo Time Display menu items become accessible y y Hospitality Logo DL This option lets you download the logo image to the TV s memory from a USB device A wait message appears while the image is being copied to the TV A completed message appears when the copy operation finishe...

Page 29: ... picture size contrast etc and the Hotel side menu 5V0 5A CLONING USB Clone TV to USB Clone USB to TV Setting Auto Initialize OFF y y Cloning from USB to TV Copies menu settings in a USB device to a TV Shortcut Turn the TV off insert the USB device turn the TV on and then press the ENTERE button for 5 seconds To clone data to the TV using the Hotel menu follow these steps 1 Turn the TV off 2 Inser...

Page 30: ...Mixed Channel Map No Dynamic SI No Picture Menu Lock Yes Menu Display Yes Tools Display Yes Channel Menu Display Yes Panel Button Lock Yes Home Menu Display Yes Home Menu Editor Yes Home Menu Auto Start Yes Clock Type Yes Local Time Yes Timer Type Yes Time Channel Type Yes Time Channel Num Yes Music Mode AV Yes Music Mode Backlight Yes Priority AV Yes Priority HDMI Yes AV Option Yes HDMI Option Ye...

Page 31: ...Room Type No Ticker Yes REACH Update Time Yes REACH Update Immediate Yes Room Number Yes REACH ServerVersion Yes Password Input Yes Password Setting No Password Reset Yes Security Mode Yes USB Yes HDMI Yes DRM Mode No PI AES Data No PI AES Log Yes View PI AES Log No Self Diagnosis for TV No Self Diagnosis for HTV No SW Update No Service Pattern Yes ATV Cable AGC Gain Yes DTV Open Cable AGC Gain Ye...

Page 32: ...he screen and the words Remote control code is set to x If you want to change the Remote control code enter the digit you want to change 2 Press the number on the remote you want to assign to the TV The TV displays the following words Remote control code is changed to x The TV will display the OSD until you press the EXIT button See the example below Remote control code is set to 0 If you want to ...

Page 33: ...hich have not been cloned are ignored The table below lists the settings that are restored to their cloned values when you set the Setting Auto Initialize function to On Menu Menu Item Menu Menu Item Picture Menu Picture Mode Sound Menu Sound Mode Backlight Sound Effect Contrast Equalizer Brightness Speaker Settings Sharpness Speaker Select Color Auto Volume Tint G R TV Installation Type Picture S...

Page 34: ...one from USB Solution Setup Room Number Group All Group ID Enter The room number Only numbers and English letters can be entered Set options regarding the selected solution Setup Complete Your TV is now ready to use Done Select your Language Select your language to start the on screen setup Press the arrow buttons to move around the screen Press the Enter button to select English Español Français ...

Page 35: ...n are the same as Samsung s consumer TV models If you press the Enter key the Picture Mode OSD appears Configure your TV OSD Initially highlighted Standard The TV displays the Picture Mode OSD where you can choose Dynamic or Standard Picture mode Auto Program OSD If you press the Enter key the TV automatically searches for channels After the automatically searches for channels complete press the n...

Page 36: ...hese steps 1 Insert a USB drive containing the SW upgrade into the USB port on the side of the TV 2 Press the MENU button to display the menu Press the or button to select Support and then press the ENTERE button 3 Press the or button to select SW Upgrade and then press the ENTERE button The message Scanning for USB This may take more than1min is displayed 4 The message Upgrade version XXXX to ver...

Page 37: ... option External Device Sound Bar Out On Hotel option Power On Power On Volume User Defined Hotel option Power On Power On Volume Num Set greater than 0 Hotel option Power On Max Volume Set greater than 0 2 Connect an HDMI cable from the HDMI OUT jack on the back of the Sound Bar to the HDMI port supporting ARC on the hospitality TV 3 After the Sound Bar is connected to the hospitality TV when the...

Page 38: ...ccess depend on the Bank Card installed in their SMOOVIE remote Setting the Channel Bank Editor under Stand alone Mode 1 Press MUTE 1 1 9 ENTERE on the remote to enter the Hotel Standalone menu 2 Go to SI vendor and then select Smoovie 3 Find the new menu option Channel 4 Enter the Channel Bank Editor Hospitality Mode Standalone SI Vendor OFF d SI Vendor Smoovie d Channel d Channel Bank Editor 5 E...

Page 39: ...ls from the Bank1 channel list In the Channel Guide or the Channel List Smoovie Set Up Sequence Step Smoovie TV Setup Air Cable Only Air or Cable used Only Air or Cable used If the TV starts with Hotel Plug Play If Hotel Plug Play already done 1 Do a complete P P including Air or Cable auto tune Enter the Hotel menu 2 After P P the TV displays the Hotel menu Select the channel type ATV orADTV forA...

Page 40: ...ity Mode Standalone System SI Vendor OFF Power On Channel Menu OSD Clock Music Mode Remote Jack Pack External Source Eco Solution Logo Message Cloning REACH Solution DRM r Channel Editor Depending on model and region some menu items may not exist General Steps for Using the Channel Editor in Stand alone Mode Step Broad Outline 1 Run Channel in the Hotel Option Menu 2 Enter Channel Editor in the Ho...

Page 41: ...om the channel list press the red button on the remote To delete two or more channels simultaneously select multiple channels in Step 1 and then press the red button on the remote If you want to delete the scambled channels you should run the process below Hotel option Channel Channel Setup Channel Settings Clear Scrambled Channel 3 Press the green button on the remote to select all channels 4 To ...

Page 42: ... of a channel follow these steps 1 Select a channel on the Channel Edit screen 2 Press the TOOLS button on your remote 3 Select Rename Channel in the Tools menu 4 Use the on screen keyboard that appears to enter the new name for the channel Use the arrow buttons on your remote to select a letter or number and then press Enter Repeat for each letter or numberyou want to select 5 When finished selec...

Page 43: ...then using the up or down arrow button on the remote to select the channel number of the analog channel If you tune to a channel after assigning the channel to an external source you can enter the external source without opening the TV source menu 30 Air 22 Air 81 Cable 72 Cable HDMI2 DVI AV 50 2 CH 50 2 50 4 CH 50 4 27 Air 73 Cable HDMI1 HDMI3 50 1 CH 50 1 20 2 50 3 CH 50 3 51 1 KUSI HD 27 Air 20...

Page 44: ... of wall mount kit depending on the geographical region y y Standard dimensions forwall mount kits are shown in the table below y y If you are installing a third party wall mount note that the length of the screws you can use to attach the TV to the wall mount is shown in column C in the table below TV size in inches VESA screw hole specs A B in millimeters C mm Standard Screw Quantity 32 100 x 10...

Page 45: ...sary clamps screws and string are not supplied please purchase these additionally 2 Remove the screws from the back center of the TV put the screws into the clamps and then fasten the screws onto the TV again Screws may not be supplied with the product In this case please purchase the screws 3 Connect the clamps fixed onto the TV and the clamps fixed onto the wall with a strong string and then tie...

Page 46: ... on the rear of the TV A Kensington slot is beside the K icon 1 Optional To lock the product follow these steps 1 Wrap the Kensington lock cable around a large stationary object such as desk or chair 2 Slide the end of the cable with the lock attached through the looped end of the Kensington lock cable 3 Insert the locking device into the Kensington slot on the product 1 4 Lock the lock These are ...

Page 47: ...ally 49 Class 48 5 measured diagonally Sound Output 10 W x 2 10 W x 2 Stand Swivel Left Right 20 60 90 20 60 90 Dimensions W x D x H Body With stand 979 9 x 77 3 x 571 9 mm 979 9 x 226 5 x 623 4 mm 1112 8 x 78 3 x 646 5 mm 1112 8 x 226 5 x 698 0 mm Weight Without Stand With Stand 8 0 kg 11 0 kg 10 3 kg 13 4 kg Environmental Considerations Operating Temperature Operating Humidity Storage Temperatur...

Page 48: ...iner y y Sound orvideo may not work if the contents have a standard bit rate frame rate above the compatible Frame sec listed in the table y y If the Index Table is in error the Seek Jump function is not supported y y Some USB digital camera devices may not be compatible with the player y y The menu can be displayed late if the video is over10Mbps bit rate Video decoder Audio decoder y y Supports ...

Page 49: ... y y Internal Name Container Format Xsub AVI Picture Format SubStation Alpha MKV Text Format Advanced SubStation Alpha MKV Text Format SubRip MKV Text Format MPEG 4 timed text MP4 Text Format Supported Music Formats File Extension Type Codec Remark mp3 MPEG MPEG1 Audio Layer 3 m4a mpa aac MPEG4 AAC flac FLAC FLAC Can support up to 2channel ogg OGG Vorbis Can support up to 2channel wma WMA WMA WMA1...

Page 50: ...HDMI Logo are trademarks or registered trademarks of HDMI Licensing LLC in the United States and other countries Open Source License Notice Open Source used in this product can be found on the following webpage http opensource samsung com Open Source License Notice is written only English ...

Page 51: ...HG49NJ478 1 2 4 3 5 8 6 7 Unit mm 1 2 3 4 5 6 7 8 HG32NJ470 HG32NJ477 HG32NJ478 737 4 700 4 394 9 438 0 484 6 64 2 74 1 192 6 HG40NJ470 HG40NJ477 HG40NJ478 917 1 880 1 487 1 527 7 578 3 65 4 77 0 226 5 HG43NJ470 HG43NJ477 HG43NJ478 979 9 942 9 531 3 571 9 623 4 66 0 77 3 226 5 HG49NJ470 HG49NJ477 HG49NJ478 1112 8 1075 8 606 0 646 5 698 0 67 0 78 3 226 5 ...

Page 52: ...G49NJ470 HG49NJ477 HG49NJ478 unit mm 1 2 3 4 5 6 HG32NJ470 HG32NJ477 HG32NJ478 100 9 114 6 106 0 482 4 100 0 100 0 HG40NJ470 HG40NJ477 HG40NJ478 121 8 141 1 176 7 636 0 200 0 200 0 HG43NJ470 HG43NJ477 HG43NJ478 151 0 170 2 191 6 673 6 200 0 200 0 HG49NJ470 HG49NJ477 HG49NJ478 205 1 215 7 212 4 757 7 200 0 200 0 ...

Page 53: ...53 English Stand base view 32 192 6 123 2 451 3 192 6 55 9 451 3 R9 50 mm R3 75 mm 135 0 152 0 40 49 226 5 174 1 556 5 226 5 67 0 556 5 R9 50 mm R3 75 mm 135 0 152 0 ...

Page 54: ...ing should be limited to no more than 5 of the total television viewing perweek Additionally viewing other stationary images and text such as stock market reports video game displays station logos web sites or computer graphics and patterns should be limited as described above for all televisions Displaying stationary images that exceed the above guidelines can cause uneven aging of LED Displays t...

Page 55: ... relating to Samsung products please contact the SAMSUNG customer care center Samsung Hospitality Hotline 1 866 sam4biz US 1 800 749 0205 CANADA 01 800 726 7864 MEXICO Web site http www samsung com us business 2018 Samsung Electronics America Inc HJ470_NA_ENG_US 00 ...

Reviews: