English - 21
Updating the TV’s Software
DO NOT turn off the TV’s power until the update is complete. The
TV will turn off and on automatically after completing the software
update. Video and audio settings will be reset to their defaults after
a software update. To easily reset the settings after software update,
we recommend you to copy the TV's settings.
•
For more information about the USB cloning function, refer to
page 16.
Updating through a USB device
To update the TV's software, follow these steps:
1.
Insert a USB device containing the software update file into the
USB port of the TV.
2.
Run
SW Update
.
–
Hotel Option
menu >
System
>
SW Update
3.
The TV displays a pop-up message that checks for the updated
version.
4.
Move the focus to
OK
, and then press the
Select
button on the
remote control.
– Please be careful to not disconnect the power or remove the USB
device while upgrades are being applied. The TV will turn off and
turn on automatically after completing the SW upgrade. Please
check the SW version after the upgrades are complete.
07 Editing Channels
Using Channel Editor
O
Hotel Option
menu >
Channel
>
Channel Editor
Using
Channel Editor
you can edit the channels stored in the TV's
memory.
•
Change the channel numbers and names, edit the channel
language and channel genre and delete channels.
•
If you set the
Screen Off
function to
On
for the selected channels,
a screen off message is displayed, and pictures are turned off
by the
Screen Off
function and only audio is output from those
channels.
•
Channel Editor
also lets you view information about each channel
easily, without your having to display each channel directly.
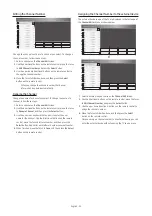
General Steps for Using the Channel Editor in
Standalone Mode
– The image on your TV may differ from the image above depending
on the model and geographical area.
1.
Run
Channel Auto Store
(
Channel
>
Channel Auto Store
) in the
Hotel Option
menu.
2.
Enter
Channel Editor
(
Channel
>
Channel Editor
) in the
Hotel
Option
menu.
3.
On a piece of paper, compile a list of channels you want to have,
arranged in the order you want.
4.
Based on the list created in Step 3, rearrange the channels and
edit the channel names.
5.
Press the
button to exit.


